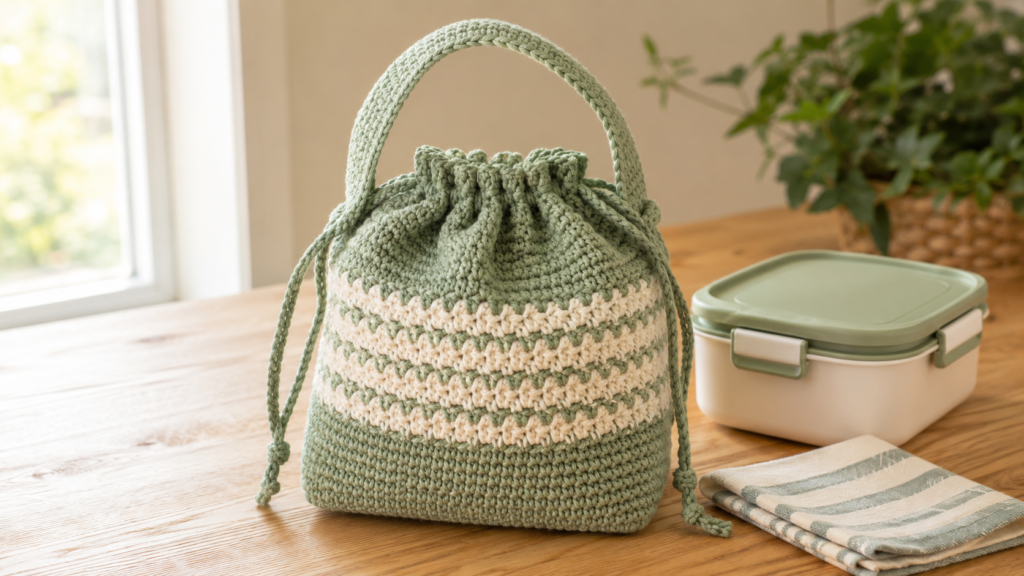
A handmade lunch bag is one of those crochet projects that manages to be both practical and satisfying. Unlike a purely decorative project, you can actually pack it with a sealed lunch container, fruit, napkin, or snacks and carry it to work, school, a picnic, or a day trip.
This beginner-focused tutorial shows you how to make a sturdy cotton crochet lunch bag with a flat rectangular base, textured walls, a softly striped upper section, drawstring closure, two braided cords, and one wide handle. The overall construction was developed after researching the Make & Do Crew lunch-bag tutorial, which uses a flat bottom, joined rounds, a separate upper cover, braided cords, and a crocheted handle. The original source project uses mercerized cotton and a 5.5 mm hook.
The instructions below are not a copy of that source pattern. Instead, this is a new, simplified tutorial that uses a different construction sequence and original instructions designed to make the project easier for someone who already knows the basic crochet stitches but has not made many bags.
One practical note before beginning: a crochet lunch bag by itself is not the same thing as a waterproof or insulated food container. Use securely closed food boxes and bottles. For temperature-sensitive food, place an insulated lunch box or suitable reusable liner inside the crochet bag.
What You’ll Learn
By the end of this tutorial, you will know how to:
- Crochet a flat rectangular base.
- Mark four corners so a bag grows evenly.
- Turn a flat base into upright walls.
- Work half double crochet through the back loop for texture.
- Change yarn colors neatly.
- Make evenly spaced drawstring openings.
- Create two braided cords that close the bag from opposite directions.
- Crochet a flat, sturdy handle.
- Center and reinforce the handle.
- Weave in ends and shape the finished bag.
Materials You’ll Need
Choose a smooth, sturdy cotton yarn for this project. Medium-weight yarn is classified as category 4 in the Craft Yarn Council’s standard system, which is useful when substituting yarn.
For the original tutorial version described here, gather:
- Approximately 450–550 yards total of medium-weight cotton yarn.
- Main color: soft sage green.
- Contrast color: warm cream.
- 5.5 mm crochet hook.
- Four locking stitch markers.
- Blunt tapestry needle.
- Small sharp scissors.
- Flexible measuring tape.
- Optional removable markers for the handle positions.
- Optional washable cotton lining fabric.
A tightly spun cotton or mercerized cotton is particularly useful for a project that needs structure. The selected reference source likewise chose 100% mercerized cotton for its smooth texture, durability, and washability.
Step-by-Step Crochet Tutorial
Step 1: Crochet the Flat Rectangular Base
Using sage-green yarn and your 5.5 mm hook, make a foundation chain long enough to measure approximately 8 inches without stretching.
For a medium lunch bag, start with ch 25.
Base Row 1: Sc in the second ch from the hook and in each remaining ch. You should have 24 sc.
Base Rows 2–14: Ch 1, turn, and sc across.
At the end of Row 14, your rectangle should be approximately 8 inches long and 4–5 inches deep, depending on tension.
Do not worry if your exact dimensions differ slightly. What matters most is whether your preferred lunch container fits comfortably on the base.
Once the rectangle is complete, place one stitch marker at each corner.
Beginner tip: Put your actual sealed lunch container on the finished rectangle before moving on. There should be a little space around it rather than an exact tight fit.
Common mistake to avoid: Do not stretch the rectangle while measuring. Let it rest naturally on the table.
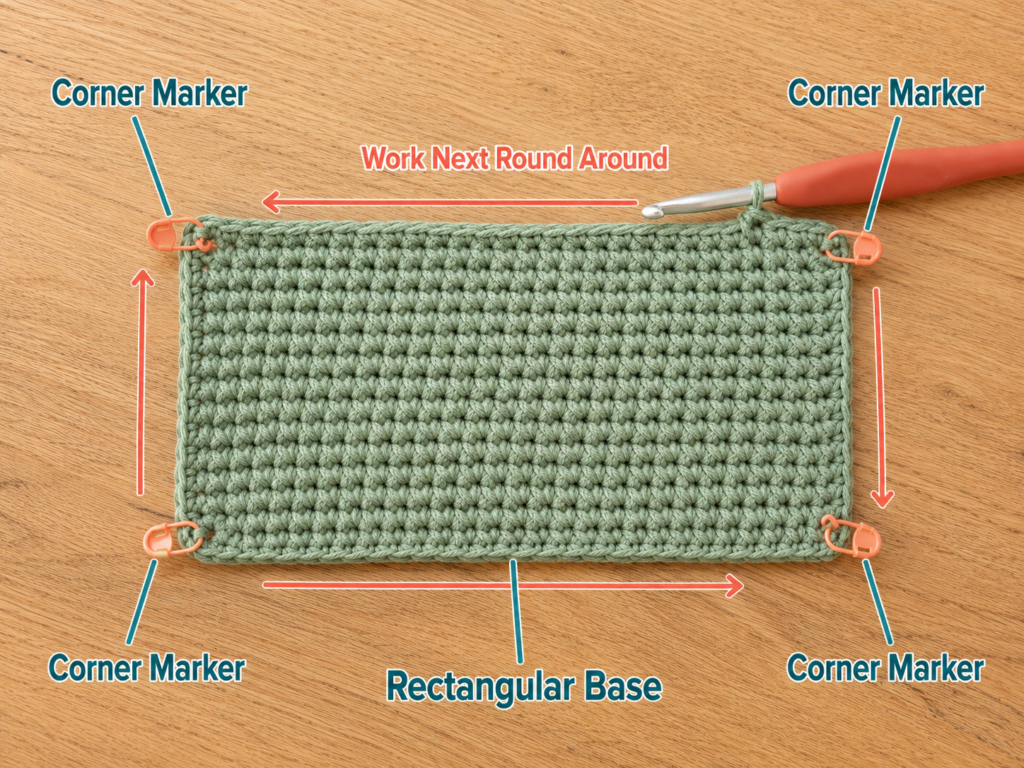
Step 2: Crochet Around the Base and Turn the Walls Upward
Do not fasten off.
Rotate the rectangle so you can work around its entire outside edge.
Work:
- One sc in each stitch across the first long edge.
- One sc into each row end along the first short edge.
- One sc in each foundation-chain stitch along the opposite long edge.
- One sc in each row end along the final short edge.
At each corner, work 2 sc into the corner space to help the fabric turn neatly.
Join with a sl st to the first sc.
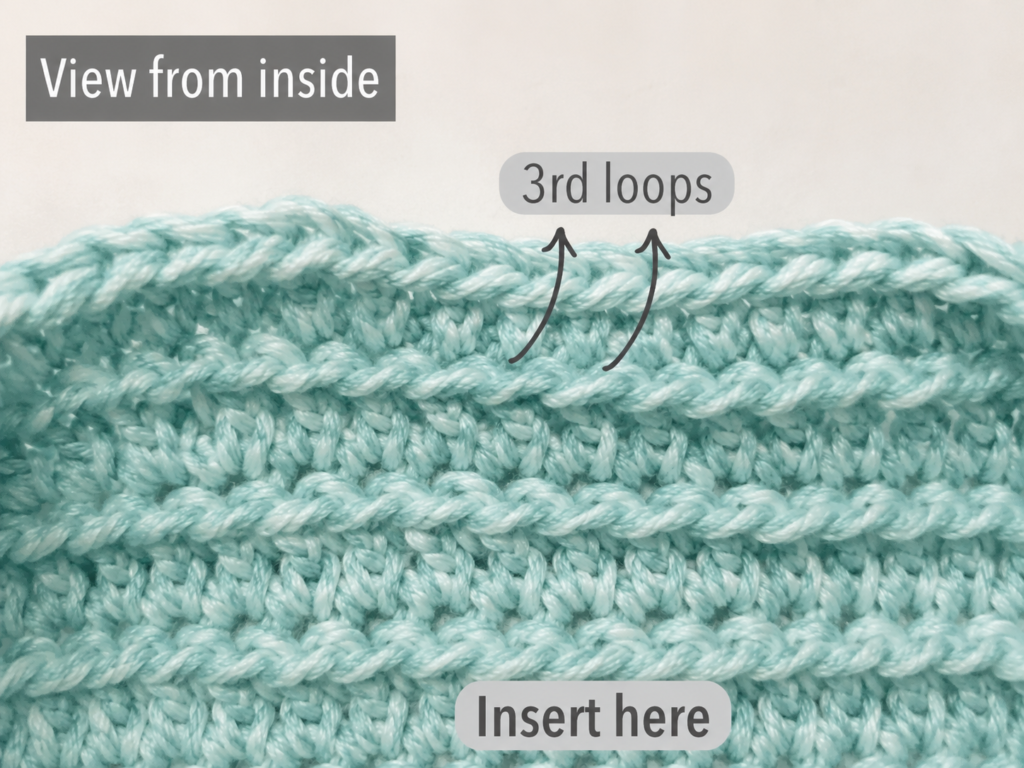
For the next round, work hdc BLO in every stitch around. Working through the back loop leaves a small ridge and encourages the fabric to fold upward from the base.
Continue with hdc BLO rounds until the lower walls measure approximately 3–4 inches.
Beginner tip: Move your four corner stitch markers upward every two or three rounds. They help you see immediately whether the bag is twisting.
Common mistake to avoid: Do not add accidental stitches at the join. Count periodically and make sure your bag is not getting wider without intention.
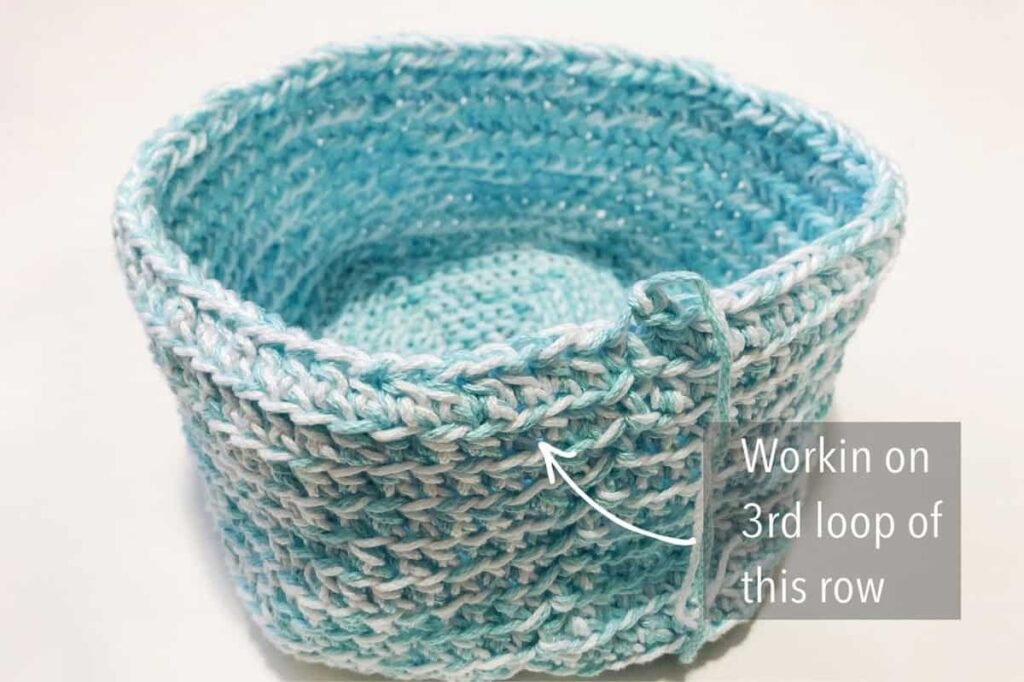
Step 3: Build the Textured Main Body
Continue working joined rounds in sage green.
For an easy, structured texture:
Round A: Hdc BLO in each stitch around. Join.
Round B: Hdc in both loops in each stitch around. Join.
Repeat Rounds A and B until the main body measures approximately 5–6 inches from the base.
This alternating texture creates subtle horizontal ridges without requiring advanced stitches.
Keep the bag upright occasionally and look at it from all sides. It should grow straight rather than flare outward.
Beginner tip: Count the stitches at the end of every fourth round. Catching one missed stitch early is far easier than unraveling several inches later.
Common mistake to avoid: The joining slip stitch is not an extra body stitch. Always begin the next round in the correct first stitch.
Step 4: Add the Cream Stripes
When the sage-green body reaches the desired height, change to warm cream at the final yarn-over of the last stitch before joining.
Work:
- 2 rounds cream.
- 2 rounds sage.
- 2 rounds cream.
- 2 rounds sage.
Carry the inactive yarn loosely up the inside of the bag if you prefer fewer ends to weave in. Alternatively, cut the yarn after each stripe and weave the tails in later.
Keep the color joins at the center back or one short side so they are less visible.
Beginner tip: Change color on the final yarn-over of the last stitch rather than after the stitch is complete. This creates a cleaner transition.
Common mistake to avoid: Do not pull carried yarn too tightly. Tight floats can make the upper section pucker.
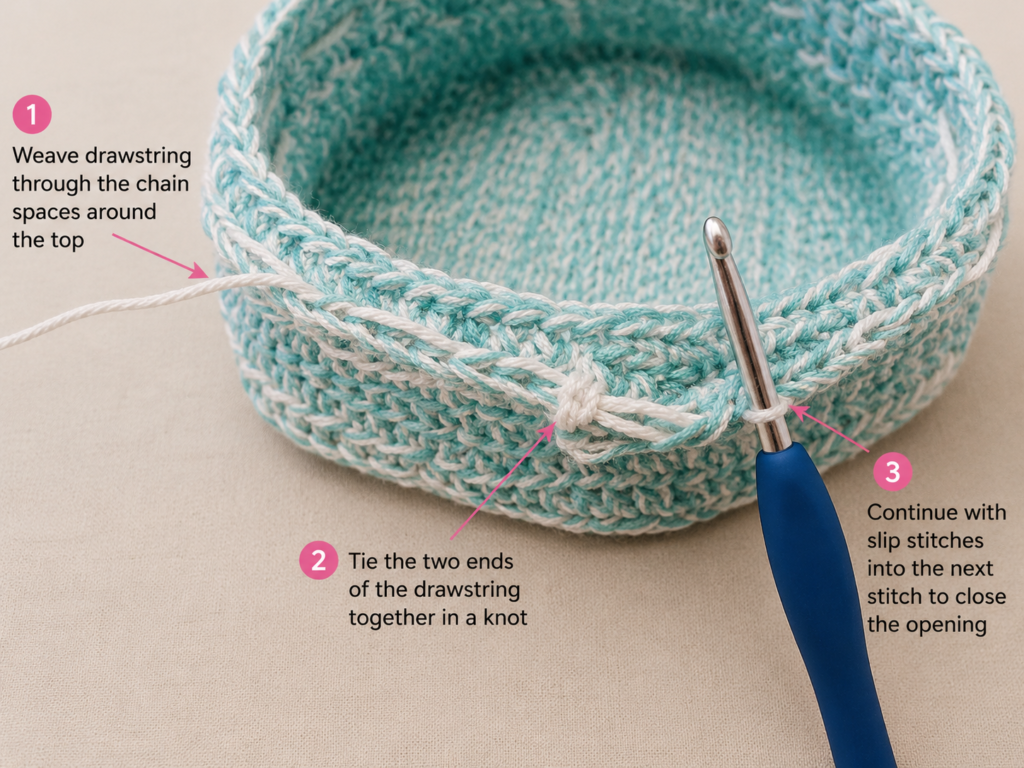
Step 5: Make the Drawstring Eyelet Round
Now create a row of openings for the braided cords.
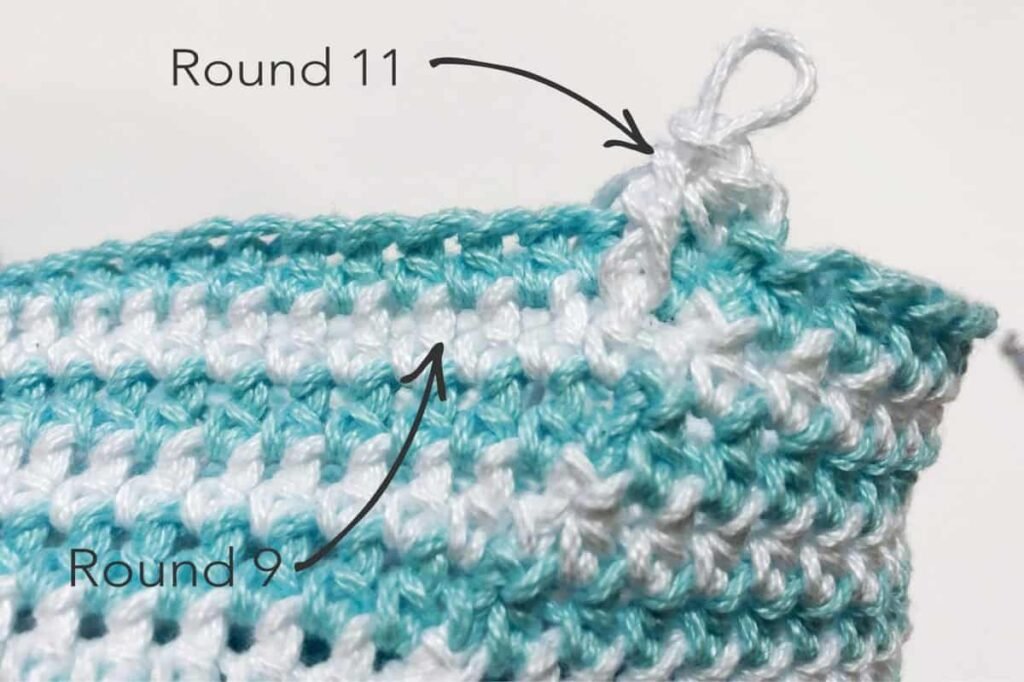
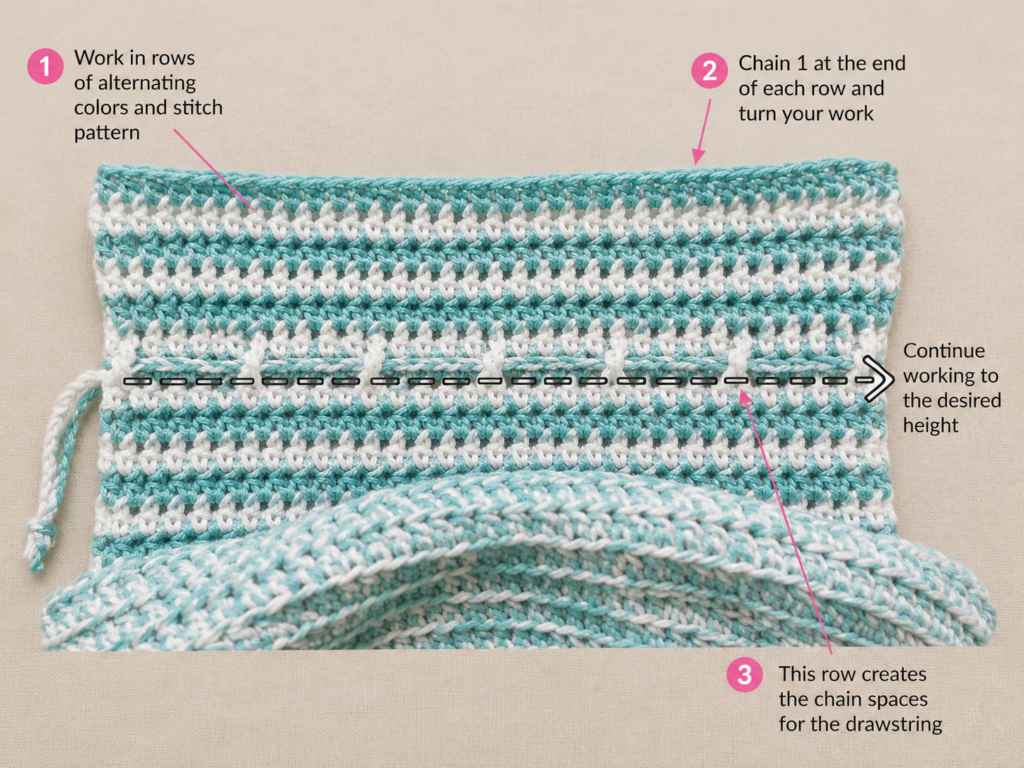
Work around the bag in sc, adding approximately 10–12 evenly spaced ch-1 openings:
- Sc in several stitches.
- Ch 1.
- Skip the next stitch.
- Continue in sc.
Repeat until the eyelets are evenly distributed.
You do not need to force an exact mathematical repeat if your total stitch count differs. The important goal is to create an even number of openings spaced consistently around the bag.
After the eyelet round, work 2–3 ordinary sc or hdc rounds above it to stabilize the top.
Beginner tip: Count and mark the planned eyelet positions before crocheting the round.
Common mistake to avoid: Avoid placing two eyelets immediately beside a corner. Leave at least a few solid stitches between each opening.
Step 6: Make Two Braided Drawstring Cords
For each cord, cut three strands approximately 36 inches long.
For Cord 1:
- Use two sage strands and one cream strand.
For Cord 2:
- Use two cream strands and one sage strand.
Tie the three strands together temporarily at one end, braid evenly, then secure the other end.
Make both braids approximately the same finished length.
Thread the first cord all the way around the bag and bring both ends out through openings on the left short side.
Thread the second cord in the opposite direction and bring both ends out on the right short side.
When you pull both cords, the top should gather evenly.
Beginner tip: Clip one end of the strands to a heavy book or secure it with removable tape while braiding.
Common mistake to avoid: Do not braid one cord much tighter than the other. Unequal cords can make the closure pull unevenly.
Step 7: Crochet the Wide Handle
Using two strands of sage-green cotton held together:
Ch 7.
Row 1: Sc in second ch from hook and across. You should have 6 sc.
Row 2: Ch 1, turn, sc across.
Repeat Row 2 until the handle measures approximately 15–17 inches, or your preferred length.
Fasten off, leaving a long tail for sewing.
A wider handle distributes weight better than a thin cord-style handle.
Beginner tip: Hold the unfinished handle against the bag before fastening off. Longer is easy to adjust before sewing.
Common mistake to avoid: Do not make the handle extremely stretchy. Firm single crochet fabric is preferable here.
Step 8: Center and Attach the Handle
Lay the bag flat.
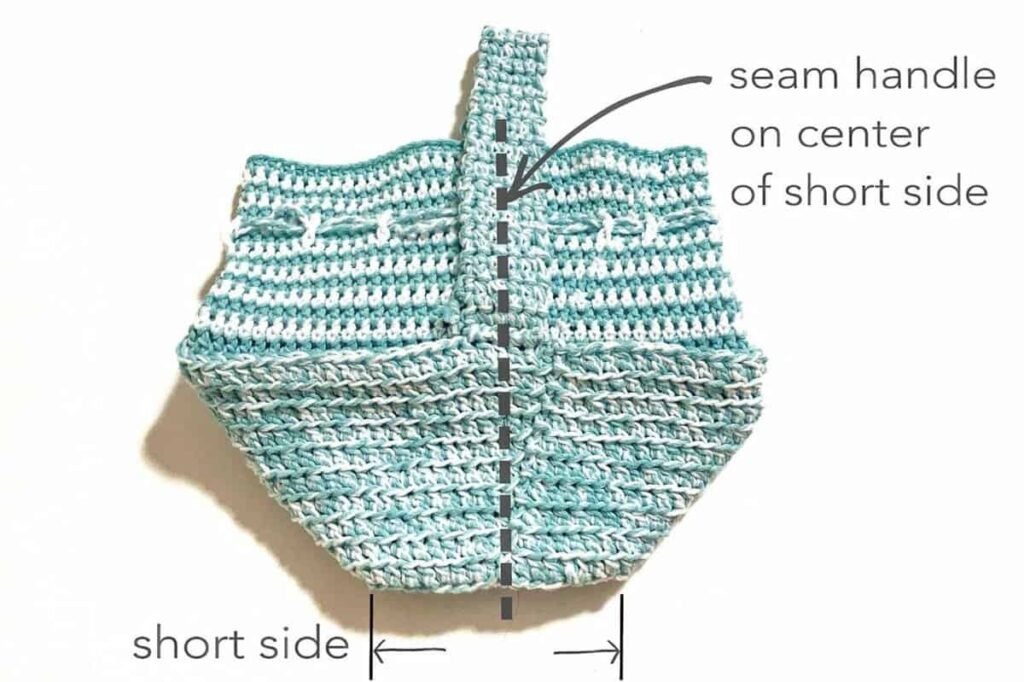
Identify the center of each short side and mark both positions.
Pin or clip the handle ends into place. Before sewing, lift the bag gently to check that the handle is centered.
Using the long yarn tail and tapestry needle, sew the first handle end securely to the bag. Stitch through several rows rather than attaching it to only one thin edge.
Repeat on the opposite side.
Reinforce each corner of the handle attachment several times.
The selected reference project similarly stresses centering the handle on the short sides and reinforcing the attachment so it remains sturdy.
Beginner tip: Use two temporary stitch markers to hold each handle end before sewing.
Common mistake to avoid: Never attach a load-bearing handle with only one pass of yarn.
Step 9: Test the Closure and Shape the Bag
Pull both drawstrings to close the upper section.
Check that:
- The fabric gathers evenly.
- Neither braid catches on a stitch.
- The handle remains centered.
- All yarn tails are hidden.
- The rectangular base sits reasonably flat.
Place an empty reusable lunch container inside to help shape the bag.
Avoid loading the finished bag heavily before checking the handle seams.
Beginner tip: After the first use, inspect the handle attachment and reinforce it if necessary.
Common mistake to avoid: Do not rely on the drawstrings as carrying straps unless you intentionally designed them for that load.
Pattern Notes or Stitch Notes
Turning chains
When working the flat base in rows, ch 1 before turning. In this tutorial, that turning chain does not count as a stitch.
Stitch count
Count your base rows carefully. Once you begin crocheting around the rectangle, maintain the same stitch count throughout the vertical wall rounds unless intentionally shaping.
Joined rounds
Join each round with a slip stitch. Mark the first true stitch of the next round so the seam stays easy to identify.
Back-loop texture
Working through the back loop leaves the unused front loop visible as a horizontal ridge. The standard abbreviation BLO means back loop or back loop only.
Right side and wrong side
For this bag, choose the side with the cleanest visible texture as the outside. Keep carried yarn strands and most woven tails on the inside.
Size adjustment
To make the bag wider, begin with a longer foundation chain.
To make it deeper, add more base rows.
To make it taller, add more body rounds before the eyelets.
Remember that changing dimensions can also change yarn requirements and handle placement.
Common Beginner Mistakes
1. A tight foundation chain
Problem: The bottom edge pulls inward.
Fix: Remake the foundation chain with relaxed tension or use a hook 0.5–1 mm larger for the chain only.
2. Accidentally increasing at the round join
Problem: The bag gets wider as it grows.
Fix: Mark the first stitch and do not treat the slip-stitch join as an extra body stitch.
3. Uneven corners
Problem: One side is higher or wider.
Fix: Keep four corner markers in place and compare the corners every few rounds.
4. Tight color changes
Problem: The striped upper section puckers.
Fix: Keep any carried yarn relaxed along the inside.
5. Uneven eyelet spacing
Problem: The gathers look crooked.
Fix: Mark all intended opening positions before crocheting the eyelet round.
6. One drawstring shorter than the other
Problem: The bag closes unevenly.
Fix: Measure both cords after braiding and adjust before threading.
7. Weak handle seams
Problem: The handle begins pulling away from the bag.
Fix: Sew through multiple rows and reinforce all four attachment corners several times.
How to Customize This Crochet Project
Yarn changes
Smooth medium-weight cotton is ideal for a structured lunch bag. You can also try recycled cotton or a sturdy cotton blend.
The Craft Yarn Council’s yarn-weight system can help compare substitute yarns by category and recommended hook ranges.
Color changes
Try:
- Sage and cream for a calm natural look.
- Navy and white for nautical style.
- Pink and red for a bright school bag.
- Mustard and rust for autumn.
- Black and natural cotton for a modern adult lunch tote.
Size changes
For a child’s small lunch container, reduce the foundation chain and base rows.
For an adult meal-prep container, enlarge the base before beginning the walls.
Border options
Add:
- One round of reverse single crochet.
- A simple contrasting single crochet edge.
- A slip-stitch top border.
Texture options
Replace the simple hdc body with:
- Moss stitch.
- Waistcoat stitch.
- Lemon peel stitch.
- Alternating single and half double crochet.
For a first bag, however, simple half double crochet is easier to count and correct.
Lining option
A washable fabric lining can help contain crumbs and make the inside easier to clean. Make the lining removable when possible so it can be washed separately.
Gift ideas and use cases
A crochet lunch bag can also work as:
- A reusable snack bag.
- A child’s treasure bag.
- A small yarn project bag.
- A reusable gift bag.
- A picnic utensil tote.
- A teacher gift.
Finishing Instructions
Fasten off all remaining yarn.
Using a blunt tapestry needle, weave each tail through several stitches on the wrong side. Change direction once to make the tail less likely to work free.
Gently shape the base and corners by hand.
For cotton yarn, light wet blocking can help even the shape. The Craft Yarn Council’s general blocking guidance recommends laying damp crochet flat and allowing it to dry thoroughly.
Do not aggressively stretch the handle while blocking. Keep it at its intended finished length.
For washing, always follow the care instructions for your specific yarn. Remove food containers and any removable liner first.
FAQ
Is this crochet lunch bag pattern suitable for beginners?
Yes, for an advanced beginner who knows chain, single crochet, half double crochet, slip stitch, and how to work in rounds. A complete beginner may want to practice these basics first.
What yarn is best for a crochet lunch bag?
A smooth medium-weight cotton is an excellent choice because it provides stitch definition and structure. The selected professional reference tutorial likewise uses medium-weight mercerized cotton for its lunch bag.
Does a crochet lunch bag keep food cold?
Crocheted fabric alone is not insulation. For food that must stay chilled, use an appropriate insulated lunch container or insulated removable liner inside the crochet bag.
Can I make the lunch bag larger?
Yes. Make the base rectangle longer, wider, or both before working the side walls. Check your actual lunch container against the base for fit.
Can I make this bag without stripes?
Yes. Work the entire bag in one color. The construction stays the same.
Why is my lunch bag getting wider?
You may be accidentally adding stitches at the join or working twice into the first stitch. Mark the beginning of each round and count periodically.
Can I add a zipper instead of a drawstring?
Yes, but sewing a zipper into crochet requires additional finishing. For a beginner, a braided drawstring closure is simpler and more forgiving.
Conclusion
A crochet lunch bag is an excellent project for moving beyond scarves and flat rectangles because it introduces practical bag construction without requiring complicated shaping. You begin with a simple rectangular base, build the walls upward, add texture and stripes, make an easy eyelet closure, braid two cords, and finish with one sturdy handle.
The most important part is not making every stitch perfect. It is learning how the different construction stages work together: flat base → upright walls → closure → cords → handle → finishing.
Once you understand that sequence, you can change the size, colors, textures, and handle length to make a lunch bag that actually suits the way you use it.





