A giant crochet pencil is one of those projects that immediately makes sense in a classroom. It looks cheerful on a classroom door, above a reading corner or beside a bulletin board, and unlike another teacher mug, it can be personalized to match a teacher’s colors or classroom theme.
This beginner-friendly crochet classroom pencil banner pattern is designed as a long pencil-shaped wall hanging rather than a rectangular tapestry. That keeps the construction approachable: you crochet two matching flat panels, shape the sharpened end with simple decreases, join the layers and add a hanging loop.
If you already know how to chain and make a half double crochet, you can make this project. The tutorial will also teach clean color changes, stitch counting, symmetrical decreases, simple seaming and basic finishing.
What You’ll Learn
- How to crochet a flat pencil shape in rows
- How to maintain straight crochet edges
- How to change yarn colors cleanly
- How to work hdc2tog decreases
- How to create a symmetrical pencil point
- How to make two matching panels
- How to single crochet two layers together
- How to add optional lightweight structure
- How to create a secure hanging loop
- How to customize classroom colors and size
Materials You’ll Need
For one pencil wall banner approximately 26–28 inches long:
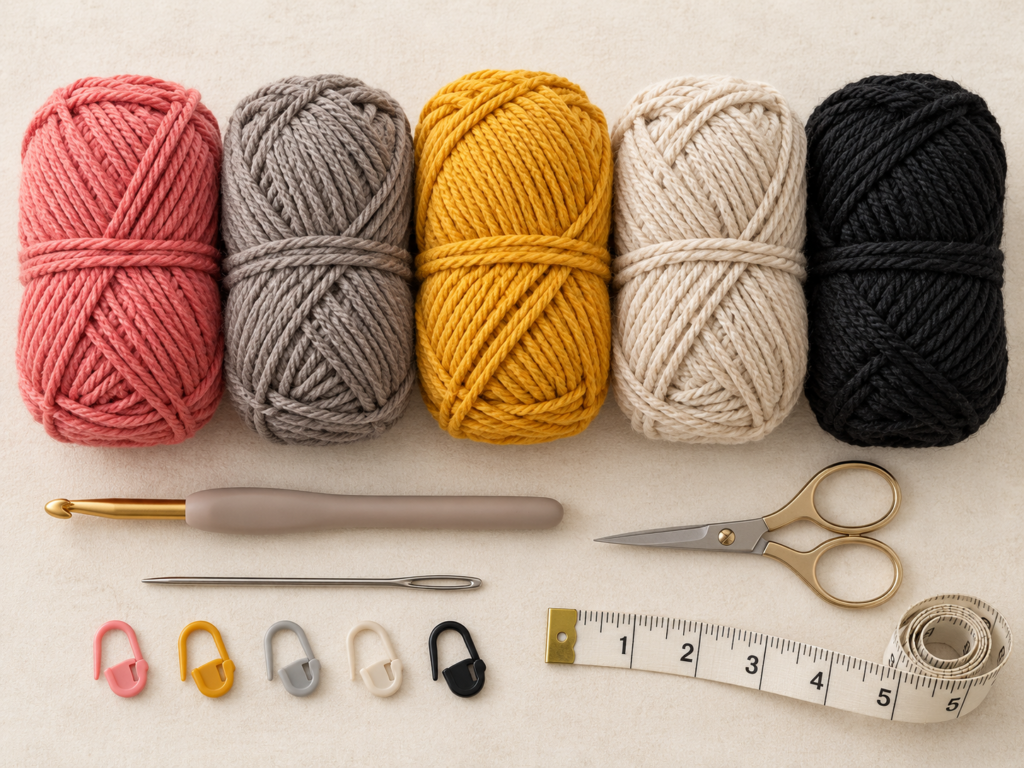
- Medium #4 worsted-weight yarn
- Approximately 35–45 yd dusty coral for the eraser
- Approximately 25–35 yd taupe-gray for the ferrule
- Approximately 180–220 yd golden mustard for the body
- Approximately 45–60 yd oatmeal beige for the exposed wood
- Approximately 15–20 yd charcoal for the graphite
- 5 mm / H-8 crochet hook
- Tapestry needle
- Scissors
- Measuring tape
- 6–10 locking stitch markers
- Optional thin craft felt or low-loft batting
- Optional small amount of polyester filling
Medium #4 yarn normally includes worsted, afghan and aran yarns. The Craft Yarn Council publishes broad hook recommendations, but individual yarn, stitch choice and personal tension can change the best hook size, so treat 5 mm as the starting point for this project rather than an absolute rule. Craft Yarn Council
Finished Size
Approximately:
26–28 in / 66–71 cm long
6.5–7 in / 16.5–18 cm wide
Exact dimensions will vary with yarn, hook and tension.
Gauge
Aim for approximately:
14 hdc × 10 rows = 4 in / 10 cm
Exact gauge is less critical for wall decor than for clothing, but your fabric should be firm enough not to sag.
Crochet Abbreviations Used
This tutorial uses U.S. crochet terminology.
- ch = chain
- hdc = half double crochet
- hdc2tog = half double crochet two together
- sc = single crochet
- sl st = slip stitch
- st/sts = stitch/stitches
- RS = right side
- WS = wrong side
- rep = repeat
These abbreviations align with standard U.S. crochet terminology published by the Craft Yarn Council. A U.S. half double crochet is called a half treble in U.K. terminology. Craft Yarn Council
Before You Start
The turning chain does not count as a stitch
At the end of each straight row, ch 1 and turn. In this tutorial that chain is only for turning height.
Do not crochet into it as an additional stitch.
Learn where the final stitch is
Missing the final stitch is probably the easiest way to create unintentionally sloping sides.
For the first several rows, put one marker in the first stitch and another in the final stitch.
Count frequently
The rectangular sections remain 24 stitches wide.
Do not wait until the pencil is 15 inches long before discovering that it has gradually become 21 stitches wide.
Keep the foundation chain relaxed
A very tight chain can pull the eraser inward and make the panel curve.
If your chains are naturally tight, make the foundation with a 5.5 mm hook and switch to 5 mm for Row 1.
Color palette
The sample tutorial uses:
- Dusty coral — eraser
- Warm taupe — ferrule
- Golden mustard — pencil body
- Oatmeal — wood
- Charcoal — graphite
Changing these colors will not affect the construction.
Step-by-Step Crochet Tutorial
Step 1: Crochet the Eraser
With dusty-coral yarn:
Foundation: Ch 25.
Work one hdc into the second chain from the hook and continue across.
You should finish with 24 hdc.
Ch 1 and turn.
Continue working hdc across each row until the eraser section measures approximately 2–2.5 inches tall. For the sample proportions, work 7 rows total.
Count after every row when you are new to crochet.
Beginner tip
Place stitch markers into the first and last actual hdc. When you turn, those markers tell you exactly where the row begins and ends.
Common mistake to avoid
Do not mistake the turning chain for a stitch. If you work into both the first hdc and the turning chain, the eraser will gradually flare outward.
Step 2: Crochet the Ferrule
The narrow band separating the eraser from the pencil body represents the metal ferrule.
You will change from coral to taupe at the end of the final coral row.
Begin the last hdc normally. When three loops remain on the hook, stop before the final yarn-over.
Drop the coral.
Yarn over with taupe and pull the new color through all three loops.
The color change now sits at the edge instead of creating an obvious step halfway through the next stitch.
Using taupe, crochet 5 rows of hdc, keeping 24 stitches in every row.
Beginner tip
Leave approximately 5–6 inches of yarn at every color change. Short tails are unnecessarily difficult to weave securely.
Common mistake to avoid
Do not tie large knots between color sections. They create bulky edges that become especially noticeable when the two panels are joined.
Step 3: Build the Long Pencil Body
Change to golden-mustard yarn during the final yarn-over of the last taupe stitch.
Continue:
Hdc in every stitch across. Ch 1, turn.
The body should remain 24 stitches wide.
Work approximately 30–32 rows in mustard, depending on your preferred finished length.
Instead of continuously recounting 30 rows at the end, place a removable marker every eight rows.
A useful checkpoint system is:
- Checkpoint 1 — count stitches
- Checkpoint 2 — check both edges
- Checkpoint 3 — measure width
- Final checkpoint — lay the work flat
The long edges should remain parallel.
Beginner tip
Crocheting a long stretch of identical rows can make edge mistakes easier to miss. Count 24 stitches every four to six rows.
Common mistake to avoid
Avoid pulling the first stitch of each new row extremely tight. Over time, this can make both sides curve inward.
Step 4: Shape the Wooden Pencil Tip
After finishing the mustard body, change to oatmeal-beige yarn.
We now need the rectangular piece to narrow into a pencil point.
The simplest method is to remove one stitch at each end of selected rows.
How to work hdc2tog
- Yarn over.
- Insert hook into the next stitch.
- Yarn over and pull up a loop.
- Yarn over.
- Insert hook into the following stitch.
- Yarn over and pull up a loop.
- Yarn over and pull through all loops.
Two stitches have become one.
Wooden tip shaping
Beginning with 24 stitches:
Decrease Row 1: hdc2tog, hdc across until 2 sts remain, hdc2tog.
22 sts
Work one plain hdc row.
Next decrease row: decrease once at each end.
20 sts
Continue alternating a decrease row with a plain row until you reach approximately 14 stitches.
This creates a gradual sharpened-wood angle rather than an abrupt triangle.
Beginner tip
Write your current stitch count on a small note beside the project:
24 → 22 → 20 → 18 → 16 → 14
That makes it much harder to lose your place.
Common mistake to avoid
Never put both decreases at the same side. One decrease belongs at the beginning and one at the end.
Step 5: Crochet the Graphite Point
Change to charcoal yarn when approximately 14 stitches remain.
The charcoal section can taper faster because a pencil’s graphite point is shorter than the exposed wooden section.
Begin with one decrease at each edge.
Continue decreasing until approximately:
12 sts → 10 sts → 8 sts → 6 sts → 4 sts → 2 sts
For the final point, work the remaining stitches together or finish with a short, narrow final row.
Fasten off.
Do not worry if the very tip is not mathematically perfect. Once the two panels are joined, you can shape the point neatly with the border stitches.
Beginner tip
After every decrease row, physically count the stitches before continuing.
Common mistake to avoid
If the point bends strongly to one side, undo the last few rows. It almost always means one decrease was missed or added at the wrong edge.
Step 6: Inspect and Finish the Front Panel
Lay the pencil flat.
You should see five distinct visual sections:
- Coral eraser
- Taupe ferrule
- Mustard painted body
- Beige exposed wood
- Charcoal graphite
Check the long sides.
Check the tip.
Check all color transitions.
Weave in the internal ends now because they will become harder to reach after assembly.
Optional pencil detail
For extra definition, embroider two subtle vertical lines down the mustard body using slightly darker mustard yarn.
Alternatively, leave it plain for a clean modern classroom look.
Step 7: Crochet a Matching Back Panel
Make a second panel using exactly the same sequence and measurements.
This step sounds obvious but deserves attention: the two pieces need to match before joining.
Rather than comparing only physical length, compare:
- Number of eraser rows
- Number of ferrule rows
- Number of body rows
- Each decrease checkpoint
- Point length
Small tension variations are normal.
A difference of a few millimeters is easy to absorb while joining. A difference of three full crochet rows is not.
Beginner tip
Keep the finished first panel beside you while making Panel 2.
Step 8: Align the Panels
Place both pencil pieces together with wrong sides touching and the nicer surfaces facing outward.
Align:
- Eraser corners
- Ferrule transitions
- Mustard-to-beige transition
- Beige-to-charcoal transition
- Pencil point
Use locking markers to hold both layers together.
The markers are particularly important along the long body because one layer can stretch farther than the other while you crochet.
Step 9: Single Crochet Around the Pencil
Attach yarn at the eraser end.
Insert the hook through both panels.
Work sc evenly around the outside.
When working across normal stitch tops, crochet into the obvious stitch loops.
When working down row ends, concentrate on even spacing rather than trying to locate a conventional stitch.
You can use one neutral border around the whole pencil, or change border colors to match the five sections.
A color-matched edge produces the most polished result:
- Coral around eraser
- Taupe around ferrule
- Mustard around body
- Oatmeal around wood
- Charcoal around graphite
Beginner tip
Every few inches, stop and verify that the hook has been going through both layers.
Common mistake to avoid
Do not force two or three single crochets into every row end. Too many stitches cause the edge to ripple.
Step 10: Add Optional Structure
Before closing the final 5–6 inches, decide whether you want the banner flat or slightly dimensional.
Option A: Flat banner
Add nothing.
This is the lightest choice for bulletin boards and classroom doors.
Option B: Thin structured banner
Cut craft felt or low-loft batting slightly smaller than the crochet pencil.
Slide it inside before closing.
This is my preferred option because the pencil gains enough body to hang neatly without becoming bulky.
Option C: Lightly padded banner
Insert small wisps of polyester filling.
Use very little.
This should still look like wall decor, not a stuffed pillow.
Step 11: Close and Add the Hanging Loop
Continue single crocheting until the opening is closed.
Sl st to finish the border and fasten off securely.
Vertical hanging loop
At the back of the eraser:
- Attach matching yarn.
- Ch approximately 20–30.
- Anchor the chain into a nearby stitch.
- Fasten off.
- Reinforce both attachment points with a tapestry needle.
Horizontal display option
Instead of one loop, create two small loops:
- One near the eraser
- One near the beginning of the sharpened section
This allows the pencil to hang horizontally above a classroom board.
Classroom safety note
Keep long cords and loose hanging loops out of children’s reach. Small secure loops or standard classroom display hardware are preferable.
Pattern Notes or Stitch Notes
Turning chain
Ch 1 at the end of each row.
It does not count as a stitch.
Straight-section stitch count
Maintain 24 sts through:
- Eraser
- Ferrule
- Pencil body
Decrease principle
Shape the sharpened end by removing one stitch at both ends of the same decrease row.
Worked flat
The panels are crocheted back and forth in rows, not in continuous rounds.
RS and WS
Ordinary hdc fabric is fairly reversible. Before joining, simply choose the cleaner-looking surface of each panel as the RS.
Size adjustments
To make a longer pencil, add mustard rows.
To make a shorter pencil, remove mustard rows.
Those changes do not affect the tip shaping.
To make a significantly wider pencil, add foundation stitches in even-number increments and redesign the decrease sequence so both sides remain symmetrical.
Common Beginner Mistakes
1. Accidentally losing edge stitches
Problem: The pencil begins narrowing during the rectangular body.
Fix: Mark the first and last stitch and count 24 regularly.
2. Crocheting into the turning chain
Problem: The panel gradually becomes wider.
Fix: Remember that the ch 1 is not included in the stitch count.
3. Uneven color-change edges
Problem: The new color appears to begin one stitch late.
Fix: Introduce the next color during the final yarn-over of the previous stitch.
4. Different panel lengths
Problem: Color sections no longer line up during assembly.
Fix: Match row counts, not only measurements.
5. Crooked pencil point
Problem: The graphite points toward one side.
Fix: Check that every decrease row removes exactly one stitch from both edges.
6. Ruffled border
Problem: The joined edge waves.
Fix: Reduce the number of sc stitches worked into row ends.
7. One panel stretching beyond the other
Problem: The front panel reaches the point before the back.
Fix: Mark all important transitions before seaming.
8. Banner feels too bulky
Problem: The finished piece looks more like a pillow.
Fix: Remove stuffing and replace it with thin batting.
How to Customize This Crochet Project
Change the pencil color
Traditional yellow is easy to recognize, but classroom decor is more interesting when it coordinates with the room.
Try:
- Sage green
- Navy
- Lavender
- Sky blue
- Coral
- Rainbow stripes
- School colors
- Montessori neutrals
Keep the wood and graphite sections recognizable if you still want the silhouette to read immediately as a pencil.
Add the teacher’s name
Before joining the panels, embroider a surname across the main body.
Simple block letters are easiest to position.
You can also add:
- Teacher initials
- Grade number
- “READ”
- “CREATE”
- “LEARN”
Add crocheted letters
Small alphabet appliqués can be sewn onto the body after the panel is complete.
Avoid very heavy embellishments that might pull the banner out of shape.
Make mini pencil bunting
Once you understand the construction, make much smaller pencil motifs in different colors and connect them to a long crochet chain.
This creates a back-to-school classroom garland.
Create a classroom collection
The pencil design pairs naturally with:
- Crochet apple garland
- Crochet crayon bunting
- Crochet book appliqués
- Crochet alphabet banner
- Crochet ruler wall hanging
- Crochet number garland
- Crochet school-bus appliqué
These are also excellent related SEO articles because they create a tightly focused classroom-crochet topic cluster.
Finishing Instructions
Fastening off
After your final sl st, cut the yarn leaving approximately a 6-inch tail.
Pull the tail fully through the final loop.
Weaving in ends
Thread each tail onto a tapestry needle.
Weave through multiple nearby stitches on the hidden side.
Reverse direction once before trimming.
Blocking
Acrylic, cotton and wool all respond differently to blocking, so follow the care requirements for your specific yarn.
For a simple classroom wall hanging:
- Lay the pencil flat.
- Straighten the eraser corners.
- Align the body edges.
- Shape both sides of the wooden tip.
- Center the graphite point.
- Allow the piece to dry completely before hanging.
Avoid applying uncontrolled high heat to synthetic yarn.
Washing
Because this is wall decor rather than clothing, spot cleaning is usually sufficient.
For washable yarn, follow the manufacturer’s care label.
Quick Printable-Style Summary
Project: Crochet Classroom Pencil Banner
Skill level: Easy / confident beginner
Construction: Two flat pencil panels joined around edge
Yarn: Medium #4 worsted-weight yarn
Hook: 5 mm
Main stitches: ch, hdc, hdc2tog, sc, sl st
Starting method: Ch 25 for a 24-stitch panel
Straight section: Maintain 24 sts
Color order: Eraser → ferrule → body → wood → graphite
Tip shaping: Decrease once at each edge
Assembly: Place wrong sides together and sc through both layers
Optional structure: Felt, thin batting or light stuffing
Finishing: Close edge, weave ends, block lightly, add secure hanging loop
FAQ
Is this crochet classroom pencil banner suitable for beginners?
Yes. Most of the project uses repetitive half double crochet rows. The new techniques are basic color changes, hdc decreases and joining two flat pieces.
What yarn is best for a classroom crochet banner?
Worsted-weight acrylic is practical because it is affordable, easy to find and available in many classroom-friendly colors. Cotton-blend yarn also works if you prefer more stitch definition.
Can I make the banner without stuffing?
Yes. In fact, a completely flat or felt-lined version usually hangs better on a classroom wall.
Can I make the crochet pencil longer?
Yes. Add more mustard body rows before beginning the beige sharpened section. Repeat the same change on both panels.
Can I personalize it for a teacher?
Absolutely. Embroider the teacher’s name, surname, initial, grade or classroom number onto the front panel before assembly.
Can this become a crochet pencil garland?
Yes. Reduce the dimensions and yarn size, make several small pencils and attach them to a long crocheted chain.
What is the difference between U.S. hdc and U.K. terminology?
A U.S. half double crochet (hdc) is called a half treble (htr) in U.K. terminology. The Craft Yarn Council publishes a useful comparison chart for these terminology differences. Craft Yarn Council
Conclusion
A crochet classroom pencil banner is a useful beginner project because the recognizable finished shape comes from surprisingly simple techniques: straight half-double-crochet rows, five color sections, controlled decreases and one uncomplicated joining edge.
Make the first one in classic school-pencil colors, then adapt the idea to a teacher’s favorite colors, school colors or a classroom theme.
The same construction can also become a smaller pencil garland, a classroom-door decoration, a teacher gift or the starting point for a complete handmade back-to-school crochet collection.





