A handmade pencil pouch is one of those small crochet projects that feels surprisingly satisfying. It is practical enough to use every day, small enough to finish without committing to weeks of work, and interesting enough to teach you several useful crochet skills along the way.
In this tutorial, you will make a textured crochet pencil pouch from the bottom up. The project begins with one foundation chain, continues around both sides of that chain to create a seamless oval base, and then grows upward in beautiful star-stitch rounds. A zipper keeps pens and pencils secure, while an optional fabric lining gives the inside a polished finish.
The star stitch may look detailed, but the construction becomes repetitive once you understand where to insert your hook. I will slow down the first few stars, explain the loop count, point out the most common mistakes, and give you checkpoints for keeping the project even.
The finished pouch is designed to hold standard pencils, pens, crochet hooks, small scissors, or other slim craft supplies.
What You’ll Learn
By the end of this tutorial, you will know how to:
- Crochet around both sides of a foundation chain.
- Create a flat seamless pouch base.
- Form a six-loop star stitch.
- Identify the eye of a completed star stitch.
- Continue textured stitches in joined rounds.
- Keep your stitch count consistent.
- Finish the top edge neatly.
- Prepare an optional fabric lining.
- Hand-sew a zipper into a crochet pouch.
- Adjust the length and depth for different uses.
Project Details
Skill level: Easy / Confident Beginner
Finished size: Approximately 8¼ inches wide × 4¼ inches tall
Estimated time: 4–6 hours
Construction: Bottom-up, worked around a foundation chain in joined rounds
Closure: 8-inch zipper
Terms: US crochet terminology
The finished dimensions will vary slightly depending on yarn, hook, and personal tension.
Materials You’ll Need
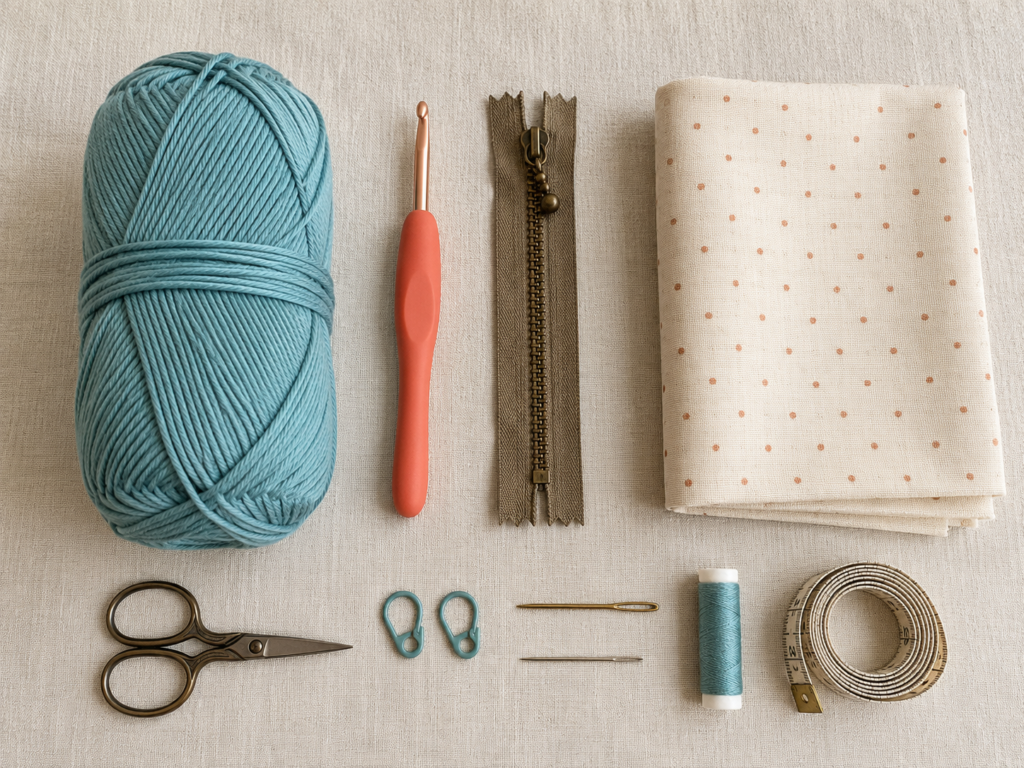
- Approximately 100–130 yards of DK or light worsted cotton yarn.
- 4 mm / US G-6 crochet hook.
- 8-inch zipper.
- Yarn needle.
- Sewing needle and matching thread.
- Scissors.
- 1 or 2 stitch markers.
- Measuring tape.
- Optional cotton fabric for lining.
- Optional iron for preparing the fabric lining.
Cotton is especially useful for a structured pouch because it usually gives good stitch definition and does not stretch as much as very soft, loosely spun fibers. The Craft Yarn Council classifies yarns by standardized weight categories and recommends checking gauge rather than assuming every yarn within one category behaves identically.
Crochet Abbreviations Used
This pattern uses standard US crochet terminology:
- ch = chain
- sc = single crochet
- sl st = slip stitch
- st/sts = stitch/stitches
- rnd = round
- rep = repeat
- yo = yarn over
- RS = right side
- WS = wrong side
The Craft Yarn Council’s standard abbreviation list confirms these abbreviations and also explains the important terminology difference between US and UK crochet: a US single crochet corresponds to a UK double crochet.
Before You Start
Gauge and tension
Exact gauge is not critical for this project because you can adjust the length of the foundation chain before building the pouch body.
As a starting point, aim for approximately:
18 single crochet stitches × 20 rows = 4 inches / 10 cm
The more important check is the length of your foundation chain. Before beginning the body, lay a standard pencil beside the chain. The chain should be slightly longer than the pencil so the finished case is comfortable to open and close.
Do not crochet the star stitches too tightly. You will frequently need to pull the hook through six loops at once, and excessively tight tension makes that unnecessarily difficult.
How to count your stitches
Place a stitch marker in the first single crochet of the base round. When working the textured rounds, move the marker upward as necessary so you can clearly identify where each round begins.
How to keep the pouch straight
Three habits make a major difference:
- Count the base round carefully.
- Keep every star approximately the same size.
- Join each round at the same location instead of accidentally adding an extra stitch.
How to prevent curling
A slight curve in the earliest rounds is normal because you are building a tube. Severe twisting usually means one of three things:
- Your foundation chain was twisted.
- Your tension is too tight.
- An extra stitch was added or skipped.
Stop and correct the problem early rather than hoping later rounds will hide it.
Beginner note
Practice two or three star stitches with scrap yarn before starting the actual pouch. Ten minutes of practice can save considerably more time later.
Step-by-Step Crochet Tutorial
Step 1: Make the Foundation Chain
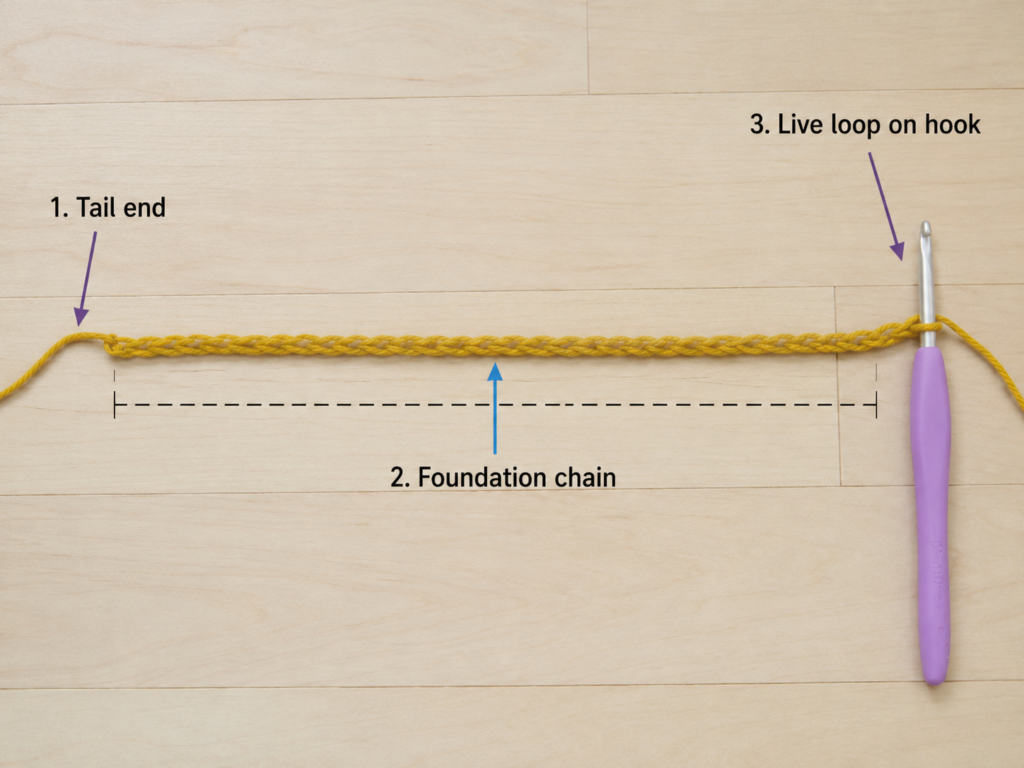
Make a slip knot and place it on your 4 mm hook.
Chain 42.
Lay the entire chain flat before proceeding. Make sure all the V-shaped chain stitches face the same direction and that the chain has not twisted around itself.
The pouch is worked around both sides of this chain, so the chain determines the approximate width of the finished project.
Beginner tip:
Do not make your starting chain extremely tight. A slightly relaxed foundation gives you more room when working into the unused loops on the opposite side.
Common mistake to avoid:
Do not count the loop currently sitting on your hook as one of the 42 chains.
Step 2: Crochet Around the Foundation Chain
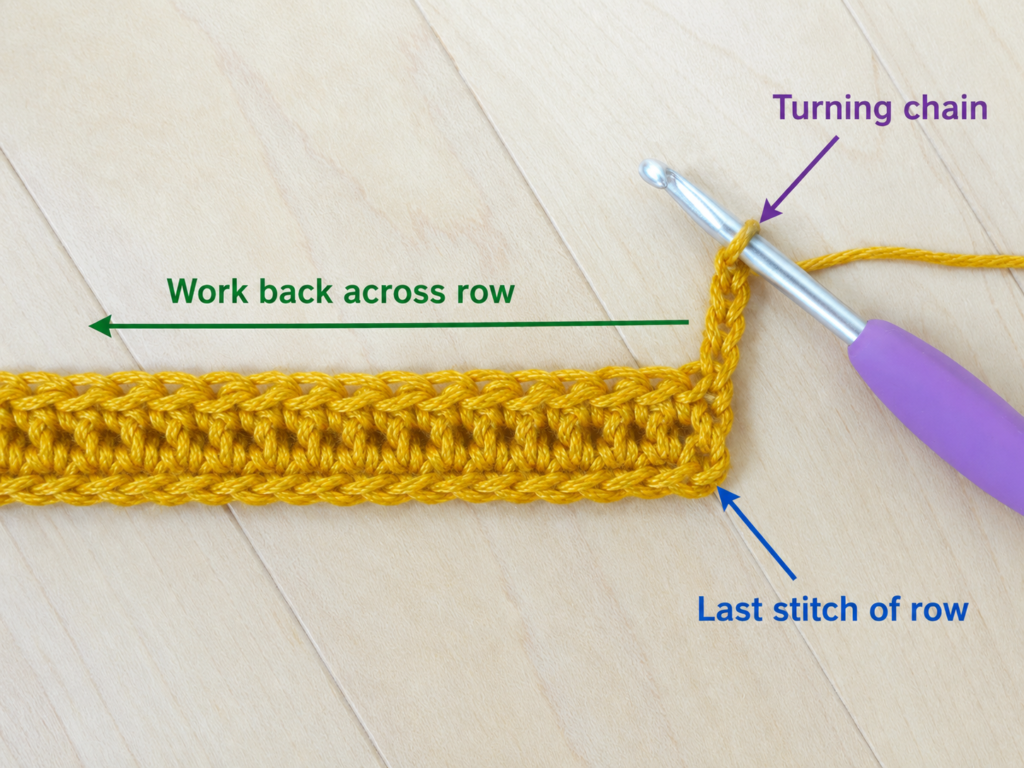
Starting in the second chain from the hook, work 1 sc in each of the next 41 chains.
You now have 41 single crochet stitches along the first side.
Do not turn.
Rotate the work so the unused underside loops of the foundation chain face upward. Work 1 sc into each of those 41 unused loops.
You should now have:
82 sc total
Join with a slip stitch to the first single crochet.
This creates a narrow oval that becomes the seamless bottom edge of the pencil pouch.
Beginner tip:
After finishing the first 41 stitches, pause and physically rotate the piece. Do not turn the work as you would at the end of a normal crochet row.
Common mistake to avoid:
Missing the first or last underside loop can throw off the final stitch count. Count both sides before continuing.
Step 3: Make the First Star Stitch
This is the step where the project begins to develop its decorative texture.
Chain 3.
Now collect loops as follows:
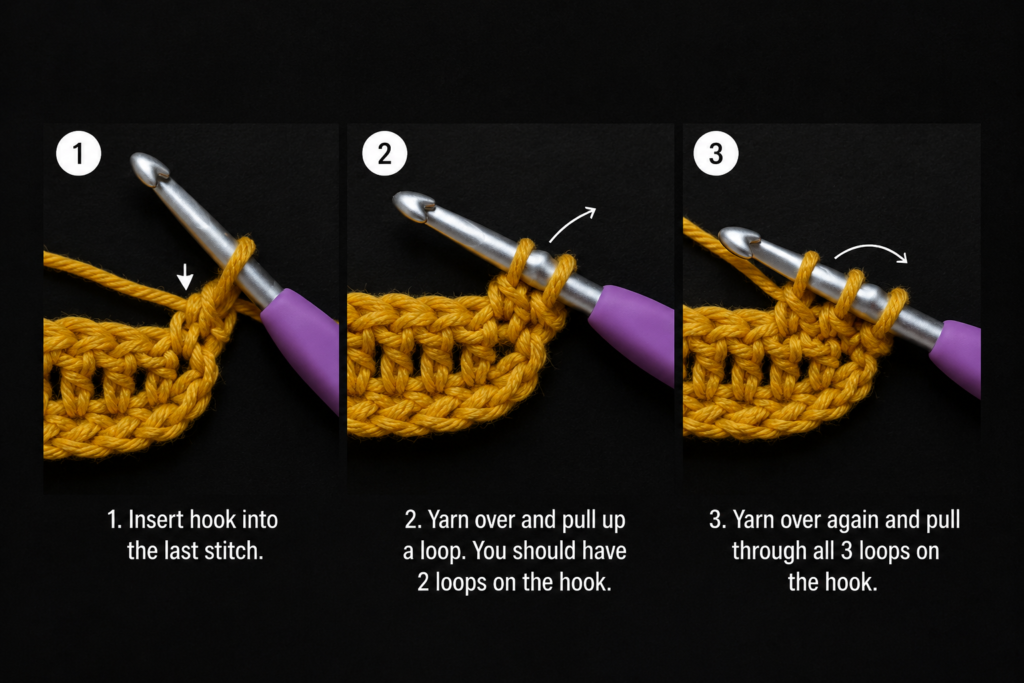
- Insert the hook into the second chain from the hook. Yarn over and pull up a loop.
- Insert the hook into the next chain. Yarn over and pull up another loop.
- Insert the hook into the starting point at the base of the chain-3. Pull up a loop.
- Insert the hook into the next available stitch. Pull up a loop.
- Insert the hook into the following stitch. Pull up one final loop.
You should now have 6 loops on your hook.
Yarn over and pull through all six loops in one movement.
Then chain 1.
That final chain creates the small central opening, or eye, of the star.
Beginner tip:
Before pulling through all six loops, slide the loops slightly upward onto the shaft of your hook. This keeps them uniform and prevents them from becoming too tight near the hook’s throat.
Common mistake to avoid:
Do not forget the chain 1 after closing the six loops. Without it, the eye will not form correctly, making the next star much more difficult to begin.
Step 4: Continue With the Next Star Stitch
After the first star, each following star shares parts of the previous one.
To begin the next star:
- Insert the hook into the eye you just created and pull up a loop.
- Insert the hook under the side strands of the final spike of the previous star and pull up a loop.
- Insert the hook into the base where that final spike emerged and pull up another loop.
- Pull up a loop from the next unworked stitch.
- Pull up one final loop from the following unworked stitch.
Check the hook.
You should again have 6 loops.
Yarn over and pull through all six loops. Chain 1 to create the next eye.
Continue this sequence around the pouch.
You should form approximately 41 stars in the first texture round when the 82-stitch base is worked correctly.
Beginner tip:
Think of each star as borrowing part of the previous star. You are not finding six completely new insertion points every time.
Common mistake to avoid:
The eye and the side of the previous star are easy to confuse. After completing each star, take one second to identify its eye before proceeding.
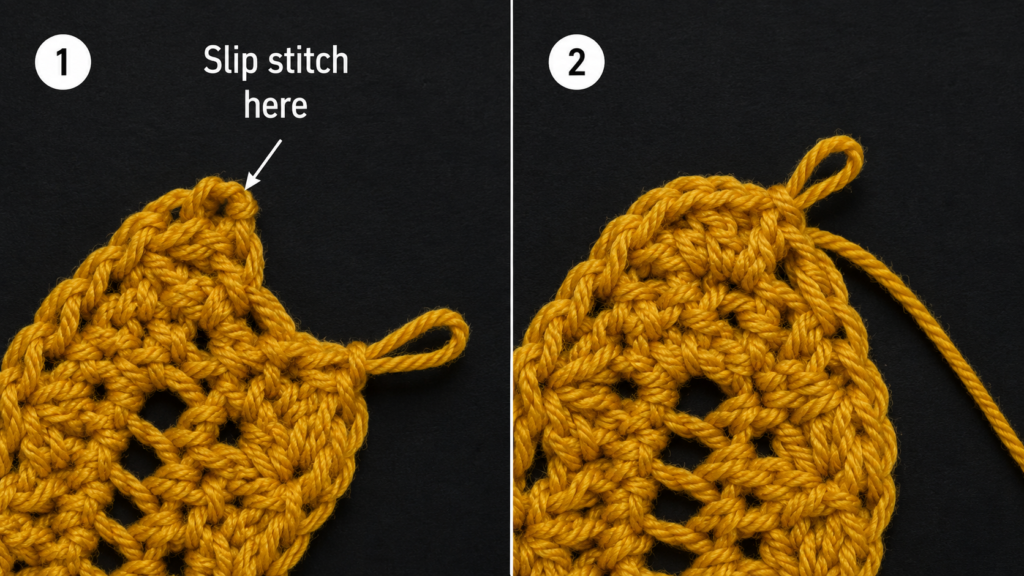
Step 5: Join the First Texture Round
When you reach the beginning of the round, the final star may use the joining area as one of its final insertion points.
Do not force an extra stitch into the round merely because the ending looks different from the middle of the work.
After completing the last star and its chain-1 eye, close the round with a neat slip stitch at the starting join.
Look at the complete round before moving on.
The stars should form an uninterrupted textured band.
A small seam line may appear where the joined rounds begin and end. This is normal.
Beginner tip:
Place a removable marker in the first join. This makes later rounds much easier to count.
Common mistake to avoid:
Adding one unnecessary star at the join can increase the stitch count and gradually make the pouch wider.
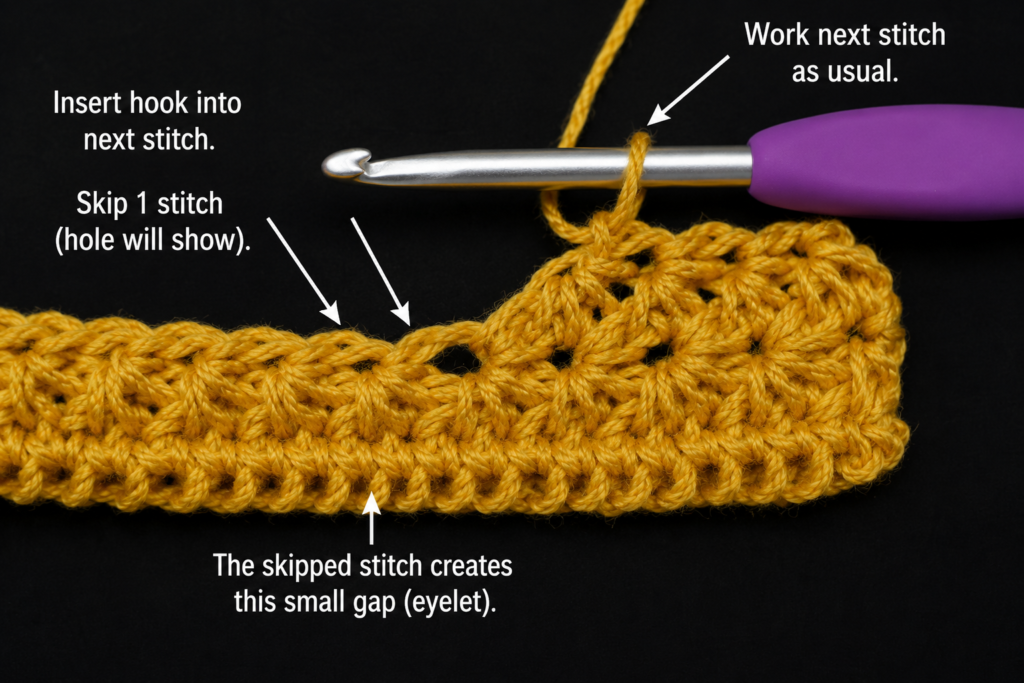
Step 6: Crochet the Next Star-Stitch Round
Chain 3 and begin another star using the same six-loop principle.
As you work above the previous texture round, notice that the surface gives you a repeating series of larger stitch sections and small star eyes.
Keep your sequence consistent.
The most important rule is not to guess. Before inserting the hook, identify the next visible structural point.
Complete the round with approximately the same number of stars as the first texture round.
Join neatly.
Stitch count checkpoint: Approximately 41 stars per full texture round.
Beginner tip:
Count the first two or three rounds. Once the texture is stable and you know your stitch count is correct, the repetition becomes easier.
Common mistake to avoid:
Do not tighten the chain-1 eye after each star excessively. A tiny eye makes the next insertion harder and can distort the fabric.
Step 7: Build the Pouch to the Desired Height
Continue working star-stitch rounds until the pouch measures approximately 4 inches from the bottom edge, or until it reaches your preferred depth.
For the sample dimensions, work approximately 9 texture rounds total after the foundation round.
Your individual gauge may require one more or one fewer round.
Before finishing, insert several pencils into the pouch and check the proportions.
The zipper will add a little structure at the top, but it will not significantly increase the usable internal depth.
Beginner tip:
Measure the pouch while it is lying flat and relaxed. Do not stretch it vertically.
Common mistake to avoid:
Do not continue solely by counting rounds when your yarn or tension differs from the sample. Measurements are more reliable for final sizing.
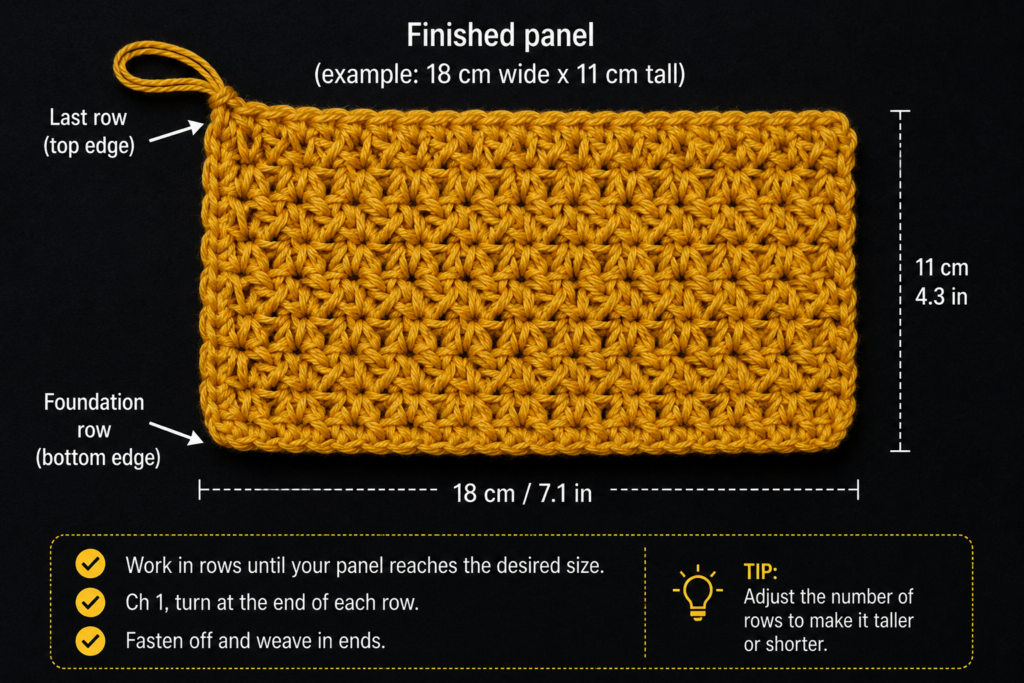
Step 8: Finish the Top Edge
Once the pouch reaches the desired height, work one round of slip stitches around the top.
Keep these stitches relaxed.
The purpose is to create a clean, stable edge rather than to cinch the opening.
Fasten off and leave a yarn tail long enough to weave securely into the inside of the pouch.
Use a yarn needle to weave through several stitches in one direction, change direction, and weave through another section before trimming.
Inspect the interior and top edge.
The opening should lie smoothly without dramatic rippling or pulling inward.
Beginner tip:
Try closing the zipper against the crochet opening before sewing anything. This is the easiest moment to confirm that the zipper length is suitable.
Common mistake to avoid:
Tight slip stitches can make the opening significantly smaller. Keep your hand relaxed.
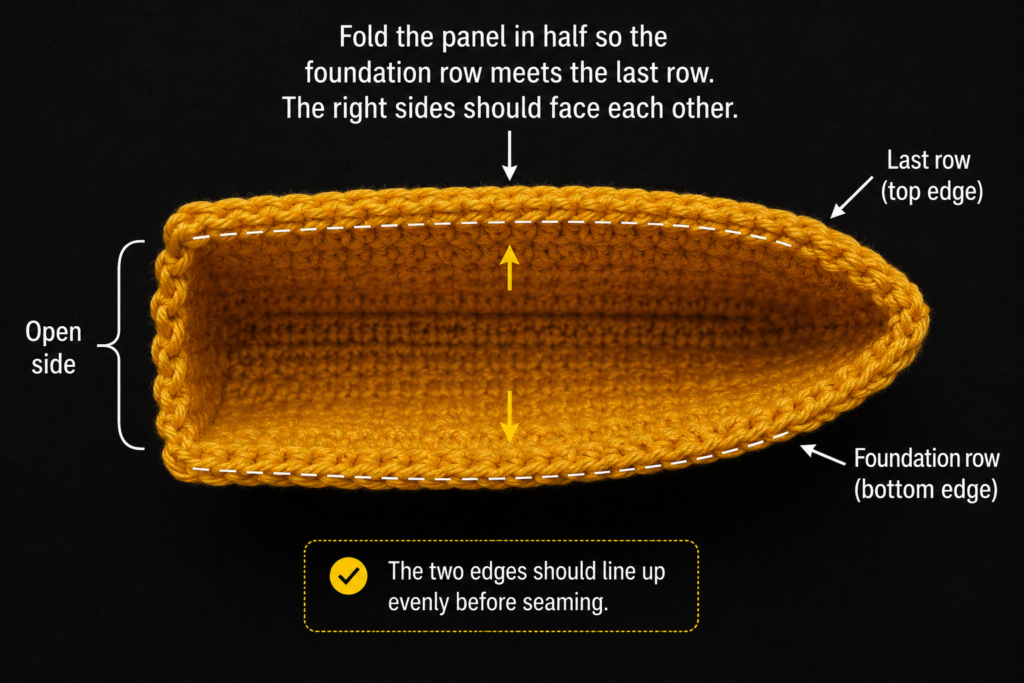
Step 9: Prepare the Optional Fabric Lining
A fabric lining is optional, but it has several advantages. It keeps pencil tips away from crochet gaps, gives the pouch additional structure, and creates a polished interior.
Place the finished pouch flat on your fabric.
Cut a rectangle slightly larger than twice the pouch height, allowing room for seams.
For an approximately 8¼ × 4¼-inch pouch, begin with a fabric rectangle around:
9 inches wide × 10 inches tall
This is only a starting measurement. Always compare the cut fabric against your actual crocheted piece before sewing.
Fold the fabric so the right sides face each other.
Sew the two side seams, leaving the top open.
Turn the lining right side out and test it inside the crochet pouch. It should sit comfortably without excessive bunching.
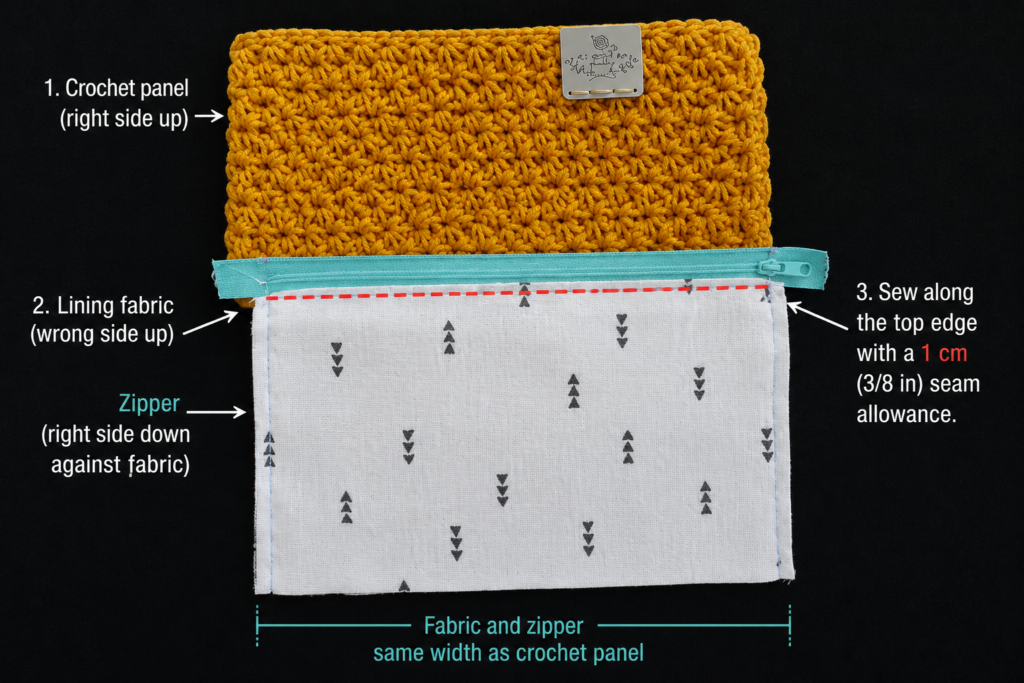
Fold the raw upper edge inward and press it carefully.
Step 10: Install the Zipper
Open the zipper.
Position one side of the zipper tape along one inside edge of the crochet opening. The zipper teeth should sit slightly below the upper crochet edge rather than directly on top of it.
Pin or clip the zipper temporarily.
Using a sewing needle and matching thread, sew the zipper tape to the crochet fabric with small, even stitches.
Avoid pulling the thread too tightly. The crochet fabric should remain flat.
Repeat on the opposite side.
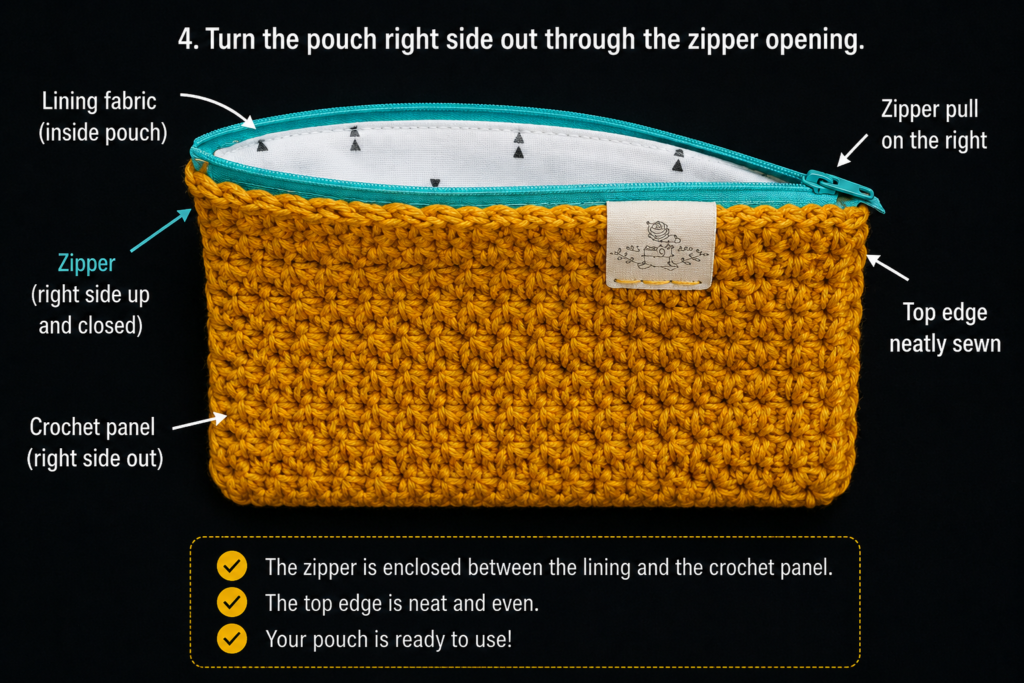
Before attaching the optional lining, test the zipper several times.
It should:
- Open smoothly.
- Close without catching yarn.
- Sit evenly on both sides.
- Keep the pouch opening symmetrical.
Once the zipper works properly, position the fabric lining inside the crochet pouch. Fold the lining’s top edge beneath itself and hand-sew it close to the zipper tape without stitching through the outermost crochet surface whenever possible.
Beginner tip:
Make several temporary stitches first, test the zipper, and only then complete the permanent sewing.
Common mistake to avoid:
Do not sew extremely close to the zipper teeth. Thread or lining fabric that enters the zipper path can cause snagging.
Pattern Notes or Stitch Notes
Turning chain rules
This project is worked in joined rounds rather than turned rows. The starting chain used to establish each star round is part of the stitch setup and should not be treated as an additional separate star.
Stitch count
- Foundation chain: 42 ch.
- Base round: 82 sc.
- Texture rounds: approximately 41 stars per round.
Check your count before progressing too far. A changing count can gradually alter the pouch width.
Repeat pattern
Once the first star is made, each following star repeats this general logic:
- Pull up from the previous star eye.
- Pull up from the side of the previous star.
- Pull up from its base area.
- Pull up through the next two working points.
- Six loops on hook.
- Yarn over and pull through all six.
- Chain 1 to create the new eye.
Right side and wrong side
The star texture forms the decorative right side of the pouch. The smoother reverse surface remains inside and is eventually hidden if you add fabric lining.
Size adjustment notes
For a longer pouch, add more foundation chains.
Because the pouch is worked along both sides of the chain, every added chain creates additional room around the base round.
Before beginning the star stitch, confirm that the base round has an even total number of stitches.
For greater depth, simply add more texture rounds before finishing the upper edge.
Common Beginner Mistakes
1. Pulling the foundation chain too tightly
Problem: The bottom edge feels rigid or curls.
Fix: Restart with a looser chain or use a hook 0.5 mm larger for the foundation only.
2. Losing the star-stitch eye
Problem: You cannot determine where to begin the next star.
Fix: After completing each star, identify the small opening made by the final chain 1. That opening is the eye.
3. Having fewer or more than six loops on the hook
Problem: The stars vary dramatically in size.
Fix: Stop before closing every star and count: exactly six loops should be visible.
4. Pulling through six loops with excessive difficulty
Problem: The hook feels stuck.
Fix: Relax your tension and pull the loops slightly higher before the final yarn-over.
5. Accidentally increasing at the round join
Problem: The pouch slowly becomes wider.
Fix: Mark the beginning of each round and avoid inserting an additional star merely to fill the small visual gap near the seam.
6. Making the top slip-stitch edge too tight
Problem: The zipper no longer fits the opening.
Fix: Work the slip stitches loosely. Going up one hook size for the edging is also acceptable.
7. Sewing the zipper too close to its teeth
Problem: The zipper catches the thread or fabric.
Fix: Position the stitch line farther into the zipper tape and test the zipper frequently while sewing.
How to Customize This Crochet Project
Change the yarn
Mercerized cotton gives excellent stitch definition, but regular cotton, cotton blends, and smooth acrylic yarns can also work.
Avoid extremely fuzzy yarn for your first star-stitch project because the individual insertion points can be harder to see.
Change the colors
Try:
- One solid color for a clean modern look.
- Alternating colors every two texture rounds.
- A contrasting top edge.
- A zipper color that matches the yarn.
- A brightly colored zipper against neutral yarn.
Change the size
A longer foundation creates a wider pouch.
More texture rounds create a deeper pouch.
The same basic construction can be adapted for:
- Crochet-hook storage.
- Makeup brushes.
- Small travel accessories.
- Reading glasses.
- Art supplies.
- Charging cables.
- Small sewing tools.
Add a decorative border
Instead of the plain slip-stitch edge, consider a final round of relaxed single crochet. Keep the edge simple so it does not interfere with the zipper.
Add a wrist strap
Crochet a short chain strap, reinforce it with slip stitches, and secure it near one upper corner.
Gift ideas
Fill the completed pouch with:
- Colored pencils.
- Fine-liner pens.
- Crochet hooks.
- Art markers.
- Small stationery.
- Sewing notions.
It makes a practical handmade gift for students, teachers, artists, crocheters, and stationery lovers.
Finishing Instructions
Once the zipper and lining are secure, inspect the entire pouch.
Look for:
- Loose yarn tails.
- Unsecured sewing-thread ends.
- Gaps near the zipper ends.
- Twisted lining.
- Thread crossing too close to zipper teeth.
Weave every yarn tail securely.
Tie off sewing threads inside the lining where the knots remain hidden.
Lightly shape the pouch by hand.
Heavy blocking is usually unnecessary for a small structured cotton case. If the fabric appears uneven, lightly dampen it, reshape it on a flat towel, and allow it to air-dry completely.
Always follow the care information provided on the yarn label. The Craft Yarn Council recommends retaining yarn-label information because the fiber content and care symbols indicate the appropriate laundering method for the finished item
Quick Printable-Style Summary
Skill level: Easy / Confident Beginner
Finished size: Approximately 8¼ inches wide × 4¼ inches tall
Materials: DK or light worsted cotton yarn, 4 mm crochet hook, 8-inch zipper, scissors, yarn needle, sewing needle and thread, optional cotton lining fabric
Stitches: Chain, single crochet, slip stitch, six-loop star stitch
Starting method: Chain 42, then crochet around both sides of the chain
Base round: 82 single crochet stitches total
Texture repeat: Approximately 41 star stitches per round
Height: Continue to approximately 4 inches or desired depth
Finishing: Work one loose slip-stitch round, fasten off, weave in ends, sew in zipper, and add optional fabric lining
FAQ
Is this crochet pencil pouch pattern suitable for a complete beginner?
It is best for an adventurous or confident beginner who already knows how to chain and make a single crochet. The star stitch requires several insertion points, but once the first few stars are complete, the process becomes repetitive.
A complete beginner can still attempt it by practicing the stitch first with scrap yarn.
Can I make the pouch with only single crochet?
Yes. After completing the 82-stitch base round, you can continue with one single crochet in each stitch around until the pouch reaches the desired height.
That version will be simpler and denser, although it will not have the same decorative star texture.
Do I need to add fabric lining?
No. The lining is optional.
However, it is particularly useful for a pencil pouch because it prevents sharp pencil tips from pushing through small crochet openings.
Can I make the pouch without a zipper?
Yes. Possible alternatives include:
- A buttoned flap.
- A drawstring.
- Snap fasteners.
- Hook-and-loop tape.
For pencils and pens, a zipper provides the most secure closure.
How can I make the pouch longer?
Add more chains to the foundation.
Before continuing, place your longest pencil or crochet hook beside the chain and ensure that the chain is slightly longer than the object.
Maintain an even stitch count around the completed base before beginning the star texture.
Why are my star stitches uneven?
The most common causes are inconsistent loop height and varying tension.
Before pulling through all six loops, make sure the loops are approximately the same height. Try not to make some stars tightly and others loosely.
What yarn is best for a crochet pencil case?
Smooth cotton or cotton-blend yarn is an excellent choice because it provides visible stitch definition and reasonable structure.
The exact yarn brand matters less than choosing a smooth yarn that works well with your hook and maintaining consistent tension.
Conclusion
This crochet pencil pouch is a useful small project for learning how three-dimensional crochet construction works without starting with a complicated garment or large bag.
You begin with a simple chain, crochet around it to create a seamless base, learn a decorative texture one star at a time, and finish with a practical zipper. The result is a handmade accessory that can hold pencils, pens, art supplies, crochet hooks, or other everyday essentials.
The most important part of learning the star stitch is not speed. Work slowly through the first few stars, count the six loops before closing each cluster, and keep identifying the small eye that begins the next stitch. Once the rhythm becomes familiar, the textured rounds move much faster.
Save the tutorial for later, choose a cotton color you genuinely enjoy, and make the pouch in a size that suits how you plan to use it.





