A basic dorm mirror does its job, but it rarely adds much personality to a small room. This crochet dorm mirror decor pattern turns a simple round craft mirror into soft handmade wall decor using cotton yarn, a lightweight supporting ring and beginner-friendly crochet stitches.
The project is small enough to make over a weekend and gives you an opportunity to practice crocheting in rounds without committing to a blanket or large wearable.
You will make three main elements:
- a flat crocheted circle that protects and supports the back of the mirror,
- a narrow crochet frame worked around a rigid ring,
- optional fringe for a little extra texture and color.
The mirror is then sandwiched between the two crochet sections and sewn securely around the edge.
Unlike a permanent glued mirror makeover, the crochet frame does most of the structural work, which also gives the project a soft handmade finish.
The sample described here uses a warm oatmeal frame with dusty sage and muted terracotta accents, but the design is easy to adapt to your dorm colors.
This is an original tutorial rather than a reproduction of the reference pattern discussed above.
What You’ll Learn
By making this project, you will practice:
- starting crochet with a magic ring
- crocheting a flat circle
- spacing increases evenly
- counting stitches in joined rounds
- crocheting directly around a rigid ring
- making a circular frame
- joining two crochet layers with a yarn needle
- attaching simple fringe
- adjusting a pattern to fit a different mirror size
- diagnosing curling and ruffling
- finishing a decor project neatly
Materials You’ll Need
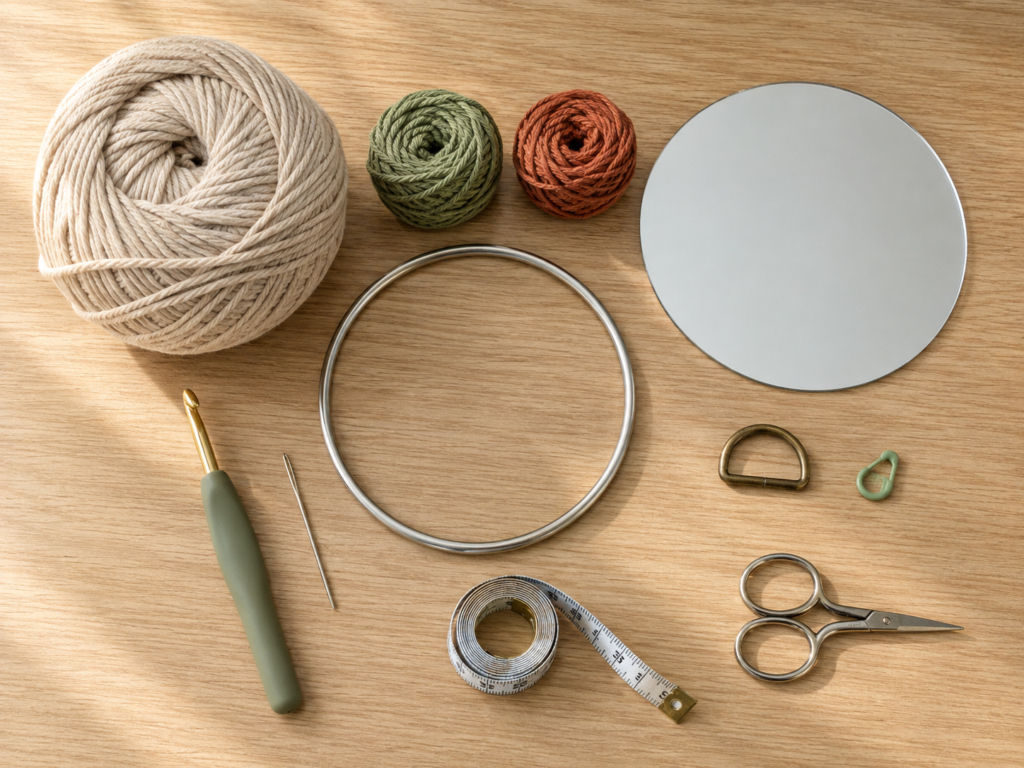
For one approximately 10–11-inch finished mirror:
- Medium / weight 4 cotton yarn: approximately 120–160 yards in warm oatmeal
- Small quantity of dusty sage cotton yarn
- Small quantity of muted terracotta cotton yarn
- 4.5 mm crochet hook
- 9-inch / approximately 23 cm round craft mirror
- 7-inch / approximately 18 cm lightweight metal or wooden craft ring
- One small D-ring, approximately 25 mm
- Yarn needle
- Scissors
- Stitch marker
- Flexible measuring tape
A smooth, tightly spun cotton is particularly useful here because the stitches remain easy to see and the frame does not become excessively fuzzy.
Weight 4 is classified as a medium yarn category by the Craft Yarn Council. Recommended hooks vary with the yarn and intended fabric, so treat the 4.5 mm hook in this tutorial as a project choice rather than a universal requirement.
Crochet Abbreviations Used
This tutorial uses US crochet terminology.
- ch = chain
- sc = single crochet
- hdc = half double crochet
- sl st = slip stitch
- st / sts = stitch / stitches
- rep = repeat
- inc = increase; work 2 stitches into the same stitch
- RS = right side
- WS = wrong side
- BLO = back loop only
These abbreviations follow common Craft Yarn Council terminology.
Before You Start
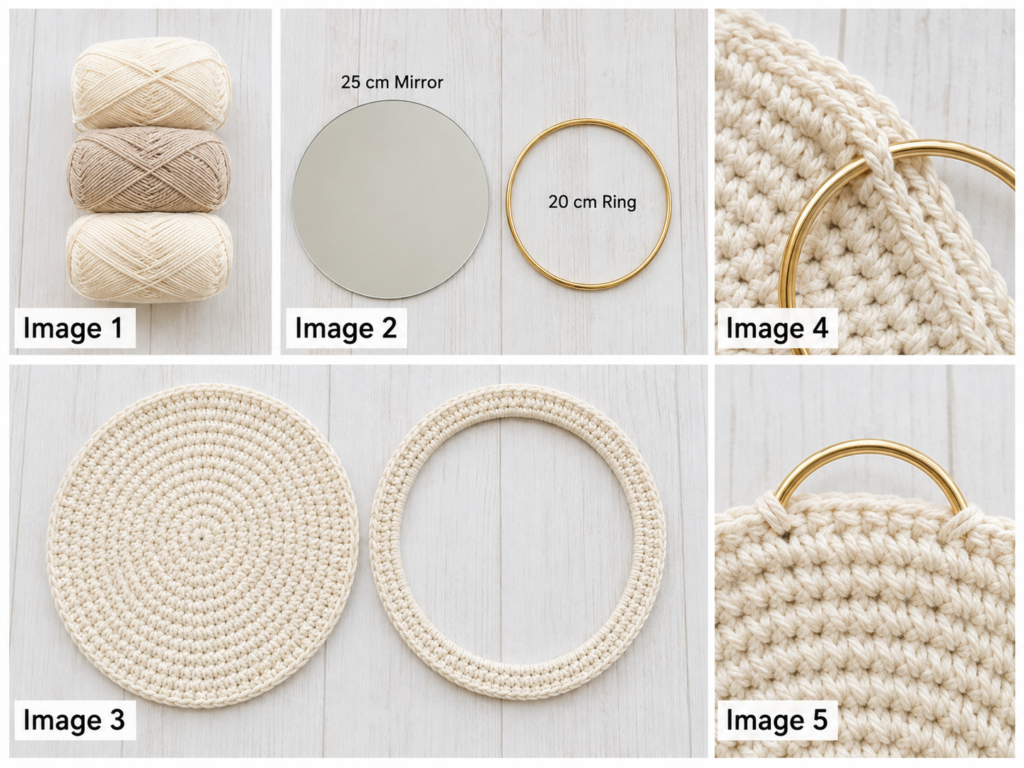
Check Your Mirror and Ring
Measure the actual mirror before crocheting.
For this tutorial:
- mirror diameter: about 9 inches / 23 cm
- ring diameter: about 7 inches / 18 cm
- difference in radius: about 1 inch / 2.5 cm
That space between the supporting ring and outer mirror edge is where the crochet front frame will sit.
Your components do not need to match these measurements exactly. What matters is that the supporting ring is smaller than the mirror and that the crochet frame becomes wide enough to overlap the mirror’s perimeter securely.
Gauge and Tension
Exact gauge is less important here than finished diameter.
As a starting point, aim for approximately:
14–16 hdc stitches across 4 inches / 10 cm
Your circle should feel firm but still flexible.
If your fabric is very loose, switch to a smaller hook.
If it feels hard and stiff or your hook struggles to enter the stitches, try the next hook size up.
How to Count Your Stitches
Place a stitch marker in the first stitch of each round.
When you reach the marker again:
- stop,
- count the stitches,
- correct any missing or extra stitches before continuing.
Finding a stitch-count problem two rounds later is much more frustrating than checking each round as you go.
How to Avoid a Wavy Crochet Circle
A circular piece gives you useful visual feedback.
If the edge begins to ruffle, you probably have too many stitches for your tension.
If the piece begins forming a bowl, you may have too few increases.
The increase formula below is a starting point. If your individual yarn behaves differently, adjust by distributing a few more or fewer increases around the next round.
Choosing Dorm-Friendly Colors
For a calmer dorm aesthetic, try:
- oatmeal + sage
- ivory + dusty rose
- cream + muted blue
- beige + terracotta
For a more colorful room:
- lavender + coral
- aqua + yellow
- pink + orange
- navy + gold-inspired neutrals
Avoid attaching anything extremely bulky to the mirror if it will be mounted with a lightweight removable wall hook.
Step-by-Step Crochet Tutorial
Step 1: Crochet the Center of the Back Panel
The back panel begins as a flat hdc circle.
Make a magic ring with the oatmeal yarn.
Round 1
Work:
10 hdc into the magic ring.
Pull the ring closed and join to the first hdc with a sl st.
Stitch count: 10
For this pattern, the beginning chain does not count as a stitch.
Round 2
Ch 1.
Work 2 hdc into every stitch around.
Join.
Stitch count: 20
Round 3
Ch 1.
Repeat:
1 hdc in next st, 2 hdc in next st
around.
Join.
Stitch count: 30
Round 4
Repeat:
1 hdc in next 2 sts, 2 hdc in next st
around.
Stitch count: 40
Continue the same increase principle.
Each new round adds one additional regular hdc between increases.
So your counts progress approximately:
- Round 5 = 50
- Round 6 = 60
- Round 7 = 70
- Round 8 = 80
- Round 9 = 90
- Round 10 = 100
- Round 11 = 110
- Round 12 = 120
Your target is more important than blindly completing every round.
Stop when the back circle measures approximately 8.5–8.75 inches / 21.5–22 cm across and sits just inside the edge of your mirror.
Beginner tip:
Lay the circle on the table after every two rounds. A good backing should relax flat without needing to be stretched.
Common mistake to avoid:
Do not place each increase directly above the increase from the previous round forever. That can create a polygon-like shape.
Offsetting the increase positions occasionally makes the circle look more naturally round.
Step 2: Finish and Stabilize the Back Panel
Once your circle is slightly smaller than the mirror, work one firm finishing round.
Ch 1, sc in each stitch around.
If you finished with 120 stitches, you should still have:
120 sc
Do not increase during this round unless the fabric begins pulling upward sharply.
Fasten off, leaving an ordinary weaving tail.
Lay the backing over the rear face of your mirror.
You want approximately 1/8–1/4 inch of the mirror edge to remain beyond the crochet circle. This small difference helps the final crochet cover stay under tension after sewing.
Beginner tip:
Do your sizing check on a flat table instead of holding everything in the air. Gravity can make a crochet circle appear longer than it actually is.
Common mistake to avoid:
Do not make the backing larger than the mirror. Excess fabric may become visible from the front after assembly.
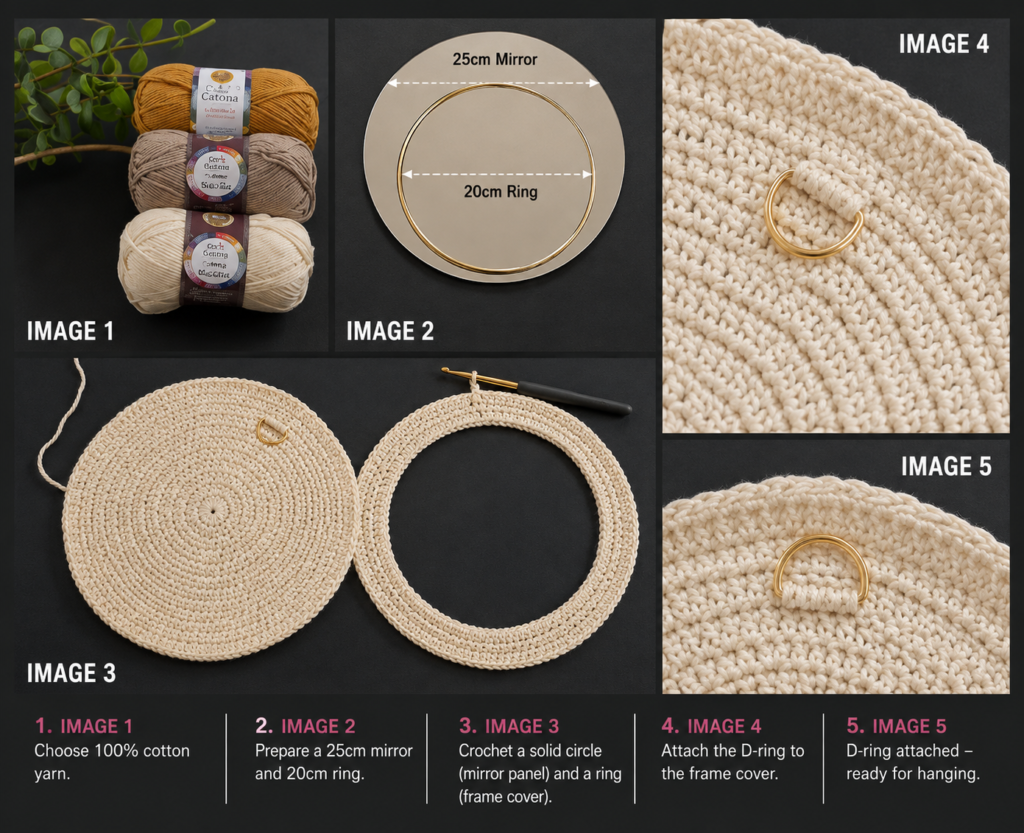
Step 3: Add the Hanging Ring
Decide which point will be the top of your mirror.
Turn the backing so the wrong side faces you.
Position your D-ring approximately 1–1.5 inches below the outer edge.
Thread a yarn needle with a doubled length of oatmeal yarn.
Sew repeatedly around the straight section of the D-ring, catching sturdy portions of several nearby crochet stitches.
Do not sew through only one strand of one stitch. Spread the load across a small area.
Tie the yarn securely on the wrong side and weave the ends through several directions.
Test the ring gently before assembling the mirror.
Beginner tip:
Mark the exact opposite point on the circle with another stitch marker. This makes it easier to keep your decorative fringe at the bottom rather than accidentally rotating the mirror during assembly.
Common mistake to avoid:
Do not make your hanging loop from a very long loose yarn chain. Cotton can stretch under constant weight. A small sturdy D-ring gives a more controlled hanging point.
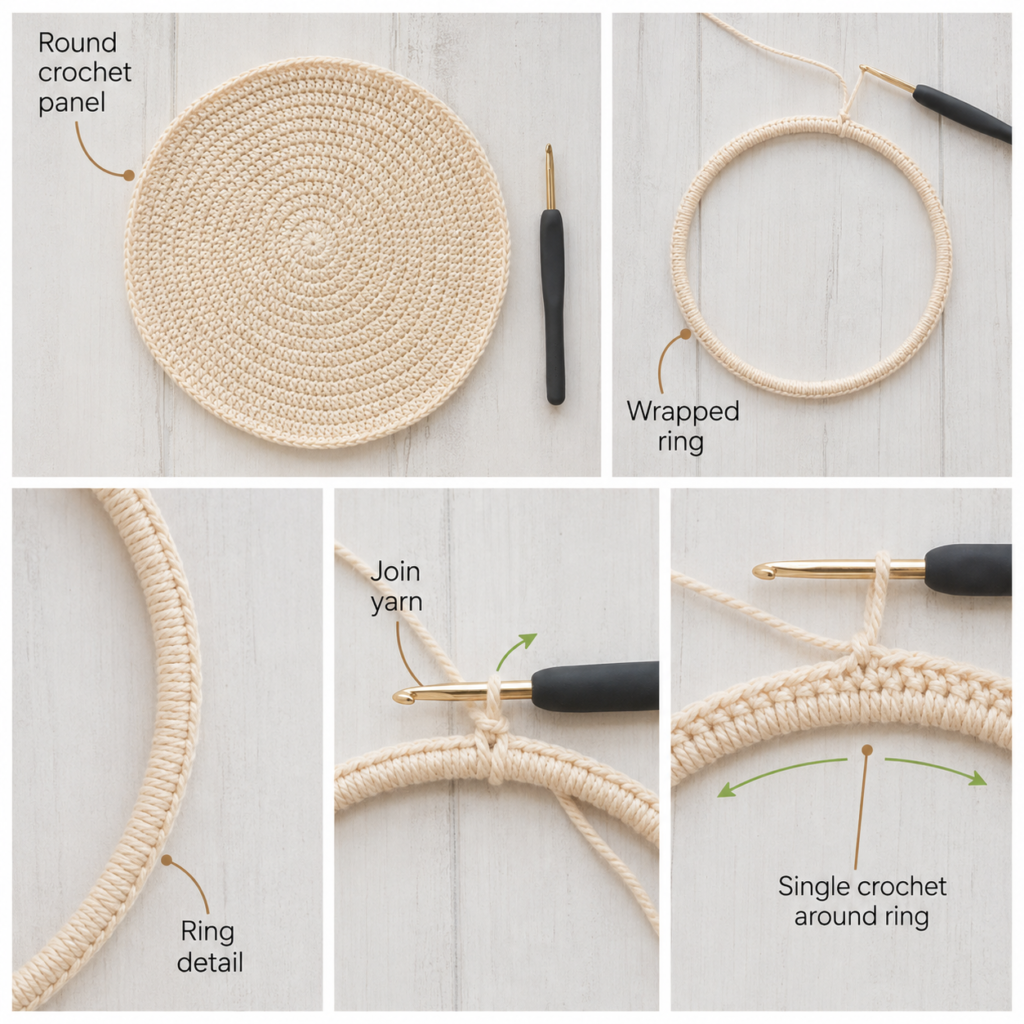
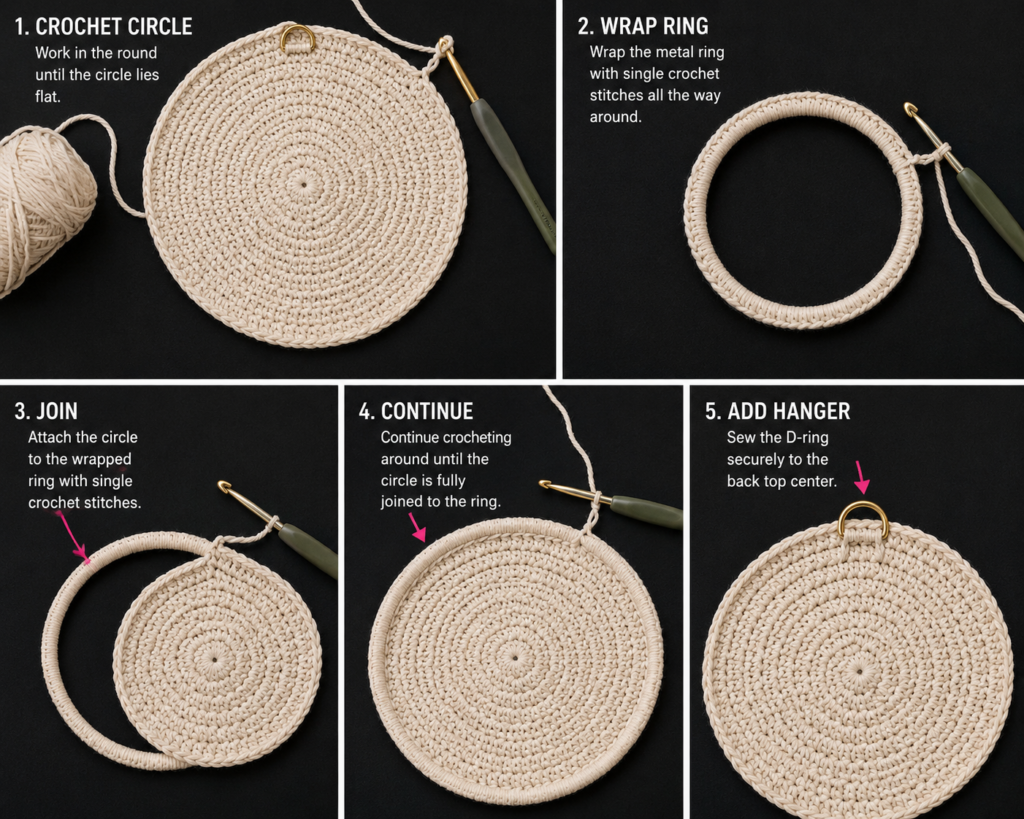
Step 4: Crochet Around the Support Ring
Now make the front frame.
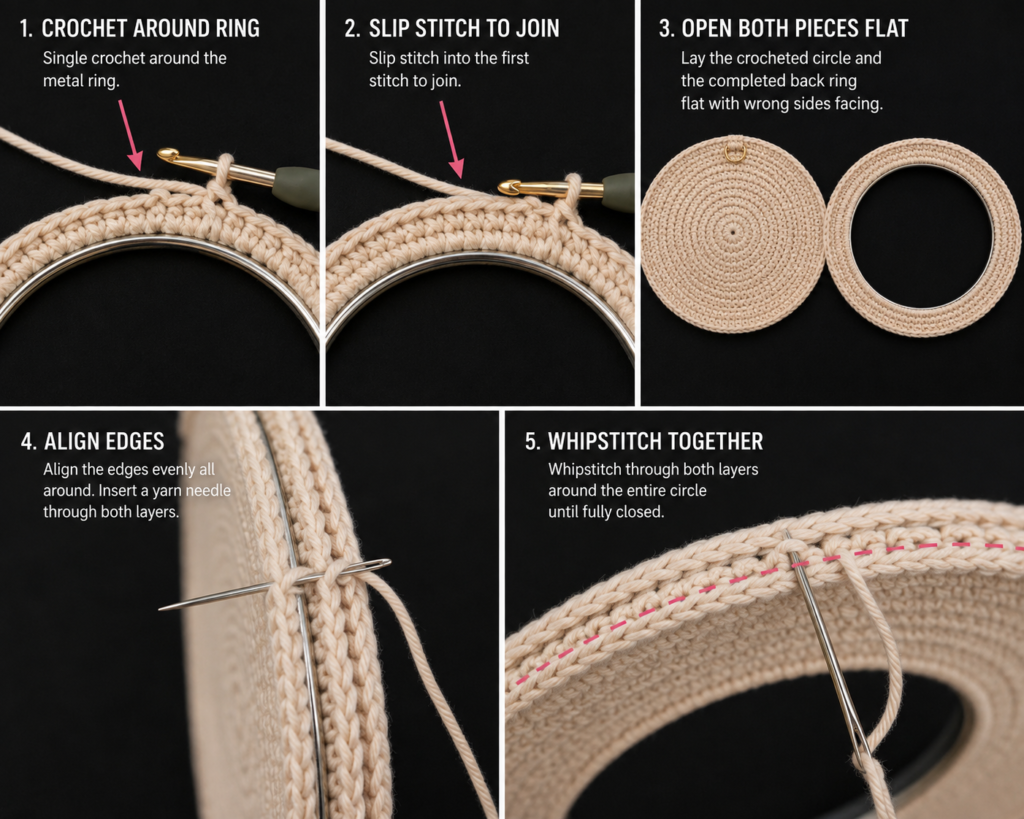
The first round is worked around the physical ring, not into a foundation chain.
Make a slip knot and place it on your hook.
Hold the yarn behind the ring.
Insert the hook through the center of the ring, yarn over and pull a loop forward.
Yarn over again and complete a single crochet.
Continue working sc stitches around the ring until the surface is completely covered.
For the 7-inch sample ring, aim for approximately:
110 sc around the ring
This count can vary slightly according to the thickness of your ring and your stitch tension.
Slide the stitches together periodically so there are no obvious gaps.
Join to the first sc.
Beginner tip:
The stitches should touch one another without overlapping. Think of covering the ring rather than stretching the crochet around it.
Common mistake to avoid:
If you can still see large sections of metal or wood between the stitches, your foundation is too sparse.
Add more sc before joining the round.
Step 5: Build the Front Crochet Frame
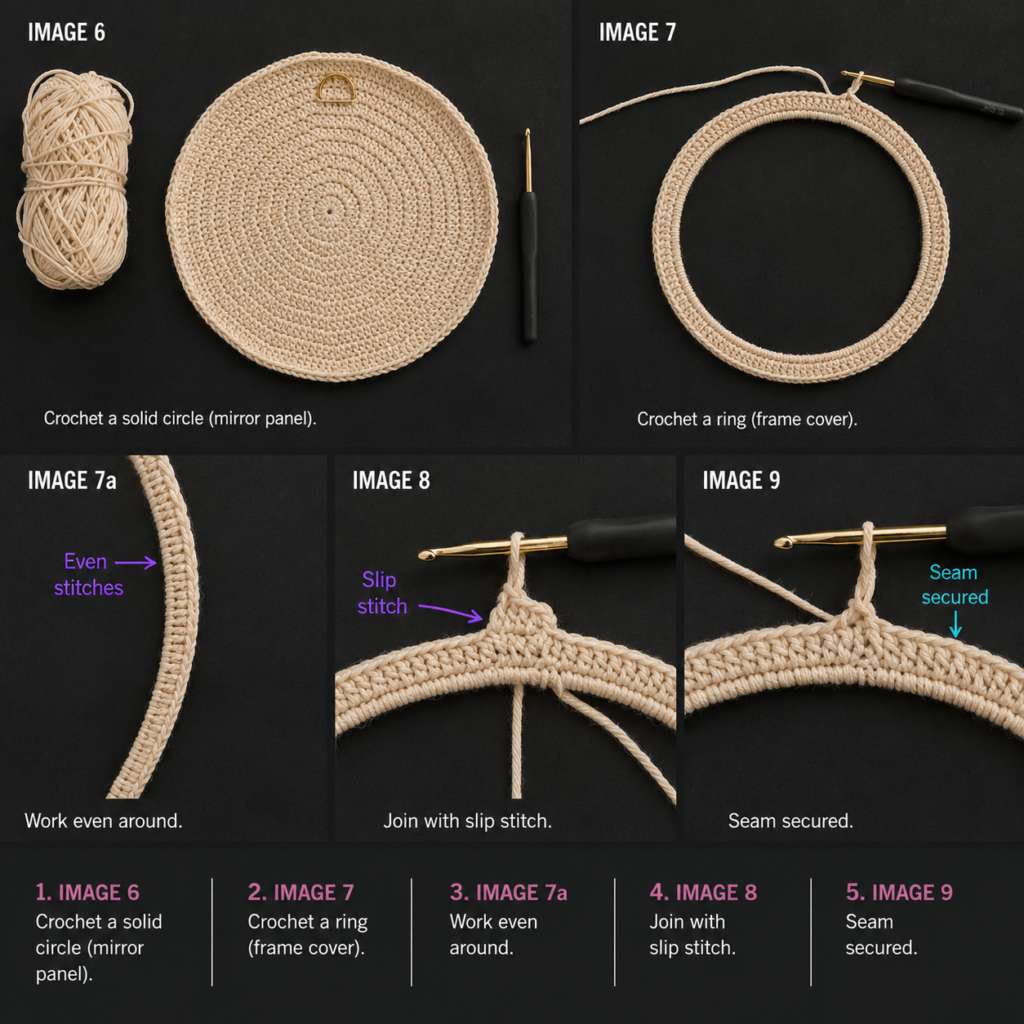
The ring now becomes the inner edge of the frame.
Front Round 1
Ch 1.
Work 1 hdc in each sc around.
Join.
Approximately 110 sts
Front Round 2
We need to widen the circumference gradually.
Repeat approximately:
hdc in next 10 sts, 2 hdc in next st
around.
Distribute 10 increases evenly.
You should finish near:
120 sts
Do not worry if your foundation had 108 or 112 stitches. The key is to distribute enough increases to let the frame lie flat.
Front Round 3
Ch 1.
Work:
1 hdc in each stitch around.
Join.
Front Round 4
Ch 1.
Work:
1 sc in each stitch around.
Join and fasten off.
Check the front frame against the mirror.
The outer crochet edge should overlap the outer perimeter of the glass by roughly 1/2 inch.
Beginner tip:
Place the frame directly over the mirror after each round. The mirror itself is the most useful sizing template.
Common mistake to avoid:
Too many increases make the frame ripple.
Too few make it curve upward like the side of a basket.
If necessary, unravel only the last round and adjust the number of increases.
Step 6: Check Your Frame and Fix Any Ripples
Lay the finished front frame on the table.
Ask three questions:
- Does the inner ring stay circular?
- Does the crochet lie reasonably flat?
- Is the final outer edge wide enough to overlap the mirror?
Minor waves usually disappear once the piece is stretched around the mirror.
Large waves need correction.
If the frame ruffles badly, remove the final increase round and remake it with fewer increases.
If it cups inward, add several evenly distributed increases.
You can also gently shape cotton crochet before assembly.
Avoid aggressively stretching the inner ring because you want it to remain symmetrical.
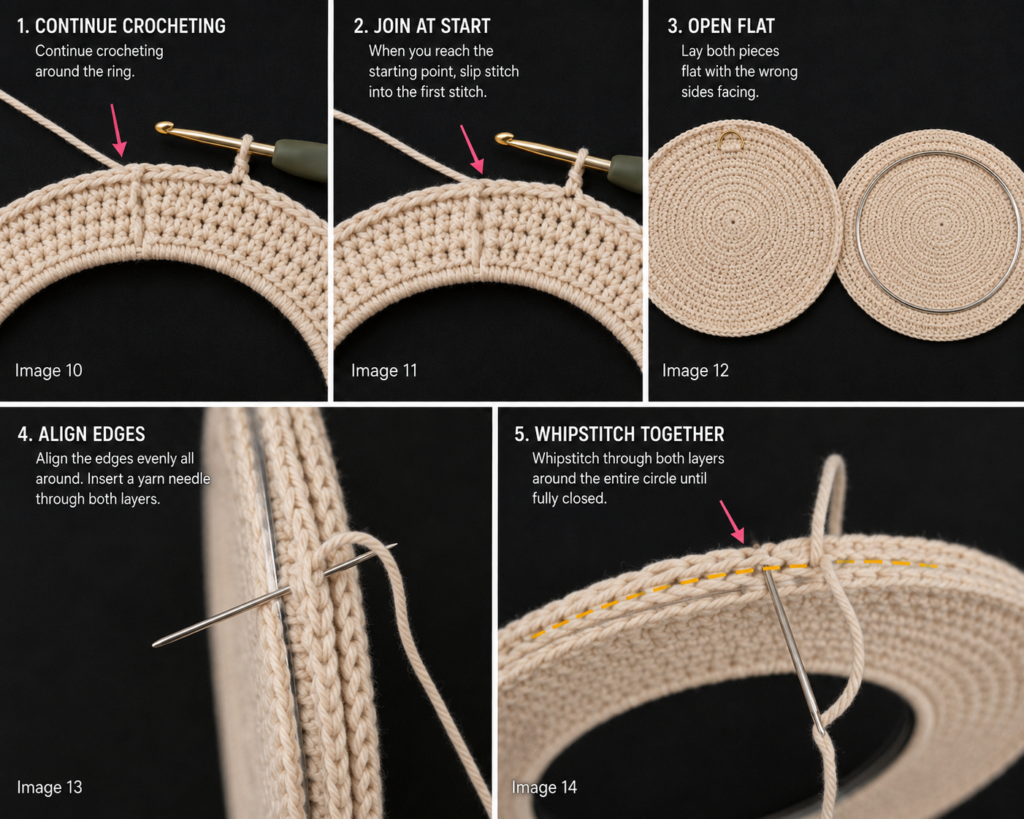
Stitch Close-Up
The final round should show clear, even V-shaped stitch tops. These are the loops you will use when sewing the front to the back.
Step 7: Sandwich the Mirror Between the Crochet Pieces
Clear your work surface.
Place the back panel wrong side up.
Center the mirror on the backing.
Check that:
- the D-ring sits at 12 o’clock,
- the mirror is centered,
- the backing does not extend beyond the glass.
Now position the front ring over the mirror.
The rigid ring should sit concentrically over the glass.
The crochet frame should overlap the glass perimeter.
Rotate the front piece until the joining rounds align neatly.
Use four stitch markers to temporarily clip the front and back together at:
- 12 o’clock
- 3 o’clock
- 6 o’clock
- 9 o’clock
This prevents the mirror from shifting while you sew.
Beginner tip:
Do not begin sewing immediately after matching only one point.
Quartering the circle first makes it much easier to distribute the crochet evenly.
Common mistake to avoid:
Make sure the D-ring is outside the finished cover rather than trapped between the crochet backing and the mirror.
Step 8: Sew the Front and Back Together
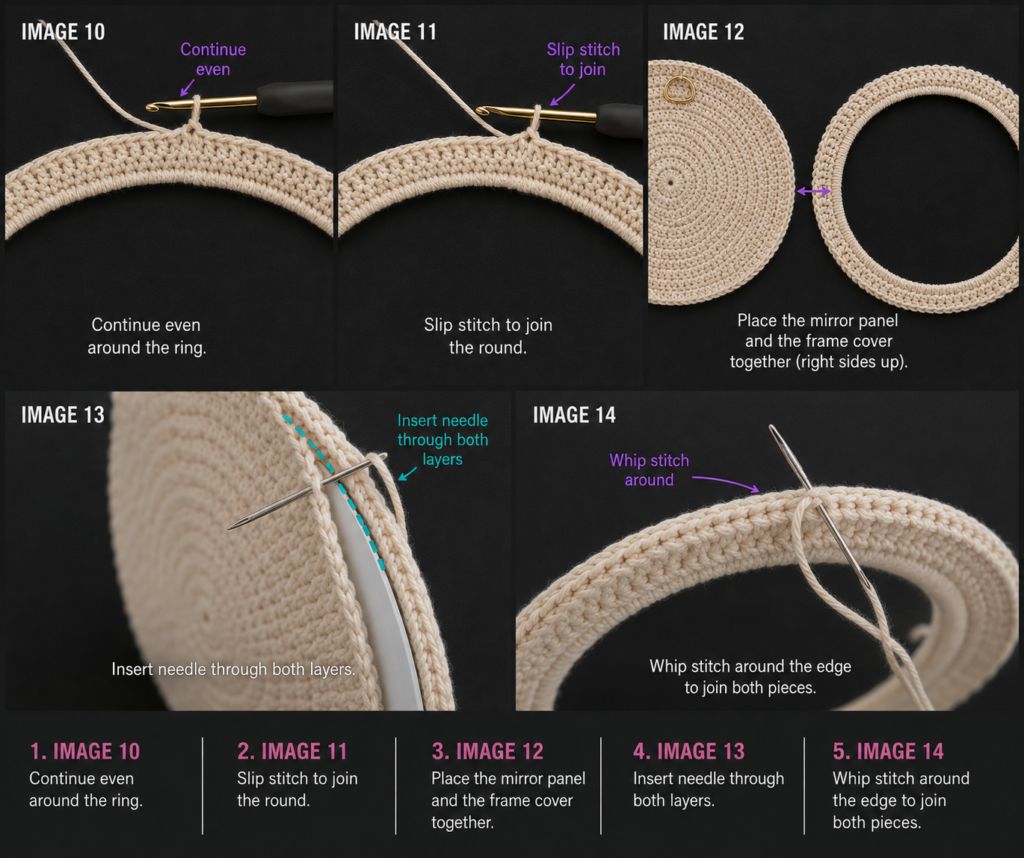
Cut a comfortable length of oatmeal yarn and thread your yarn needle.
Begin close to the bottom of the mirror so the final woven tail will be less noticeable.
For a clean seam, work through the corresponding outer loops of the front and back edges.
If both edges contain about 120 stitches, pair them approximately one-to-one.
Pass the needle through:
- one loop of the front edge,
- the corresponding loop of the back edge.
Pull until the edges touch.
Do not yank the seam tight.
Continue around several inches, then stop and check the front.
The mirror should remain centered and the crochet edge should not pucker.
Remove each quarter marker only when you reach it.
Finish the seam, knot securely on the back and weave the yarn tail through several stitches.
Beginner tip:
Rotate the whole mirror as you sew instead of twisting your wrist around the circle.
Common mistake to avoid:
Overtightening each sewing stitch makes the outer edge shrink.
Your goal is a firm seam, not a drawstring.
Step 9: Add Optional Dorm-Room Fringe
You can stop now for a minimalist mirror.
For a softer boho dorm look, add a small asymmetric fringe cluster.
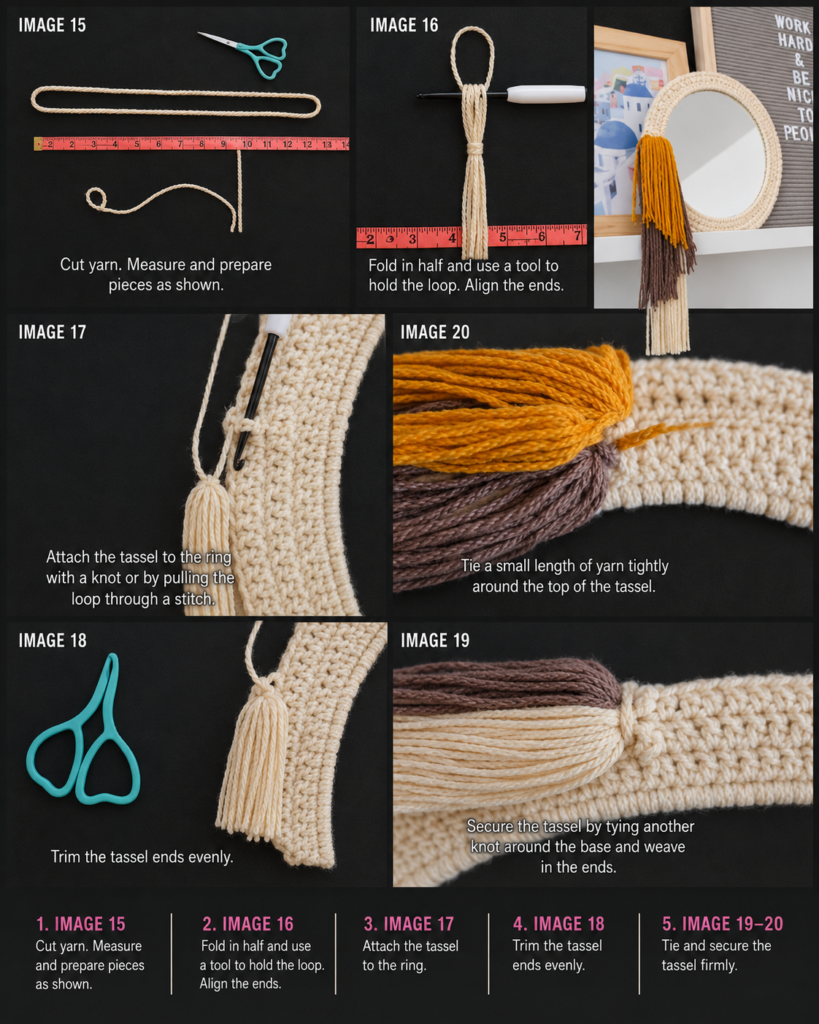
Cut:
- 6 strands of dusty sage, about 12 inches each
- 6 strands of muted terracotta, about 10 inches each
- 4 strands of oatmeal, about 14 inches each
These measurements are deliberately easy to customize.
Attaching One Fringe Bundle
Take two strands.
Hold them together and fold them in half.
Insert your crochet hook through one outer frame stitch.
Pull the folded center through the stitch to make a loop.
Pass all four loose ends through that loop.
Pull gently.
Continue along only the lower-left portion of the mirror.
Mix the three colors rather than creating one solid color block.
Trim the ends after the mirror is hanging so gravity can show you the natural line of the fringe.
Beginner tip:
Start with fewer strands than you think you need.
It is easy to add more fringe. Removing a dense fringe section after everything has tightened is slower.
Common mistake to avoid:
Do not attach every bundle to adjacent stitches if your yarn is thick. Leaving occasional empty stitches creates a lighter, more modern appearance.
Step 10: Final Shaping and Hanging
Hold the completed mirror vertically.
Straighten the crochet edge with your fingers.
Trim the fringe only after it has been hanging for a few minutes.
You can create:
- a straight line,
- a soft diagonal,
- a stepped fringe,
- intentionally uneven boho lengths.
Before hanging the project, check the D-ring and seam again.
Because dorm-room wall rules vary, use whatever wall-mounting method your residence permits and make sure the hook is rated comfortably above the total weight of your mirror.
For safety, avoid placing a glass mirror where it could easily fall onto a bed, desk chair or high-traffic walkway.
Pattern Notes or Stitch Notes
Turning Chain
This project is worked in joined rounds rather than rows.
The beginning ch 1 does not count as a stitch.
Work the first actual hdc or sc into the first available stitch.
Back Circle Stitch Count
The suggested increase progression adds approximately 10 stitches per round:
- 10
- 20
- 30
- 40
- 50
- and so on
For the sample size, approximately 120 outer stitches works well as the target.
However, the finished diameter takes priority over the theoretical count.
Front Frame Stitch Count
The sample begins with approximately:
110 sc around the support ring
It then increases to approximately:
120 outer stitches
This makes it easier to pair the front and back edges during assembly.
Right Side and Wrong Side
The prettier outward-facing surface is the RS.
For the back panel:
- RS faces away from the mirror after assembly.
- WS faces the rear of the mirror.
For the front frame:
- RS faces the viewer.
Repeat Pattern
The back circle follows the standard logic of spacing increases farther apart on each round.
For example:
- 1 stitch between increases
- then 2
- then 3
- then 4
Continue until the required diameter is reached.
Size Adjustment Notes
This project is highly adjustable.
For a larger mirror:
- use a larger support ring,
- continue the back circle until it is slightly smaller than the mirror,
- cover the ring densely with sc,
- add enough front-frame rounds to span the difference between the support ring and mirror edge,
- adjust increases whenever the frame starts cupping.
For a smaller mirror, stop the back circle earlier and use fewer foundation stitches around a smaller ring.
The important measurement is not a specific round number. It is the relationship between:
mirror radius – support-ring radius = approximate required frame width
Common Beginner Mistakes
1. Back Circle Turns Into a Bowl
Cause: Too few increases or very tight tension.
Fix: Add several evenly spaced increases on the next round. If the bowl shape is severe, unravel one round and remake it more loosely.
2. Back Circle Becomes Wavy
Cause: Too many increases.
Fix: Work the next round with fewer increases or no increases in selected areas.
A mild wave may settle during assembly, but large ruffles should be corrected first.
3. Gaps Appear Around the Support Ring
Cause: The foundation single crochet stitches were spaced too far apart.
Fix: Slide the existing stitches together and add more sc before closing the round.
4. Front Frame Will Not Lie Flat
Cause: The stitch count is not expanding at the same rate as the frame circumference.
Fix: If it cups, add increases. If it ripples, reduce increases.
Do this before adding the mirror.
5. Mirror Moves Inside the Cover
Cause: The backing or front frame is too large, or the seam is too loose.
Fix: Use a slightly smaller backing and sew the perimeter firmly while maintaining even tension.
6. Outer Seam Puckers
Cause: The joining yarn was pulled too tightly.
Fix: Undo several inches of seam and resew with enough slack for the edges to rest naturally together.
7. Mirror Hangs Crooked
Cause: Hanging hardware is not positioned directly opposite the visual bottom of the project.
Fix: Mark 12 and 6 o’clock before assembly.
If adding asymmetric fringe, judge the balance while the mirror is temporarily hanging before trimming.
How to Customize This Crochet Project
Change the Yarn
Cotton gives the project a crisp stitch definition, but a cotton-acrylic blend can also work.
Avoid an extremely fuzzy yarn if you want the individual stitches around the mirror opening to stay visible.
Try Different Color Palettes
Soft Neutral Dorm
- ivory
- oatmeal
- taupe
Sage Dorm Room
- cream frame
- sage fringe
- pale olive accent
Retro Dorm
- mustard
- rust
- cream
Pastel Dorm
- lavender
- blush
- soft blue
School-Color Inspired
Use generic coordinating colors that match your bedding or room accessories.
Make the Frame Wider
Add another hdc round before the final sc round.
Check the frame after every new round.
A wider frame may require additional increases.
Add a Decorative Border
Instead of a plain final sc round, try:
- reverse single crochet
- small picots
- alternating sc and ch-1 spaces
- tiny shell edging
Keep the decoration relatively shallow so it does not block too much of the mirror.
Add More Texture
Replace one hdc round with:
- BLO hdc
- alternating hdc and sc
- subtle puff-stitch accents
For beginners, keep the final joining edge in plain sc because the loops are easier to identify while sewing.
Skip the Fringe
A plain oatmeal frame works particularly well in minimalist dorm rooms.
You could instead add:
- one small crochet flower
- a tiny bow
- three short tassels
- a removable ribbon
- small crochet leaves
Gift Ideas
This mirror would make a useful handmade gift for:
- a student moving into their first dorm
- back-to-school season
- a college care package
- a roommate
- a new apartment
- a craft-room makeover
- a handmade birthday gift
Finishing Instructions
Fastening Off
After the final stitch, cut the yarn leaving at least a 5-inch tail.
Pull the tail completely through the final loop.
Weaving in Ends
Thread the tail onto a yarn needle.
Run it beneath several stitches.
Change direction and weave back through another section.
Trim the excess only after the tail feels secure.
Avoid leaving knots directly against the mirror’s visible front edge.
Blocking
Because the mirror provides a rigid final shape, heavy blocking is usually unnecessary.
If the separate back panel needs gentle shaping before assembly, lightly dampen it, shape it flat and allow it to dry according to the care requirements of your specific yarn.
General blocking guidance recommends following the yarn’s care instructions first and shaping the damp piece while it dries.
Do not soak the completed project with the mirror enclosed unless you know the mirror backing and metal hardware tolerate water.
Washing and Care
The safest approach is usually spot cleaning because the project contains:
- a mirror,
- metal or wooden support hardware,
- hanging hardware.
Dust the crochet gently or use a slightly damp cloth where needed.
Always follow the care label for your particular yarn.
Quick Printable-Style Summary
Project: Crochet Dorm Mirror Decor
Skill level: Easy / Advanced Beginner
Finished size: Approximately 10–11 inches across, excluding fringe
Mirror: Approximately 9 inches / 23 cm
Support ring: Approximately 7 inches / 18 cm
Yarn: Medium / weight 4 cotton
Hook: 4.5 mm
Main stitches:
ch, sc, hdc, sl st
Starting method:
Magic ring for back panel
Back panel:
Flat hdc circle increasing by approximately 10 stitches per round until slightly smaller than mirror; finish with sc.
Front frame:
Approximately 110 sc worked directly around support ring; expand to approximately 120 stitches; complete with hdc and sc rounds.
Assembly:
Center mirror between front and back pieces and sew matching outer loops together.
Decoration:
Optional asymmetric oatmeal, dusty sage and terracotta fringe.
Finishing:
Weave all ends securely, test hanging hardware, trim fringe and hang using an appropriately rated dorm-approved hook.
FAQ
Can a beginner make this crochet dorm mirror decor pattern?
Yes. A confident beginner who already knows single crochet and half double crochet should be able to complete it.
The two techniques most likely to feel new are crocheting around a rigid ring and maintaining a flat circle.
Both become easier when you work slowly and check the shape frequently.
What yarn is best for crocheting around a mirror?
A smooth cotton or cotton-blend yarn is a strong choice because it produces clear stitch definition and a relatively structured fabric.
Medium-weight yarn also creates a substantial frame without becoming extremely bulky.
Do I have to use a craft ring?
For this particular construction, a ring is recommended because it keeps the mirror opening round and supports the crochet front.
Without it, the inner crochet edge could stretch or distort over time.
Can I use a rectangular dorm mirror?
Not with these exact instructions.
The increase system in this tutorial is designed for a circular mirror.
A rectangular mirror frame would normally be built with straight sections and planned corner increases rather than circular rounds.
Can I make the pattern without fringe?
Absolutely.
Stop after assembling the frame, weave in all ends and hang it.
A simple cotton frame often works better than fringe in a minimalist or modern dorm room.
How do I adapt the pattern to a different mirror size?
Measure the mirror and use a support ring several inches smaller in diameter.
Crochet the backing until it sits slightly inside the mirror edge.
Then crochet the front frame wide enough to bridge the distance between your ring and the mirror’s outside edge.
Use the mirror itself as your sizing template rather than relying exclusively on the sample stitch counts.
How should I hang a crochet mirror in a dorm?
Use a mounting method allowed by your residence and rated safely above the actual finished weight of the mirror.
Check the D-ring attachment before hanging.
Because this project includes glass, choose a position where the mirror will not easily be knocked down.
Conclusion
A small mirror is one of the easiest practical objects to turn into handmade room decor, and crochet gives you far more freedom than a fixed store-bought frame.
Once you understand the three-part construction—flat backing, ring-based front frame, and sewn assembly—you can reuse the basic idea with different mirror sizes, yarn colors and decorative borders.
For a cozy college-room look, keep the main frame neutral and use small amounts of your favorite colors in the fringe. For something more minimalist, leave the fringe off entirely and let the texture of the cotton stitches become the decoration.
Most importantly, check the fit frequently instead of worrying about reproducing an exact diameter from stitch counts alone. The mirror in front of you is the best measuring tool for this project.
Save the tutorial so you can reuse the construction later for another room, a handmade gift or a coordinated set of crochet dorm decor.





