A cheer bow is supposed to make a statement. It needs enough width to be noticeable, defined loops that do not disappear into the hair, and a firm center that keeps everything sitting where you put it.
Fortunately, you do not need complicated shaping to crochet one.
This beginner-friendly crochet cheer bow pattern starts with one long ribbed strip. After the crocheting is finished, that strip is folded into two loops and two tails, pinched through the center, and finished with a small crocheted center band.
The construction is much easier than the finished bow makes it look.
If you can chain and work a half double crochet, you can make the main bow. The back-loop-only rows add subtle ribbing and enough structure to help the loops hold their shape without making the fabric stiff.
The result is a reusable crochet hair bow that can be worked in school colors, team colors, holiday combinations, or one simple solid shade.
What You’ll Learn
By the end of this tutorial, you will know how to:
- Crochet a long ribbed strip with straight edges.
- Work half double crochet through the back loop only.
- Measure the strip instead of relying entirely on gauge.
- Fold one crochet strip into classic cheer-bow loops and tails.
- Create an even accordion pinch through the middle.
- Crochet and attach a separate center band.
- Attach the finished bow securely to an alligator clip or barrette.
- Adjust the pattern to create smaller or larger bows.
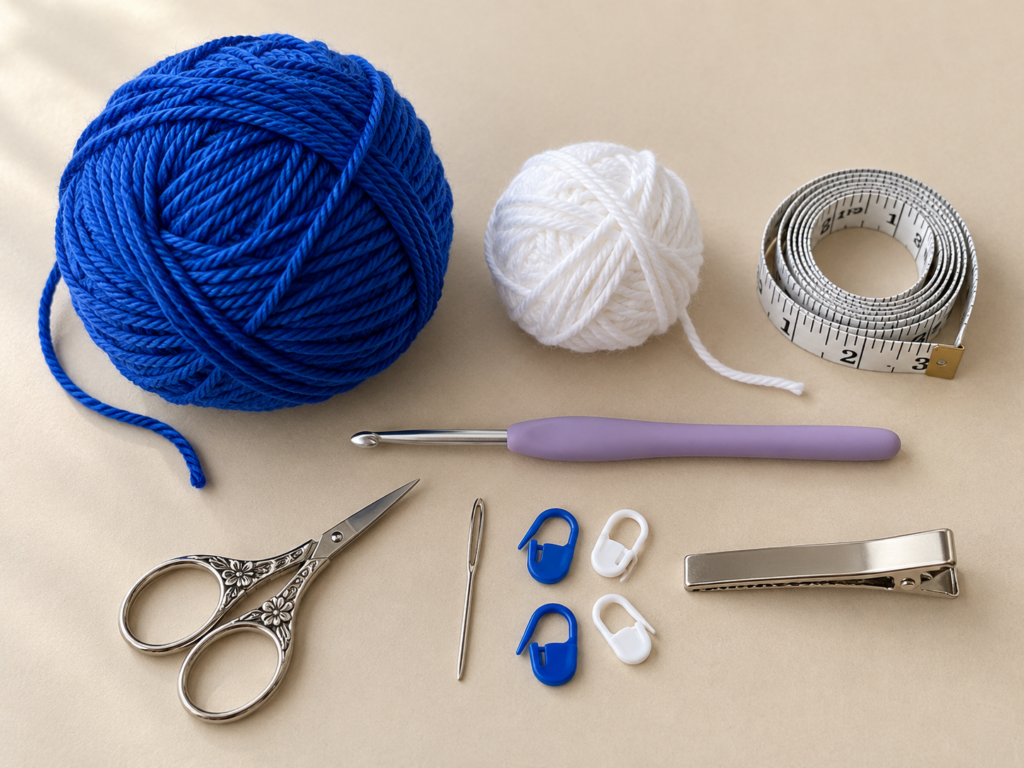
Materials You’ll Need
For one medium/large cheer-style bow:
- Approximately 35–45 yards of #4 medium/worsted-weight yarn.
- Small amount of contrasting yarn if you want a different-colored center.
- 4.0 mm crochet hook.
- Scissors.
- Blunt tapestry needle.
- 2–4 stitch markers, optional.
- Measuring tape.
- 2.25–3 inch alligator clip or barrette.
- Sewing thread and needle, optional for additional clip security.
A cotton or cotton-blend yarn is particularly useful because it gives the bow some body. Smooth acrylic also works. Avoid very fuzzy yarn for your first bow because the stitch loops and center shaping are more difficult to see.
The Craft Yarn Council classifies yarn weights and provides recommended hook ranges, but those hook recommendations are guidelines rather than rigid rules. For this accessory, the fabric should be fairly firm, so a 4 mm hook works well with many medium yarns.
Crochet Abbreviations Used
This tutorial uses U.S. crochet terminology.
- ch = chain
- sc = single crochet
- hdc = half double crochet
- sl st = slip stitch
- st/sts = stitch/stitches
- BLO = back loop only
- RS = right side
- WS = wrong side
- FO = fasten off
These abbreviations correspond with standard crochet terminology published by the Craft Yarn Council. Note that U.S. and U.K. terminology differ: for example, the U.S. half double crochet is called a half treble in U.K. terminology. Craft Yarn Council
Finished Size
With #4 yarn and a 4 mm hook, aim for approximately:
Width: 5–6 in / 12.5–15 cm
Height including tails: 4.5–5.5 in / 11.5–14 cm
Exact dimensions depend on yarn, tension, and how much of the strip you place into the loops.
Gauge and Tension
Gauge is not critical because you can measure the ribbon as you work.
A useful target is approximately:
Main ribbon: 16–18 inches / 41–46 cm long and about 1.5–2 inches / 4–5 cm wide.
The important point is consistency. Loose stitches produce a softer bow that may droop. Very tight stitches produce a stiff strip that can be difficult to fold through the middle.
Your fabric should bend comfortably while still holding its edges.
Before You Start
Count your stitches
The main ribbon remains the same width from beginning to end. If your stitch count changes, one edge will gradually slope.
Place a stitch marker in the first and last stitch of each row if you regularly miss edge stitches.
Know your loops
After making a crochet stitch, look at its top edge. You will see a small V.
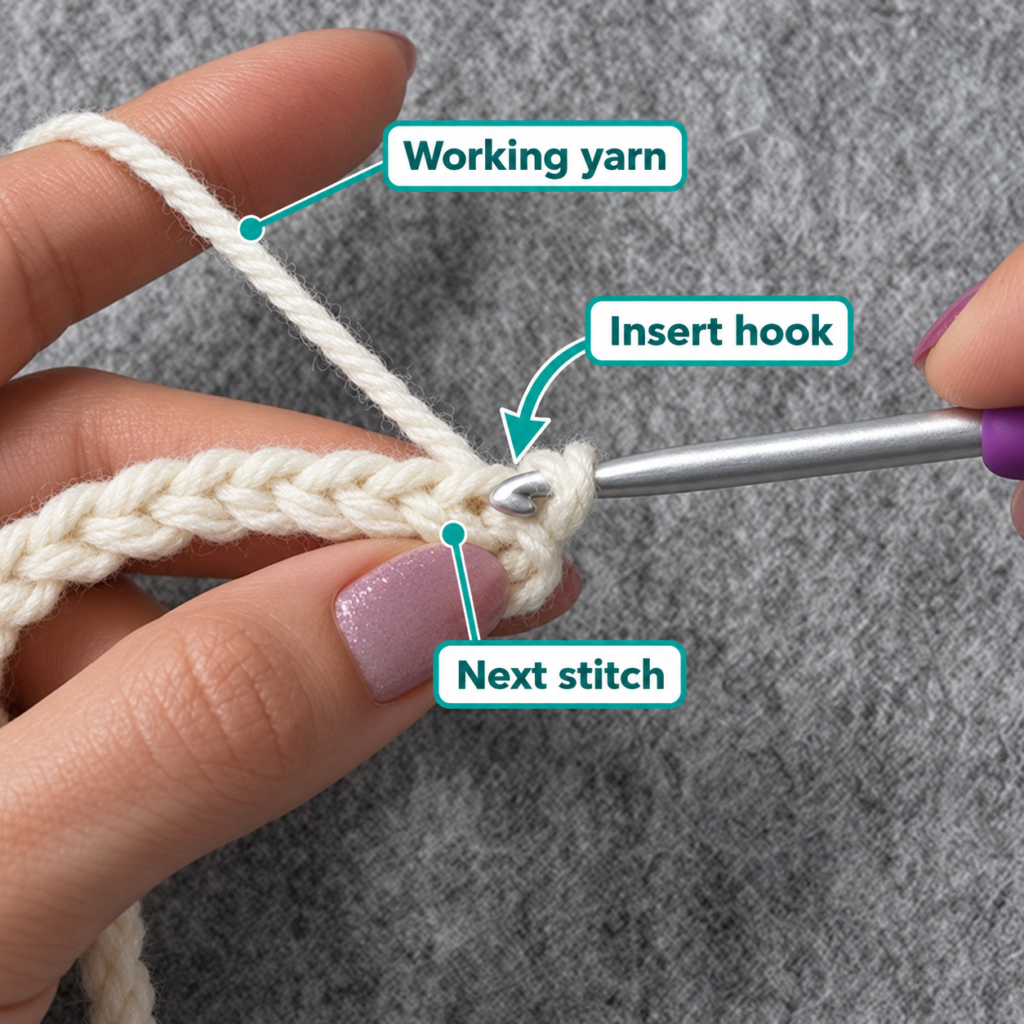
The loop closest to you is the front loop. The loop farther away is the back loop.
Working through only the back loop creates the raised ribbed texture used in this pattern.
Keep the foundation chain relaxed
A foundation chain that is noticeably tighter than the following rows will pull one long edge inward.
If your chains are naturally tight, make the foundation with a 4.5 mm hook and change to 4 mm for the rows.
Choose colors before assembly
Classic options include:
- Team primary color with a contrasting center.
- School colors.
- Red, white and blue.
- Black and gold.
- Pastels for a softer bow.
- One solid color for a minimalist look.
For the photographed tutorial plan, royal blue is the primary yarn and white is the center accent.
Step-by-Step Crochet Tutorial
Step 1: Make the Foundation Chain
Create a slip knot and place it on your 4 mm hook.
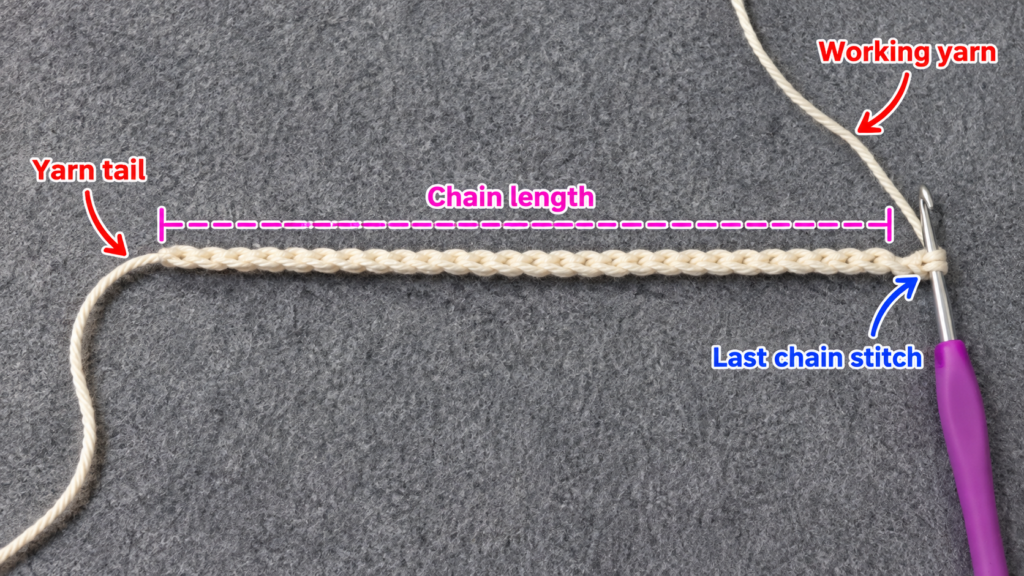
Chain 62.
Do not pull the chains tightly against the hook. Each chain should be large enough for the hook to enter easily on the next row.
Lay the foundation on the table occasionally to make sure it is not twisting excessively.
With average worsted yarn and tension, 62 chains should provide enough length for a medium/large cheer bow. However, length is more important than the exact number. You are ultimately aiming for a finished crochet ribbon approximately 16–18 inches long.
Beginner tip
When counting a foundation chain, do not count the loop currently on the hook.
Common mistake to avoid
Do not use an extremely tight chain just because you want a firm bow. Firmness should come from consistent rows, not from choking the starting chain.
Step 2: Crochet the First Row
Work one hdc in the second chain from the hook, then work one hdc into each remaining chain across.
You should have 61 hdc when you reach the end.
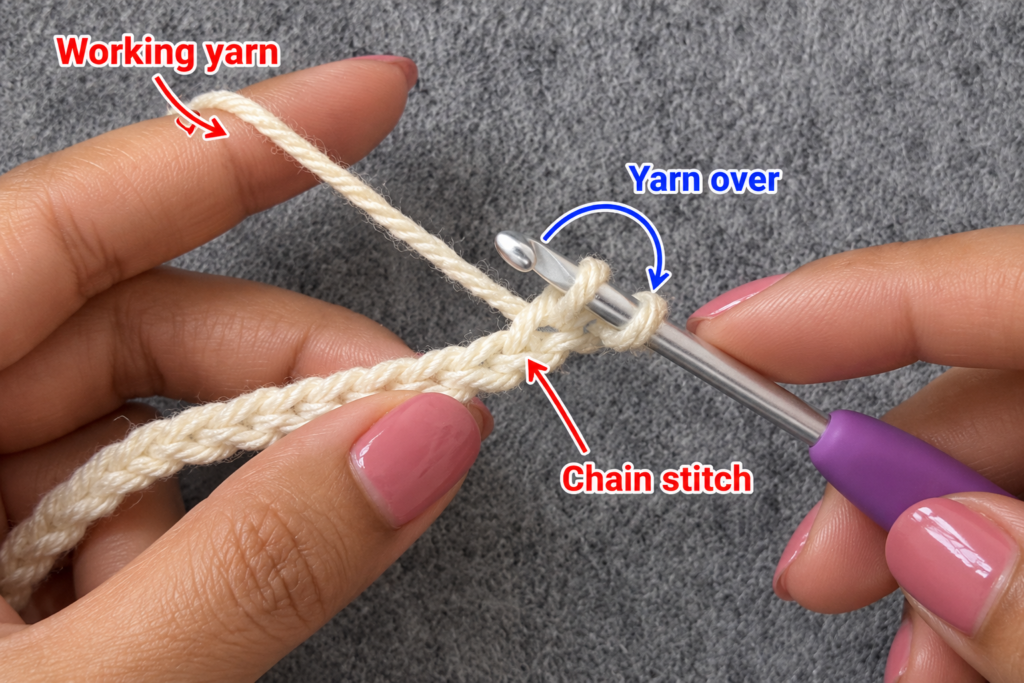
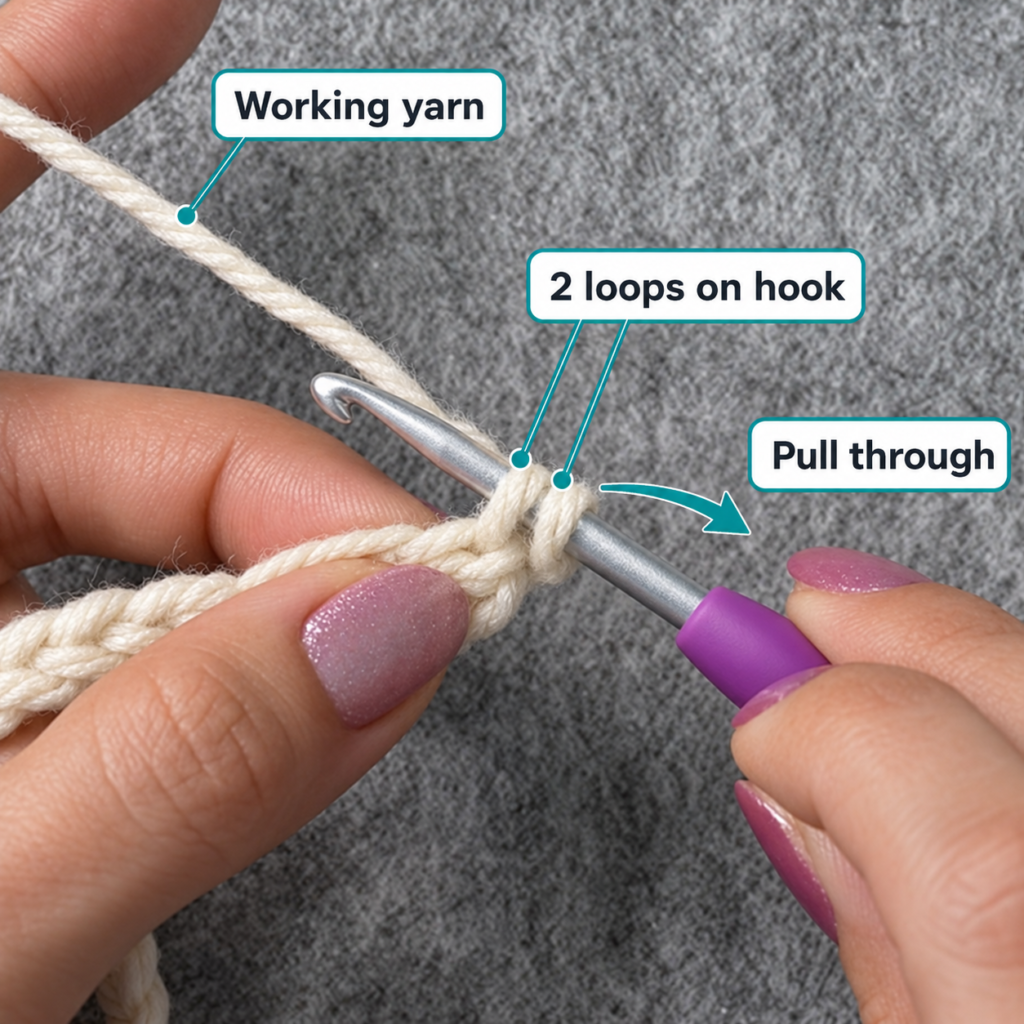
To make a half double crochet:
- Yarn over.
- Insert the hook into the stitch.
- Yarn over again and pull up a loop.
- You now have three loops on your hook.
- Yarn over and pull through all three loops.
Try not to tighten each stitch immediately after completing it. Let the hook establish the loop size naturally.
At the end of the row, chain 1 and turn.
Beginner tip
Your first row may feel slower than subsequent rows because working into a chain is less obvious than working into finished stitches.
Common mistake to avoid
Do not accidentally work into the same foundation chain twice. After completing a stitch, move immediately to the next chain.
Step 3: Crochet the Ribbed Rows
For Rows 2–5:
Ch 1, turn. Hdc in BLO of every stitch across.
Maintain 61 stitches.
Repeat until you have a total of five hdc rows, including your first row.
The back-loop-only technique creates a subtle ridge between the rows. On a bow, that texture does two useful things: it makes a simple rectangular strip more visually interesting, and it gives the fabric enough flexibility to form smooth loops.
If five rows do not give you approximately 1.5–2 inches of width, adjust by adding or removing one row.
Beginner tip
Before inserting your hook, tilt the top of the work slightly toward you. The two loops of each stitch will become much easier to distinguish.
Common mistake to avoid
If you accidentally work under both loops for one stitch, the bow will still function. Do not unravel an entire row for one minor mistake. Just return to BLO on the next stitch.
Step 4: Check and Finish the Main Ribbon
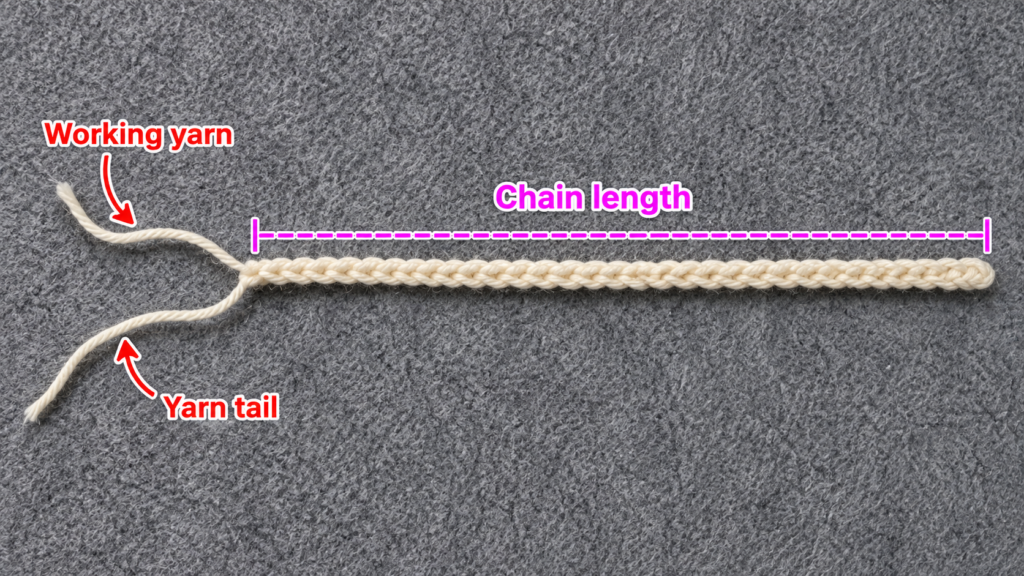
Lay the strip flat without stretching it.
Aim for approximately:
16–18 inches long × 1.5–2 inches wide.
If the strip is significantly shorter, you can restart with more foundation chains for a larger cheer bow. If you are only slightly under the suggested measurement, continue—the final dimensions are flexible.
Fasten off, leaving an ordinary 5–6 inch tail.
Optional firmer version
If your yarn feels very soft, work one row of slip stitches or single crochet along the two short ends. Do not make the edging tight; it is only there to keep the ends neat.
Step 5: Weave In the Ribbon Ends
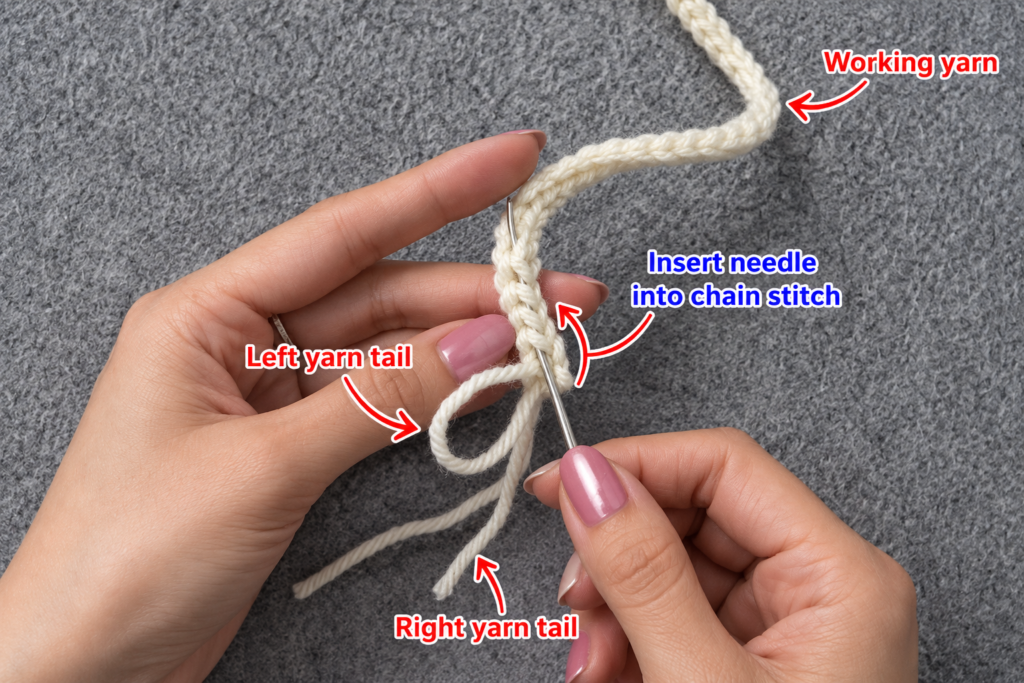
Thread the yarn tail onto a tapestry needle.
On the wrong side, weave the tail horizontally through several stitches. Change direction once, weave through another short section, and trim the excess.
Repeat for the starting tail.
Avoid carrying the needle directly through the front surface of the ribbing. Keeping it within the back of the stitches makes the finished bow cleaner.
Beginner tip
Gently stretch the fabric after weaving the tail. If the yarn tail pulls the crochet inward, you wove it too tightly.
Step 6: Fold the Strip Into a Cheer Bow
This is the step that transforms an ordinary rectangle into a bow.
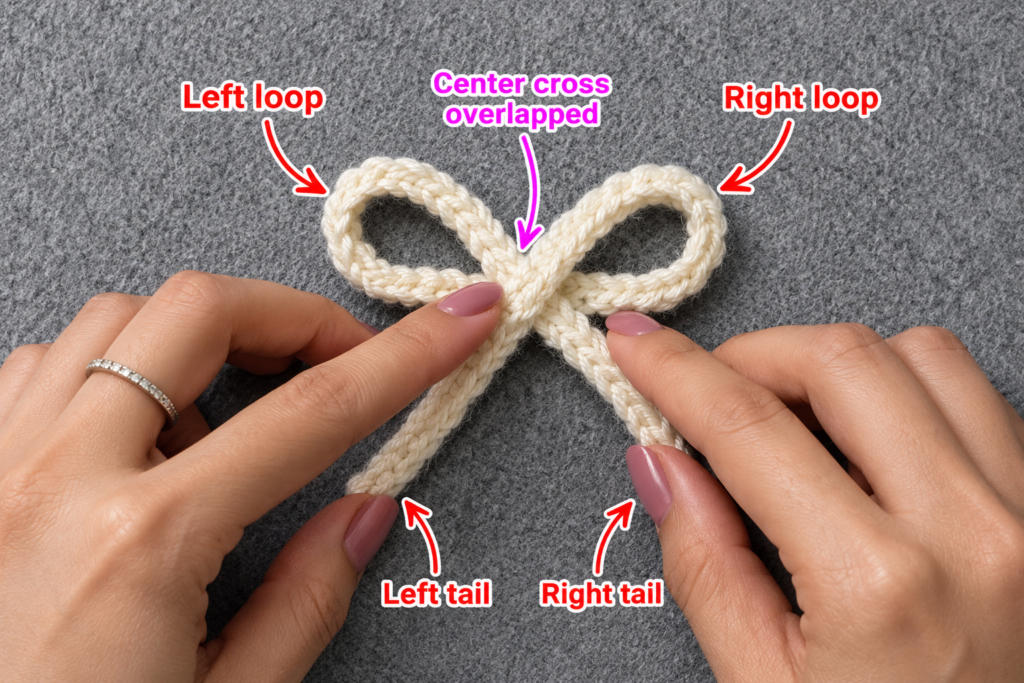
Lay the ribbon horizontally with the right side facing down.
Find the center.
Bring the right side inward, creating a large loop. Allow the end of the ribbon to continue below the center as a tail.
Now do the same with the left side.
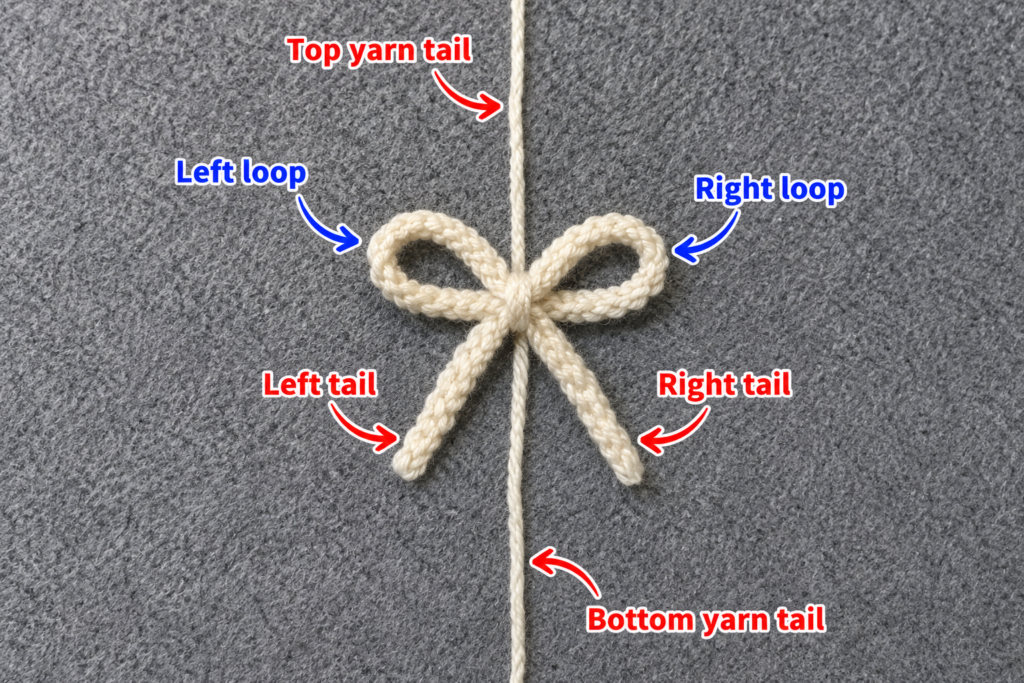
Cross the two sections through the middle so you have:
- One loop on the left.
- One loop on the right.
- One tail pointing down-left.
- One tail pointing down-right.
Think of the strip as forming a wide, flattened figure eight through the upper section, while the two free ends become the cheer-bow tails.
Spend a little time adjusting the shape before securing anything.
The two loops should be roughly equal in width and height.
Beginner tip
Measure from the center to the outer edge of each loop. Small corrections now are easier than corrections after wrapping the center.
Common mistake to avoid
Do not make the loops too small and leave extremely long tails. For a traditional cheer-bow silhouette, the loops should be the dominant visual element.
Step 7: Pinch and Secure the Center
Cut about 18 inches / 45 cm of matching yarn.
Place the bow on top of the yarn so the strand passes beneath the exact center.
Now pinch the middle into a small accordion:
- Fold the upper edge slightly toward you.
- Push the center backward.
- Bring the lower edge forward.
You are aiming for two or three compact folds.
Wrap the loose yarn around the center several times.
Pull firmly enough to hold the folds, but not so hard that the crochet fabric bunches into a tiny knot.
Flip the bow over and tie a secure double knot at the back.
Do not trim the tying yarn yet. You can use it later to secure the center band.
Beginner tip
Before tying the final knot, turn the bow to the front and check the symmetry again.
Common mistake to avoid
If one loop is larger, do not compensate by crushing the center more tightly. Undo the wrap and reposition the loop.
Step 8: Crochet the Center Band
Using royal blue or a contrasting team color:
Ch 7.
Work sc in the second chain from the hook and across: 6 sc.
Ch 1 and turn.
Work another row of 6 sc.
Repeat until the band comfortably wraps around the compressed center of your bow—usually 3–4 rows depending on yarn and tension.
Fasten off, leaving approximately 10 inches for sewing.
Wrap the small rectangle around the center with its seam positioned at the back.
Using the long tail, stitch the two short edges of the band together.
Do not sew completely through the front of the bow.
Optional color idea
A blue bow with a white center band gives a clear two-color team effect without requiring complicated color changes inside the main ribbon.
Step 9: Attach the Hair Clip
Position the alligator clip horizontally across the back of the bow.
There are two easy methods.
Method 1: Slide under the center band
If the center band has enough room, open the alligator clip and slide its upper arm beneath the center band.
This is quick and allows the clip to be removed.
Method 2: Sew the clip in place
For a more permanent cheer accessory, use strong sewing thread or yarn and stitch through the holes or structural openings in the clip.
Catch only the back layers of the crochet fabric so your stitches remain invisible from the front.
Secure the thread firmly.
For accessories used during vigorous movement, sewn attachment is preferable to relying only on a removable slide-in connection.
Pattern Notes or Stitch Notes
Turning chain
The chain 1 at the beginning of an hdc or sc row is a turning chain only. It does not count as a stitch in this pattern.
Main stitch count
Maintain 61 hdc in every main-ribbon row when starting with 62 chains.
Center-band stitch count
Maintain 6 sc per row.
Right side and wrong side
The ribbed texture works on both surfaces, so there is no critical right or wrong side during crocheting.
For assembly, choose whichever surface looks neatest as your visible front.
Size adjustment
For a larger bow, extend the foundation chain until it measures approximately 19–21 inches after the first row.
For a smaller bow, aim for approximately 12–14 inches.
The width should stay proportional. A longer bow usually benefits from one or two additional hdc rows.
Common Beginner Mistakes
1. The edges become narrower
Cause: A stitch is being skipped at the end of the row.
Fix: Count every row and mark the first and last stitches.
2. The bow curls badly
A small amount of curling is normal with crochet strips.
Cause: Usually tight tension, especially in the foundation.
Fix: Gently steam/block according to the yarn manufacturer’s care instructions, or use a slightly larger hook for the chain.
3. One loop is much larger than the other
Cause: The center crossing was not positioned at the true midpoint.
Fix: Undo the temporary wrap and measure both loops before tightening the center.
4. The center looks bulky
Cause: Too much yarn was wrapped around the middle before adding the crocheted center band.
Fix: Use only enough wrapping yarn to secure the accordion folds. The crocheted band supplies the finished appearance.
5. The bow droops after wearing
Cause: Very soft yarn, overly loose gauge, or oversized loops.
Fix: Use cotton or cotton blend, reduce the hook size slightly, or shorten the loops.
6. The tails point straight inward
Cause: The folded ends were aligned too vertically.
Fix: Rotate the two tails outward before securing the center.
7. The clip shows from the front
Cause: Attachment stitches passed completely through the bow.
Fix: Catch the center band and back layers only.
How to Customize This Crochet Project
Use school or team colors
Make the main strip in the primary color and the center band in the secondary color.
For example:
- Royal blue + white.
- Red + black.
- Purple + gold.
- Green + white.
- Navy + silver-gray.
Create a two-tone edge
After completing the ribbed strip, work a shallow round of single crochet around the perimeter using a contrast color.
Keep the edging loose enough that it does not distort the rectangle.
Change the size
The easiest approach is to crochet by finished strip measurement, not by copying a fixed stitch count.
For a toddler accessory, a 12–14 inch strip may be enough.
For a dramatic cheer-style bow, try 18–20 inches.
Change the texture
Once you understand the construction, the same folding method can be used with:
- Single crochet.
- Standard half double crochet.
- Hdc BLO ribbing.
- Moss stitch.
- A simple striped fabric.
Avoid very open lace patterns if you want a strong cheer-bow silhouette.
Add a decorative center
The center band is a good place for contrast because it requires very little yarn.
You can also attach a small embroidered initial or team-colored button if the bow is intended for decorative use.
Be mindful of loose embellishments when making accessories for very young children.
Gift ideas
A handmade cheer bow works well for:
- Team gifts.
- Dance accessories.
- School spirit days.
- Birthday gift toppers.
- Cheerleader gift baskets.
- Matching sister accessories.
- Holiday hair accessories.
Finishing Instructions
Once the center and clip are secure, inspect the bow from all angles.
Pull gently on both loops to make sure they are firmly held.
Adjust the tails so they angle outward.
Use your tapestry needle to hide every remaining yarn tail inside the back of the bow.
Trim only after the tails have passed through several stitches.
If the bow needs shaping, lightly dampen it and arrange the loops on a towel. Allow it to dry completely before attaching or wearing it.
For acrylic yarn, use only the care method recommended by the yarn manufacturer. Excessive heat can damage synthetic fibers.
Do not aggressively flatten the center during blocking—the accordion pinch is what gives the bow volume.
Quick Printable-Style Summary
Project: Crochet Cheer Bow
Skill level: Beginner/easy
Yarn: #4 medium/worsted cotton, cotton blend, or smooth acrylic
Hook: 4.0 mm
Main stitches: ch, hdc, BLO hdc, sc
Finished size: About 5–6 inches wide
Main ribbon:
Ch 62. Hdc across beginning in second chain from hook. Work approximately five rows total, using BLO hdc after the first row. Aim for a strip about 16–18 inches long × 1.5–2 inches wide.
Center band:
Ch 7. Work 6 sc across. Continue in rows until the piece wraps comfortably around the pinched center.
Assembly:
Fold the main ribbon into two equal loops with two downward tails. Pinch the middle into an accordion fold. Secure with yarn. Wrap and sew the center band around the middle.
Finishing:
Weave in all ends and secure a 2.25–3 inch alligator clip or barrette to the back.
FAQ
Is a crochet cheer bow suitable for beginners?
Yes. The crocheting itself is primarily straight rows of half double crochet. The assembly requires a little patience, but no advanced shaping techniques are necessary.
What yarn is best for a crochet cheer bow?
Medium-weight cotton or cotton blend is especially useful because it provides structure and visible stitch definition. Smooth acrylic is also appropriate.
How do I make the bow stiffer?
Use a slightly smaller hook, choose cotton rather than very soft acrylic, keep your tension consistent, and avoid making the loops excessively large.
You can also add a single-crochet edging.
Can I make the cheer bow in two colors?
Yes. The simplest method is to crochet the main strip in one color and the center band in the second color.
You can also crochet the final row or border in your contrast shade.
How can I make a larger crochet cheer bow?
Increase the starting chain until your completed first row reaches your desired length. A dramatic bow may use an 18–20 inch strip.
Add one or two extra rows if the increased length makes the strip look disproportionately narrow.
Can I attach the bow to a hair elastic instead?
Yes. Place the elastic behind the center before sewing the center band closed.
Make sure your stitches go around the elastic rather than piercing it.
Why does my crochet bow look floppy?
The most common causes are a very soft yarn, loose crochet tension, or loops that are too large for the width of the strip.
Use firmer yarn or shorten the loops before tightening the center.
Conclusion
Once you understand the construction, this crochet cheer bow pattern becomes an easy project to customize.
You crochet one simple ribbed ribbon, arrange that ribbon into the classic bow silhouette, pinch the center, and lock everything in place with a small crocheted band.
The first bow may take an hour while you experiment with the loop proportions. After that, they become quick projects that are easy to repeat in different school, team, or seasonal colors.
Save your measurements when you find a size you like. That makes it much easier to crochet a matching set later without having to reshape every bow from scratch.





