Carrying a water bottle sounds simple until you are walking the dog, browsing a market, taking the kids outside, hiking a short trail, or trying to keep both hands free. A crochet water bottle sling solves that problem with surprisingly little yarn.
This beginner-friendly project starts with a small solid circle that supports the bottom of the bottle. From there, you crochet upward into a lightweight mesh tube, reinforce the opening, and add a simple crossbody strap.
The construction is intentionally repetitive. Once the base is finished, most of the project consists of the same easy mesh sequence, making this a good next project after learning basic crochet stitches.
The tutorial below is an original pattern-style tutorial rather than a reproduction of the reference source. You will learn how to size the holder to your own bottle rather than depending entirely on one fixed bottle measurement.
What You’ll Learn
- How to crochet a flat circular base.
- How to increase evenly without making the circle ruffle.
- How to test the base against your own bottle.
- How to create a crisp bottom-to-side transition using BLO stitches.
- How to crochet an easy open mesh.
- How to keep joined rounds neat.
- How to make the sling taller or wider.
- How to add a reinforced upper edge.
- How to crochet a sturdy crossbody strap.
- How to attach the strap so it can support the weight of a filled bottle.
- How to weave in and secure the ends neatly.
Materials You’ll Need
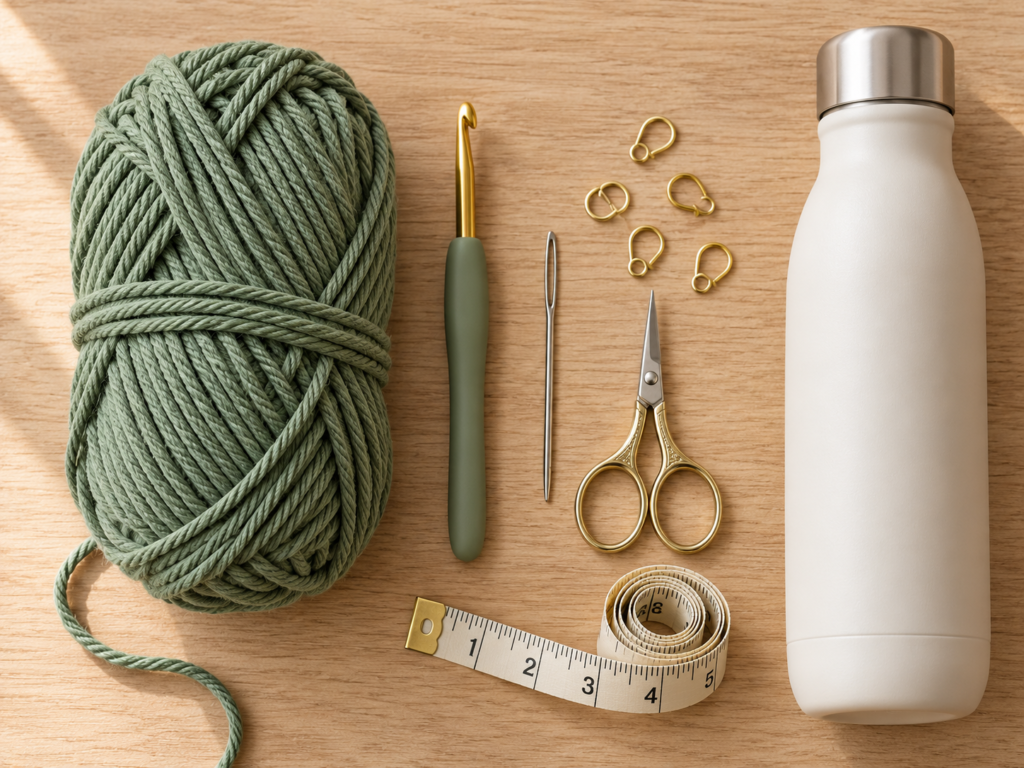
For one standard bottle sling, gather:
- Approximately 100–140 yd / 90–128 m of medium #4 cotton yarn
- 4.5 mm / US 7 crochet hook
- Scissors
- Blunt yarn or tapestry needle
- 2 locking stitch markers
- Measuring tape
- Your intended water bottle for fitting
- Optional: removable marker for identifying the beginning of each round
Cotton is my preferred fiber here because the finished holder needs structure. Very soft acrylic can work, but it may lengthen more noticeably when a full bottle pulls against the sling.
A medium #4 yarn is categorized as medium/worsted-weight yarn under the Craft Yarn Council’s standardized yarn-weight system.
Crochet Abbreviations Used
This tutorial uses US crochet terminology.
- ch = chain
- sc = single crochet
- hdc = half double crochet
- dc = double crochet
- sl st = slip stitch
- st / sts = stitch / stitches
- rnd = round
- rep = repeat
- BLO = back loop only
- inc = increase; work 2 stitches in one stitch
These abbreviations are consistent with common US crochet terminology listed by the Craft Yarn Council. Craft Yarn Council
US / UK terminology note
If you normally follow UK terminology:
- US single crochet = UK double crochet
- US half double crochet = UK half treble
- US double crochet = UK treble
Finished Size
The sample dimensions are approximately:
- Base diameter: 3–3.25 in / 7.5–8.25 cm
- Body height: 7–8 in / 18–20 cm
- Strap width: about 1 in / 2.5 cm
- Finished strap length: approximately 42–46 in / 107–117 cm
The important measurement is your actual bottle, not the sample dimensions.
Gauge / Tension
Exact garment-style gauge is not critical because you can test the sling directly against the bottle.
As a general target, aim for approximately:
14–16 single crochet stitches = 4 in / 10 cm
Your stitches should feel firm but not stiff.
Loose crochet makes the carrier grow noticeably once a filled bottle is added. If your fabric feels floppy, switch to a hook 0.5 mm smaller.
Before You Start
Count your stitches carefully
The circular base depends on evenly spaced increases. Missing or adding one increase can make it:
- cup too early,
- become wavy,
- develop an uneven edge.
Use a stitch marker in the first stitch if you tend to lose your place.
The base should be slightly smaller than the bottle
Crochet stretches. A base matching the bottle exactly while lying completely relaxed may become too large after use.
Aim for a crochet circle approximately 1/8–1/4 inch / 3–6 mm smaller than the bottle’s bottom.
Keep the joining seam neat
When joining a round, slip stitch into the specified first stitch rather than into the turning chain unless the instructions tell you otherwise.
Avoid over-stretching the mesh
Open mesh naturally expands. Stop the body slightly below the bottle’s shoulder or neck rather than making it excessively tall.
Choose practical yarn
Smooth cotton makes it easier to:
- see stitches,
- find chain spaces,
- keep the mesh consistent,
- wash the finished sling.
Very fuzzy yarn can obscure stitch placement.
Step-by-Step Crochet Tutorial
Step 1: Crochet the Solid Circular Base
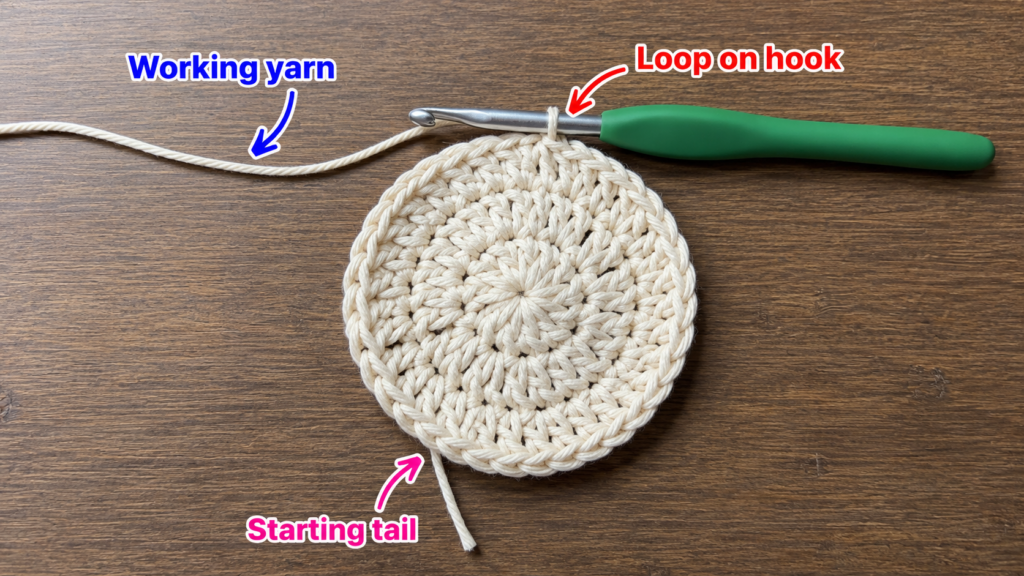
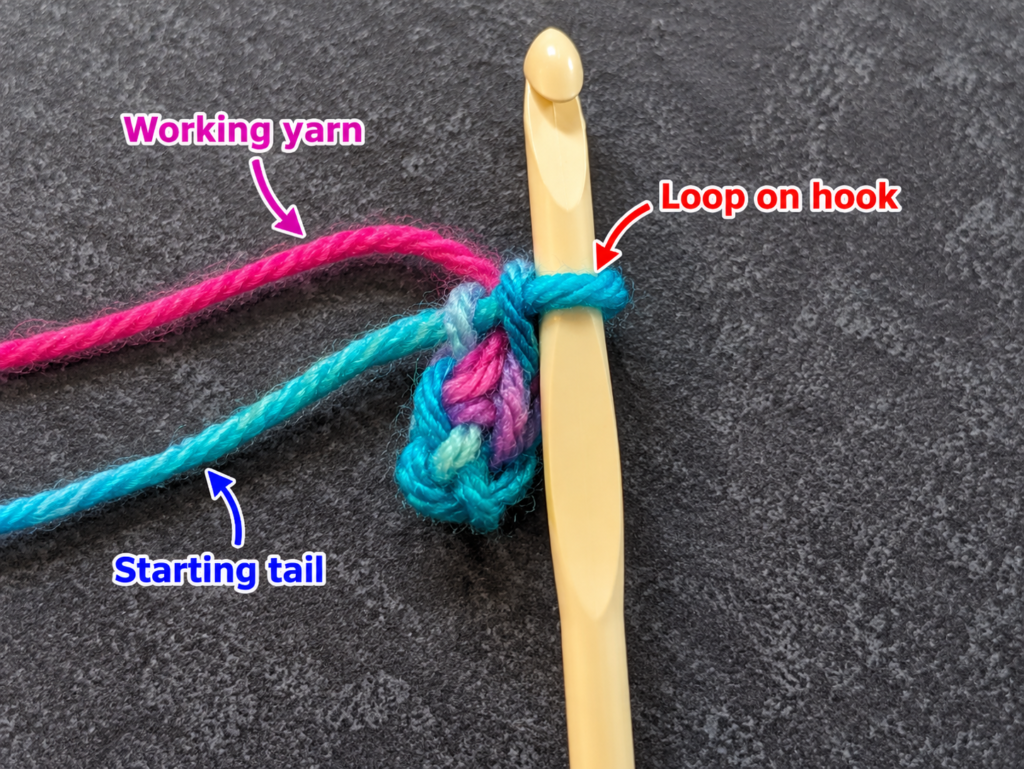
Make a magic ring.
If you dislike magic rings, chain 4 and join the first chain with a slip stitch to make a small ring.
Round 1
Work 8 sc into the magic ring.
Join with a sl st to the first sc.
8 sts
Pull the center tail firmly but gently until the opening closes.
Round 2
Ch 1.
Work 2 sc in every stitch around.
Join with sl st.
16 sts
Round 3
Ch 1.
Repeat:
1 sc in next st, 2 sc in next st
around.
Join.
24 sts
Round 4
Ch 1.
Repeat:
1 sc in each of next 2 sts, 2 sc in next st
around.
Join.
32 sts
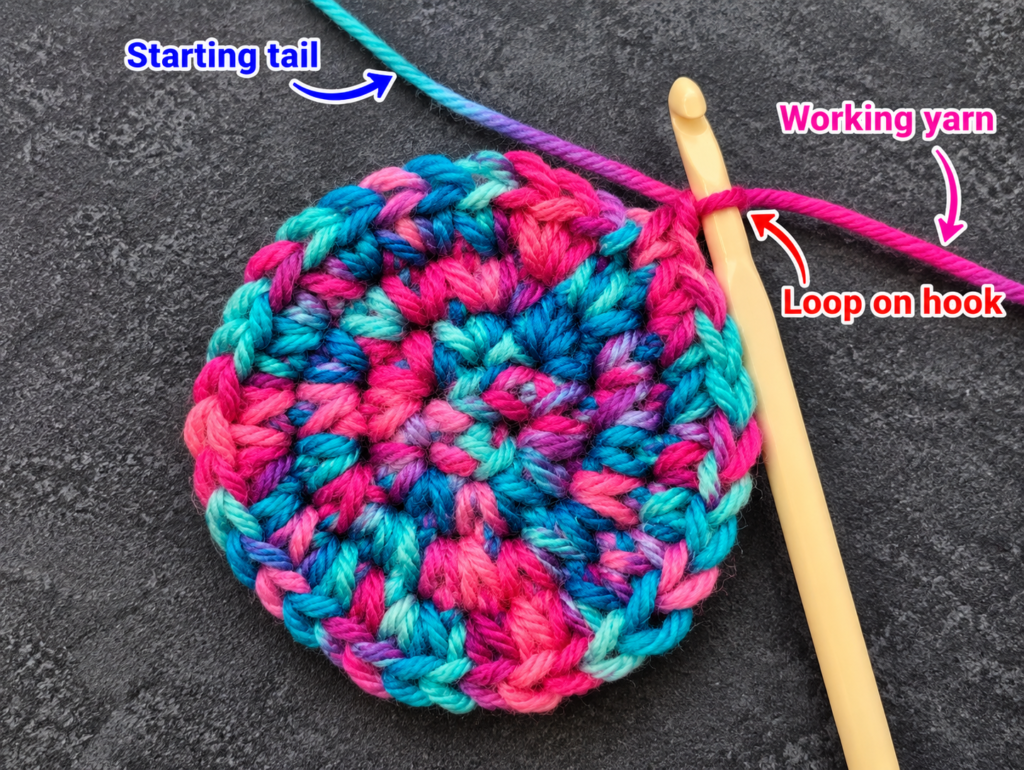
The piece should form a relatively flat circle.
Beginner tip: Place your stitch marker in the first sc of every round rather than in the joining slip stitch.
Common mistake to avoid: Do not accidentally crochet into the slip stitch from the previous round. That adds unwanted stitches.
Step 2: Check the Base Size
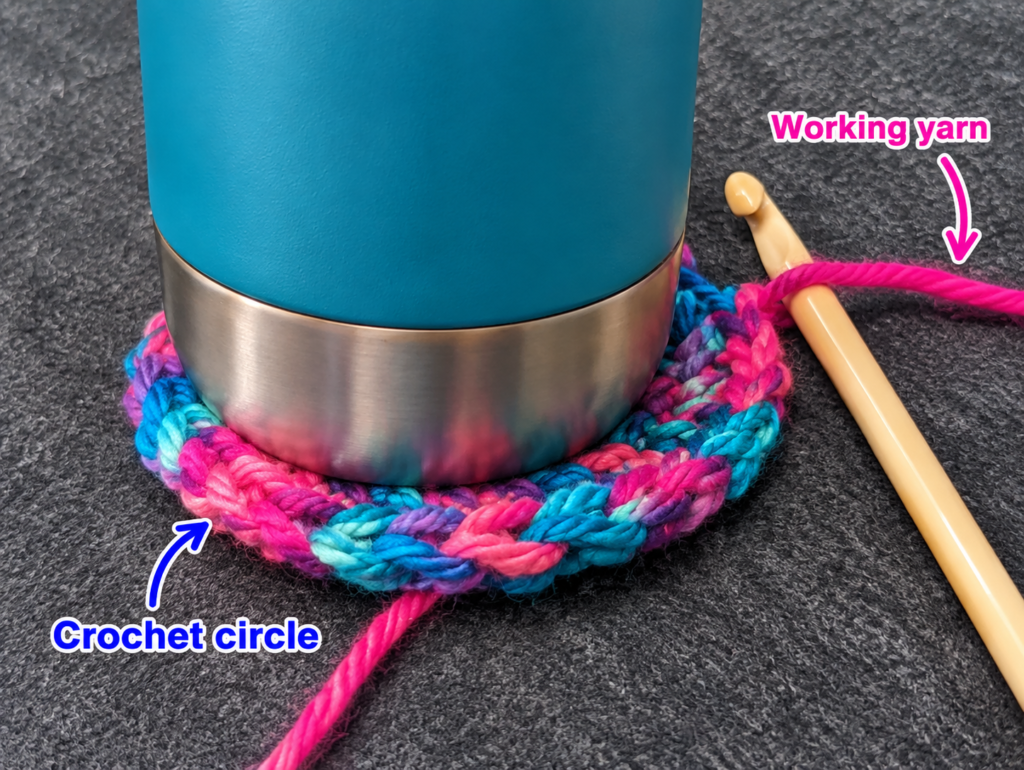
Set your bottle upright on the crochet circle.
Ideally, the crochet base should disappear just inside the outer edge of the bottle.
If your base is already the correct width, continue to Step 3.
If you have a wider insulated bottle, add another increase round.
Optional Round 5 for a wider bottle
Ch 1.
Repeat:
sc in next 3 sts, 2 sc in next st
around.
Join.
40 sts
For an even larger bottle, continue the logical increase progression by adding one more regular sc between each increase on each new round.
The goal is not a particular stitch count. The goal is a flat circle slightly smaller than the actual bottle base.
Beginner tip: Check your bottle after every additional increase round.
Common mistake to avoid: Do not keep adding rounds simply because another pattern used more rounds. Bottle diameters vary considerably.
Step 3: Increase the Base Evenly
Now turn the tiny center into a flat circle.
Use this standard progression:
Round 2: 2 sc in every stitch around.
Stitch count: 12
Round 3: 1 sc in next st, 2 sc in next st; repeat around.
Stitch count: 18
Round 4: 1 sc in next 2 sts, 2 sc in next st; repeat around.
Stitch count: 24
Round 5: 1 sc in next 3 sts, 2 sc in next st; repeat around.
Stitch count: 30
After each round, lay the work flat.
You may not need every round. A narrow 500 ml bottle may require fewer rounds, while a larger flask may require another increase round.
To continue increasing, simply add one more ordinary single crochet between each increase.
For example, the next increase round would use four individual sc stitches followed by an increase.
Beginner tip: The number of ordinary stitches between increases grows by one on each increase round.
Common mistake to avoid: Do not place all increases randomly. Even spacing creates a much flatter, more symmetrical circle.
Step 4: Check the Base Against Your Water Bottle
Stop crocheting for a moment and place your bottle directly over the circle.
For a firm cotton holder, the crochet disk should be slightly smaller than the bottle bottom.
Why slightly smaller?
Because crochet stretches.
A holder that seems perfectly loose when empty can become noticeably longer and wider once a full bottle adds weight.
If your circle extends beyond the bottle base, undo the last increase round.
If there is a large gap around the bottle bottom, add another increase round.
This sizing method is far more useful than forcing every bottle into one predetermined stitch count.
The selected visual source follows the same practical principle of expanding the bottom until it suits the bottle. Deliberate Owl
Beginner tip: Photograph the bottle sitting on the circle. Looking at a photo often makes sizing differences easier to spot.
Common mistake to avoid: Do not stretch the crochet circle while checking. Let it rest naturally.
Step 5: Create the Turn From Base to Sides
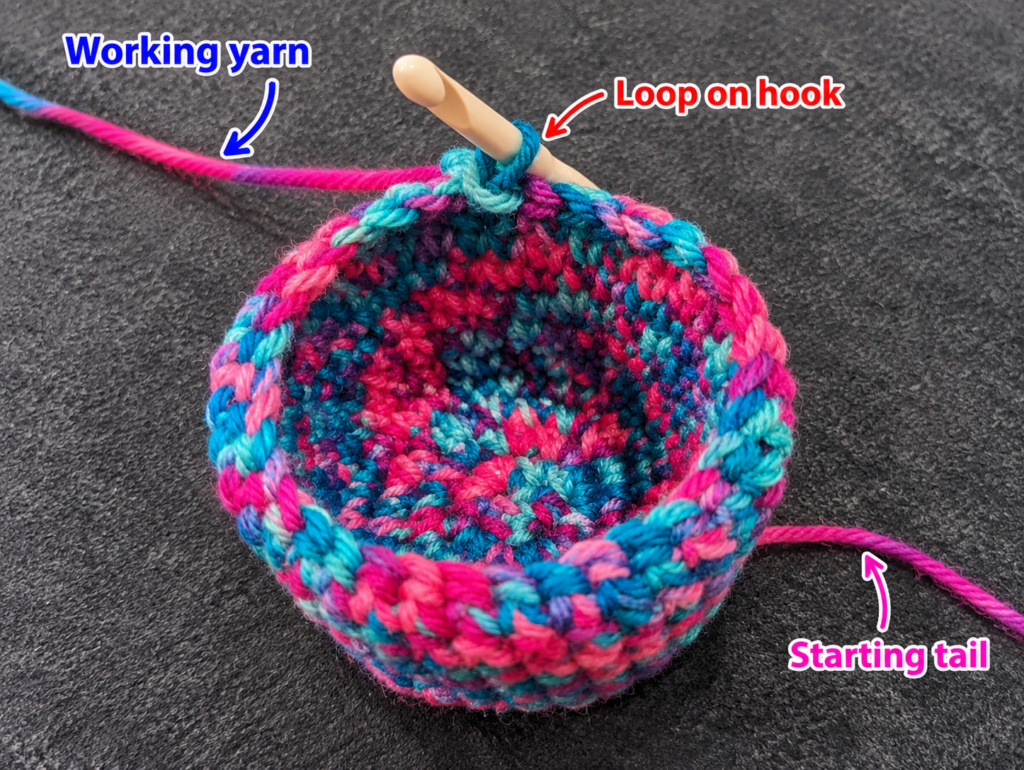
Once the diameter is correct, stop increasing.
For one round, work:
1 sc BLO in every stitch around.
BLO means working through only the back loop of each stitch.
This produces a subtle horizontal ridge and helps encourage the next rounds to turn upward instead of continuing outward.
After the BLO round, return to normal single crochet through both loops.
Next round: 1 sc in every stitch around.
No increases.
After another round or two, the flat circle should begin to look like a shallow bowl.
That is exactly what you want.
Beginner tip: If you cannot identify the back loop, look at the top of the stitch. Each stitch resembles a small V. The loop farther away from you is normally the back loop.
Common mistake to avoid: If you continue adding increases here, the fabric will remain flat or become ruffled instead of forming the holder walls.
Step 6: Crochet the Body
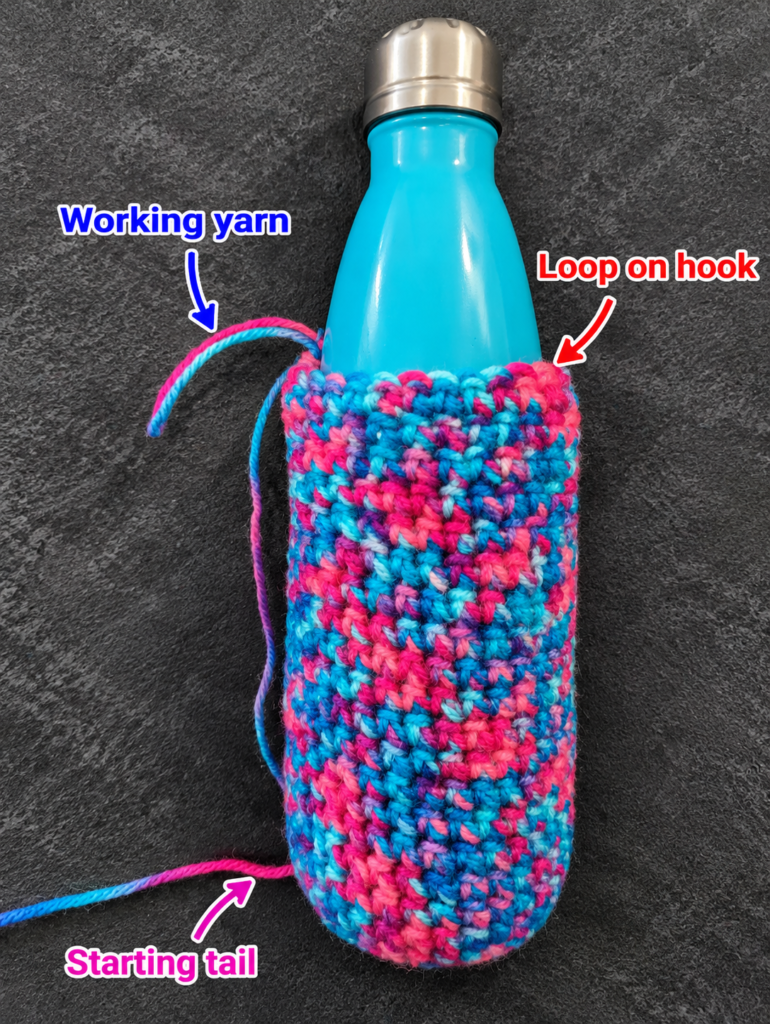
Continue working:
1 sc in every stitch around.
Do not increase.
Check your stitch count every three or four rounds. It should remain the same.
Insert the bottle periodically instead of waiting until the end.
The holder should fit firmly but should not require excessive force to pull over the bottle.
Continue until the crochet reaches approximately:
- two-thirds of the bottle height for a lightweight sling; or
- just below the bottle shoulder for extra security.
Avoid covering the cap area. The bottle should remain easy to remove and open.
For a typical bottle, the body may measure around 7–9 in / 18–23 cm, but bottle proportions vary considerably.
Beginner tip: Crochet two rounds, test the fit, then continue. Frequent checking is faster than unraveling several inches later.
Common mistake to avoid: If the body gradually widens, you are probably working an accidental increase at the marked round transition.
Step 7: Begin the Shoulder Strap
Now stop working around the full circumference.
The strap will grow from one small section of the top edge.
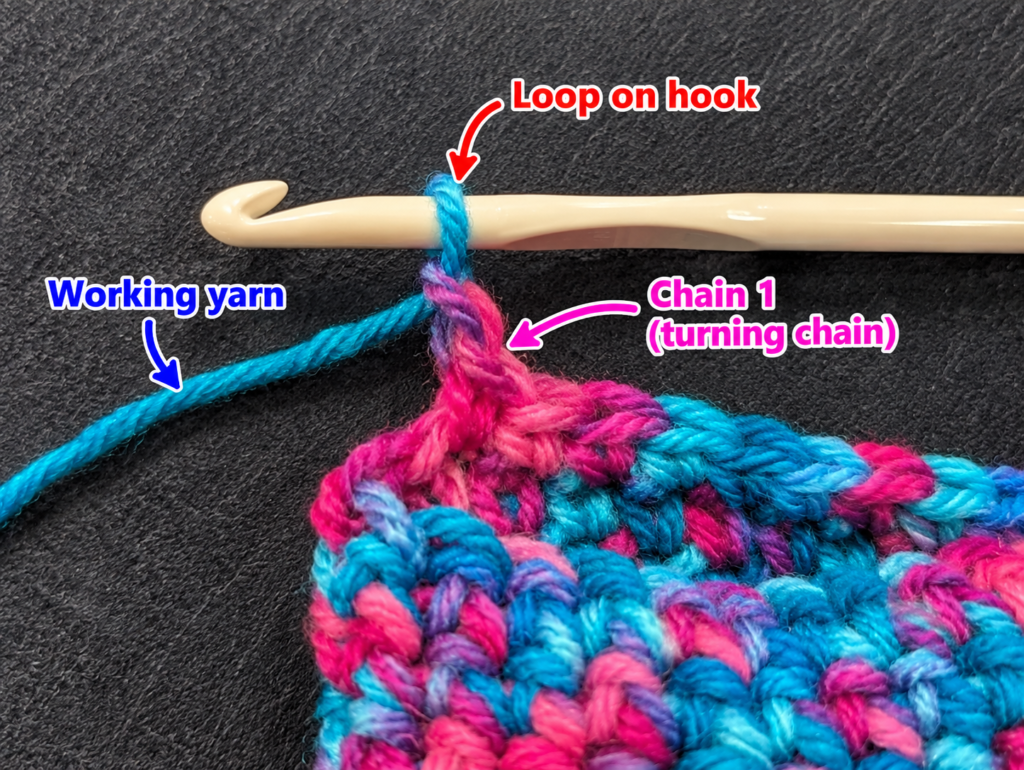
Work:
Sc in next 5 sts.
Chain 1 and turn.
Work:
5 sc back across.
Chain 1 and turn again.
From this point forward, continue these five-stitch rows.
This creates a strap approximately 1–1.5 in / 2.5–4 cm wide depending on your yarn and tension.
If you plan to carry a large metal bottle, six or seven stitches may feel more comfortable across the shoulder.
Beginner tip: Count the strap stitches on every row. Narrow strips make missing the final stitch especially easy.
Common mistake to avoid: Your ch-1 turning chain does not count as a stitch in this tutorial.
Step 8: Crochet the Strap to Your Preferred Length
Repeat:
Ch 1, turn, sc across all 5 sts.
Before choosing the final length, place the holder around the bottle.
Then hold the strap over your shoulder as though the opposite end were already attached.
Useful approximate finished strap lengths are:
- 20–26 in / 51–66 cm: short shoulder carry;
- 30–36 in / 76–91 cm: longer shoulder strap;
- 38–48 in / 97–122 cm: crossbody range for many adults.
These are only starting points. Body size, bottle weight and preferred carrying height all affect the best measurement.
Remember that crochet fabric can lengthen under load.
Therefore, make the strap a little shorter than the final length you think you need.
Beginner tip: Put the bottle in the holder while checking strap length. An empty holder does not reproduce the downward pull of a filled bottle.
Common mistake to avoid: Do not stretch the strap deliberately while measuring.
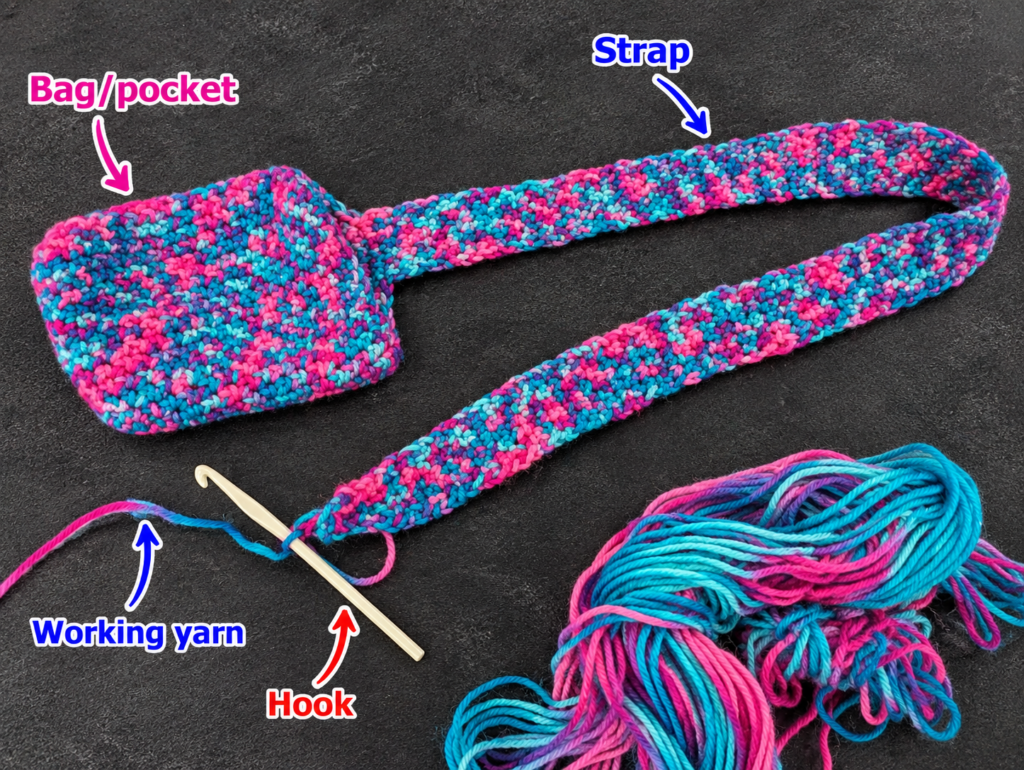
Step 9: Attach the Strap to the Opposite Side
Lay the bottle holder flat.
Locate the point directly opposite the strap’s starting edge.
Before sewing, perform three checks:
- the strap is not twisted;
- both attachment points are at the same height;
- the strap is centered across approximately the same number of stitches as its width.
Leave a yarn tail roughly 18 in / 45 cm long.
Thread the tail onto a tapestry needle.
Sew the strap end securely through both the strap edge and top stitches of the holder.
Work across once, then reinforce the seam by passing back across the attachment area in the opposite direction.
Avoid pulling so hard that the top rim puckers.
The selected visual source contains an unusually detailed multi-image sequence for this attachment stage, including alignment, edge views and stitching through both layers. Deliberate Owl
Beginner tip: Pin the strap temporarily with a locking stitch marker before sewing.
Common mistake to avoid: Check for a twist before making the first stitch. Once the seam is reinforced, correcting a twisted strap becomes annoying.
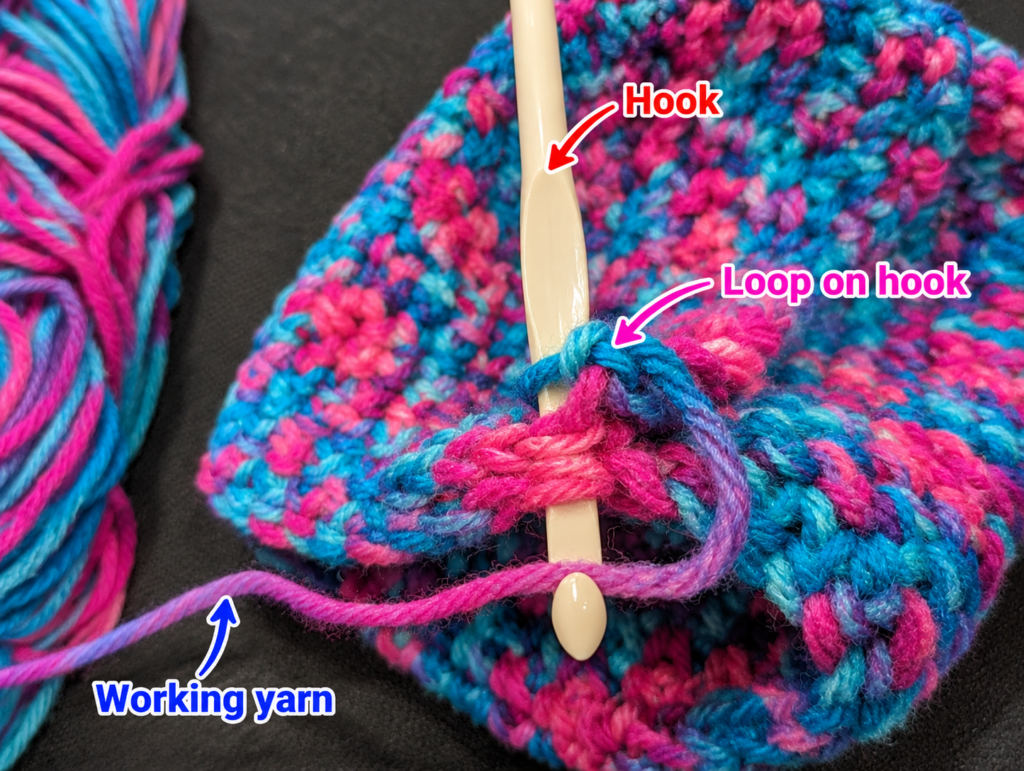
Pattern Notes and Stitch Notes
Turning chains
The ch 1 used when crocheting the strap is a turning chain only.
It does not count as a stitch.
Stitch counts
The body stitch count should equal the final number of stitches in your base.
Example:
If your final circle contains 30 stitches, every straight body round should also contain 30.
Continuous rounds
The base and body are worked in a continuous spiral.
Move your stitch marker upward each round.
Right side and wrong side
Because the body is crocheted continuously in the round, the outside naturally remains the right side.
The strap is turned after every row, so alternating rows face opposite directions.
Size adjustments
Do not add more body stitches simply because you want a taller holder.
Diameter and height are controlled separately:
- base increases = width
- additional straight rounds = height
Common Beginner Mistakes
1. The bottom is wavy
Cause: Too many increases.
Fix: Undo the latest increase round and space the next increases farther apart.
2. The base cups before it is wide enough
Cause: Not enough increases or unusually tight tension.
Fix: Add another evenly distributed increase round or move up 0.5 mm in hook size.
3. The holder becomes wider as it gets taller
Cause: Accidental increases at the round transition.
Fix: Mark the first stitch and recount regularly.
4. The bottle keeps sliding out
Cause: The body is too short or too loose.
Fix: Add additional body rounds or use a smaller hook for a firmer fabric.
5. The strap stretches too much
Cause: Loose stitches, highly elastic yarn, or an excessively narrow strap.
Fix: Use cotton, tighten the strap tension, make it wider, or crochet the strap slightly shorter.
6. The strap twists after attachment
Cause: Its free end rotated before sewing.
Fix: Lay the whole sling and strap flat before attaching the second side.
7. The strap edges become narrower
Cause: Missing the final stitch of rows.
Fix: Count all five stitches after every row until recognizing the edge stitch becomes automatic.
How to Customize This Crochet Project
Change the yarn
Cotton is my first choice for a bottle sling because it creates a practical, defined fabric.
You can also try:
- recycled cotton;
- cotton-linen blends;
- sturdy cotton-acrylic blends.
Avoid very fuzzy yarn for your first version because it makes stitches harder to identify.
Add color changes
A simple stripe works well because the body consists of repetitive rounds.
Try:
- cream body + sage strap;
- terracotta base + beige body;
- alternating two-round stripes;
- contrasting top edge.
Change the size
For a wider bottle, continue the increase formula until the disk is slightly smaller than the bottle bottom.
For a taller bottle, simply crochet more straight body rounds.
Add a border
Work one final round of slip stitches around the top before starting the strap if you want a firmer rim.
Make the strap wider
For heavier bottles, use 7–9 stitches instead of 5.
A wider strap spreads the load over more of the shoulder.
Add texture
Once you understand the plain version, experiment with:
- BLO body rounds;
- alternating sc and hdc;
- simple mesh sections;
- narrow decorative stripes.
Keep the lower 1–2 in / 2.5–5 cm fairly solid so the bottle base remains secure.
Gift ideas
A bottle sling makes a practical handmade gift for:
- hikers;
- teachers;
- travelers;
- dog walkers;
- festival visitors;
- teenagers;
- gardeners;
- sports spectators.
Pair it with a reusable bottle for an easy handmade gift set.
Finishing Instructions
Cut the yarn, leaving approximately 6–8 in / 15–20 cm.
Pull the yarn completely through the final loop.
Thread it onto a tapestry needle.
Weave the tail through several nearby stitches, reverse direction once, and weave through another section before trimming.
Repeat for the center starting tail.
Pay particular attention to the strap seam. A filled bottle places significantly more stress there than elsewhere on the project.
Blocking
Heavy blocking is unnecessary.
If the holder looks uneven:
- lightly dampen it;
- shape it around the empty bottle;
- remove the bottle after shaping if its material should not remain damp;
- allow the crochet to air dry naturally.
Washing and care
Follow the yarn label’s care instructions because fiber blends vary.
A cotton holder may relax slightly after washing, so reshape it while damp.
Do not put a wet crochet sling around electronics or objects that could be damaged by moisture.
Quick Printable-Style Summary
Skill level: Beginner / easy
Yarn: Medium-weight cotton
Hook: 4.5 mm
Main stitches: ch, sc, sc inc, sl st, BLO sc
Starting method: Adjustable ring
Base:
- Round 1: 6 sc
- Round 2: inc around = 12
- Round 3: sc 1, inc = 18
- Round 4: sc 2, inc = 24
- Round 5: sc 3, inc = 30
- Continue the same increase logic only if your bottle requires a larger base.
Sizing rule: Stop increasing when the circle is approximately 5–10 mm smaller than the bottle bottom.
Turning round: 1 sc BLO around.
Body: 1 sc in every stitch around until desired height.
Strap: Work 5 sc across; ch 1 and turn after each row. Repeat until desired carrying length.
Finishing: Sew strap securely to opposite edge, weave in all ends and lightly shape.
FAQ
What yarn is best for a crochet water bottle sling?
A firm cotton yarn is an excellent option because it provides useful stitch definition and tends to produce a sturdy fabric. Medium/worsted yarn is convenient for beginners because it is easy to handle and see.
The Craft Yarn Council classifies worsted and aran yarns within its medium-weight category, although actual thickness and recommended hook size still vary by yarn. Craft Yarn Council
How much yarn do I need?
For many standard bottles, roughly 90–140 yd / 82–128 m should be sufficient for a dense holder and strap.
A large bottle, very long crossbody strap or unusually wide strap will require more.
Can I use acrylic yarn?
Yes, but some acrylic yarns stretch more noticeably when supporting a heavy bottle.
If using acrylic, consider:
- going down a hook size;
- making the strap wider;
- making it slightly shorter;
- reinforcing the strap seam carefully.
How do I make the sling fit a larger bottle?
Keep adding base increase rounds using the established formula.
After each round, compare the circle with the bottle bottom.
Once the circle is slightly smaller than the base, stop increasing and begin the upright section.
Why is my crochet circle curling?
If it curls upward before reaching the correct diameter, your tension may be too tight or you may have too few increases.
If it ripples, you probably have too many increases.
How long should a crochet bottle sling strap be?
There is no universal length.
Measure with the bottle actually inside the holder. A shoulder strap may be roughly 20–36 inches, while crossbody straps commonly need more length.
Crochet can stretch under weight, so test before permanently attaching the second end.
Can I make the strap adjustable?
Yes. Instead of directly attaching both crochet ends, you can incorporate suitable bag hardware such as D-rings and a slider.
For a first project, however, a fixed crochet strap is simpler and requires no extra hardware.
Conclusion
This crochet water bottle sling pattern is useful because almost every part of it teaches a transferable crochet skill.
The circular bottom prepares you for hats, baskets and bags. The straight sides teach you how increases affect shape. The strap gives you practice working narrow rows, and the final seam introduces basic crochet assembly.
More importantly, sizing the project directly against your own bottle means you are learning how crochet construction works rather than simply following numbers without understanding them.
Once you have made the plain single-crochet version, try a striped sling, a wider strap, a mesh body, or a contrasting base. The basic construction remains the same.
Save the tutorial so you can use the same round-base technique for future crochet bags and accessories.





