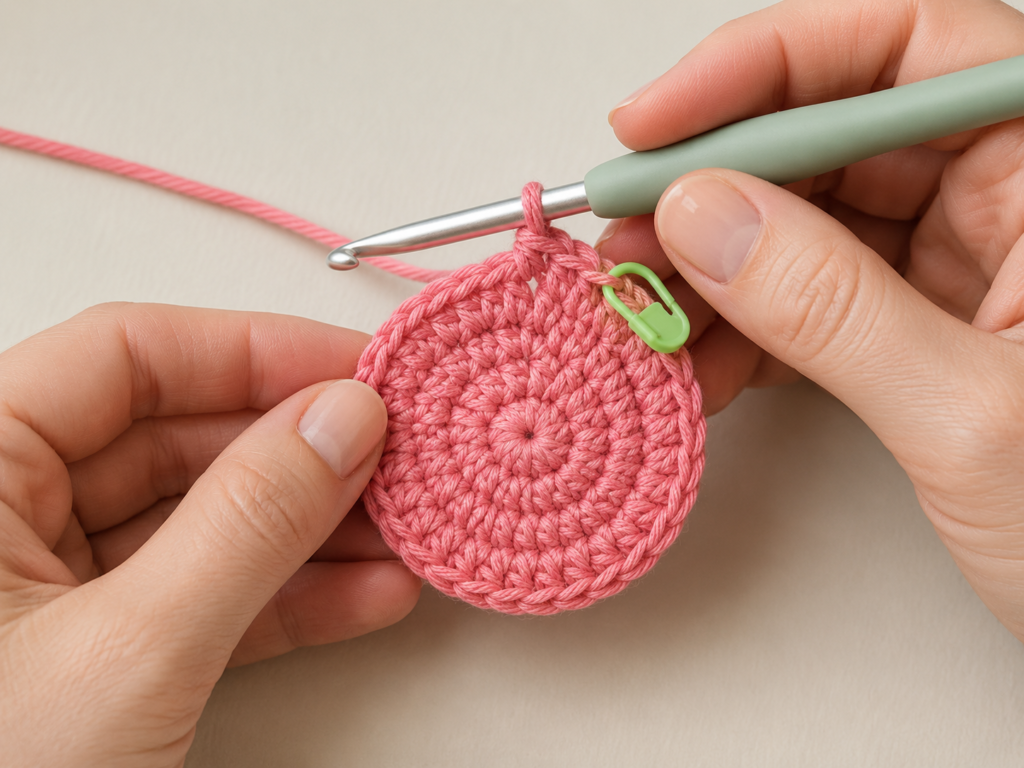
The best classroom decorations do more than fill an empty wall. They help a space feel welcoming, creative, and personal—and a handmade crochet decoration adds a texture you simply cannot get from paper posters or mass-produced plastic décor.
This easy crochet classroom pencil garland is designed for crocheters who know the basic single crochet stitch but want to try a small three-dimensional project. You will make a cheerful stuffed pencil from the eraser down to the graphite point, repeat it in matching or coordinating colors, and then turn the finished pencils into a hanging garland for a classroom door, reading corner, bulletin board, whiteboard area, library space, or teacher’s desk.
The pattern uses simple continuous rounds, basic increases and decreases, back-loop-only stitches, and straightforward color changes. Because each pencil is made in one continuous piece, there are no separate erasers, tips, or pencil bodies to sew together.
This version also avoids required plastic safety eyes. You can leave the pencils completely plain for a traditional school-supply look or embroider tiny faces with black thread. For decorations intended for spaces accessible to very young children, embroidered details eliminate detachable plastic facial pieces.
The tutorial below creates one approximately 5.5-inch stuffed pencil. Make five for the standard garland, three for a mini banner, or seven to nine for a larger classroom display.
What You’ll Learn
By completing this tutorial, you will practice:
- Starting amigurumi with a magic ring.
- Increasing a flat crochet circle.
- Working in continuous spiral rounds.
- Using a stitch marker correctly.
- Crocheting in the back loop only.
- Making clean yarn-color transitions.
- Maintaining a consistent stitch count.
- Stuffing a narrow crochet shape without lumps.
- Creating a tapered pencil tip with decreases.
- Closing a small amigurumi opening.
- Turning individual crochet motifs into hanging classroom décor.
Materials You’ll Need
For one pencil ornament:
- Medium-weight cotton or cotton-blend yarn in:
- Muted coral pink for the eraser.
- Soft silver gray for the ferrule.
- Golden mustard yellow for the pencil body.
- Warm natural cream for the wooden tip.
- Charcoal for the graphite point.
- 3.5 mm / E-4 crochet hook.
- Small amount of polyester stuffing.
- Locking stitch marker.
- Tapestry needle.
- Scissors.
- Black embroidery thread and embroidery needle, optional.
For the five-pencil classroom garland:
- Five finished pencil ornaments.
- Approximately 45–55 inches of strong cotton cord, crocheted chain, or sturdy yarn.
- Tapestry needle for attaching the hanging loops.
Medium yarn is classified as yarn-weight category 4 under the Craft Yarn Council’s standard system, although actual yarns within the same category can still differ in thickness and behavior. A swatch or small test motif is useful when exact dimensions matter.
Finished Size
Using medium-weight cotton and a 3.5 mm hook, one pencil should measure approximately:
- Length: 5–6 inches / 12.5–15 cm.
- Width at body: Approximately 1.25–1.5 inches / 3–4 cm.
A finished five-pencil garland can span approximately 40–50 inches, depending on your spacing.
Exact size is not critical. Using heavier yarn and a larger hook will create a larger classroom decoration; finer yarn and a smaller hook will make miniature pencils suitable for a smaller banner.
Gauge and Tension Note
A formal gauge swatch is not essential for this decorative project. What matters more is creating a fabric dense enough to hold stuffing without obvious gaps.
Your stitches should be:
- Firm but comfortable to make.
- Close enough that stuffing does not show through.
- Even enough that the pencil stays symmetrical.
Do not crochet so tightly that inserting the hook becomes painful. When amigurumi fabric is too loose, try reducing the hook size before dramatically tightening your hand tension.
Crochet Abbreviations Used
This pattern uses standard U.S. crochet terminology:
- MR = magic ring
- sc = single crochet
- inc = increase; work 2 sc in the same stitch
- dec = decrease; combine 2 stitches into 1
- sl st = slip stitch
- st/sts = stitch/stitches
- rnd/rnds = round/rounds
- BLO = back loop only
- rep = repeat
These abbreviations correspond with terminology listed by the Craft Yarn Council, including sc, inc, dec, rnd, BLO, sl st, and st.
U.K. terminology note: The U.S. single crochet used throughout this tutorial is called double crochet in U.K. terminology.
Before You Start
Use a stitch marker from the first round
This pencil is made in continuous spiral rounds. You do not join every round with a slip stitch and you do not turn the work.
Place the marker in the first stitch of each round. When you return to it:
- Remove the marker.
- Crochet into the marked stitch.
- Place the marker into the new first stitch.
This simple habit prevents most accidental increases and missing stitches.
Count your stitches frequently
The pencil body should contain 18 stitches around for most of its length. A pencil that gradually becomes wider usually has accidental increases. One that becomes narrower too soon usually has skipped stitches.
How to recognize the back loop
Look at the top of a crochet stitch. You will see a small V.
The loop nearest you is the front loop.
The loop farther away is the back loop.
When the instructions say BLO, insert the hook under the back loop only.
How to keep the pencil straight
The simplest rule is to maintain the required stitch count and avoid overstuffing. Uneven stuffing can make a correctly crocheted tube appear bent or lumpy.
Choosing colors
Traditional yellow is immediately recognizable as a pencil, but classroom décor does not need to be traditional. You could make:
- Pastel pencils.
- Rainbow pencils.
- School-color pencils.
- Neutral Montessori-inspired pencils.
- Bright primary-color pencils.
- One pencil in a different color for every student group or classroom table.
For visual consistency, the tutorial images use coral, silver gray, mustard yellow, natural cream, and charcoal.
Step-by-Step Crochet Tutorial
Step 1: Crochet the Flat Eraser Base
Begin with the coral-pink yarn.
Round 1
Make a magic ring and work:
6 sc into the ring. (6 sts)
Pull the yarn tail gently to close the center.
Round 2
Work:
Inc in each stitch around. (12 sts)
You have doubled the stitch count from 6 to 12.
Round 3
Work:
[Sc in next st, inc in next st] 6 times. (18 sts)
At the end of Round 3, you should have a small flat circle containing 18 stitches.
This becomes the flat top of your pencil eraser.
Beginner tip: Put your stitch marker in the first stitch immediately. Do not rely on recognizing the first stitch visually after completing the entire round.
Common mistake to avoid: Do not count the loop currently on your crochet hook as a stitch.
Step 2: Turn the Flat Circle Into the Eraser
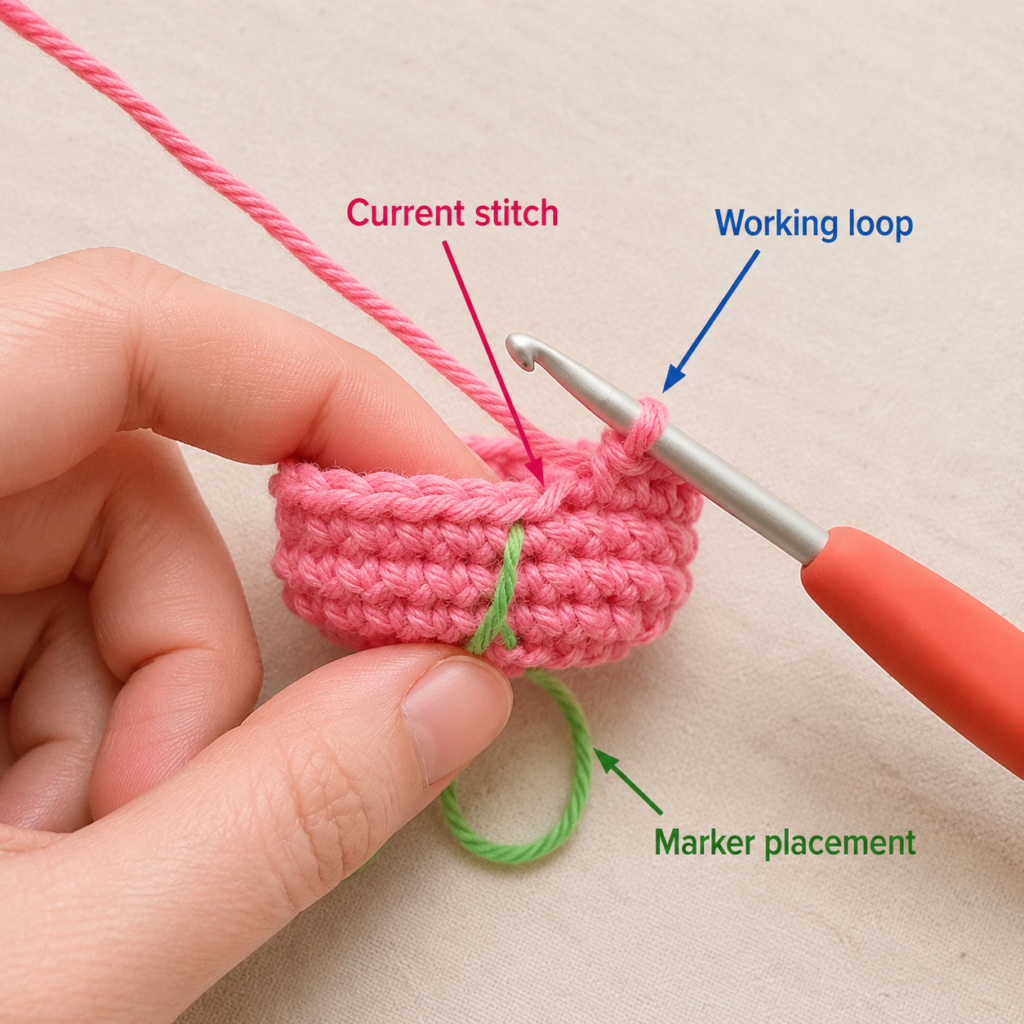
The next round creates a deliberate fold so the flat circle begins developing vertical sides.
Round 4
Work:
Sc BLO in each of the 18 stitches around. (18 sts)
The unworked front loops will form a horizontal ridge around the edge.
Rounds 5–6
Work:
Sc in every stitch around. (18 sts)
After Round 6, the crochet should resemble a shallow coral cup.
Do not stuff it yet. Stuffing is easier once you have created more of the pencil body.
Beginner tip: After working the BLO round, gently push the center outward with one finger. This helps the new vertical sides become easier to see.
Common mistake to avoid: Do not accidentally work under both loops during Round 4. A true BLO round leaves one visible horizontal loop around the fabric.
Step 3: Add the Gray Ferrule
The ferrule is the metal-looking band between the eraser and pencil body.
We will use soft silver-gray yarn.
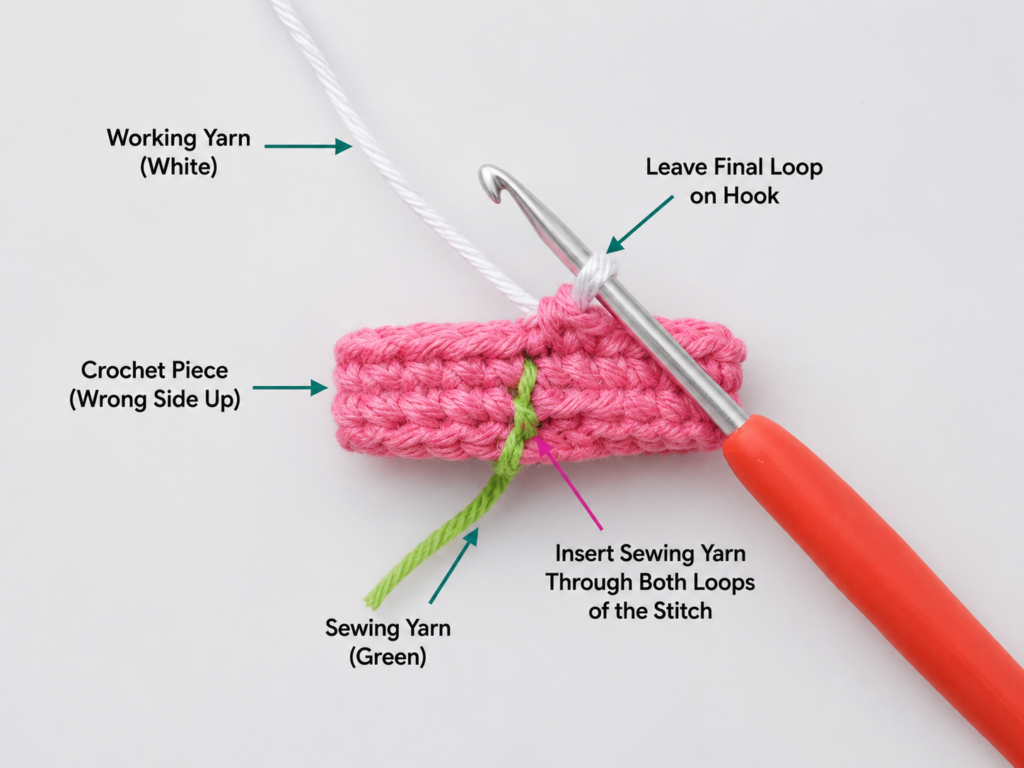
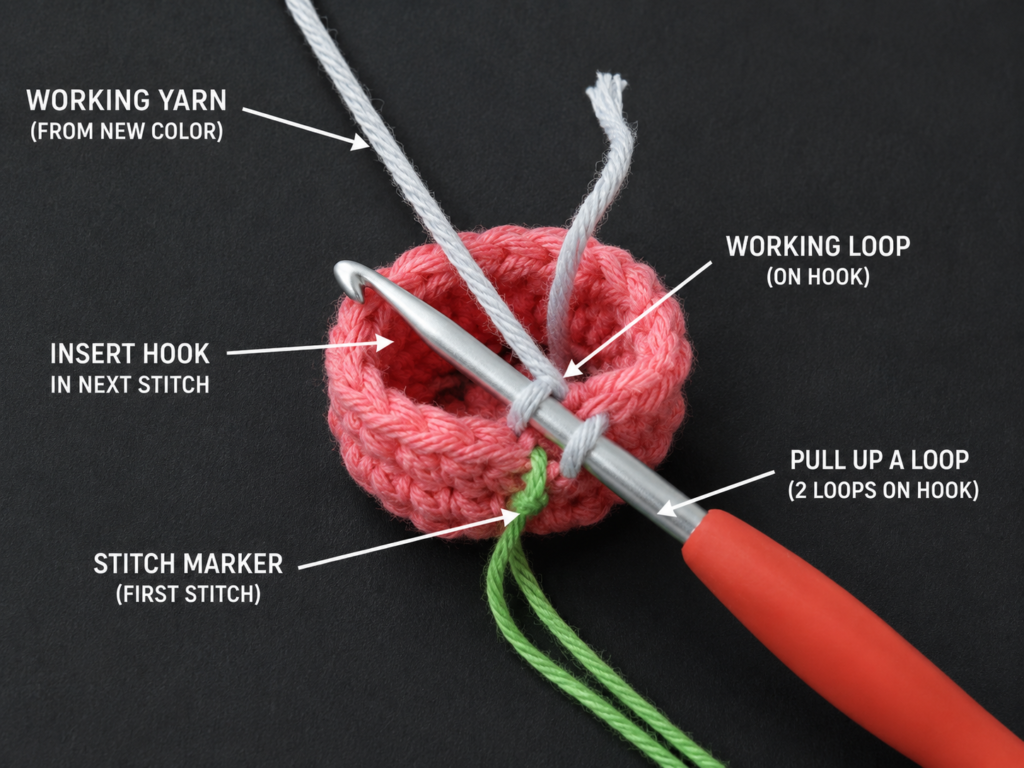
For the cleanest basic color change, begin the final single crochet of Round 6 with coral:
- Insert the hook into the last stitch.
- Yarn over with coral.
- Pull up a loop. You now have two coral loops on the hook.
- Drop the coral yarn.
- Yarn over with gray.
- Pull the gray yarn through both coral loops.
The final coral stitch is now complete, but the active loop on your hook is gray.
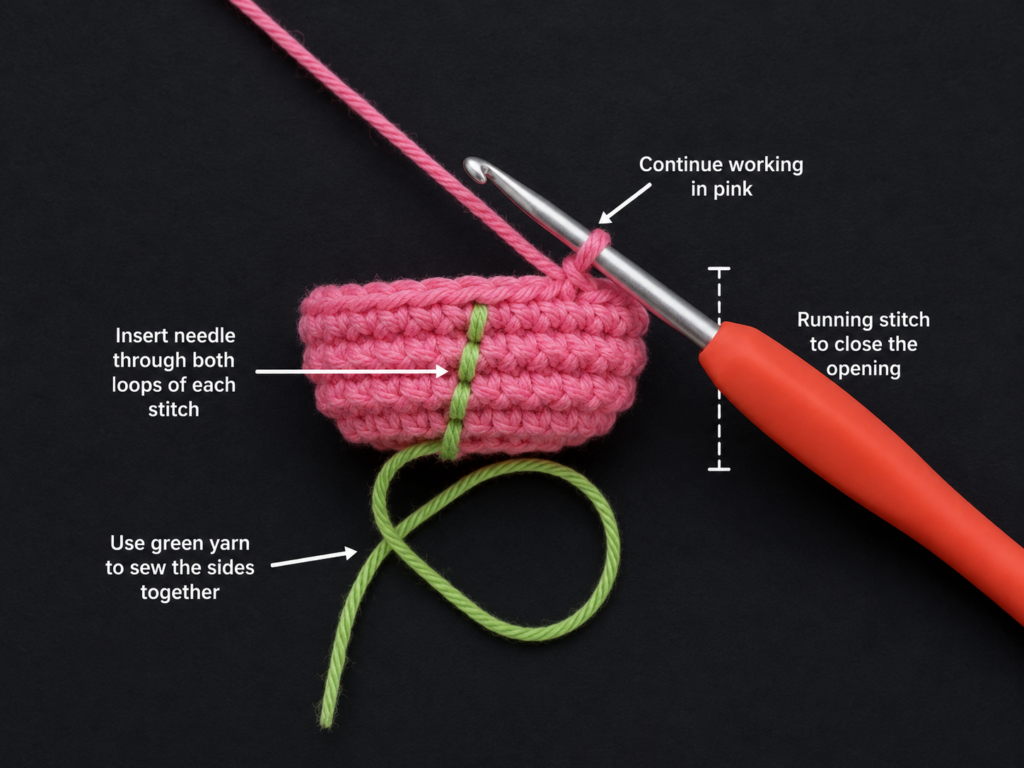
Now continue:
Round 7
With gray:
Sc BLO in each stitch around. (18 sts)
Round 8
Sc in every stitch around. (18 sts)
These two rounds create the narrow metallic band.
Beginner tip: Keep the unused yarn tails inside the pencil. They will be hidden by stuffing later.
Common mistake to avoid: Do not knot the two yarn colors tightly together at the transition. A bulky knot may create a visible lump.
Step 4: Crochet the Long Yellow Pencil Body
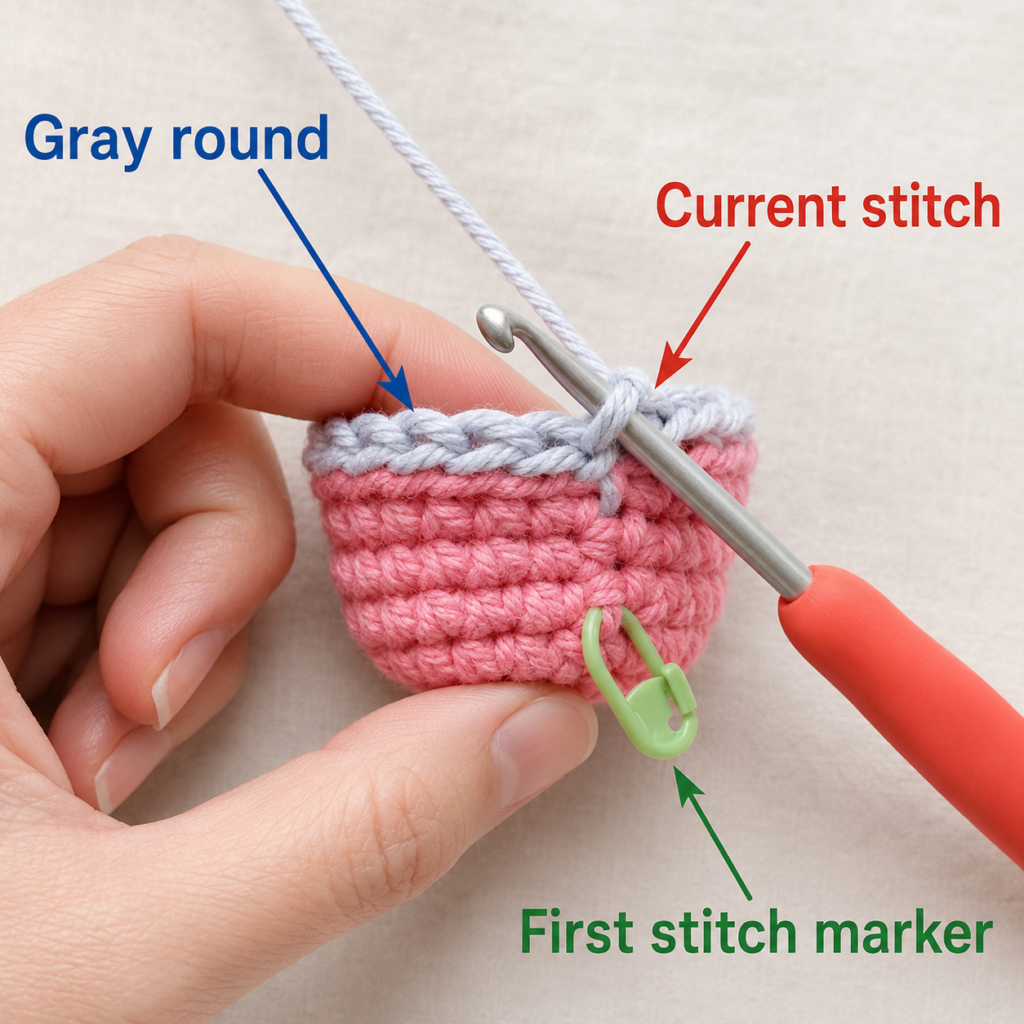
Change to golden mustard-yellow yarn using the same basic technique:
Complete the final gray single crochet with the yellow yarn.
Round 9
With yellow:
Sc BLO in each stitch around. (18 sts)
Rounds 10–19
Sc in every stitch around. (18 sts per round)
The pencil should now begin looking long and cylindrical.
Stop occasionally and count all 18 stitches.
If your pencil is:
- Getting wider: check for accidental increases.
- Becoming narrower: look for skipped stitches.
- Leaning: redistribute the stuffing later and check that your tension is reasonably consistent.
Step 5: Check the Shape and Add Optional Embroidery
Before making the pencil tip, stop and look carefully at your work.
The color boundaries should be reasonably level. A tiny jog is normal when crocheting in a continuous spiral, but the sections should still read clearly as:
- Coral eraser.
- Silver-gray ferrule.
- Mustard-yellow pencil body.
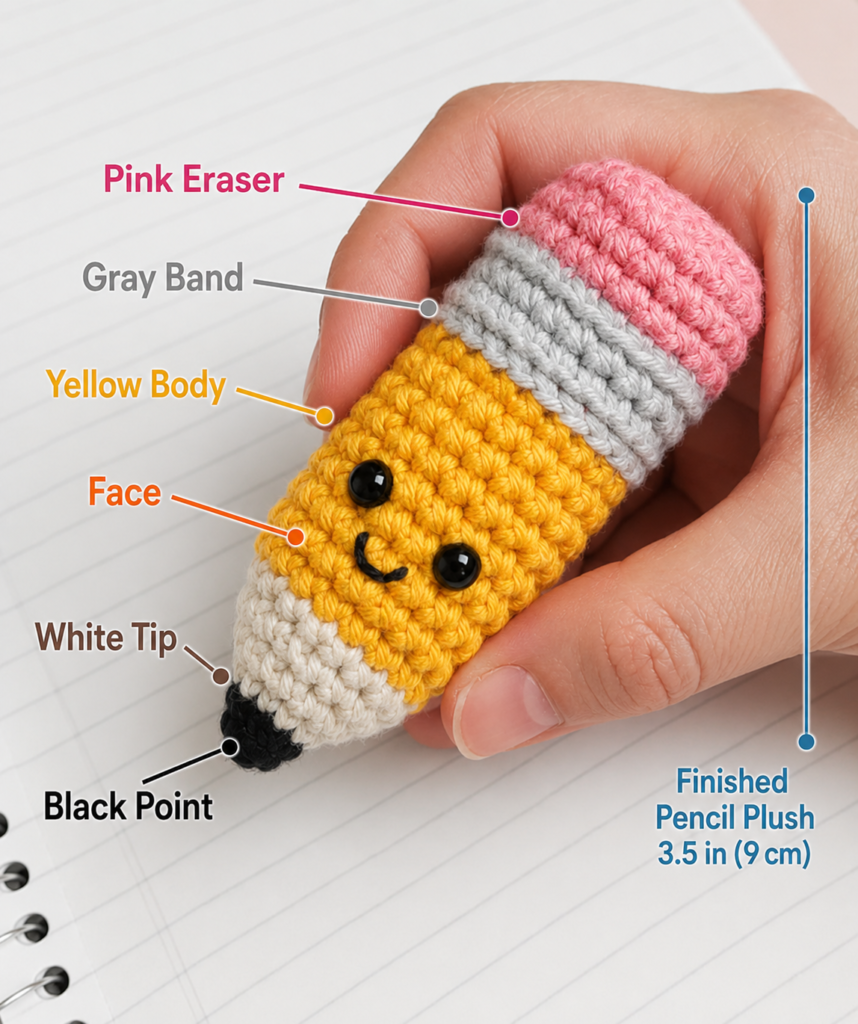
Optional face
For a friendly classroom mascot, use black embroidery thread to add:
- Two tiny embroidered eyes.
- A small curved smile.
A good approximate position is around Rounds 14–16 on the yellow section.
Keep the face simple and relatively small.
For a more traditional classroom garland, skip the face completely.
Step 6: Crochet the Wooden Tip, Stuff the Pencil, and Add Graphite
Change to warm natural-cream yarn.
Round 20
Sc in every stitch around. (18 sts)
Round 21
[Sc in next st, dec over next 2 sts] 6 times. (12 sts)
The shape will begin narrowing.
Round 22
Sc in every stitch around. (12 sts)
Now pause and stuff the pencil.
Use small pieces of stuffing instead of one large ball.
Begin at the eraser end and push the stuffing gently into position with:
- The blunt end of a crochet hook.
- A chopstick.
- A stuffing tool.
Add enough stuffing to hold the cylindrical shape but do not pack it so tightly that the stitches stretch apart.
The tip area should remain accessible for the final rounds.
Now change to charcoal yarn.
Round 23
Sc in every stitch around. (12 sts)
Round 24
Dec 6 times around. (6 sts)
Fasten off, leaving a tail approximately 6 inches long.
Thread the tail onto a tapestry needle. Pass the needle through the front loops of the final six stitches, pull gently to close the opening, secure the yarn, and weave the remaining tail into the pencil.
You now have one complete crochet pencil.
Beginner tip: Roll the completed pencil gently between your palms to redistribute the stuffing and improve its symmetry.
Common mistake to avoid: Overstuffing the pointed cream and charcoal sections can make the pencil tip look blunt.
Step 7: Make Enough Pencils for the Classroom Garland
Repeat Steps 1–6 until you have five complete pencils.
You can make all five identical for a coordinated display or vary only the yellow body color.
A balanced five-pencil palette might be:
- Pencil 1: Mustard yellow.
- Pencil 2: Dusty blue.
- Pencil 3: Soft sage.
- Pencil 4: Muted coral.
- Pencil 5: Mustard yellow.
Keep the eraser, ferrule, wooden tip, and graphite colors the same across all five motifs for a cohesive finished project.
Before attaching the pencils to the cord, lay them flat in the order you plan to use.
Check:
- Are the pencil lengths reasonably similar?
- Are all yarn tails secure?
- Is the stuffing evenly distributed?
- Are the graphite tips completely closed?
- Are any embroidered details firmly secured?
Step 8: Make the Hanging Cord
You have two easy options.
Option 1: Use a premade cotton cord
Cut approximately 45–55 inches of strong cotton cord.
This is the easiest option for a firm, tidy garland.
Option 2: Crochet your own cord
With cream yarn:
Ch 140–170, depending on the desired width.
Fasten off and weave in the ends.
For a sturdier crocheted cord, slip stitch back through each chain before fastening off.
Do not stretch the chain aggressively when measuring.
Step 9: Add a Hanging Loop to Each Pencil
Using matching cream yarn and a tapestry needle:
- Insert the needle securely through the center of the coral eraser end.
- Create a small yarn loop approximately 1–1.5 inches long.
- Pass through the same area again.
- Secure the yarn firmly inside or against the back of the ornament.
- Weave in the tail.
Repeat for every pencil.
These loops allow each ornament to hang from the main cord.
For a completely fixed garland, sew each pencil directly onto the main cord instead.
Step 10: Assemble the Final Classroom Garland
Lay the main cord on a flat surface.
Position the five pencils approximately 6–8 inches apart.
Start with the middle pencil and work outward. This makes symmetrical spacing easier.
A simple order is:
Pencil — 7 inches — Pencil — 7 inches — Pencil — 7 inches — Pencil — 7 inches — Pencil
Leave enough cord at both ends for hanging.
Slide each pencil’s small loop over the cord, or sew the loop securely around it.
Before tightening everything permanently, hold the garland up and inspect the spacing.
Adjust until:
- The pencils hang relatively straight.
- No two motifs overlap.
- The center pencil sits near the midpoint.
- Both ends have sufficient hanging cord.
Your crochet classroom pencil garland is now ready to display.
Pattern Notes or Stitch Notes
Starting method
The project begins with a magic ring containing six single crochet stitches.
A chain-2 alternative can be used by crocheters who dislike magic rings, but the exact appearance of the eraser center may differ.
Turning-chain rules
There are no turning chains because the pencil is worked in continuous spiral rounds.
Stitch count
The key stitch counts are:
- Round 1: 6 sts.
- Round 2: 12 sts.
- Round 3: 18 sts.
- Rounds 4–20: Generally maintained at 18 sts until tip shaping.
- After first tip decrease: 12 sts.
- Final decrease: 6 sts.
Repeat pattern
The long pencil body simply repeats:
Sc in every stitch around.
Right side and wrong side
The outside of the pencil remains facing outward throughout construction. There is generally no need to turn the piece inside out unless you prefer the appearance of the reverse fabric.
Size adjustments
To make the pencil longer, add plain yellow rounds before Round 20.
To make the entire pencil significantly larger, use thicker yarn and an appropriately sized hook.
To make a smaller pencil, use lighter yarn and a smaller hook.
Changing yarn thickness may alter the finished size considerably, and yarns sharing the same weight classification are not necessarily perfectly interchangeable.
Common Beginner Mistakes
1. Losing the beginning of a round
Problem: The stitch count changes without explanation.
Fix: Use a locking stitch marker from the first round and move it every time a new round begins.
2. Accidentally increasing the straight body
Problem: The yellow section gets wider.
Fix: Maintain exactly one single crochet in each of the 18 stitches.
3. Making the magic ring too loose
Problem: A hole remains visible in the center of the eraser.
Fix: Pull the magic-ring tail closed before the work becomes too tall to access easily.
4. Crocheting through both loops during a BLO round
Problem: The intended horizontal ridge is missing.
Fix: Pause and identify the V at the top of each stitch. Insert the hook through the back loop only.
5. Creating a bulky color-change knot
Problem: A visible bump appears where two colors meet.
Fix: Complete the final stitch with the new yarn instead of tying a large knot at the fabric surface.
6. Stuffing too early
Problem: The stuffing gets in the way of the hook.
Fix: Wait until the pencil is mostly complete before filling it.
7. Overstuffing the tip
Problem: The pencil looks blunt rather than tapered.
Fix: Use smaller amounts of stuffing near the cream and charcoal sections.
8. Pulling the closing tail too aggressively
Problem: The yarn snaps or the final stitches distort.
Fix: Pull gradually while passing through the front loops of the remaining six stitches.
How to Customize This Crochet Project
Change the body colors
The obvious customization is to replace yellow with a rainbow of colors.
Try:
- Red.
- Orange.
- Yellow.
- Sage.
- Blue.
- Lavender.
- Pink.
A seven-pencil rainbow garland would work particularly well above an art area.
Use school colors
Make the pencil bodies in the school’s official colors for a sports classroom, teacher gift, or school library display.
Create a neutral classroom palette
For a softer classroom aesthetic, use:
- Oatmeal.
- Terracotta.
- Muted sage.
- Dusty blue.
- Warm beige.
Add embroidered letters
Instead of a face, embroider one letter onto each pencil to spell a short word such as:
READ
or:
LEARN
For longer words, make additional pencil motifs.
Make a vertical door hanging
Instead of positioning the pencils horizontally across one cord, attach three to five pencils below each other on a vertical cord.
This works especially well on a classroom door.
Use flat hanging loops
For a cleaner look, make the hanging loops from the same color as the eraser so they visually disappear into the top of each pencil.
Create a seasonal version
Change the color palette without changing the pattern:
- Autumn classroom: rust, mustard and olive.
- Winter classroom: icy blue, white and silver.
- Valentine’s classroom: pink, red and cream.
- Spring classroom: pastel yellow, lavender and mint.
Turn individual pencils into gifts
One pencil ornament can become:
- A teacher desk decoration.
- Backpack charm.
- Gift topper.
- Reading-corner ornament.
- Pencil-case mascot.
- Small teacher-appreciation gift.
Finishing Instructions
Once every pencil is complete:
Fastening off
Leave a long enough tail to close the final six-stitch opening securely.
Use a tapestry needle to pass through the front loops, pull closed, and weave the remaining yarn inside the stuffed ornament.
Weaving in ends
Most internal color-change tails can remain hidden inside the stuffed pencil, provided they are secure.
Any exposed outer tails should be woven through several stitches before trimming.
Shaping
Roll the finished pencil gently between your palms.
Press lightly along the body to redistribute the stuffing.
Avoid crushing the tip.
Blocking
Traditional wet blocking is usually unnecessary for a small stuffed amigurumi decoration.
Hand shaping should be sufficient.
Washing and care
Follow the yarn manufacturer’s care label. For a decorative stuffed garland, gentle spot cleaning is generally preferable to frequent machine washing because it helps preserve the stuffing distribution and hanging structure.
Display safety
Hang the garland securely and keep long cords positioned appropriately for the age group using the classroom. A decorative garland should not be placed where young children can pull it down or become entangled in a hanging cord.
Quick Printable-Style Summary
Project: Crochet pencil classroom garland
Skill level: Easy Beginner
Finished pencil size: Approximately 5–6 inches long
Garland size: Approximately 40–50 inches, adjustable
Yarn: Medium-weight cotton or cotton blend
Hook: 3.5 mm / E-4
Stitches: Magic ring, single crochet, increase, decrease, BLO
Starting method: 6 sc in a magic ring
Main body count: 18 sts around
Eraser: Coral, Rounds 1–6
Ferrule: Gray, Rounds 7–8
Pencil body: Mustard yellow, Rounds 9–19
Wooden tip: Cream, Rounds 20–22
Graphite: Charcoal, Rounds 23–24
Repeat: Make five pencils
Assembly: Add a small loop to each pencil and space the motifs approximately 6–8 inches apart on a 45–55-inch cord.
Finishing: Close the final six-stitch opening, weave in ends, shape stuffing, attach hanging loops and assemble the garland.
FAQ
Is this crochet classroom decor pattern suitable for beginners?
Yes. The main techniques are single crochet, simple increases and decreases, continuous rounds, basic color changes, and back-loop-only crochet. A beginner who already knows how to form a single crochet stitch can use this project to practice basic amigurumi construction.
The Craft Yarn Council describes easy projects as those that can include basic stitches, repetitive patterns, simple color changes, and simple shaping and finishing, which closely matches the techniques used here.
How many crochet pencils should I make for a classroom garland?
Five is a balanced number for a medium-size display. Make three for a mini garland or seven to nine for a wider bulletin board or classroom wall.
Can I make the pencil without a magic ring?
Yes. Ch 2 and work the initial six single crochet stitches into the second chain from the hook. The center may look slightly different, but the rest of the construction can continue normally.
Which yarn is best for crochet classroom decorations?
A smooth cotton or cotton-blend yarn is useful when you want defined stitches and a relatively structured finished motif. Acrylic can also work. The exact result depends on the yarn’s thickness, construction, hook choice, and your personal tension.
Can I make flat pencil decorations instead of stuffed pencils?
Yes, but that would require a different construction. This tutorial specifically creates three-dimensional stuffed pencils. For a flatter garland, a separate applique-style pencil pattern would be more suitable.
How can I make the pencil larger?
The simplest method is to use heavier yarn with an appropriately larger hook. You can also extend the yellow section by adding more rounds, but this only increases length rather than overall scale.
Can these crochet pencils be used for a preschool classroom?
They can be used as secured hanging décor, but the finished display should be positioned so long cords and small detachable parts are not accessible to children. This version makes plastic eyes optional and recommends embroidery instead.
Conclusion
This crochet pencil garland turns a handful of basic stitches into a classroom decoration that feels cheerful, recognizable, and genuinely handmade.
The project is also a useful skill builder. The small eraser base introduces increases. The back-loop rounds create defined edges. The ferrule and pencil body teach color changes. The straight middle section helps you practice maintaining a consistent stitch count, while the cream and charcoal tip introduces simple decreases and three-dimensional shaping.
Once you have completed the first pencil, the remaining motifs become much faster because the construction repeats exactly. Five matching pencils create a balanced classroom garland, but there is no need to stop there. A rainbow version can brighten an art corner, school-color pencils can decorate a classroom door, and a longer set can become a statement piece above a bulletin board or reading nook.
Save the tutorial for back-to-school crafting, and use the same basic project as a starting point for more handmade crochet classroom décor.





