The first cool mornings of autumn always seem to make yarn feel a little more tempting. Suddenly, soft textures, rusty colors, warm drinks, and handmade decorations belong everywhere—and a small crochet pumpkin is one of the easiest ways to bring that cozy feeling into your home.
This beginner-friendly fall crochet pattern creates a soft, stuffed pumpkin approximately 4.5 to 5 inches wide. It begins with a magic ring and a few simple increase rounds. After that, you crochet straight around until the fabric forms a bowl, fill it with fiberfill, gather the opening closed, and use yarn to sculpt six recognizable pumpkin sections.
The final details are completely crocheted too: a small olive-green leaf and a short taupe-brown stem.
You do not need advanced shaping experience. You do not need complicated colorwork. You do not need to sew multiple body pieces together.
The main skills are:
Counting rounds and stitches.
Making a magic ring.
Working half double crochet.
Making increases.
- Counting rounds and stitches.
- Gathering an edge with a tapestry needle.
- Stuffing evenly.
- Shaping the pumpkin with yarn.
The result is a reusable fall decoration suitable for shelves, mantels, Thanksgiving tables, teacher gifts, autumn market displays, or a handmade pumpkin patch in several colors.
This pattern is classified as Beginner to Easy because it primarily relies on basic stitches, straightforward increases, simple dimensional shaping, and basic sewing. The Craft Yarn Council describes basic-level projects as those using basic stitches and potentially basic increases or decreases, while easy-level projects can include simple stitch patterns and shaping. You’ll Learn
By the end of this tutorial, you will know how to:
- Select yarn suitable for a stuffed crochet pumpkin.
- Start a project with a magic ring.
- Make half double crochet increases.
- Count stitches in joined rounds.
- Prevent an increase circle from becoming badly wavy.
- Build height without adding more increases.
- Leave a sufficiently long finishing tail.
- Create a running-stitch gathering edge.
- Stuff a crochet pumpkin without making it lumpy.
- Close a large crochet opening securely.
- Divide a stuffed pumpkin into six sections.
- Crochet a pointed leaf around both sides of a foundation chain.
- Make a simple rolled crochet stem.
- Attach the final details securely.
- Adjust the pumpkin’s size, yarn, texture, and colors.
Materials You’ll Need
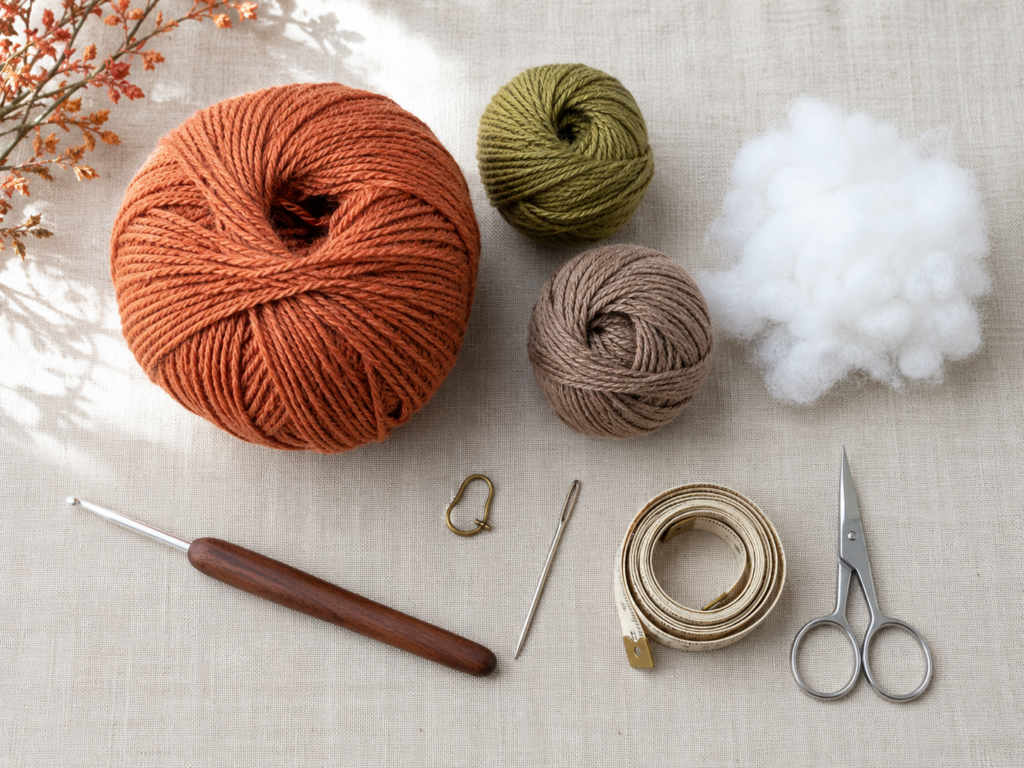
For one medium pumpkin approximately 4.5–5 inches wide:
- Approximately 90–110 yards / 82–100 meters of worsted-weight #4 yarn in dusty burnt orange.
- Approximately 10 yards of olive-green yarn for the leaf.
- Approximately 10 yards of taupe or brown yarn for the stem.
- 4.0 mm / G-6 crochet hook.
- Approximately 40–60 grams of polyester fiberfill.
- One locking stitch marker.
- Blunt tapestry needle with a large eye.
- Small embroidery scissors.
- Measuring tape.
- Optional rustproof blocking pins.
The Craft Yarn Council’s standard system classifies worsted and similar medium yarns as category #4. Its general recommended crochet-hook range for category #4 is 4.5–5.5 mm, but a smaller 4.0 mm hook is intentionally used here to produce a denser stuffed fabric with smaller gaps. hest beginner experience, choose yarn that is:
- Easy to see.
- Not excessively fuzzy.
- Not extremely splitty.
- Light or medium in color.
- Firm enough to show individual stitch tops.
Acrylic, cotton, and cotton-acrylic blends can all work.
Finished Size
Using worsted-weight yarn and a 4.0 mm hook, the finished pumpkin should measure approximately:
Width: 4.5–5 inches / 11.5–12.5 cm
Height without stem: 3–3.5 inches / 7.5–9 cm
Height with stem: Approximately 4–4.5 inches / 10–11.5 cm
Your exact measurements will vary according to:
- Yarn thickness.
- Fiber content.
- Crochet tension.
- Stuffing quantity.
- How tightly you form the external pumpkin ridges.
Exact gauge is not critical for decorative pumpkins.
Gauge and Tension
Approximate unstuffed gauge:
15 half double crochet stitches × 11 rounds = approximately 4 inches / 10 cm
You do not need to match this perfectly.
More important is creating a dense fabric without large gaps where the white stuffing can show.
Your stitches should feel:
- Firm but not painfully tight.
- Easy enough for the hook to enter.
- Compact enough to contain stuffing.
- Consistent from round to round.
A useful tension test
After completing Round 4, stretch the circle gently between your fingers.
If you can easily see large open spaces between stitches, try:
- Crocheting with slightly firmer tension.
- Switching to a 3.5 mm hook.
If your hands hurt and the hook barely enters the stitch:
- Relax your grip.
- Try the 4.5 mm hook.
Crochet Abbreviations Used
This original tutorial uses U.S. crochet terminology:
- ch = chain
- hdc = half double crochet
- sc = single crochet
- sl st = slip stitch
- st/sts = stitch/stitches
- rnd/rnds = round/rounds
- inc = increase by working two stitches into one stitch
- rep = repeat
- BLO = back loop only
- RS = right side
- WS = wrong side
These abbreviations align with the Crochet Abbreviations Master List maintained by the Craft Yarn Council. terminology note
This tutorial uses U.S. terms.
A U.S. half double crochet does not have a direct same-name equivalent under traditional U.K. terminology, so make sure any supplementary video or stitch guide you use also follows U.S. terms.
Before You Start
How to count stitches
The starting chain at the beginning of a joined round does not count as a stitch in this pattern.
After each round:
- Locate the first real half double crochet.
- Count only completed stitches.
- Join into the top of the first actual hdc.
The stitch counts are:
Round 2: 24.
Round 1: 12.
- Round 3: 32.
- Round 4: 40.
- Rounds 5–11: 40 each.
Count before moving forward.
A small counting mistake in Round 9 might not matter dramatically. A missed increase in Round 2 or 3 can noticeably change the pumpkin’s shape.
How to keep your rounds neat
Place a locking stitch marker into the first actual stitch of every round.
When you reach the marker:
- Finish the final stitch.
- Remove the marker.
- Join as instructed.
- Begin the next round.
- Replace the marker into the first actual stitch.
How to avoid curling
A slight curve is normal after the increase rounds.
Severe cupping too early may mean:
- An increase was missed.
- Your hook is too small for your tension.
- Your stitches are extremely tight.
Severe waviness may mean:
- An extra increase was added.
- One or more stitches were worked twice accidentally.
Always verify your stitch count before changing hook size or restarting.
How to choose fall colors
Traditional orange works beautifully, but fall crochet patterns do not need to be limited to bright pumpkin orange.
Try:
- Dusty burnt orange.
- Deep rust.
- Mustard.
- Muted terracotta.
- Olive.
- Oatmeal.
- Cinnamon.
- Burgundy.
- Cream.
- Soft brown.
For a coordinated pumpkin patch, choose three or four body colors and use the same olive leaf and taupe stem on every pumpkin.
Step-by-Step Crochet Tutorial
Step 1: Make the Magic Ring and First Round
With dusty burnt-orange yarn, make a magic ring.
If you are unfamiliar with a magic ring:
- Wrap the yarn into an adjustable loop.
- Insert the hook through the center.
- Yarn over.
- Pull up a loop.
- Chain 1 to stabilize the ring.
Now work:
Round 1: Ch 1, work 12 hdc into the magic ring. Pull the starting tail carefully to close the center. Join with a sl st to the first hdc.
Stitch count: 12 hdc
Do not join into the beginning chain.
Beginner tip:
Before pulling the magic ring tightly closed, count all 12 stitches. Counting is easier while the center is still slightly open.
Common mistake to avoid:
Counting the starting chain as your first hdc.
In this pattern, it is only a setup chain and does not count as a stitch.
Step 2: Increase the Pumpkin Base
The next three rounds create the width of the pumpkin.
Round 2
Ch 1.
Work 2 hdc in each stitch around.
Join with a sl st to the first hdc.
Stitch count: 24
Round 3
Ch 1.
Repeat around:
*1 hdc in each of the next 2 sts, 2 hdc in the next st; rep from * around.
Join with a sl st.
Stitch count: 32
Round 4
Ch 1.
Repeat around:
*1 hdc in each of the next 3 sts, 2 hdc in the next st; rep from * around.
Join with a sl st.
Stitch count: 40
Place the piece flat.
You should now have a relatively smooth circle.
A tiny amount of movement or soft waviness is acceptable. Severe ruffling is not.
Beginner tip:
Use stitch markers to divide long rounds into smaller sections.
For Round 4, each repeat contains five completed stitches:
- Three regular hdc.
- Two hdc in one stitch.
Eight repeats create 40 total stitches.
Common mistake to avoid:
Putting an increase in every third stitch instead of after three individual stitches.
Read the repeat slowly:
Three regular stitches first. Then one increase.
Step 3: Crochet the Straight Body Rounds
Now stop increasing.
For the next seven rounds, work one half double crochet into every stitch.
Rounds 5–11
Ch 1, hdc in each of the 40 sts around, join with sl st to first hdc.
Stitch count for every round: 40
After two or three straight rounds, the previously flat piece should begin curving upward naturally.
Do not force it flat.
Do not add extra increases to correct the curve.
The emerging bowl shape is exactly what you want.
By Round 11, the body should look like a soft crochet container with a wide opening.
Beginner tip:
Turn the work slightly after every few stitches instead of twisting your wrists around the entire piece.
Common mistake to avoid:
Accidentally increasing at the join.
Make sure you do not place stitches in:
- The slip-stitch join.
- The starting ch 1.
- The same first stitch twice.
Maintain exactly 40 stitches.
Step 4: Create the Gathering Edge
After completing Round 11, cut the yarn, leaving an extra-long tail approximately 30 inches / 75 cm long.
Pull the entire tail through the active loop to fasten off.
Thread the tail onto a blunt tapestry needle.
Now pass the needle through the front loop only of each of the 40 stitches around the opening.
Do not pull tightly yet.
Think of this like threading a drawstring through the crochet edge.
Use large, relaxed running stitches.
After working all the way around, leave the yarn loose while you add stuffing.
Beginner tip:
Double-check that the yarn tail is long enough before you begin gathering.
It must be long enough to:
- Travel around the opening.
- Tighten the opening.
- Secure the closure.
Common mistake to avoid:
Pulling the opening closed before adding stuffing.
Leave the gathering yarn loose until the pumpkin is filled.
Step 5: Stuff and Close the Pumpkin
Begin adding polyester fiberfill in small handfuls.
Do not push one enormous lump into the center.
Instead:
- Add a small amount.
- Push it toward the sides.
- Add another small amount.
- Rotate the pumpkin.
- Continue until the shape feels evenly filled.
Pay particular attention to the bottom edges.
A good pumpkin should feel:
- Firm enough to hold its shape.
- Soft enough to sculpt into ridges.
- Evenly rounded without hard lumps.
When satisfied, hold the pumpkin in one hand and gradually pull the gathering yarn with the other.
The opening should begin closing.
Pause before it closes completely.
Add a small final amount of stuffing through the remaining gap if the upper portion feels hollow.
Then pull the yarn firmly until the opening is almost completely closed.
Pass the needle across the opening several times, catching sturdy stitches from opposite sides.
Pull securely.
Make several small securing stitches.
Do not cut the yarn tail immediately if it is still long enough for additional shaping.
Beginner tip:
A pumpkin that looks slightly overstuffed before shaping often develops into a fuller finished pumpkin after the external ridge yarn is tightened.
Common mistake to avoid:
Packing the fiberfill until the crochet fabric stretches severely.
If large white gaps begin appearing between stitches, remove a little stuffing.
Step 6: Shape Six Pumpkin Sections
Cut approximately 60 inches / 150 cm of matching burnt-orange yarn.
Thread it through your tapestry needle.
Insert the needle through the top center of the pumpkin and push it directly through the stuffing until it exits from the bottom center.
Leave approximately 8 inches of yarn at the top.
Now bring the working yarn around the outside of the pumpkin.
Insert the needle through the bottom center and pass it back through the pumpkin to the top.
Pull gently.
You should see the first indentation form.
Repeat this process around the pumpkin until you have created six approximately even sections.
A useful way to think about the spacing is like a clock:
- First ridge: 12 to 6.
- Second: approximately 2 to 8.
- Third: approximately 4 to 10.
Then continue dividing the remaining spaces until six sections look balanced.
Do not worry about perfect mathematical precision.
Handmade pumpkins look natural with slight differences.
Once satisfied:
- Bring the final yarn to the top.
- Tie it securely to the initial 8-inch tail.
- Hide both yarn ends inside the pumpkin with the tapestry needle.
How tightly should you pull?
Pull enough to create visible valleys between pumpkin sections.
Do not pull so hard that:
- The yarn cuts deeply into the crochet.
- The pumpkin becomes extremely flat.
- The stuffing bunches into hard lumps.
Beginner tip:
Create all six sections loosely first.
Then inspect the pumpkin from every angle before tightening them further.
Common mistake to avoid:
Trying to make each section extremely deep on the first pass.
Gradual tightening gives you far more control.
Step 7: Crochet the Olive-Green Leaf
With olive-green worsted-weight yarn:
Ch 8.
Beginning in the second chain from the hook, work:
- 1 sc.
- 1 hdc.
- 1 dc.
- 1 hdc.
- 1 sc.
- 1 sl st.
- 1 sl st.
Ch 1.
Rotate the foundation chain so you can work along its opposite unused loops.
Now work:
- 1 sl st.
- 1 sl st.
- 1 sc.
- 1 hdc.
- 1 dc.
- 1 hdc.
- 1 sc.
Join with a sl st near the base of the leaf.
Fasten off, leaving approximately 12 inches of yarn for sewing.
The wider double crochet near the middle helps create a rounded leaf body, while the smaller stitches narrow both ends.
Beginner tip:
Do not work your initial chain too tightly.
You need enough space to insert the hook along both sides.
Common mistake to avoid:
Accidentally working both leaf sides into the exact same chain loops.
After finishing the first side, turn the chain and locate the unused loops along the opposite edge.
Step 8: Crochet the Short Brown Stem
With warm taupe or brown yarn:
Ch 8.
Row 1
Beginning in the second chain from the hook:
Sc in each chain across.
Stitch count: 7
Ch 1 and turn.
Row 2
Work 1 sc BLO in each of the 7 stitches across.
Fasten off, leaving a 15-inch sewing tail.
You now have a small narrow rectangle.
Roll it tightly from one short end to create a small stem cylinder.
Thread the sewing tail onto your tapestry needle.
Pass through the rolled layers several times until the shape remains secure.
Leave the remaining tail for attachment.
Beginner tip:
Roll the stem before cutting the yarn to check whether you like its height.
For a shorter stem, remove one or two chains from the foundation.
Step 9: Attach the Leaf and Stem
Place the stem in the upper center indentation.
Using its brown sewing tail:
- Pass the needle into strong pumpkin stitches around the center opening.
- Catch the lower portion of the rolled stem.
- Repeat several times from different directions.
- Pull snugly without crushing the pumpkin.
Now position the olive leaf beside the stem at a slight angle.
Avoid centering it perfectly.
A small diagonal leaf generally looks more natural.
Use the olive sewing tail to secure:
- The base of the leaf.
- One or two central stitches.
Leave the pointed outer tip slightly free for dimension.
Weave the remaining tails deeply into the pumpkin.
Pattern Notes or Stitch Notes
Turning chain rule
The beginning ch 1 used for pumpkin rounds does not count as a stitch.
Always join into the top of the first actual half double crochet.
Stitch counts
- Round 1: 12 sts.
- Round 2: 24 sts.
- Round 3: 32 sts.
- Round 4: 40 sts.
- Rounds 5–11: 40 sts each.
Increase pattern
The pumpkin width is built gradually:
Round 2: Increase in every stitch.
Round 3: Two regular stitches, then one increase.
Round 4: Three regular stitches, then one increase.
After Round 4, stop increasing.
Joined-round note
This tutorial uses joined rounds rather than continuous spiral rounds.
That makes it easier for beginners to:
- Identify the end of each round.
- Verify stitch counts.
- Understand where increases begin and end.
A subtle joining line may be visible, but it becomes less noticeable after stuffing and shaping.
Right side and wrong side
The outer visible surface is the right side.
Yarn ends and securing stitches should be hidden on the wrong side or inside the stuffed pumpkin whenever possible.
Size-adjustment notes
To make a mini pumpkin
Use:
- Sport-weight or DK yarn.
- 3–3.5 mm hook.
- The same stitch counts.
The finer yarn naturally creates a smaller finished pumpkin.
To make a larger pumpkin
After Round 4, add:
Round 5: Ch 1, *hdc in next 4 sts, 2 hdc in next st; rep around. Join.
Stitch count: 48
Then work straight rounds until the body reaches your preferred height.
A larger pumpkin requires:
- More yarn.
- More stuffing.
- A longer gathering tail.
- A longer shaping strand.
Common Beginner Mistakes
1. The starting circle will not close
Likely cause: The stitches were worked around the yarn tail instead of inside a functioning adjustable magic ring.
Fix: Check the ring before adding all 12 stitches. Pull gently on the starting tail after three or four hdc to confirm that the loop tightens.
2. The circle becomes very wavy
Likely cause: Too many increases.
Fix: Verify the exact totals:
12 → 24 → 32 → 40.
Do not add extra increases because you see a temporary small gap.
3. The pumpkin becomes narrow and tall
Likely cause: An increase round was missed or your yarn is substantially thinner.
Fix: Check the first four stitch counts. For a wider future pumpkin, add another increase round before working straight.
4. White stuffing shows through the fabric
Likely cause: Loose crochet tension, an oversized hook, or excessive stuffing.
Fix: Try a smaller hook or remove a little fiberfill.
5. The gathering yarn breaks
Likely cause: The opening was pulled closed too suddenly or with weak yarn.
Fix: Tighten gradually while distributing the fabric evenly around the opening.
For fragile yarn, use a separate doubled strand for gathering.
6. One side of the pumpkin is lumpy
Likely cause: The stuffing was inserted as one large compressed piece.
Fix: Pull out the stuffing and refill using smaller tufts distributed around the sides.
7. The pumpkin ridges look uneven
Likely cause: Some shaping strands are much tighter than others.
Fix: Form all sections lightly first, inspect the complete shape, and only then tighten gradually.
8. The leaf twists severely
Likely cause: The foundation chain is too tight or the stitch placement differs on the two sides.
Fix: Remake the chain with looser tension and carefully identify every unused loop before beginning the second side.
How to Customize This Crochet Project
Change the yarn
You can create dramatically different fall pumpkins simply by changing yarn texture.
Try:
- Smooth cotton for crisp stitches.
- Acrylic for accessible color options.
- Wool blends for rustic texture.
- Velvet yarn for a soft luxury pumpkin.
- Chunky yarn for oversized decor.
- Tweed yarn for farmhouse autumn styling.
When using significantly thicker yarn, increase the hook size appropriately and expect the finished dimensions to change.
Change the colors
A fall crochet pumpkin does not need to be orange.
Try a complete handmade patch in:
- Burnt orange.
- Mustard gold.
- Oatmeal cream.
- Deep olive.
- Brick red.
- Burgundy.
- Dusty rose.
- Warm taupe.
- Muted teal.
For a cohesive display, keep all stems in the same brown shade and all leaves in the same olive yarn.
Change the number of sections
This tutorial uses six exterior sections.
You could instead create:
- Four wide sections for a simple graphic shape.
- Eight narrow sections for more texture.
More sections require careful spacing.
For your first pumpkin, six is a good balance between simplicity and recognizable shaping.
Add a curling vine
With olive yarn:
- Ch 20.
- Work 2 or 3 sc into every chain.
The fabric will naturally curl.
Sew the small vine near the stem.
Add surface embroidery
Before stuffing, embroider:
- Tiny cream stars.
- Simple dots.
- A small initial.
- Short vertical decorative lines.
Do not add hard beads to items intended for babies or very young children.
Make a complete fall centerpiece
Create:
- One large pumpkin.
- Two medium pumpkins.
- Three mini pumpkins.
Use three coordinating colors and place them on a wooden tray with dried leaves or other safe decorative elements.
Gift ideas and uses
A finished crochet pumpkin can work as:
- Fall shelf decor.
- Thanksgiving table decoration.
- Teacher gift.
- Housewarming gift.
- Autumn market product.
- Office decoration.
- Mantel styling.
- Handmade centerpiece.
- Seasonal photography prop.
Finishing Instructions
Fastening off
After completing every component:
- Cut the yarn, leaving an appropriate tail.
- Pull the cut tail completely through the active loop.
- Tighten gently.
Do not cut sewing tails short until the component has been securely attached.
Weaving in ends
For exposed leaf or stem ends:
- Thread the yarn onto a tapestry needle.
- Pass beneath several stitches.
- Change direction
- Pass beneath several more stitches.
- Trim carefully.
For the pumpkin body, longer tails can often be hidden directly inside the stuffing.
Blocking
The pumpkin itself does not require traditional flat blocking.
Shape it manually by:
- Adjusting the six sections.
- Redistributing the stuffing with your fingers.
- Straightening the stem.
- Positioning the leaf.
The small leaf can be lightly blocked separately before attachment if necessary.
Follow the care requirements of your specific yarn fiber.
Washing and care
Always follow the washing instructions on your yarn label.
For a stuffed decorative pumpkin, gentle spot cleaning is often the simplest option.
If a full wash is necessary:
- Use an appropriate method for the chosen fiber.
- Avoid aggressive twisting.
- Reshape the pumpkin while damp.
- Allow it to dry completely before storage.
Store seasonal crochet pumpkins in a breathable, dry place.
Quick Printable-Style Summary
Project: Easy Fall Crochet Pumpkin
Skill level: Beginner to Easy
Finished size: Approximately 4.5–5 inches wide
Yarn: Worsted-weight #4 yarn
Hook: 4.0 mm / G-6
Main color: Dusty burnt orange
Accent colors: Olive green and taupe brown
Stitches: Ch, sl st, sc, hdc, inc
Pumpkin body
Round 1: 12 hdc in magic ring. Join.
Round 2: 2 hdc in every stitch. 24 sts.
Round 3: *Hdc in next 2 sts, 2 hdc in next; repeat around. 32 sts.
Round 4: *Hdc in next 3 sts, 2 hdc in next; repeat around. 40 sts.
Rounds 5–11: Hdc in every stitch around. 40 sts.
Fasten off with a 30-inch tail.
Pass the tail through the front loops around the opening.
Stuff evenly.
Pull the gathering yarn closed and secure.
Use a separate long strand to create six pumpkin sections.
Leaf
Ch 8 and work graduating stitch heights along both sides of the foundation chain.
Stem
Ch 8.
Work two rows of seven single crochets, with the second row in BLO.
Roll and secure into a short cylinder.
Finishing
Sew the stem into the top indentation.
Attach the leaf at a slight angle.
Hide all yarn tails.
Shape with your fingers.
FAQ
Are crochet pumpkins good fall crochet patterns for beginners?
Yes. A simple pumpkin can be an approachable seasonal project because it primarily uses basic crochet stitches, straightforward increases, stuffing, and simple finishing. This particular version avoids complex colorwork and separate body panels.
What is the best yarn for a crochet pumpkin?
Worsted-weight acrylic, cotton, or a blend is a practical starting point. Smooth yarn makes individual stitch tops easier to identify, which is especially useful for beginners.
Chunky and velvet yarns can also make attractive pumpkins, but they will significantly change the finished dimensions.
Can I make this crochet pumpkin without a magic ring?
Yes.
Instead:
- Ch 4.
- Join with a sl st to form a small ring.
- Work the first 12 hdc into the center.
The starting hole may remain sligh
tly more visible.
Why is my crochet pumpkin curling before I finish the increase rounds?
A little curving is acceptable.
Strong cupping can mean:
- You missed an increase.
- Your stitches are very tight.
- Your hook is too small for your individual tension.
Check the stitch count before restarting.
How much stuffing should I put inside?
Use enough stuffing for a full, rounded shape without forcing large gaps open between the stitches.
The pumpkin should remain soft enough to compress when the six shaping strands are tightened.
Can I make a larger pumpkin with this pattern?
Yes.
After reaching 40 stitches, add another increase round:
*Hdc in next 4 sts, 2 hdc in next; repeat around.
This gives 48 stitches.
Then add enough straight body rounds to create the desired height.
Can I use different stitches for the pumpkin body?
Yes, but different stitches change:
- Fabric density.
- Texture.
- Stretch.
- Height.
- Yarn consumption.
For your first version, half double crochet provides a good balance between speed, visible stitch structure, and relatively dense fabric.
Conclusion
Among fall crochet patterns, pumpkins are especially satisfying because the basic construction can be transformed simply by changing the yarn, color, size, stuffing, or number of sculpted sections.
Start with one dusty burnt-orange pumpkin.
Once you understand the process, try a mini cream pumpkin, a mustard version, a deep olive pumpkin, or an oversized chunky one.
The most important beginner checkpoints are simple:
Count the first four rounds carefully. Maintain 40 stitches through the body. Stuff gradually. Gather the opening securely. Shape the exterior sections a little at a time.
That approach gives you far more control than rushing through the final steps.
The finished pumpkin can return every autumn as handmade shelf decor, Thanksgiving table decoration, a teacher gift, or part of an entire crochet pumpkin patch.





