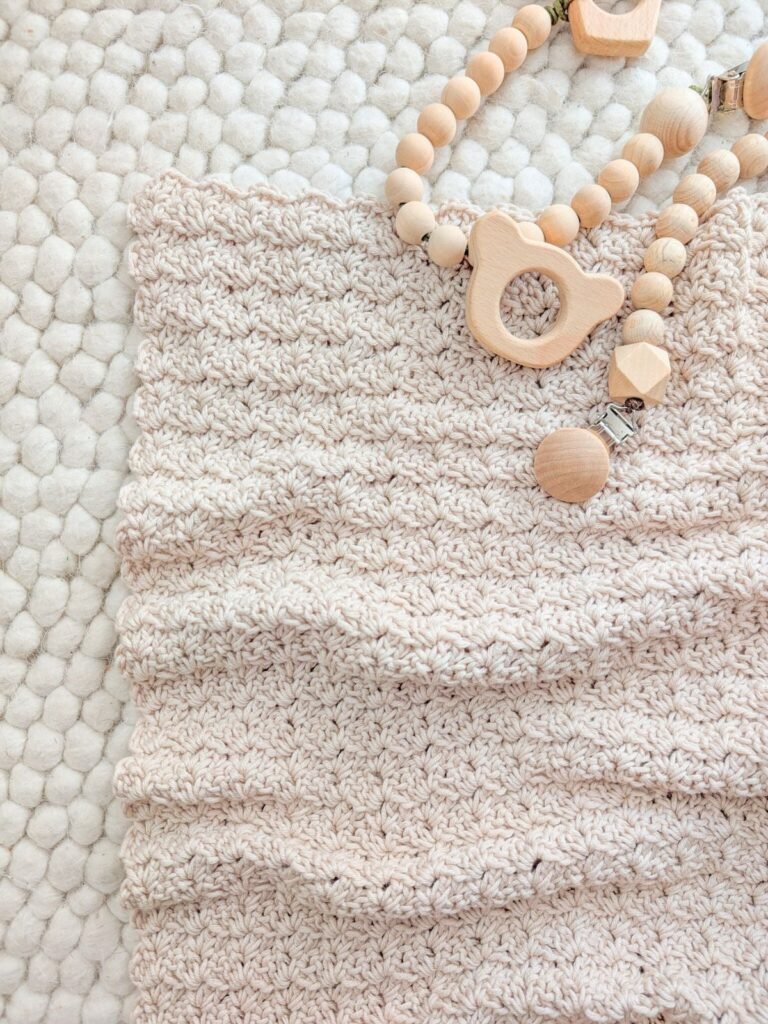
Crocheting your first baby blanket can feel like a much bigger commitment than making a coaster, washcloth, or granny square. There are more stitches to count, more rows to complete, and much more fabric in which a small mistake can hide.
The good news is that your first blanket does not need complicated color changes, advanced shaping, or a long list of special stitches.
The Soft Sage Garden Baby Blanket is designed around one simple idea: learn a short stitch sequence, repeat it until the fabric reaches the length you need, and finish the project with clean, secure edges.
The textured fabric is created with basic chain, single crochet, and double crochet stitches. After the setup row, you will work the same basic sequence again and again. That makes this an approachable project for a beginner who already understands how to hold a hook, make a chain, and recognize the top of a crochet stitch.
This is an original beginner tutorial and project structure. The selected Jewels and Jones article is used only as a visual research source for understanding how a professionally photographed baby-blanket tutorial can progress from first rows to finishing. The article below uses its own sizing, palette, hook recommendation, tutorial organization, troubleshooting advice, and finishing approach.
What You’ll Learn
By completing this beginner crochet baby blanket, you will practice:
- Making a flexible foundation chain.
- Counting chains without constantly starting over.
- Working double crochet and single crochet.
- Recognizing a chain space.
- Building a repeating textured fabric.
- Starting and ending rows correctly.
- Keeping your blanket edges straight.
- Checking tension before a large project.
- Measuring progress without stretching the fabric.
- Reattaching yarn neatly.
- Improving the appearance of the foundation edge.
- Fastening off securely.
- Weaving in yarn ends so they are less likely to work loose.
- Adjusting a blanket’s width and length.
Materials You’ll Need
Yarn
For the sample tutorial version:
- Approximately 1,000–1,150 yards of DK/lightweight category 3 yarn for the main blanket body.
- Approximately 75–125 yards of a coordinating color for the optional finishing edge.
A soft cotton-bamboo blend is an excellent choice when you want visible stitch definition and fluid drape. A soft, washable acrylic or other suitable baby yarn may also work, but always check the manufacturer’s care instructions.
For this tutorial’s visual version:
- Main color: muted soft sage green.
- Finishing color: warm cream.
The Craft Yarn Council classifies DK/light worsted as category 3 and provides standardized guidance for yarn weights and corresponding hook ranges.
Hook
- 4.5 mm crochet hook for the sample.
Your personal tension may require a larger or smaller hook.
Other Supplies
- Small sharp scissors.
- Blunt tapestry or yarn needle.
- Four to ten locking stitch markers.
- Flexible measuring tape.
- Optional row counter.
- Optional notebook or digital counter for recording completed rowsCrochet Abbreviations UsedThis tutorial uses US crochet terminology:
ch = chain
sc = single crochet
dc = double crochet
sl st = slip stitch
st/sts = stitch/stitches
sp = space
rep = repeat
These abbreviations align with commonly standardized crochet terminology published by the Craft Yarn Council.
US and UK Terminology Note
Be careful when following tutorials from different countries.
A US single crochet is called a UK double crochet.
A US double crochet is called a UK treble crochet.
This article uses US terms only.
Before You Start
Make a Small Gauge Swatch
A blanket does not need to fit a body like a sweater does, so tiny gauge differences are usually less critical. Still, making a small swatch can save you from discovering several hours later that your blanket is much narrower, wider, stiffer, or looser than expected.
For this tutorial, aim approximately for:
4 repeating stitch groups and 8 rows = about 4 inches square, measured without stretching.
The precise measurement matters less than producing fabric that feels soft, flexible, and suitable for the intended use.
When you inspect your swatch, ask:
Can I easily insert the hook into the chain spaces?
Does the fabric drape rather than stand stiffly?
Are the openings reasonably small and consistent?
Can I clearly identify the stitch groups?
Is the fabric excessively loose?
Try a larger hook if your fabric feels stiff and your stitches are difficult to work into.
Try a smaller hook if the fabric is much more open or floppy than you want.
How to Count Stitches Without Losing Your Place
The easiest time to fix a stitch-count error is during the first few rows.
For a long foundation chain, place a stitch marker every 20 chains. Instead of recounting from the beginning every time you lose concentration, you only need to recount the section between two markers.
During the blanket body, count your repeating stitch groups instead of trying to count every individual loop and post.
For the sample width, you should establish 32 textured groups across the first row.
How to Keep the Edges Straight
Most accidental increases and decreases happen at the beginning or end of a row.
To prevent them:
- Stop when you have two stitch groups remaining and work slowly.
- Look at the previous row before placing the final group.
- Count the first three rows.
- Place a stitch marker in the first and last working area if necessary.
- Compare the two sides of the blanket every five to ten rows.
Do not wait until the blanket is half finished to check the edges.
How to Avoid Curling
A foundation edge that is much tighter than the fabric above it may pull the blanket into a curved shape.
Make your starting chain relaxed.
You can deliberately use a hook one size larger for the foundation chain and then switch back to the main hook for Row 1.
Do not make the starting chain so loose that the loops become irregular; the goal is relaxed and even, not oversized and sloppy.
Choosing Colors
For the easiest first blanket, use one color for the body. You avoid repeated joins, additional yarn tails, and mistakes caused by changing colors mid-row.
A second color can be reserved for a subtle finishing edge.
Good beginner palettes include:
- Sage + warm cream.
- Dusty blue + oatmeal.
- Soft peach + ivory.
- Muted lavender + natural beige.
- Terracotta + cream for a warmer modern look.
Step-by-Step Crochet Tutorial
Step 1: Make the Foundation Chain
For the sample Soft Sage Garden Baby Blanket:
Chain 128 using the main soft sage yarn.
The stitch repeat uses a foundation multiple of 4, so you can adjust the width by adding or removing chains in groups of four.
Do not pull each chain tightly against the hook. Let the hook shaft determine the loop size.
A simple way to count 128 chains is to place a stitch marker after chains:
- 20
- 40
- 60
- 80
- 100
- 120
Then make the final eight chains.
Beginner tip:
After making the chain, lay it flat on the table before starting Row 1. Make sure it is not twisted around itself.
Common mistake to avoid:
Mistake: Crocheting the foundation chain tightly because you are worried about loose stitches.
Fix: Relax your grip and let the hook slide naturally. A tight foundation chain can pull the entire lower edge inward.
Step 2: Work the Setup Row
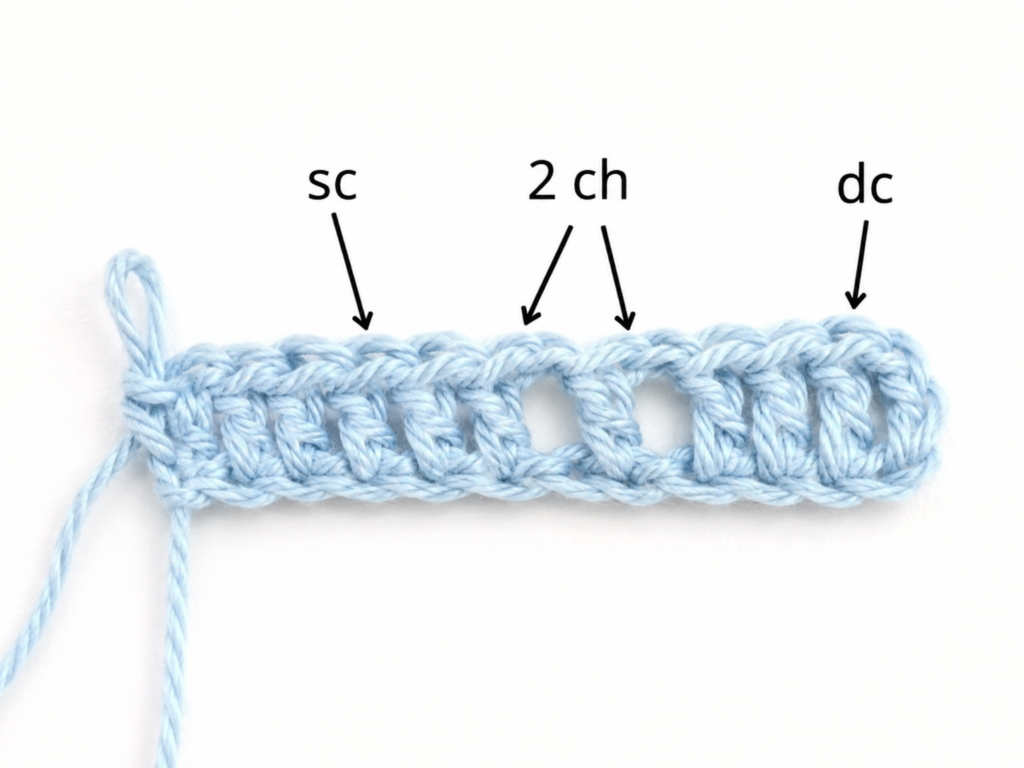
Now you will create the first row of textured stitch groups.
Row 1
Work 1 dc into the third chain from the hook.
Then:
Ch 2, sc into the next chain.
For the repeating section:
Skip 2 chains, work 2 dc into the next chain, ch 2, and sc into the next chain.
Repeat that sequence across the entire foundation chain.
The important visual feature is the ch-2 space. You will use these open spaces to make all subsequent rows much easier to read.
At the end of the setup row, stop and inspect the work.
You should see a repeated rhythm of:
tall stitches → open chain space → short anchoring stitch
Rather than worrying about every individual loop, learn to recognize that three-part visual rhythm.
Beginner tip:
Before turning, count your completed textured groups. For the sample chain of 128, you should have 32 stitch groups.
Common mistake to avoid:
Mistake: Accidentally skipping three foundation chains instead of two between groups.
Fix: After making the sc, visually count the next two chains, skip them, and place the next pair of double crochets into the following chain.
Step 3: Begin the One-Row Repeat
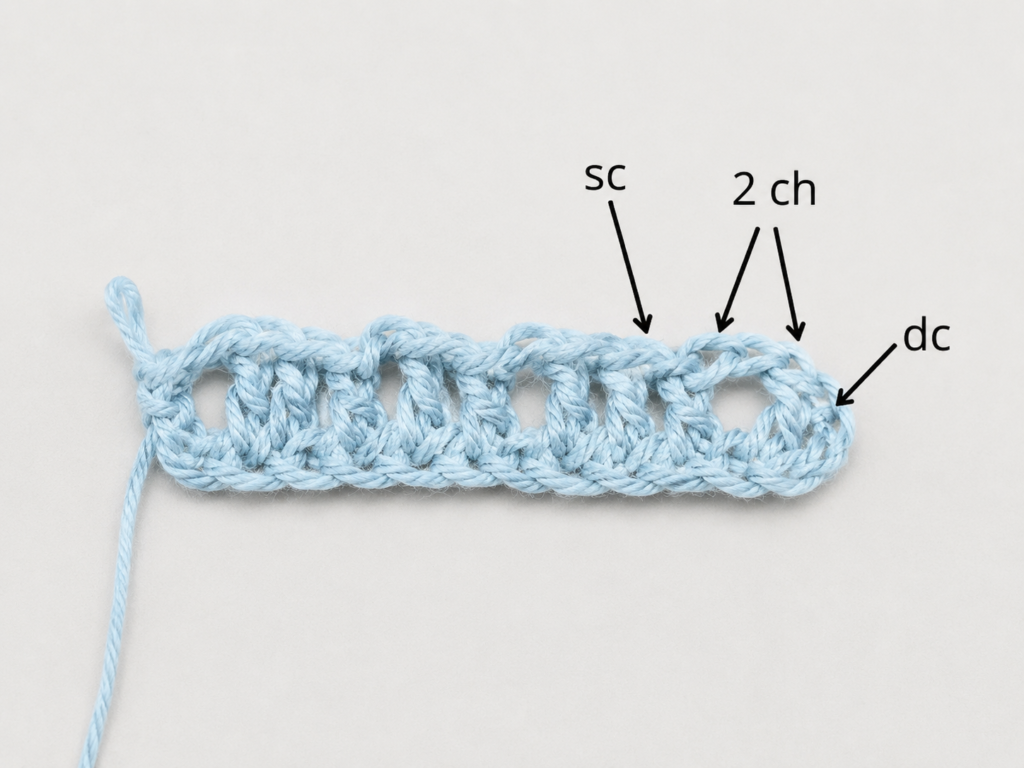
Turn your work.
Ch 2. This turning chain does not count as a stitch in this tutorial.
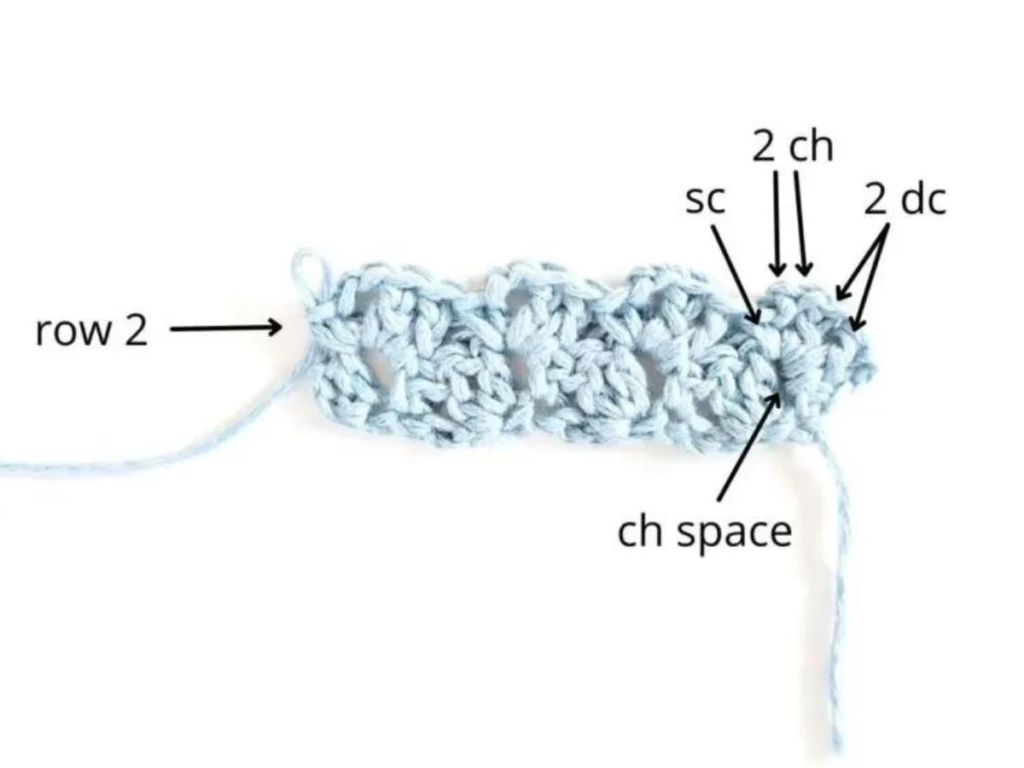
Look for the first clear ch-2 space from the previous row.
Into that chain space, work:
2 dc, ch 2, sc
Move to the next ch-2 space and repeat:
2 dc, ch 2, sc
Continue in every ch-2 space across.
The major advantage of this stitch structure is that you do not need to hunt for the tops of many individual stitches. Once you can identify the open spaces, the row becomes much more rhythmic.
Beginner tip:
Spread the fabric gently with your non-hook hand. The ch-2 spaces will look like small openings between textured stitch groups.
Common mistake to avoid:
Mistake: Working into the top of one of the double crochet stitches instead of the open chain space.
Fix: Before inserting the hook, look for an actual opening through which you can see the background. That is the working space.
Step 4: Repeat the Texture Across Every Row
From this point onward, the main body becomes repetitive.
For every new row:
- Turn the work.
- Ch 2.
- Find the first ch-2 space.
- Work 2 dc, ch 2, sc into that space.
- Repeat the same sequence in each ch-2 space across.
Continue checking that you still have 32 textured groups across your sample blanket.
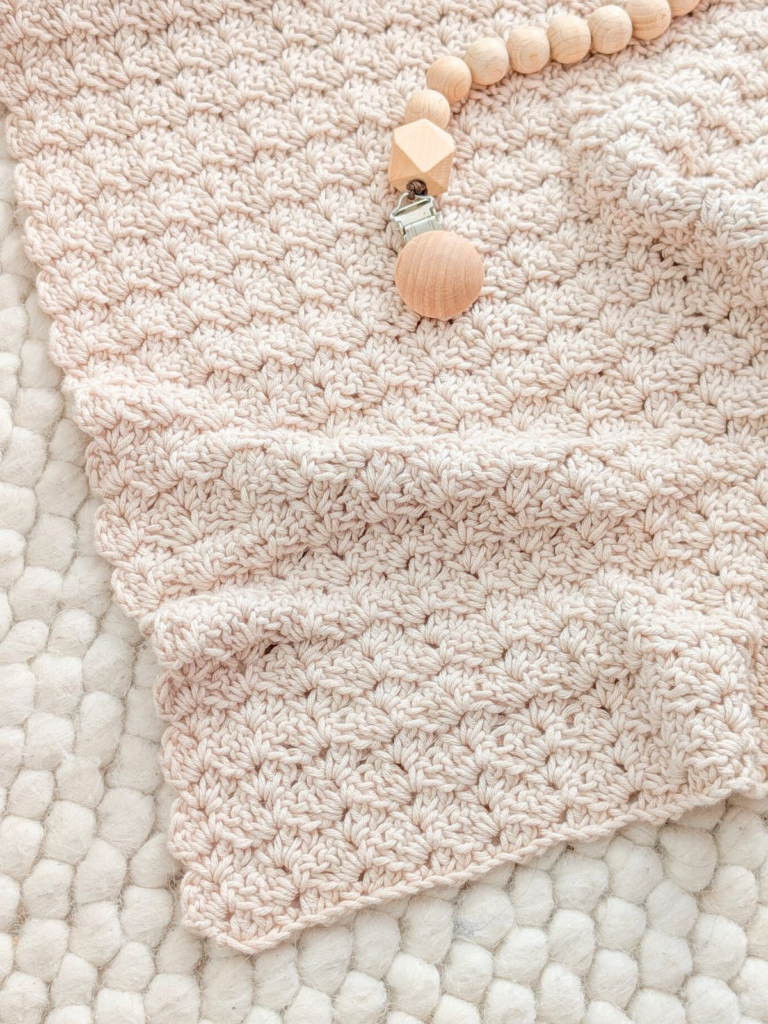
The fabric should begin showing small raised sections that nest naturally into one another. After five or six rows, the stitch pattern is much easier to recognize than it was in Row 1.
Beginner tip:
Do not judge the blanket after only one or two rows. Many crochet textures become clearer after enough fabric has developed.
Common mistake to avoid:
Mistake: Accidentally working two stitch groups into the same chain space.
Fix: After finishing each group, move your non-hook thumb to the next empty space. This physical habit makes it
harder to accidentally reuse the previous opening.
Step 5: Continue Until the Blanket Reaches the Desired Length
For the sample version, continue the repeating row until the blanket measures approximately 34 inches long.
Under the suggested gauge, this will be approximately 68 total rows, but your personal row count may differ.
For a blanket, measuring the actual fabric is usually more useful than forcing an exact row count when your personal tension differs from the sample.
How to Measure Correctly
Lay the blanket on a flat surface.
Do not:
- Pull it lengthwise.
- Stretch the lower corners.
- Measure while it is hanging vertically.
- Include an unfinished loop in the measurement.
Measure from the foundation edge to the top of the latest completed row.
Check the Sides Regularly
Every ten rows:
- Lay the blanket flat.
- Compare the left and right edges.
- Count the stitch groups.
- Check for an accidental narrowing or widening.
A slightly uneven edge can often be improved with blocking or a border. A dramatically widening blanket usually indicates accidental increases.
Beginner tip:
Use a row counter, or make a small pencil mark after every five rows. Blankets become repetitive enough that it is easy to lose track.
Common mistake to avoid:
Mistake: Discovering far too late that one row contains 31 groups and the next contains 30.
Fix: Count every row for the first five rows, then every five to ten rows once your technique is consistent.
Step 6: Complete the Main Blanket Body
Once your blanket reaches approximately 34 inches—or your preferred length—finish the final repeat row.
Do not cut the yarn immediately.
First:
- Lay the blanket flat.
- Check both side edges.
- Count the groups one final time.
- Look for skipped spaces or doubled groups.
- Measure the finished body.
For the sample size, expect approximately:
32 inches wide × 34 inches long before any significant blocking adjustment.
If you are happy with the body, fasten off the sage yarn and leave a tail of approximately six to eight inches for weaving in.
The blanket can be considered complete at this stage. The following foundation-edge treatment is optional, but it can make the starting edge look more intentionally coordinated with the textured fabric.
Step 7: Add the Optional Balanced Foundation Edge
The starting edge of a crochet blanket often looks visually different from the final edge. That is not an error; it is simply a result of beginning with a chain.
For a more decorative finish, reattach the warm cream yarn to one corner of the foundation edge.
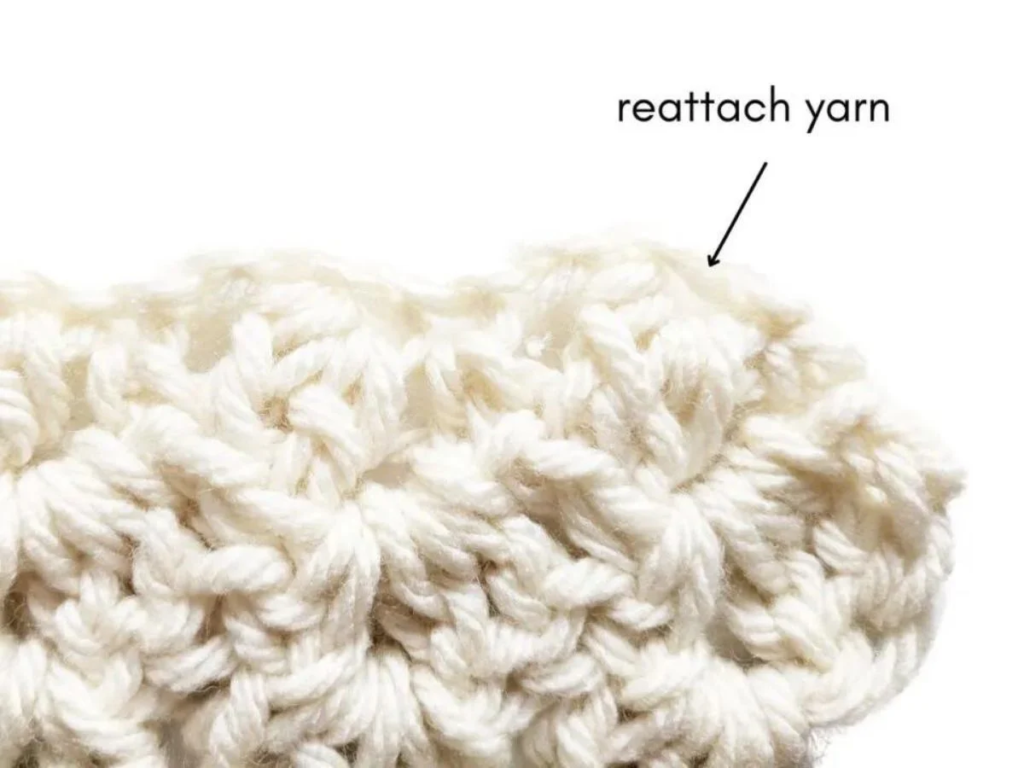
After attaching the cream yarn:
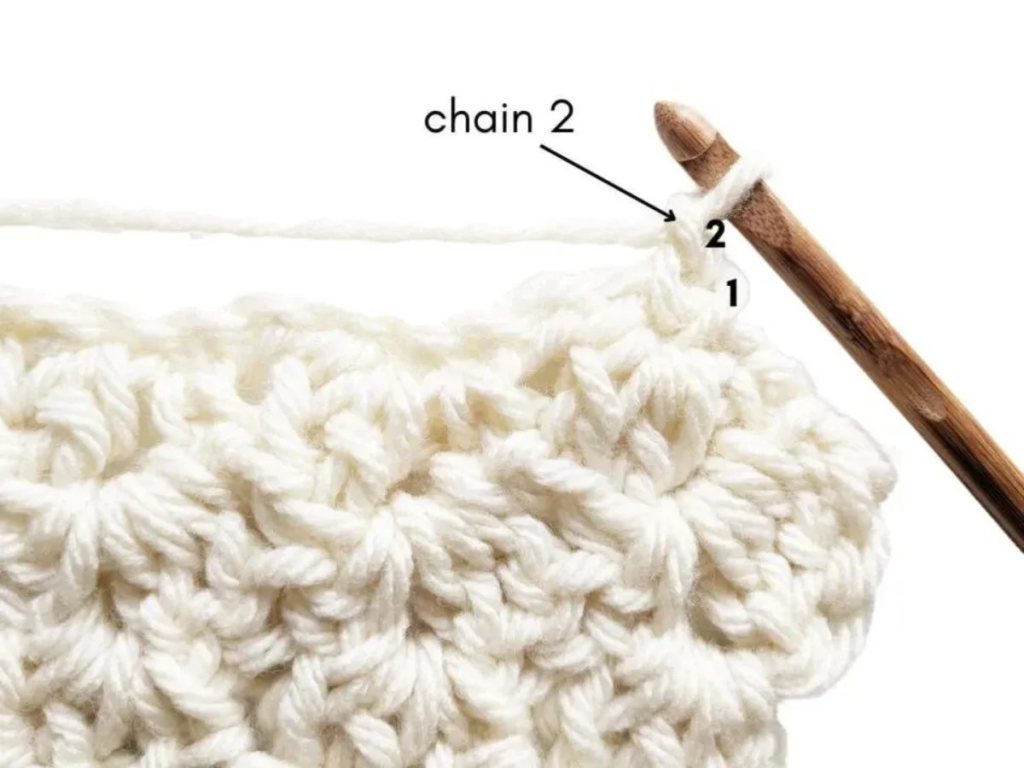
Ch 1 and work evenly along the foundation edge.
For the Soft Sage Garden version, you have two beginner-friendly finishing choices.
Option A: Simplest Edge
Work 1 sc evenly across the entire foundation edge.
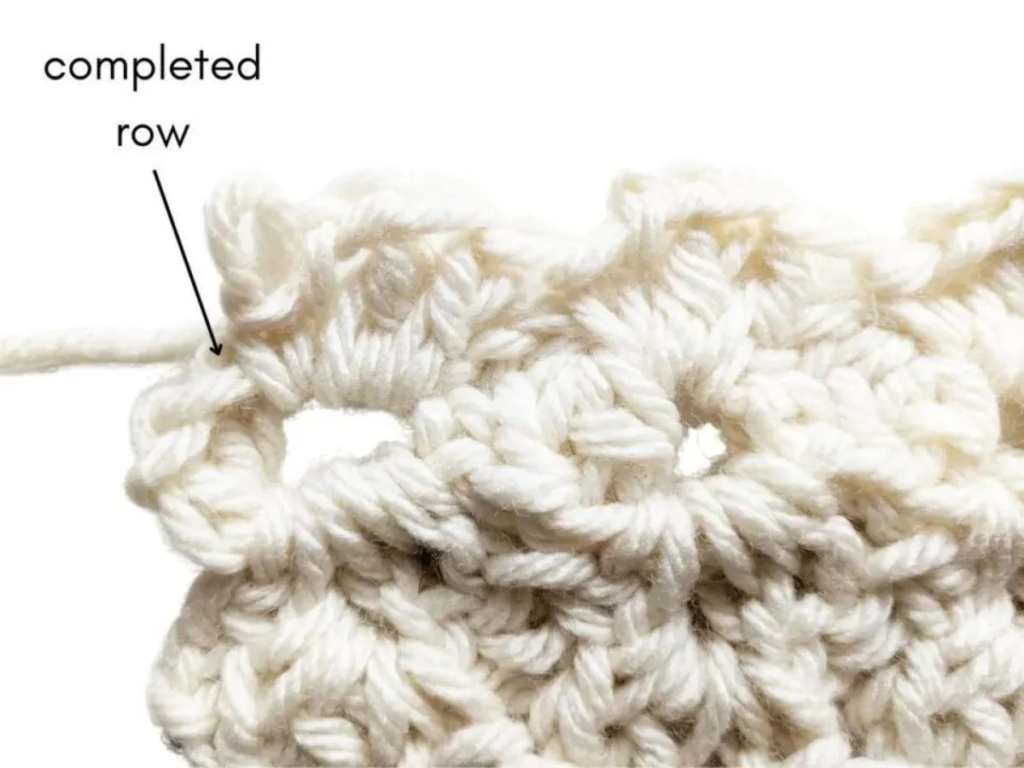
Fasten off.
This is the easiest option.
Option B: Coordinated Textured Edge
To visually echo the body texture, work a small sequence along the available foundation spaces:
2 dc, ch 2, sc
Continue at even intervals across the foundation edge, taking care not to force too many stitches into too little space.
The exact number of edge groups is less important than keeping the edge flat.
If it begins to ruffle, you have too many stitches.
If it pulls inward, you need slightly more spacing or looser tension.
Beginner tip:
Place the blanket flat after every five or six edge groups. That lets you spot ruffling before you complete the entire edge.
Common mistake to avoid:
Mistake: Trying to force the exact same number of stitches into an edge even when personal tension makes the edge buckle.
Fix: Let the fabric guide you. A flat, smooth edge is the priority.
Pattern Notes or Stitch Notes
Turning Chain Rule
The ch 2 at the beginning of a new repeat row does not count as a stitch in this tutorial.
Keep this rule consistent from beginning to end.
Stitch Group Count
The sample uses:
- Starting chain: 128
- Expected textured groups: 32
Check that number during your first several rows.
Repeat Pattern
After the setup row, work:
2 dc, ch 2, sc into each ch-2 space across.
Repeat the same structure for every subsequent body row.
Right Side and Wrong Side
This blanket is reversible enough for everyday use. The two faces may not look perfectly identical, but no strict right-side/wrong-side designation is required for the main body.
Choose the face you prefer when styling the finished blanket.
Size Adjustment
The foundation chain uses a multiple of four.
To make the blanket wider:
- Add 4 chains for each additional stitch group.
To make it narrower:
- Remove 4 chains for each stitch group you wish to eliminate.
For length, simply repeat rows until the blanket reaches the desired measurement.
Always remember that changing yarn weight or hook size changes:
- Width.
- Length per row.
- Yarn consumption.
- Drape.
- Stitch-hole size.
Common Beginner Mistakes
1. Making the Foundation Chain Too Tight
What happens: The lower edge curves inward.
Fix: Restart with looser chains or use a hook one size larger only for the foundation chain.
2. Losing a Stitch Group at the End of a Row
What happens: The blanket gradually becomes narrower.
Fix: Count the repeating groups and inspect the last chain space before ending every row.
3. Adding an Extra Group
What happens: The blanket widens toward the top.
Fix: Never put two groups into the same chain space. Move your thumb to the next empty opening after every completed group.
4. Crocheting Into Stitch Tops Instead of Chain Spaces
What happens: The established texture becomes distorted.
Fix: Look for the visible openings between stitch groups. Insert the hook into the open space rather than searching for individual top loops.
5. Changing Tension Halfway Through
What happens: One part of the blanket is wider or stiffer than another.
Fix: Use the same hook throughout the main body and check the width every ten to fifteen rows.
6. Measuring While Stretching the Blanket
What happens: You believe the blanket is longer than it really is.
Fix: Lay it flat, smooth it gently, and measure without pulling.
7. Ignoring the Yarn Label
What happens: The yarn may not tolerate the washing or drying method you intend to use.
Fix: Keep one yarn label until the project is finished and follow the manufacturer’s care instructions.
How to Customize This Crochet Project
Change the Yarn
You can substitute another DK/lightweight category 3 yarn, but make a swatch first.
A different fiber can dramatically change the feel:
- Cotton may produce more stitch definition.
- Bamboo blends may add drape.
- Acrylic can provide easy-care options.
- Wool blends may require different washing.
The yarn label and finished swatch should guide the final decision.
Change the Colors
For the simplest version, make the entire blanket in one color.
For a two-color version:
- Main blanket in sage.
- Foundation edge in cream.
For subtle stripes, change color only after completing an entire repeat row.
Avoid frequent color changes for a first blanket unless you are comfortable weaving in many additional yarn tails.
Change the Size
Because the starting chain is a multiple of four, width adjustments are straightforward.
Possible approximate project types include:
- Small lovey.
- Stroller blanket.
- Square baby blanket.
- Larger toddler blanket.
- Lap blanket.
The final dimensions will depend on your yarn, hook, stitch tension, and finishing.
Border Options
Try one of these:
- No border.
- Single crochet around the entire blanket.
- Two rounds of single crochet.
- Contrasting foundation-edge finish only.
- Simple shell edging after a stabilizing single crochet round.
For a first blanket, restraint usually produces the cleanest result.
Texture Options
After you are comfortable with the pattern, experiment with:
- A slightly larger hook for more drape.
- A slightly smaller hook for denser fabric.
- Tonal yarn.
- Subtle self-striping yarn.
Always test the result on a swatch first.
Gift Ideas and Uses
A handmade baby blanket may be suitable as:
- A baby-shower gift.
- A stroller blanket.
- A supervised tummy-time blanket.
- A keepsake.
- Nursery décor.
- A photo prop used under adult supervision.
Important infant-sleep safety note: The American Academy of Pediatrics advises keeping loose blankets and other soft objects out of an infant’s crib or bassinet during sleep. A handmade baby blanket should not be interpreted as appropriate loose bedding for an unattended infant sleep space.
Finishing Instructions
Once the final edge is complete, resist the urge to simply cut the yarn very close to the fabric.
A few careful finishing steps can make the project look cleaner and help the ends remain secure.
1. Fasten Off
After completing the final stitch:
- Cut the working yarn, leaving a six-to-eight-inch tail.
- Pull the tail completely through the final loop.
- Tighten gently.
Do not create a hard, distorted knot against the edge.
2. Weave In the Ends
Thread one yarn tail onto a blunt tapestry needle.
Weave through several stitches on the wrong side of the fabric.
Change direction at least once.
Avoid pulling so tightly that the surrounding fabric puckers.
Repeat with all remaining tails.
Trim only after you are confident the tail has been secured through enough fabric.
3. Inspect the Corners
Lay the blanket flat and check:
- Are the corners lying naturally?
- Does the finishing edge ruffle?
- Does any edge pull inward?
- Are any tails visible?
- Is one side noticeably shorter?
Small irregularities are normal in handmade work.
4. Blocking
Blocking may help relax mild unevenness and improve the final shape, depending on the fiber.
Always follow the care instructions for your chosen yarn.
A conservative approach is:
- Check the yarn label.
- Test your swatch first.
- Shape the blanket gently.
- Avoid excessive heat unless the manufacturer explicitly allows it.
- Allow the project to dry completely before folding or gifting.
5. Washing and Care
Follow the actual yarn manufacturer’s label.
For a gift, include a handwritten care card so the recipient knows:
- Whether machine washing is allowed.
- Recommended water temperature.
- Whether tumble drying is allowed.
- Whether the blanket should be reshaped and dried flat.
Quick Printable-Style Summary
Project: Soft Sage Garden Baby Blanket
Skill level: Beginner
Finished sample size: Approximately 32 × 34 inches
Yarn: DK/lightweight category 3 cotton-bamboo blend
Main yarn: Approximately 1,000–1,150 yards
Optional finishing yarn: Approximately 75–125 yards
Hook: 4.5 mm
Other supplies: Scissors, tapestry needle, stitch markers, measuring tape
Stitches: ch, sc, dc, optional sl st
Starting chain: 128
Starting-chain multiple: Multiple of 4
Setup row: Establish repeating textured groups with dc, ch-2 spaces, and sc.
Main repeat: Work 2 dc, ch 2, sc into each ch-2 space across.
Sample group count: 32 groups
Length: Repeat until approximately 34 inches or desired size.
Finishing: Fasten off, weave in ends, optionally add a coordinating foundation-edge treatment, and block only as appropriate for the chosen yarn.
FAQ
1. Is this crochet baby blanket pattern suitable for a complete beginner?
It is best for a beginner who already knows how to make a chain and has practiced single and double crochet at least briefly.
The repeating body is simple because, after the setup row, you repeatedly work into visible chain spaces rather than constantly searching for individual stitch tops.
2. What is the easiest yarn for a beginner crochet baby blanket?
Choose a smooth yarn with clearly visible strands and good stitch definition.
Very fuzzy or heavily textured yarn can make it difficult to see chain spaces and recognize mistakes.
A DK cotton-bamboo blend is used for this tutorial concept, but a suitable smooth baby yarn in another washable fiber can also work.
3. Can I use worsted-weight yarn instead of DK yarn?
Yes, but the dimensions, drape, yarn requirements, and recommended hook size will change.
Make a swatch before beginning the full blanket.
The Craft Yarn Council’s standardized weight system distinguishes light/DK yarn from medium/worsted yarn and gives different general hook ranges for each.
4. How do I make this crochet baby blanket wider?
Add foundation chains in multiples of four.
For example:
- Add 4 chains for one additional group.
- Add 8 chains for two additional groups.
- Add 20 chains for five additional groups.
Always make a swatch if precise dimensions matter.
5. Why is my crochet blanket getting narrower?
The most common reason is accidentally missing the final chain space of one or more rows.
Count the number of textured groups regularly. For the sample version, maintain 32 groups across every body row.
6. Why are my blanket edges wavy?
Possible causes include:
- Too many stitches along a border.
- Loose tension.
- An overly large hook.
- Inconsistent stitch placement.
If a border ruffles, reduce the number of stitches around the edge.
7. Does a beginner crochet baby blanket need a border?
No.
A border is optional. If your edges are straight and you like the appearance, you can simply fasten off and weave in the ends.
The Soft Sage Garden version includes an optional contrasting foundation-edge treatment primarily for visual balance.
Conclusion
Your first crochet baby blanket does not need ten different stitches or complicated shaping to feel special.
The most important skills are much simpler: create a relaxed foundation, learn to recognize your stitch spaces, count often enough to catch mistakes early, and keep repeating the same texture until the fabric reaches the size you want.
The Soft Sage Garden Baby Blanket turns those basic skills into a practical project with a soft raised texture and plenty of repetition for building confidence.
Take your time with the first two rows. They require the most concentration. Once the chain spaces become clear and the stitch rhythm starts to feel familiar, the blanket becomes far more relaxing to work.





