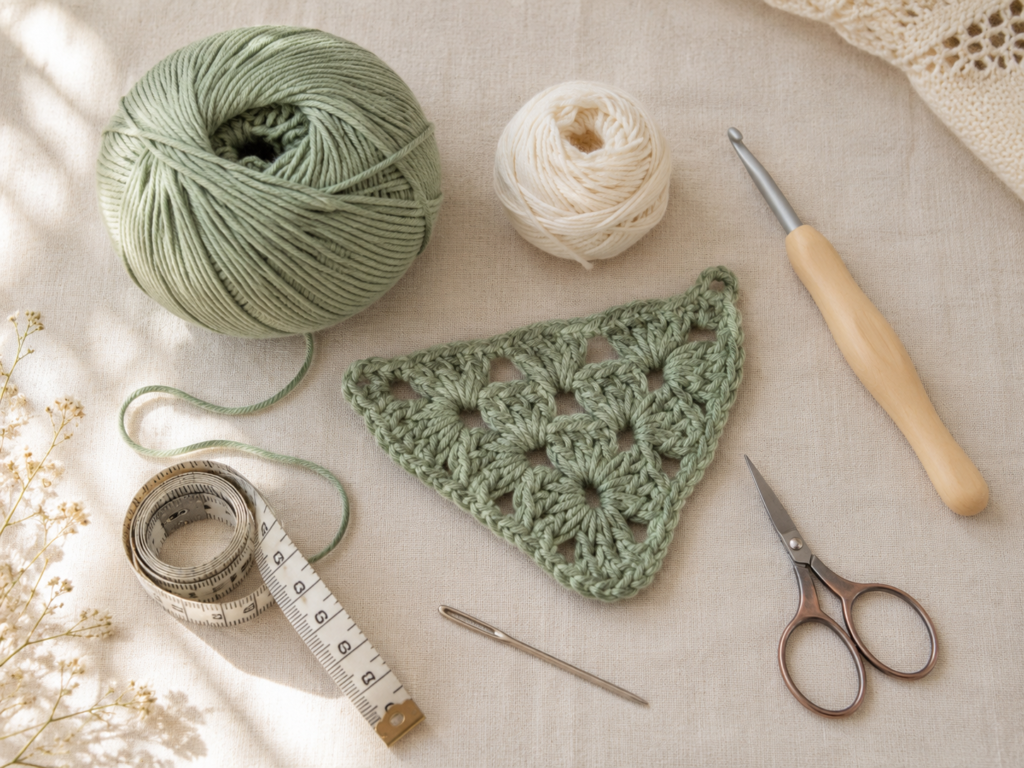
A crochet bandana is one of the best wearable projects for beginners because it feels more exciting than a practice square but still uses simple, repeatable stitches. You do not need shaping for sleeves, complicated sizing, buttonholes, seams, or advanced garment construction. You build a triangle row by row, add tie straps, finish the edges, and weave in the ends.
This tutorial teaches a lightweight granny-cluster crochet bandana pattern with optional picot edging. The finished piece can be worn as a headscarf, summer hair accessory, kerchief, festival accessory, beach cover for your hair, or handmade gift.
The selected visual reference for this article is VivCrochets’ easy crochet bandana tutorial, which uses one consistent project sequence and shows the bandana from materials through wearing. The source pattern is row-based, adjustable, and includes optional picots, which makes it a useful visual reference for a beginner-friendly bandana tutorial.
This article does not copy that source pattern. The instructions below are an original beginner version with a soft sage-green cotton palette, simplified checkpoints, different row count guidance, different tie-strap length, and additional teaching notes.
What You’ll Learn
- How to start a triangle bandana from the bottom point.
- How to crochet granny-style clusters.
- How to increase one cluster per row.
- How to measure the bandana for head coverage.
- How to add long tie straps.
- How to crochet evenly into row ends.
- How to add optional picot edging.
- How to finish and block a wearable crochet accessory.
- How to adjust the pattern for different sizes and yarns.
Materials You’ll Need
For one adult-size crochet bandana:
- 150–180 yards of light cotton, bamboo-cotton, or cotton-blend yarn.
- 4.0 mm crochet hook for a neat but drapey fabric.
- Scissors.
- Yarn needle.
- Measuring tape.
- Stitch markers, optional.
- Blocking mat or towel, optional.
Lightweight yarn is ideal because a bandana sits on the head and should not feel bulky. A soft cotton or bamboo blend gives enough structure for visible stitch texture while still keeping the fabric breathable. The Craft Yarn Council’s standard yarn-weight system lists recommended hook-size ranges by yarn category, but the best final hook size still depends on your yarn and tension.
Crochet Abbreviations Used
This pattern uses U.S. crochet terminology.
- ch = chain
- sc = single crochet
- dc = double crochet
- sl st = slip stitch
- st/sts = stitch/stitches
- sp = space
- rep = repeat
- p = picot
- RS = right side
- WS = wrong side
The Craft Yarn Council lists these as standard crochet abbreviations and also explains that U.S. and U.K. crochet terms differ, so always check which terminology a pattern uses before beginning.
Finished Size
Approximate finished size after light blocking:
- Long top edge: 18–20 inches, not including straps.
- Short diagonal sides: 13–15 inches.
- Tie straps: 12–14 inches each.
This is a flexible accessory, so exact measurements do not need to be perfect. The most important fit check is whether the triangle comfortably covers the crown of the head and reaches from one side of the head to the other before the straps begin.
Before You Start
Gauge and tension
Gauge is not strict for this bandana, but fabric drape matters. If the fabric feels stiff, your hook may be too small. If the stitches look floppy and loose, your hook may be too large.
Make a small sample of 5–6 rows before committing to the full bandana. The fabric should feel soft, flexible, and light.
How to count clusters
This bandana grows by cluster count.
A cluster in this tutorial means 3 double crochets worked into the same stitch or chain space.
The bottom row begins with one cluster. Each new triangle row adds one more cluster. If Row 1 has 1 cluster, Row 10 should have 10 clusters.
How to keep the edges straight
The beginning and ending clusters create the triangle edges. Keep your turning chain relaxed, and do not accidentally skip the last stitch or last space of the row.
How to avoid curling
Curling usually happens when the yarn tension is too tight or when the turning chain is short. Use relaxed chains and block the finished bandana lightly.
Beginner note
Read the whole pattern once before starting. The repeat becomes easy after a few rows.
Step-by-Step Crochet Tutorial
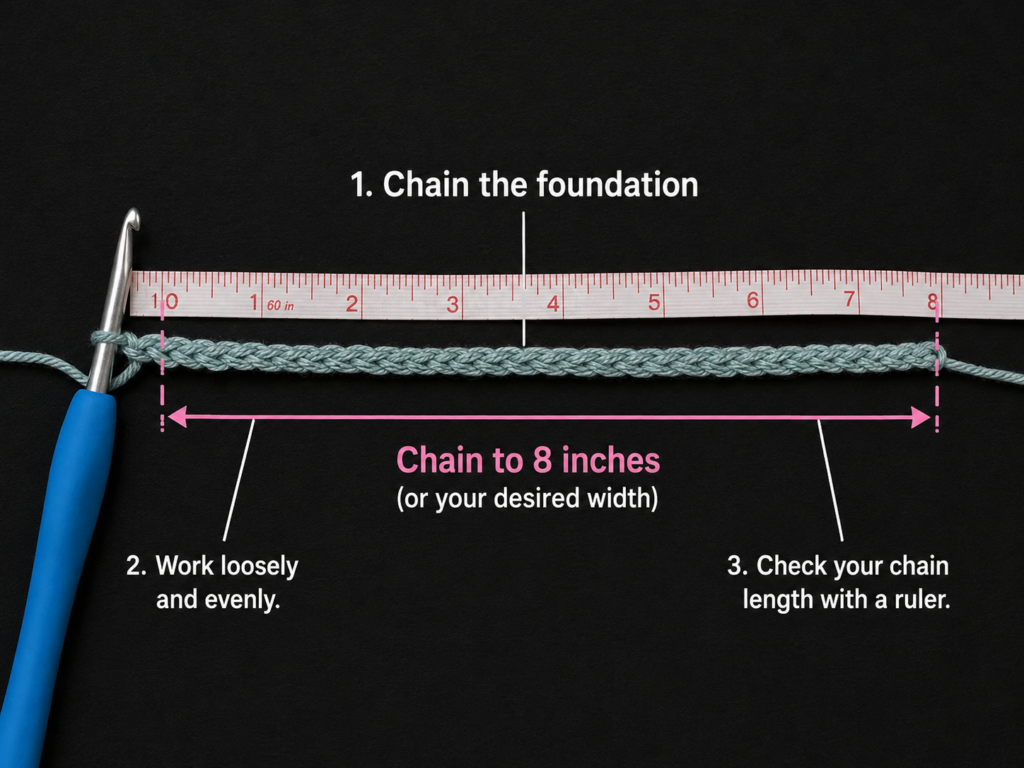
Step 1: Make the Starting Point
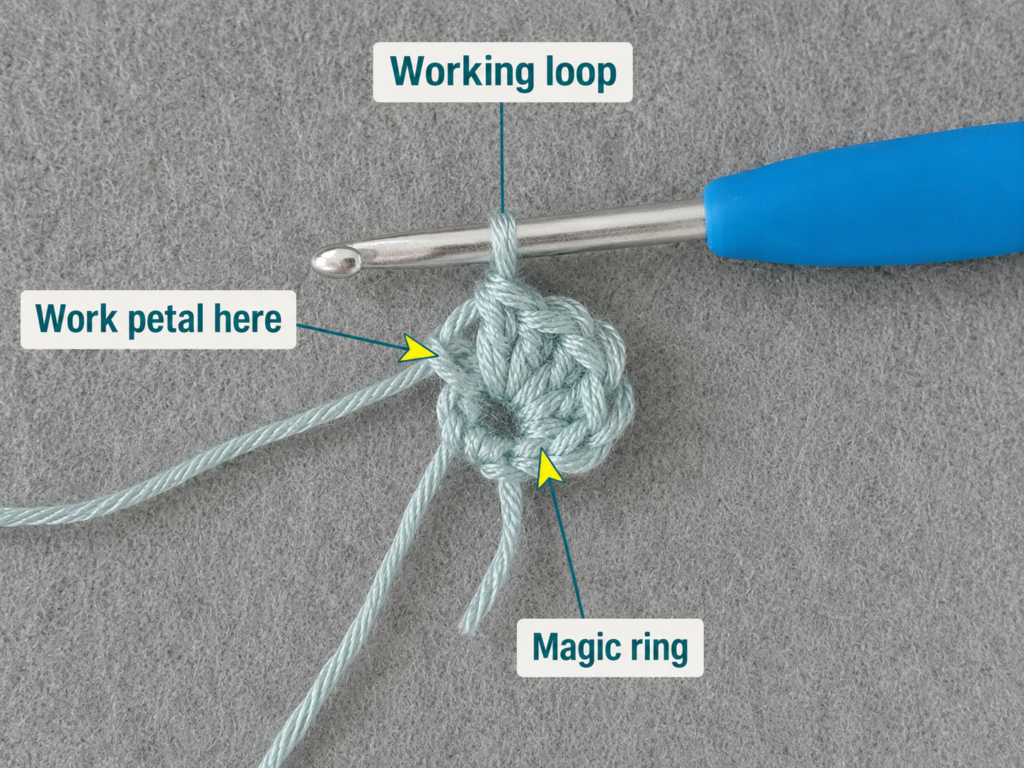
Make a slip knot.
Ch 4.
Work 2 dc into the 4th chain from the hook.
The skipped chains at the beginning act like the first double crochet, so this creates one small 3-dc cluster.
This tiny cluster becomes the bottom point of your triangle.
Beginner tip: Hold the yarn tail gently but do not pull it tight. The first row is small, so it may feel awkward.
Common mistake to avoid: Do not crochet into the loop on your hook. Count chains below the hook, then work into the 4th chain.
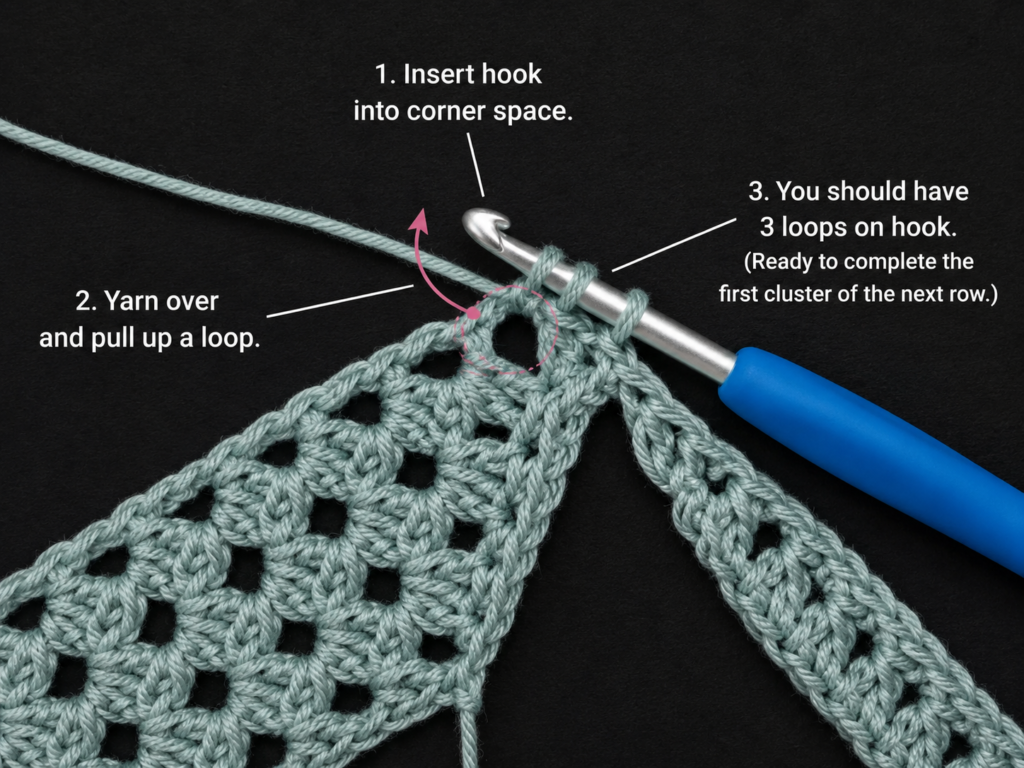
Step 2: Work Row 2 and Begin the Triangle Shape
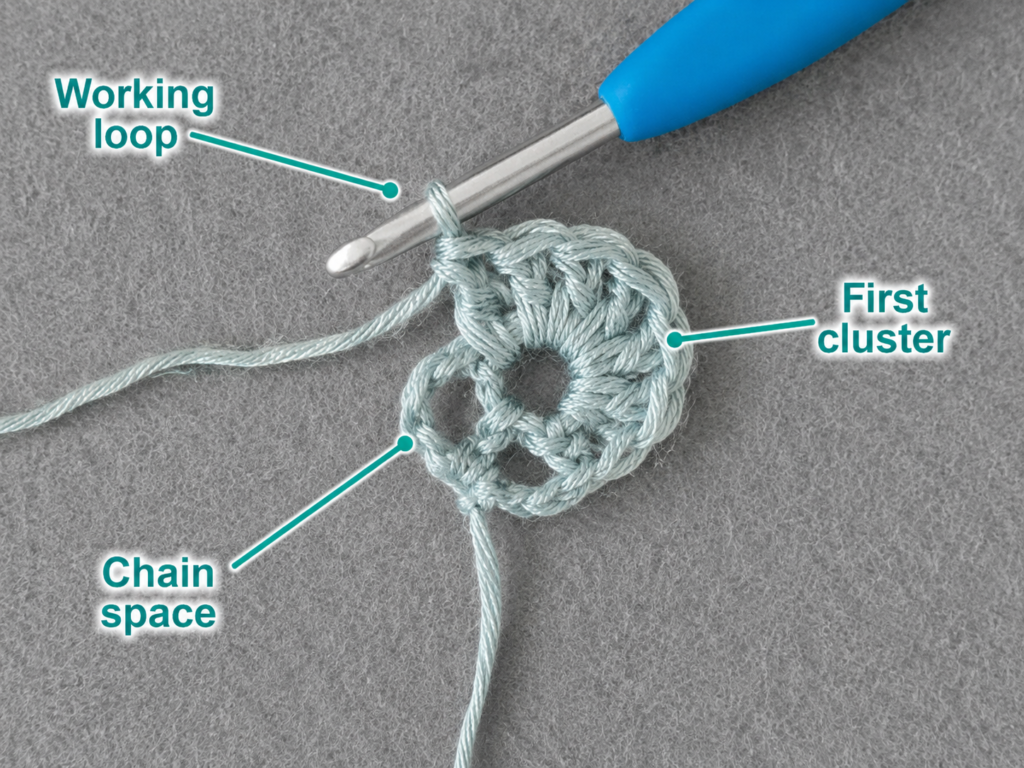
Ch 3 and turn.
Work 2 dc into the first stitch. This creates the first cluster of the row.
Ch 1.
Work 3 dc into the top of the turning chain from the previous row. This creates the second cluster.
You should now have 2 clusters.
The triangle shape begins here. One cluster sits on each side of the growing point, and the chain space between them gives the bandana its open, light texture.
Beginner tip: Turn the work slowly and identify the top of the previous turning chain before making the last cluster.
Common mistake to avoid: Do not work the final cluster too far down the side edge. It belongs at the upper edge of the previous row.
Step 3: Continue the Granny-Cluster Row Repeat
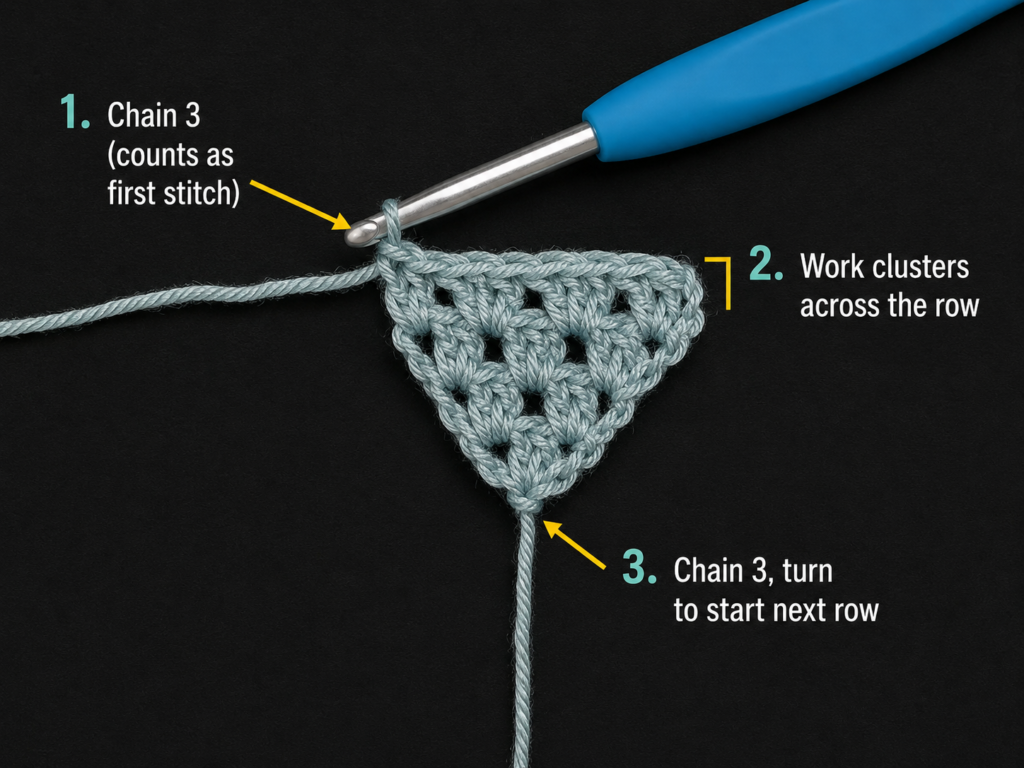
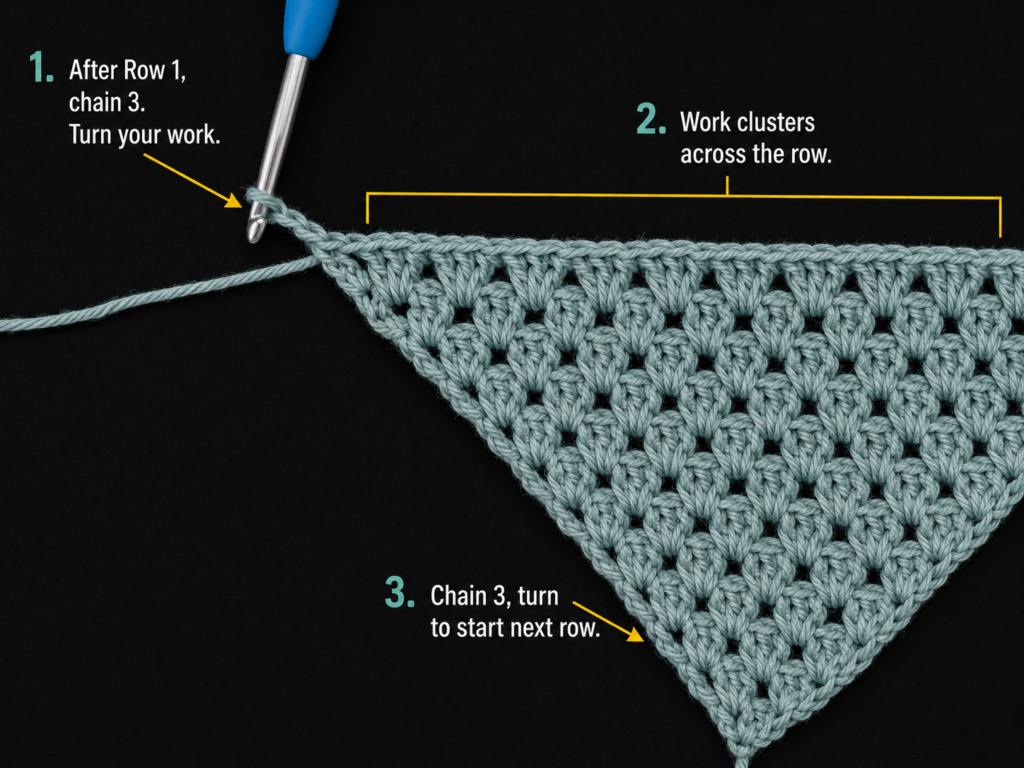
From this point, every row follows the same idea.
Ch 3 and turn.
Work 2 dc into the first stitch.
Ch 1.
Work 3 dc into each chain space across the row, placing ch 1 between clusters.
At the end of the row, work 3 dc into the top of the turning chain.
Each row should gain one cluster.
For example:
- Row 3 has 3 clusters.
- Row 4 has 4 clusters.
- Row 5 has 5 clusters.
- Row 10 has 10 clusters.
Continue until the triangle measures approximately 13–14 inches along the diagonal sides, or until it reaches your preferred size.
Beginner tip: Count the clusters at the end of every row. The row number and cluster count should match.
Common mistake to avoid: Skipping the final cluster. This is the most common reason one side of the triangle becomes shorter than the other.
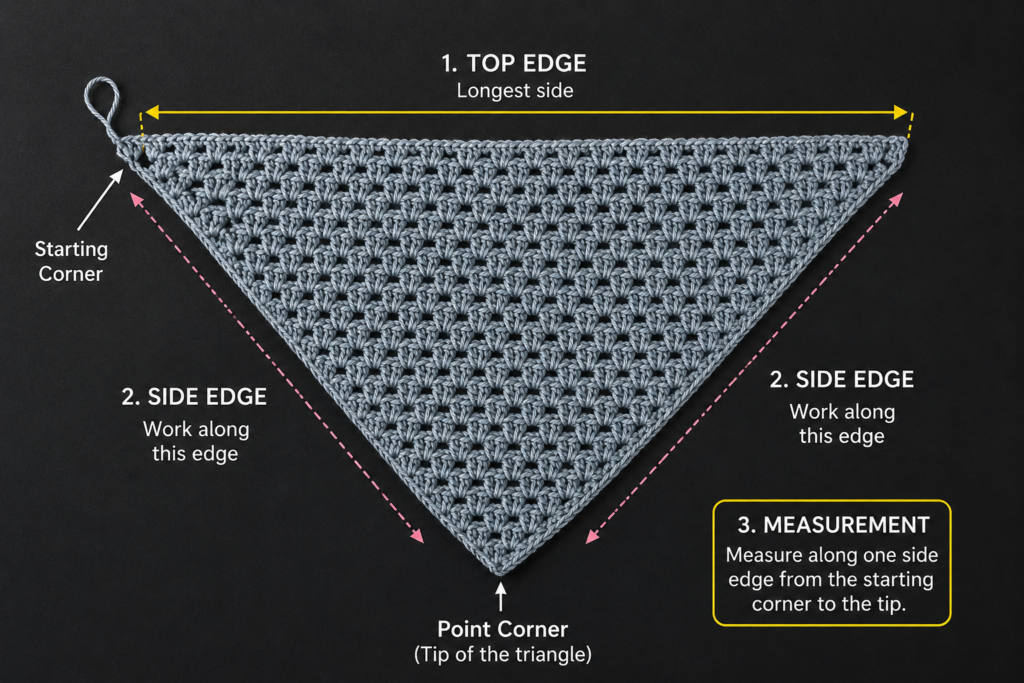
Step 4: Measure the Triangle Before Adding Straps
Lay the triangle flat without stretching it.
Measure one diagonal side from the bottom point to one upper corner.
Then measure the long top edge from corner to corner.
For most adults, a useful target is:
- Diagonal side: about 13–15 inches.
- Top edge: about 18–20 inches.
The selected source also shows measuring both the triangle sides and long upper edge before continuing with straps, which is a strong beginner checkpoint.
If your bandana is too small, add more rows.
If it already feels too large, stop sooner.
Beginner tip: Place the triangle over your head before making straps. It should cover the crown comfortably without pulling.
Common mistake to avoid: Measuring while stretching the fabric. Crochet opens up when pulled, so measure it relaxed.
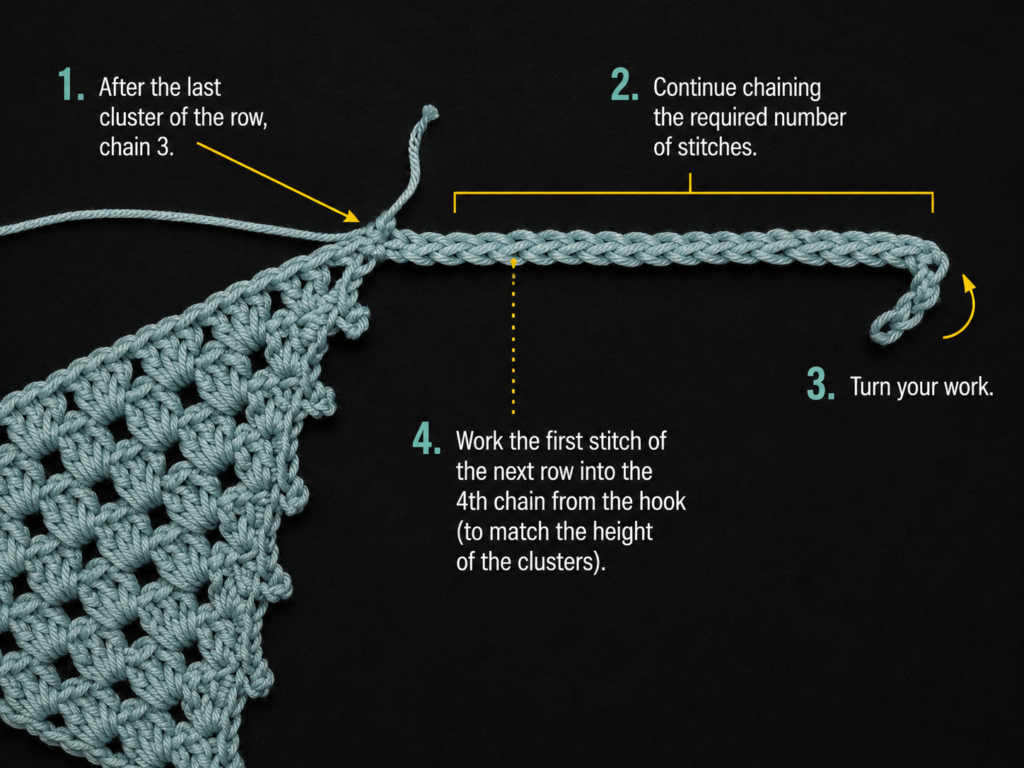
Step 5: Make the First Tie Strap
After completing the last body row, do not cut the yarn.
Ch 50 for the first tie strap.
Starting in the second chain from the hook, sl st in each chain back toward the bandana.
This creates a neat, narrow strap.
If slip stitches feel too tight, use single crochet stitches instead. The strap will be slightly thicker but easier for many beginners.
Beginner tip: Make your chain loosely. A tight chain will make the strap stiff and curled.
Common mistake to avoid: Accidentally twisting the chain before slip stitching back. Keep the chain flat as you work.
Step 6: Work Along the First Side Edge
Rotate the triangle so you can work along one short side.
Work 2 or 3 sc into the side of each row, depending on how open your edge looks.
The goal is a smooth edge that does not pull tight or wave.
For a clean beginner version, work:
2 sc into the side of each row across the first diagonal edge.
If the edge pulls inward, add a third sc in every few rows.
If it waves, reduce the number of stitches.
Beginner tip: Lay the edge flat every few inches. It should sit smoothly without rippling.
Common mistake to avoid: Forcing the same number of stitches into every edge if your tension is different. Edge stitches are more about smoothness than strict counting.
Step 7: Add Optional Picot Edging
Picots are small decorative bumps along the edge.
They make the bandana look more delicate, but they are optional.
A simple picot repeat is:
Sc in the side edge, ch 3, sl st into the first chain of the ch-3 loop.
Then continue with more sc stitches before making the next picot.
For a balanced look, add one picot every 2 rows or every 5–6 edge stitches.
If this is your first bandana, you may skip picots and keep the edge plain. The source tutorial also gives the option to skip picots and work single crochets along the edge instead.
Beginner tip: Keep picot chains relaxed. Tight picots are difficult to close neatly.
Common mistake to avoid: Making picots too close together. Crowded picots can make the edge ruffle.
Step 8: Work Around the Bottom Point and Up the Second Side
Continue the edging along the first diagonal side until you reach the bottom point.
At the bottom point, work:
2 sc, optional picot, 2 sc
This gives the point a neat finish without making it too bulky.
Then continue up the second diagonal side using the same edging rhythm as the first side.
Try to mirror your first edge.
If you added picots every 2 rows on the first side, do the same on the second side.
Beginner tip: Count the number of picots on the first side before beginning the second side.
Common mistake to avoid: Adding too many stitches at the bottom point. The point should stay pointed, not become rounded.
Step 9: Make the Second Tie Strap
When you reach the second upper corner, ch 50.
Starting in the second chain from the hook, sl st back along the chain.
When you return to the bandana edge, sl st into the side edge to secure the strap.
Fasten off, leaving a yarn tail.
Both straps should be the same length. If one is slightly longer, blocking can help, but a major difference means one strap was chained more tightly or with a different number of chains.
Beginner tip: Count your chains for the second strap carefully. Match the first strap exactly.
Common mistake to avoid: Pulling the slip stitches too tightly on the second strap. This can make it noticeably shorter.
Pattern Notes or Stitch Notes
Turning chain rules
The beginning ch 3 counts as the first double crochet of the first cluster.
Keep the chain loose enough so the edge does not pull.
Stitch count
Use cluster count instead of individual double crochet count.
Row 1 has 1 cluster.
Each row adds 1 cluster.
If you stop after Row 24, you should have 24 clusters across the final row.
Repeat pattern
The main body repeat is:
Ch 3, turn, 2 dc in first stitch, ch 1, 3 dc in each chain space across, ch 1 between clusters, 3 dc in last stitch or turning-chain space.
Row notes
The triangle is worked flat in rows.
You turn after every row.
The straps and edging are worked after the triangle body is complete.
Right side and wrong side
This bandana has a similar texture on both sides, but the right side is usually the side that looks cleaner after edging.
Size adjustment notes
For a smaller bandana, stop earlier.
For a larger bandana, add more rows before making the straps.
For longer ties, chain more than 50.
For shorter ties, chain fewer than 50.
Common Beginner Mistakes
1. The triangle leans to one side
Cause: Missing the final cluster in some rows.
Fix: Count clusters at the end of each row. The row number should match the number of clusters.
2. The fabric feels stiff
Cause: Hook too small or tension too tight.
Fix: Use a larger hook or relax your tension.
3. The bandana is too small
Cause: Stopping too early or using thinner yarn.
Fix: Add more rows before starting the straps.
4. The side edge ripples
Cause: Too many single crochets or too many picots along the edge.
Fix: Use fewer edge stitches or space picots farther apart.
5. The straps curl tightly
Cause: Tight foundation chains or tight slip stitches.
Fix: Chain loosely and work relaxed slip stitches.
6. The picots look uneven
Cause: Inconsistent chain tension.
Fix: Practice a few picots on a scrap swatch before adding them to the bandana.
7. The top edge stretches too much
Cause: Very loose yarn or oversized hook.
Fix: Use a slightly smaller hook for the edging only.
How to Customize This Crochet Project
Yarn changes
Cotton gives a clean summer look.
Bamboo-cotton gives more drape.
Acrylic works, but it may feel warmer on the head.
Fine yarn creates a delicate bandana.
DK yarn creates a slightly sturdier accessory.
Color changes
Try:
- Sage green for a soft handmade look.
- Cream for a neutral beach style.
- Dusty blue for summer.
- Terracotta for autumn.
- Striped rows for a scrap-yarn project.
- Contrast edging in cream or tan.
Size changes
For children, stop several rows earlier and shorten the straps.
For thicker hair, make the triangle wider and increase strap length.
For a neck kerchief, make fewer rows and keep the straps shorter.
Border options
You can finish the bandana with:
- Plain single crochet.
- Picot edging.
- Contrast color border.
- Slip-stitch edging.
- Crab stitch, for advanced beginners.
Texture options
Once you understand the shape, try:
- Solid double crochet rows.
- Mesh rows.
- Granny clusters with chain-2 spaces.
- Alternating color rows.
- Shell edging.
Gift ideas
A crochet bandana makes a useful handmade gift for:
- Summer birthdays.
- Beach bags.
- Festival outfits.
- Hair accessory lovers.
- Teens.
- Crochet market-table inventory.
- Matching friend accessories.
Finishing Instructions
Fasten off after the second strap.
Thread each yarn tail onto a yarn needle.
Weave tails through the wrong side of nearby stitches.
Do not simply cut the tails close to the knot. Wearable accessories need secure finishing because straps are pulled when tied.
To block the bandana:
- Soak or lightly mist according to your yarn label.
- Lay the triangle flat on a towel or blocking mat.
- Pin the top edge straight.
- Shape the bottom point.
- Gently straighten the side edges and picots.
- Let dry fully before wearing.
Cotton generally responds well to gentle blocking, but always follow the care instructions for the yarn you used.
Quick Printable-Style Summary
Skill level: Beginner to Easy
Yarn: Light cotton or cotton-blend yarn
Hook: 4.0 mm to 5.0 mm
Stitches: ch, sc, dc, sl st, optional picot
Starting method: Ch 4, then work 2 dc into the 4th chain from hook.
Main repeat: Increase one granny cluster per row by working a beginning cluster, clusters into chain spaces across, and a final cluster at the end.
Size: Stop when the triangle comfortably covers the head.
Straps: Ch 50 at each upper corner, then sl st back along the chain.
Edging: Work sc evenly along the diagonal sides. Add optional picots.
Finishing: Fasten off, weave in ends, block lightly.
FAQ
Is a crochet bandana good for beginners?
Yes. A crochet bandana is a good beginner wearable because it uses a simple flat triangle shape, repeat rows, and basic stitches. The only tricky parts are keeping the triangle edges even and adding straps neatly.
What yarn is best for a crochet bandana?
Light cotton, bamboo-cotton, or cotton-blend yarn works well because it keeps the bandana breathable and wearable. Heavy yarn can feel bulky on the head.
How do I make a crochet bandana bigger?
Add more triangle rows before making the straps. Each new row increases the width and depth of the bandana.
How long should crochet bandana straps be?
For most adult sizes, 12–14 inch straps work well. Make them longer if you prefer a larger bow or have thick hair.
Do I have to add picot edging?
No. Picots are decorative. A plain single-crochet edge is easier and still looks clean.
Why is my triangle uneven?
Most uneven triangles happen because the final cluster was skipped on some rows. Count your clusters regularly.
Can I use acrylic yarn?
Yes, but acrylic may feel warmer and less breathable than cotton. For summer or beach wear, cotton or bamboo blends usually feel better.
Conclusion
This crochet bandana pattern is a practical beginner project because it teaches useful skills without overwhelming construction. You start with one small cluster, grow a triangle row by row, check the size, add tie straps, finish the edges, and block the final accessory.
The most important habit is counting clusters. Once you understand that each row gains one cluster, the pattern becomes easy to follow and easy to resize.
Make your first version in one soft cotton color. After that, try contrast edging, stripes, picots, or a lighter yarn for more drape.





