A crochet sunflower granny square is one of the prettiest ways to turn a small motif into something useful. The center looks like a real sunflower seed head, the yellow petals add cheerful texture, and the cream granny square border makes the motif easy to join into blankets, tote bags, table runners, cushion covers, wall hangings, cardigans, and seasonal crochet projects.
This tutorial is written for beginners who already know how to make a chain, double crochet, and slip stitch, but want a guided project that explains what is happening in each round. The square begins as a small round flower. Then the petal spaces are used to build a square border around the flower.
The result is a textured sunflower block with a clear center, raised petals, and a clean granny-square frame.
This article uses U.S. crochet terminology. The Craft Yarn Council lists common U.S. crochet abbreviations such as ch, sl st, sc, dc, and tr, and those are the terms used throughout this tutorial.
What You’ll Learn
By the end of this tutorial, you will know how to:
- Crochet a small sunflower center.
- Add raised yellow petal clusters.
- Join a new color neatly.
- Use petal gaps to create a square border.
- Build four corners evenly.
- Count groups instead of counting every stitch.
- Fasten off and weave in ends cleanly.
- Block a granny square so it is easier to join.
- Customize the square for blankets, bags, cardigans, and décor.
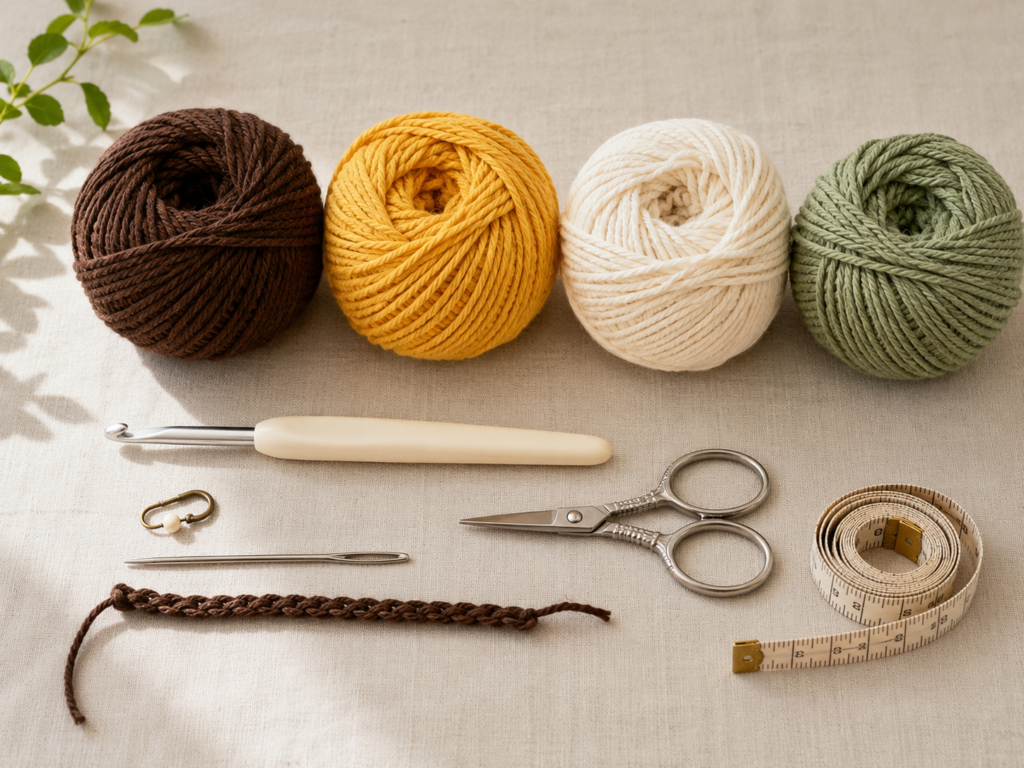
Materials You’ll Need
For one sunflower granny square:
- Worsted-weight cotton or acrylic yarn in dark brown.
- Worsted-weight yarn in golden yellow.
- Worsted-weight yarn in warm cream or ivory.
- Optional sage green yarn if you want a second border round.
- 4.0 mm / G-6 crochet hook.
- Scissors.
- Tapestry needle.
- Stitch marker, optional.
- Blocking mat and rustproof pins, optional but helpful.
The Craft Yarn Council’s yarn-weight system is useful when choosing yarn because yarn labels can vary between brands. A medium/worsted yarn will make a larger, more structured square; a DK yarn will make a smaller, lighter square.
Finished Size
With worsted-weight yarn and a 4.0 mm hook, one square measures approximately:
5–5.5 inches / 12.5–14 cm across
Your final size may change depending on yarn thickness, hook size, and personal tension. If you plan to join many squares together, make one sample square first and measure it after blocking.
Crochet Abbreviations Used
- ch = chain
- sl st = slip stitch
- sc = single crochet
- dc = double crochet
- tr = treble crochet
- st/sts = stitch/stitches
- rep = repeat
- sp = space
- rnd = round
- RS = right side
- WS = wrong side
Special stitch: Treble cluster petal
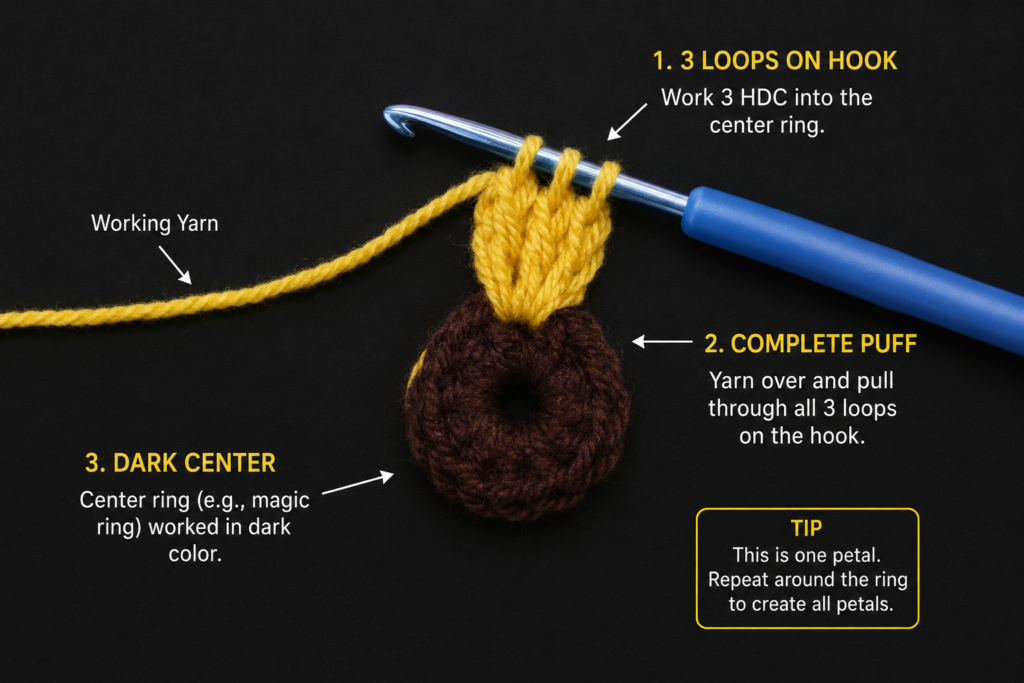
A treble cluster petal is made by working several incomplete treble crochets into the same stitch or space, then closing them together at the top.
For this tutorial:
Petal cluster:
Yarn over twice, insert hook into the indicated stitch, yarn over and pull up a loop, yarn over and pull through 2 loops, yarn over and pull through 2 loops. Stop before the final pull-through. Repeat this process until you have 4 unfinished treble crochets on the hook. Yarn over and pull through all loops on the hook.
This creates one raised sunflower petal.
Before You Start
Gauge and tension
Gauge is not critical for a single square, but it becomes important if you are making many squares for one project. Your sunflower centers and borders should be consistent from square to square.
Make one test square. Measure it. Use that square as your reference for all later squares.
How to count this square
In the center, count stitches.
In the petal round, count petals.
In the border round, count granny groups and corner spaces.
This is much easier than counting every loop once the petals become textured.
How to keep edges straight
The cream border is what turns the round flower into a square. Place the four corners evenly around the flower. If the corners are not evenly spaced, the square will lean or twist.
How to avoid curling
Curling usually happens because the petal stitches are too tight or the border is too small for the flower.
If your flower cups upward, try one of these fixes:
- Use a slightly larger hook for the petal round.
- Keep the chain spaces relaxed.
- Block the flower before adding the border.
- Do not pull the cream border tightly around the petals.
U.S./U.K. terminology note
This tutorial uses U.S. terms. In U.K. terminology, stitch names differ, so use the U.S. abbreviations listed above when following this pattern.
Step-by-Step Crochet Tutorial
Step 1: Make the Sunflower Center Ring
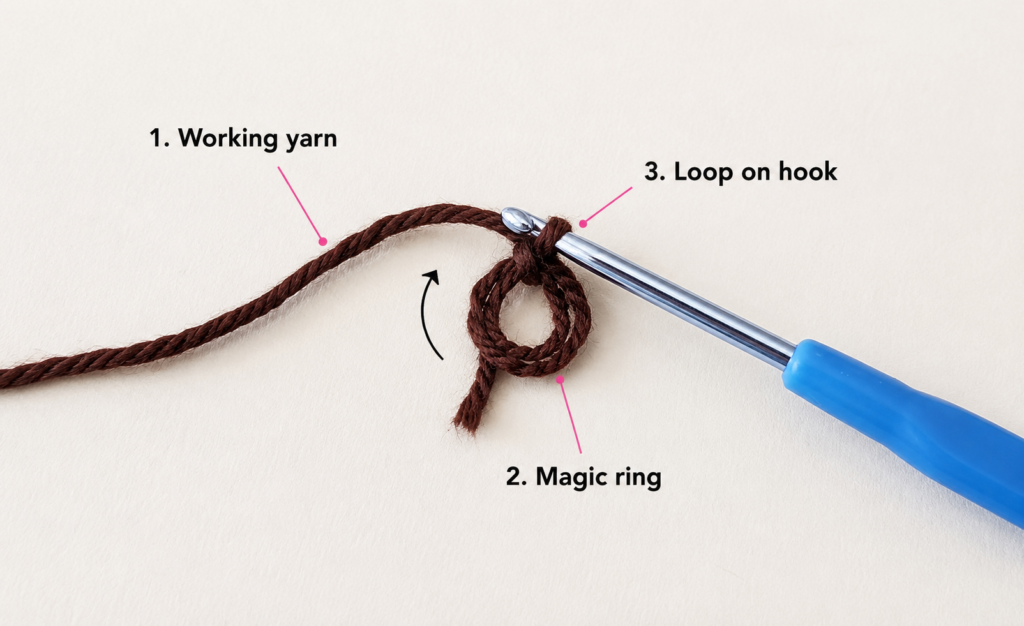
With dark brown yarn, make a magic ring.
If you do not like magic rings, use this beginner option instead:
Ch 4, sl st into the first ch to form a ring.
Either method works. A magic ring creates a tighter center, while a chain ring is easier for many beginners.
Ch 3. This counts as the first dc.
Work 11 dc into the ring.
Join with a sl st to the top of the beginning ch-3.
You should have 12 dc total.
Pull the center tail gently to close the ring if using a magic ring.
Beginner tip:
Do not make the center ring too tight before all 12 stitches are complete. It is easier to tighten the ring after the stitches are in place.
Common mistake to avoid:
Do not count the loop on your hook as a chain. Only count the actual chains you have made.
Step 2: Complete the Brown Center
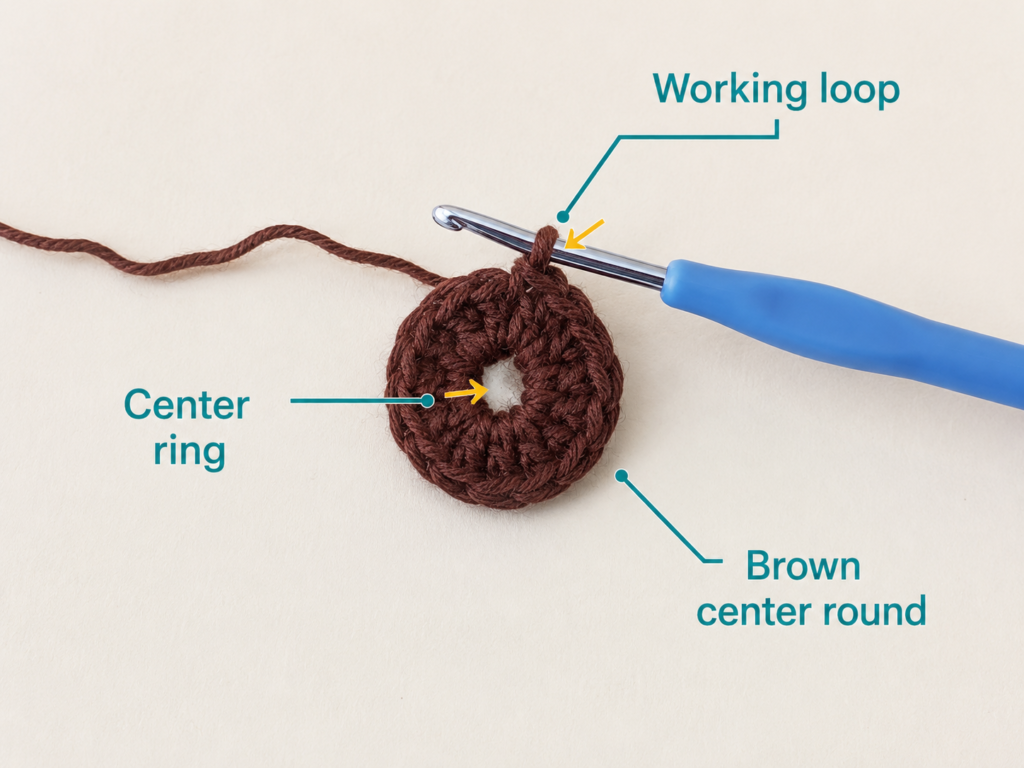
After joining the round, look at the circle carefully.
You should see 12 posts arranged around the center hole. This will become the seed head of the sunflower.
Fasten off the brown yarn, leaving a tail long enough to weave in later.
If your center looks slightly open in the middle, gently tug the starting tail and then weave it securely on the back.
Beginner tip:
Before cutting the yarn, count the stitches one more time. The petal round works best when there are exactly 12 stitches.
Common mistake to avoid:
Do not join into the side of the beginning chain. Join into the top of the beginning ch-3 so the round sits neatly.
Step 3: Join the Yellow Yarn
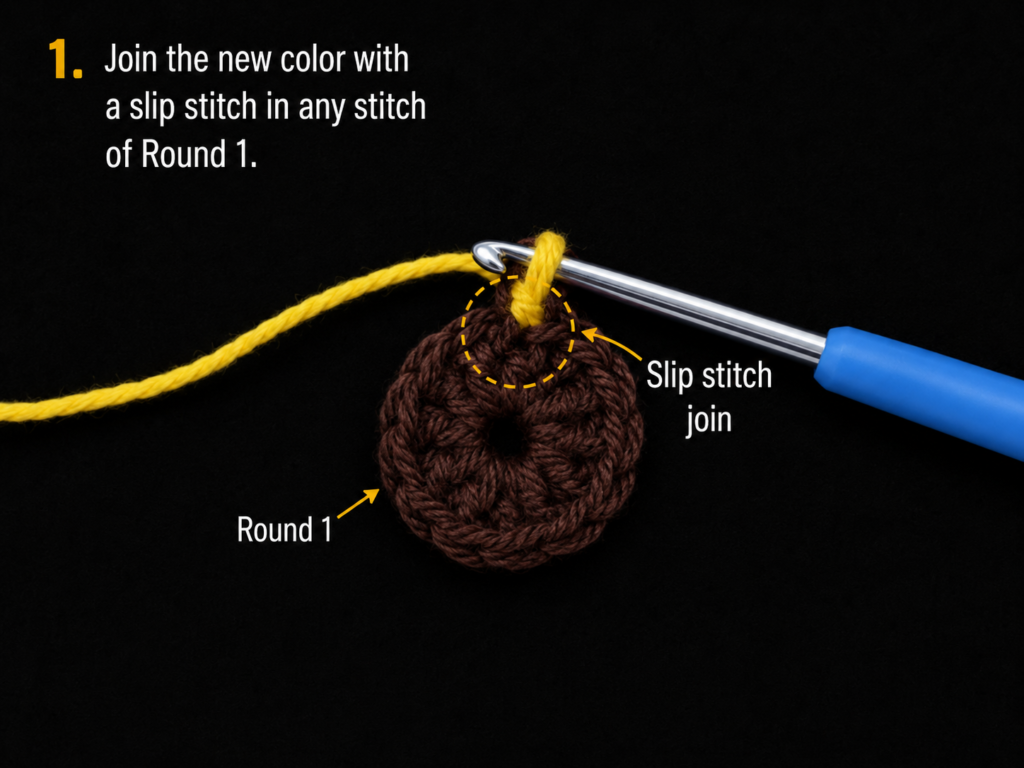
Join golden yellow yarn into any stitch around the brown center.
You can join with a slip stitch or pull up a loop directly with your hook.
Ch 2 to prepare for the first petal.
The yellow yarn should sit on the right side of the work. Keep the brown center facing you.
Beginner tip:
Hold the yellow yarn tail along the back of the center for the first few stitches. This helps secure it and reduces weaving later.
Common mistake to avoid:
Do not join the yellow yarn into the center hole. Join into one of the 12 brown stitches around the edge.
Step 4: Make the First Petal Cluster
In the same stitch where you joined the yellow yarn, make one petal cluster.
To make the petal cluster:
- Yarn over twice.
- Insert hook into the same brown stitch.
- Yarn over and pull up a loop.
- Yarn over and pull through 2 loops.
- Yarn over and pull through 2 loops.
- Stop before the final pull-through.
- Repeat until you have 4 unfinished treble crochets.
- Yarn over and pull through all loops on the hook.
Ch 2.
Sl st into the next brown stitch to anchor the petal.
You have made one sunflower petal.
Beginner tip:
Keep the unfinished treble crochets tall and relaxed. If you pull too tightly, the petal will look narrow and stiff.
Common mistake to avoid:
Do not finish each treble crochet separately. The petal shape comes from closing the tall stitches together at the top.
Step 5: Repeat Around for Twelve Petals
Continue around the brown center.
In each brown stitch, make one petal.
The repeat is:
Petal cluster, ch 2, sl st into next brown stitch.
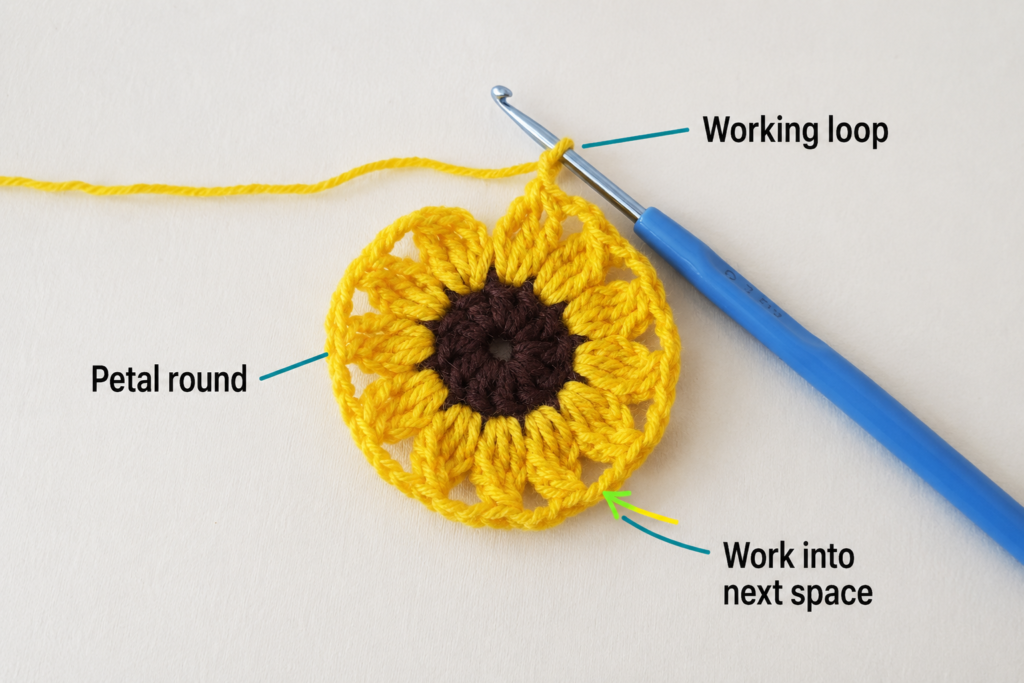
Work until you have 12 petals around the center.
Join with a sl st near the base of the first petal.
Fasten off the yellow yarn.
You should now have a round sunflower motif.
Beginner tip:
Count the petals instead of counting every stitch. There should be one petal for each brown center stitch.
Common mistake to avoid:
Do not skip a brown stitch between petals unless your chosen petal pattern specifically calls for it. Skipping stitches will give you fewer petals and uneven spacing.
Step 6: Prepare to Turn the Flower Into a Square
Lay the sunflower motif flat.
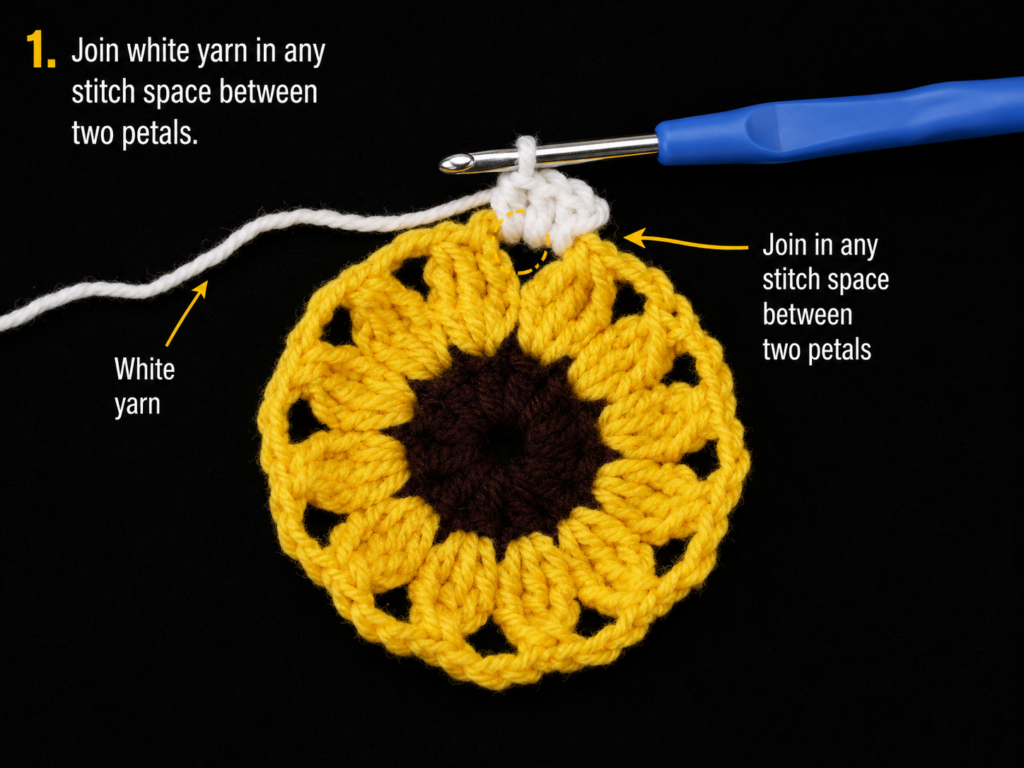
Look at the spaces between the petals. These spaces are where the cream border will be worked.
The goal is to divide the flower into four sides.
You will use 12 spaces around the flower:
- 4 spaces will become corners.
- 8 spaces will become side spaces.
That means each side of the square uses:
- 1 corner space.
- 2 side spaces.
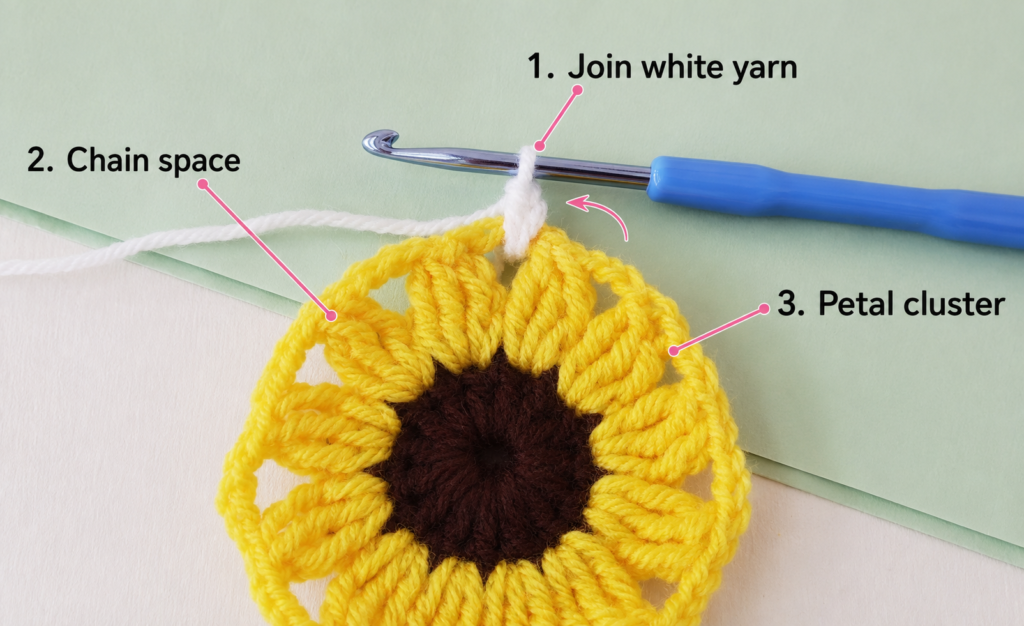
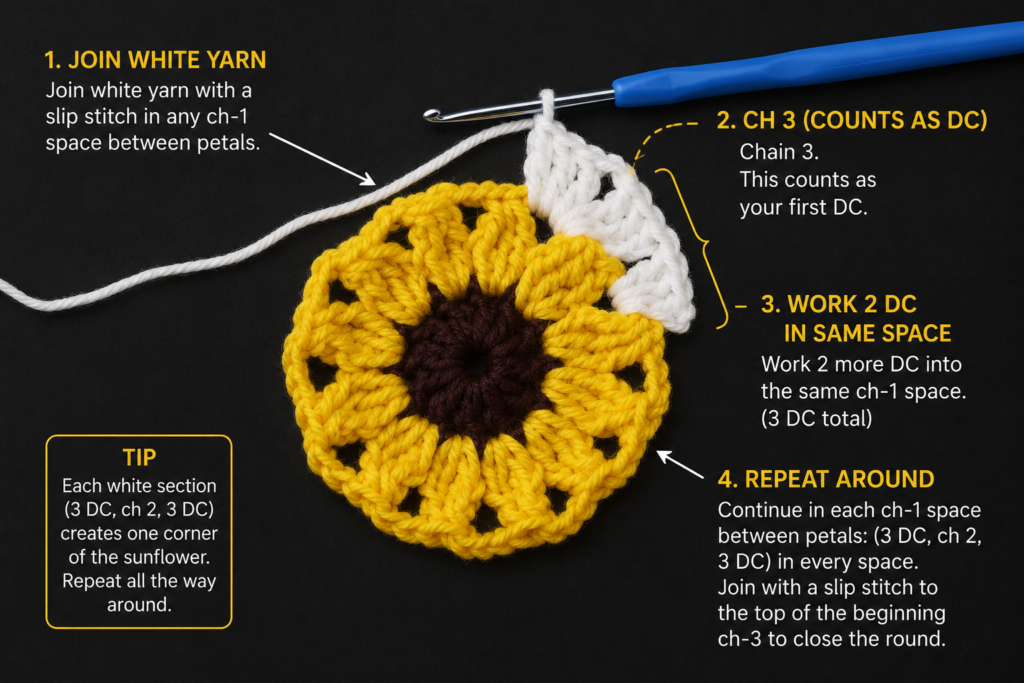
Join warm ivory cream yarn in any space between two petals.
Beginner tip:
Before joining cream yarn, place four stitch markers in evenly spaced petal gaps. These mark the four future corners.
Common mistake to avoid:
If the corner gaps are not evenly spaced, the square may look twisted. Count the spaces carefully before starting the border.
Step 7: Work the First Cream Border Round
This round creates the actual square.
Join cream yarn in a marked corner space.
Ch 3. This counts as the first dc.
In the same space, work:
2 dc, ch 2, 3 dc.
This is your first corner.
In the next two spaces between petals, work:
3 dc in each space.
In the next marked corner space, work:
3 dc, ch 2, 3 dc.
Repeat this pattern around:
Corner, side space, side space.
When you return to the beginning, join with a sl st to the top of the beginning ch-3.
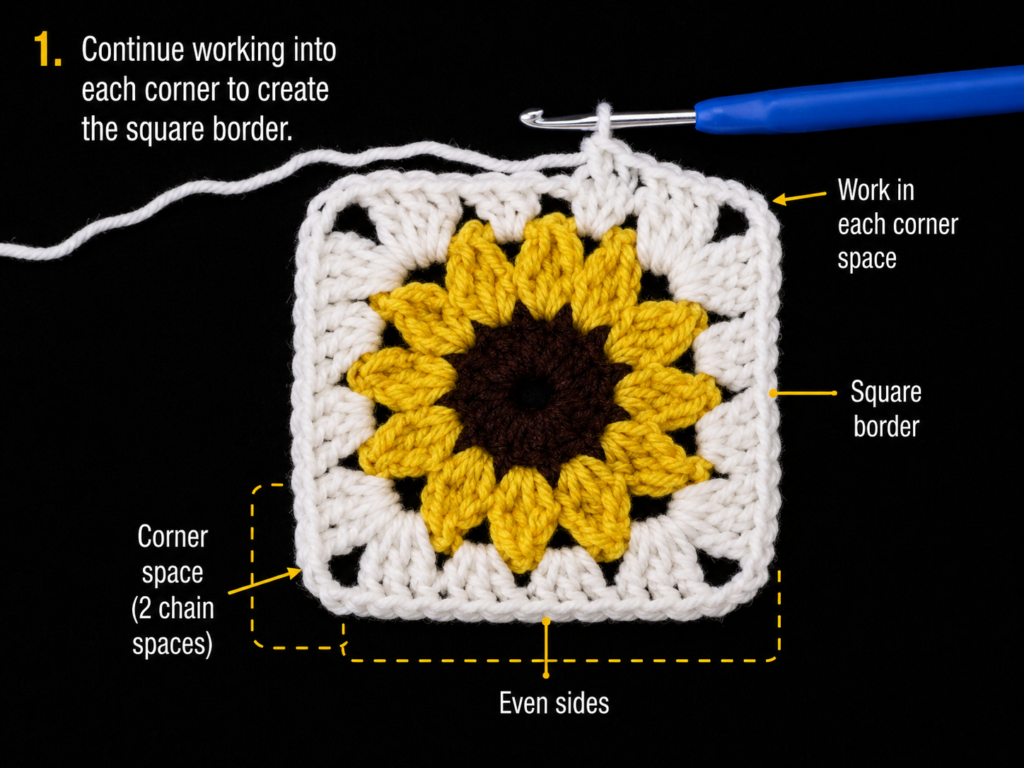
You should now see a clear square shape.
Beginner tip:
Say the rhythm out loud as you work: corner, side, side; corner, side, side.
Common mistake to avoid:
Do not forget the ch-2 in each corner. Without that corner chain space, the square will pull inward.
Step 8: Check the Corners
After the first cream round, lay the square flat.
Each corner should contain:
3 dc, ch 2, 3 dc
Each side should have two granny clusters between corners.
If one side looks longer than the others, check whether you accidentally added an extra cluster into one petal gap.
Beginner tip:
This is the best time to fix the shape. If the corners are uneven now, the next border round will not correct them.
Common mistake to avoid:
Do not force the motif flat by stretching only one corner. Recount the corner groups first.
Step 9: Add a Second Granny Border Round
A second cream round makes the square easier to join and gives the sunflower a cleaner frame.
Join cream yarn in any corner ch-2 space, or continue from your current position if the yarn is still attached.
Ch 3. This counts as the first dc.
In the same corner space, work:
2 dc, ch 2, 3 dc.
Now work 3 dc in each space between granny clusters along the side.
At each corner ch-2 space, work:
3 dc, ch 2, 3 dc.
Continue around the square.
Join with a sl st to the top of the beginning ch-3.
Fasten off.
Beginner tip:
Keep corner chain spaces loose enough for your hook to enter easily on later joining rounds.
Common mistake to avoid:
Do not place border stitches into the tops of every double crochet unless you are intentionally changing the pattern. A classic granny border is worked into spaces between clusters.
Pattern Notes or Stitch Notes
Turning chain rules
The beginning ch-3 in the brown center and cream border rounds counts as one dc.
If you prefer not to count turning chains as stitches, use a standing dc or chainless starting dc, but keep the method consistent across all squares.
Stitch count notes
Center:
- 12 dc around the ring.
Petals:
- 12 petals.
First cream border:
- 4 corners.
- 2 side clusters between each corner.
Second cream border:
- 4 corners.
- More spaces between clusters, depending on your previous round.
Repeat pattern
The cream border follows a classic granny-square rhythm:
Corners receive 3 dc, ch 2, 3 dc.
Side spaces receive 3 dc.
Right side and wrong side
The textured petals should face the right side. Weave ends on the back so the front stays clean.
Size adjustment notes
To make a smaller square:
- Use DK yarn.
- Use a 3.5 mm hook.
- Work only one cream border round.
To make a larger square:
- Use worsted or aran yarn.
- Add extra granny border rounds.
- Block to a consistent measurement.
Common Beginner Mistakes
1. The brown center has too many stitches
Problem: The petals crowd or the border becomes uneven.
Fix: Count the center before adding yellow yarn. You need 12 center stitches for this version.
2. The petal clusters are too tight
Problem: The petals look narrow and stiff.
Fix: Keep the treble stitches tall. Pull the working loop up slightly before completing each partial treble.
3. The flower curls before the border
Problem: The petal round cups upward.
Fix: Relax the petal chains and avoid pulling the slip stitches too tightly between petals.
4. The square corners are uneven
Problem: One side has more clusters than another.
Fix: Mark four evenly spaced petal gaps before starting the cream border.
5. The border pulls the flower inward
Problem: The sunflower looks squeezed inside the cream square.
Fix: Use a larger hook for the cream round or loosen your tension around the flower.
6. The square edges look wavy
Problem: Too many stitches or too much loose tension in the border.
Fix: Block the square first. If it still waves, reduce extra border rounds or use a smaller hook.
How to Customize This Crochet Project
Yarn changes
Cotton gives crisp stitch definition and a tidy blocked square.
Acrylic is lighter, softer, and often more affordable for blankets.
Wool blends can work beautifully for cozy bags or cushion covers, but check washability before making a large project.
Color changes
Try these palettes:
- Dark brown center, golden petals, cream border.
- Espresso center, mustard petals, oatmeal border.
- Black-brown center, lemon yellow petals, sage border.
- Rust center, golden petals, ivory border.
- Chocolate center, soft peach petals, cream border.
Size changes
Add more granny rounds around the flower to make a larger square.
Stop after one cream round for a smaller motif or appliqué.
Use thinner yarn for delicate projects and thicker yarn for blankets or cushion panels.
Border options
Instead of a plain cream border, try:
- One cream round and one sage-green round.
- Cream border with brown final edging.
- Yellow border for a bold sunflower field look.
- Solid granny square border with fewer gaps.
- Single crochet final edge for cleaner joining.
Texture options
For flatter petals, replace the treble cluster petals with double crochet shells.
For more dramatic petals, make taller clusters or use a slightly larger hook for the yellow round.
Gift ideas and use cases
Use sunflower granny squares for:
- Tote bags.
- Market bags.
- Baby blankets.
- Autumn throws.
- Table runners.
- Crochet cardigans.
- Pillow covers.
- Wall hangings.
- Teacher gifts.
- Summer crochet décor.
Finishing Instructions
Fastening off
After the final border round, cut the yarn and pull the tail completely through the last loop.
Do not trim the tail immediately.
Weaving in ends
Thread the tail onto a tapestry needle.
On the wrong side, weave through several stitches in one direction, then change direction and weave through a few more stitches.
Trim close to the fabric.
Weave all brown, yellow, and cream tails securely.
Blocking
Blocking is strongly recommended for granny squares, especially if you plan to join many together.
Pin the square to the desired measurement.
Make sure all four corners are sharp and all sides are straight.
Mist lightly with water or use the blocking method appropriate for your yarn fiber.
Allow the square to dry completely before unpinning.
Washing and care
Follow the yarn label instructions. Cotton squares may become heavier when wet, while acrylic squares may respond better to gentle steam blocking. Avoid overheating synthetic yarn.
Quick Printable-Style Summary
Skill level: Easy to confident beginner.
Finished size: Approximately 5–5.5 inches with worsted yarn and a 4.0 mm hook.
Materials: Brown yarn, golden yellow yarn, cream yarn, 4.0 mm hook, scissors, tapestry needle.
Stitches: Ch, sl st, dc, tr, treble cluster.
Starting method: Magic ring or ch-4 ring.
Center: 12 dc in brown.
Petals: 12 yellow treble-cluster petals.
Square border: Cream granny clusters worked into petal gaps.
Corners: 3 dc, ch 2, 3 dc.
Finishing: Fasten off, weave in all ends, block square flat.
FAQ
Is a crochet sunflower granny square beginner-friendly?
Yes, but it is best for a beginner who already knows chain, slip stitch, and double crochet. The petal cluster is the main new technique, but it becomes easier after the first few petals.
What yarn is best for a sunflower granny square?
Worsted-weight cotton or acrylic works well. Cotton gives sharper stitch definition, while acrylic is softer and lighter for blankets.
Can I make this sunflower square without treble clusters?
Yes. You can replace each treble cluster with a smaller double crochet shell if you want flatter, easier petals.
Why is my sunflower granny square curling?
Curling usually means the petal round is too tight or the border does not have enough room. Try loosening your tension, using a larger hook for the petal round, or blocking the flower before adding the border.
How many sunflower granny squares do I need for a blanket?
That depends on your square size and desired blanket size. Make one square, block it, measure it, then divide your target blanket width and length by the square measurement.
Can I use sunflower granny squares for a bag?
Yes. They are excellent for tote bags and market bags. Use cotton yarn for durability and consider adding a fabric lining if the bag will carry small items.
Should I block sunflower granny squares?
Yes, especially if you are joining multiple squares. Blocking helps straighten the sides, define the corners, and make joining easier.
Conclusion
This crochet sunflower granny square pattern is a beautiful way to practice working in rounds, changing colors, creating textured petals, and transforming a round motif into a square. The brown center gives the motif depth, the yellow petal clusters add the sunflower effect, and the cream granny border makes the finished square practical for larger projects.
Make one square first and treat it as your sample. Once you are happy with the size and tension, repeat the same yarn, hook, and blocking method for every square you plan to join.
A single sunflower square can become a coaster or appliqué. A set of four can become a pillow front. A larger stack can grow into a blanket, cardigan, tote bag, or sunny handmade home décor project.





