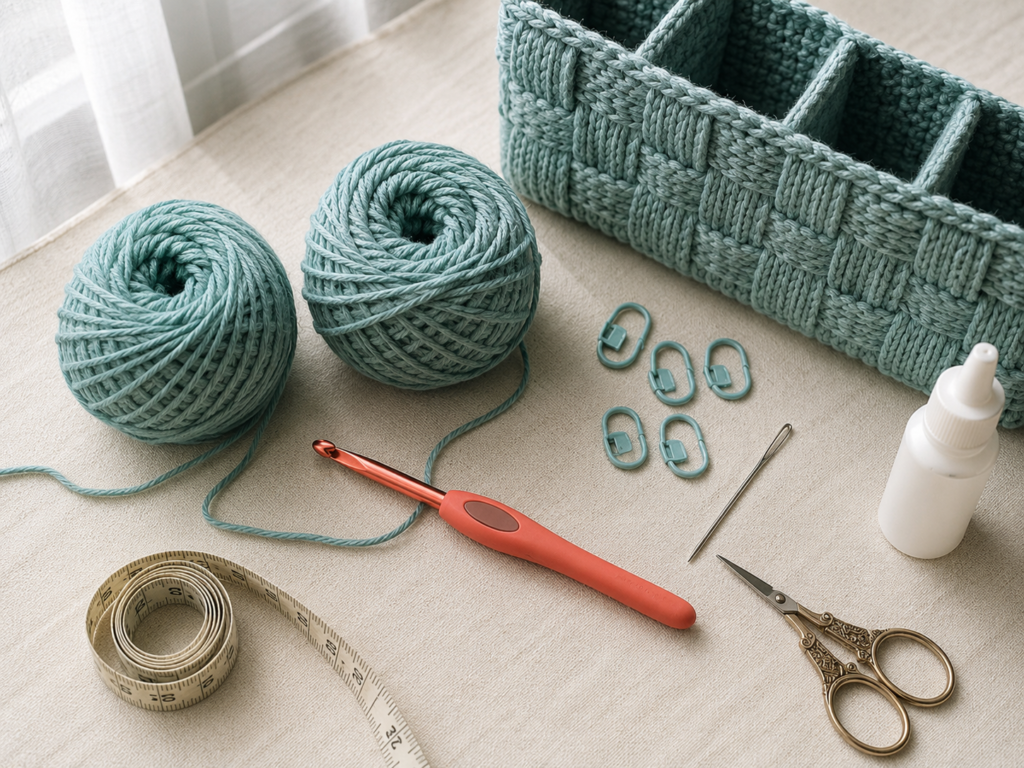
A desk organizer is one of those crochet projects that earns its place immediately. Instead of making another decorative item that waits for a purpose, you finish this organizer, place it beside your notebook or computer, and start using it the same day.
This beginner-friendly crochet desk organizer pattern creates a sturdy cylindrical cup for pens, pencils, scissors, rulers, crochet hooks, makeup brushes, or other small tools. A dense circular base keeps the container stable, a back-loop round turns the fabric upward, and several textured color bands give the organizer a handmade finish without introducing complicated construction.
The entire project is crocheted from the bottom up. There are no separate panels to seam and no zipper, lining, or hardware to install. You will practice crocheting in joined rounds, increasing a flat circle, identifying stitch loops, changing yarn colors, and making a long single crochet.
The instructions below are an original project. The selected reference tutorial is used only to plan a logical photographic sequence showing a circular base, upright sides, lower stitch placement, color changes, finishing, and the completed desk holder.
[IMAGE SLOT 2]
Source page URL:
https://ritohobby.co.uk/content/300-free-crochet-pattern-for-pencil-holder-with-spiral-effect
Reference image URL only — do not republish unless you own rights:
https://ritohobby.co.uk/img/cms/opskriftsbilleder/kit-rito-0091/12%20%2B%20forside.jpg
Consistency note: Finished-project view from the same organizer sequence.
Midjourney prompt: Realistic three-quarter-view crochet blog photo showing a finished cylindrical crochet desk organizer filled neatly with pens, pencils, scissors, and crochet hooks, dusty teal base, warm cream textured bands, muted terracotta accent, pale oak desk, soft natural daylight, sharp stitch definition, clean editorial composition, no text, no watermark, no logo, no distorted tools, no duplicated objects –ar 4:3 –v 6
Alt text: Finished textured crochet desk organizer holding writing and crochet tools.
Suggested file name: easy-crochet-desk-organizer-finished.jpg
What You’ll Learn
- How to crochet a flat circular base without making it ruffle
- How to count increases in joined rounds
- How to create a sharp base-to-wall transition
- How to crochet firm cylindrical sides
- How to change colors without cutting the yarn too early
- How to make a long single crochet texture
- How to finish a smooth, structured upper rim
- How to resize the organizer for different desk supplies
Project Details
Skill level: Beginner to easy
Finished size: Approximately 4.5 inches across and 5.25 inches tall
Construction: Bottom up in joined rounds
Estimated time: 3–5 hours
Right side: The outside of the organizer
Wrong side: The inside of the organizer
The finished measurements will vary with your yarn, hook, and tension. That variation is acceptable for a storage project as long as the base lies flat and the fabric is firm enough to support the contents.
Materials You’ll Need
- Approximately 150–180 yards of bulky #5 cotton tube yarn
- Color A: dusty teal, approximately 100–120 yards
- Color B: warm cream, approximately 25–30 yards
- Color C: muted terracotta, approximately 25–30 yards
- 6.0 mm crochet hook
- Scissors
- Large-eye tapestry needle
- Locking stitch marker
- Flexible measuring tape
- Optional removable plastic canvas circle for the base
- Optional smooth cylindrical insert for additional rigidity
A dense fabric is more useful than a loose, drapey fabric for this project. A 6.0 mm hook is intentionally compact for many bulky yarns. The Craft Yarn Council lists hook ranges as general guidance and advises crocheters to use gauge to select the appropriate hook for a specific pattern.
Avoid inserting a metal can with a rough or sharp top edge. Choose a container with a smooth finished rim or cover the edge securely before placing it inside the crochet cup.
Crochet Abbreviations Used
- ch = chain
- hdc = half double crochet
- sc = single crochet
- sl st = slip stitch
- st/sts = stitch/stitches
- BLO = back loop only
- inc = increase
- lsc = long single crochet
- rep = repeat
- rnd/rnds = round/rounds
These abbreviations follow standard US crochet terminology. The Craft Yarn Council maintains a master list of crochet abbreviations and also documents the differences between US and UK stitch names.
US/UK Terminology Note
This tutorial uses US terms:
- US single crochet = UK double crochet
- US half double crochet = UK half treble crochet
Special Stitch: Long Single Crochet
A long single crochet is worked into a lower round instead of the stitch directly beneath the hook.
To make one:
- Identify the stitch two rounds below the next unworked stitch.
- Insert the hook into that lower stitch.
- Yarn over and pull up a loop until it reaches the height of the current round.
- Yarn over and pull through both loops.
The long single crochet replaces one ordinary single crochet. It does not increase the stitch count.
Do not pull the long loop tightly. A short loop will squeeze the fabric vertically and make the textured band pucker.
Before You Start
Check the Base Measurement
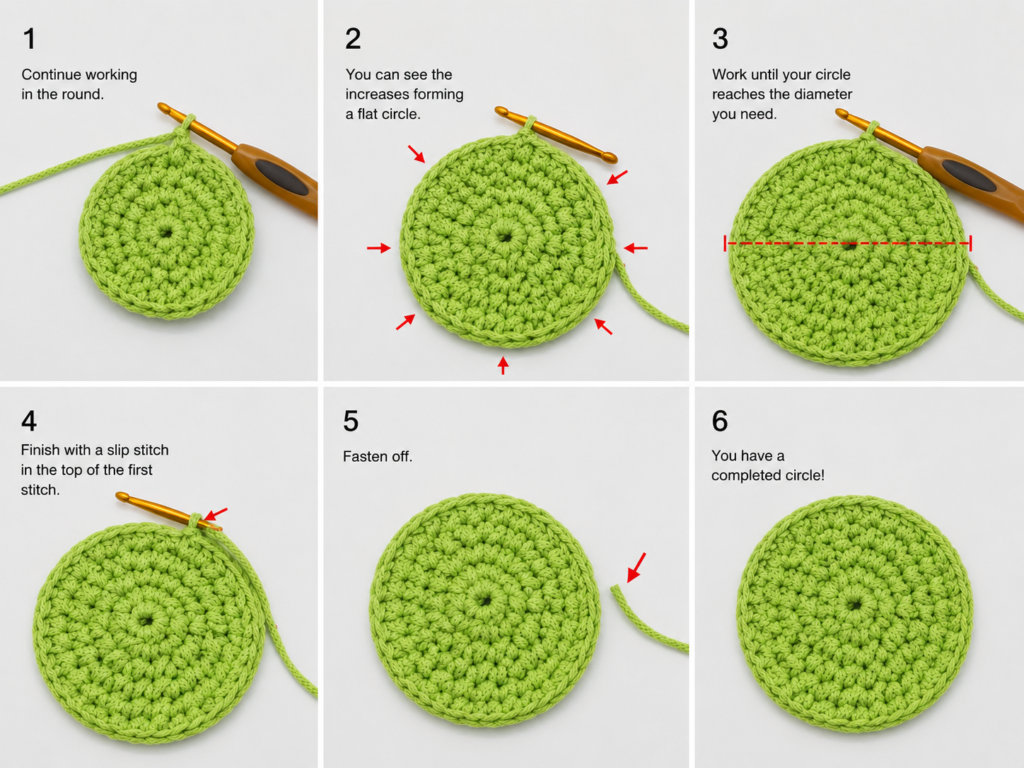
Work the first five rounds and place the base flat on the desk. It should measure approximately 4.25 inches across before the wall-transition round.
A difference of about 0.25 inch is not usually important. A much larger base will produce a wider organizer, while a much smaller base may not hold enough tools.
Watch for Ruffling
A ruffled base usually means one of three things:
- Too many increases
- A hook that is too large
- Looser tension in later rounds
Confirm the stitch count before changing hook size.
Watch for Cupping
If the base begins turning upward before the BLO round, the increases may be too tight or too widely spaced. Try loosening your tension or moving up by 0.5 mm.
Mark the First Stitch
Place a locking marker in the first stitch of every round. Even though the rounds are joined, the marker helps prevent accidental extra stitches around the join.
Change Colors in the Final Pull-Through
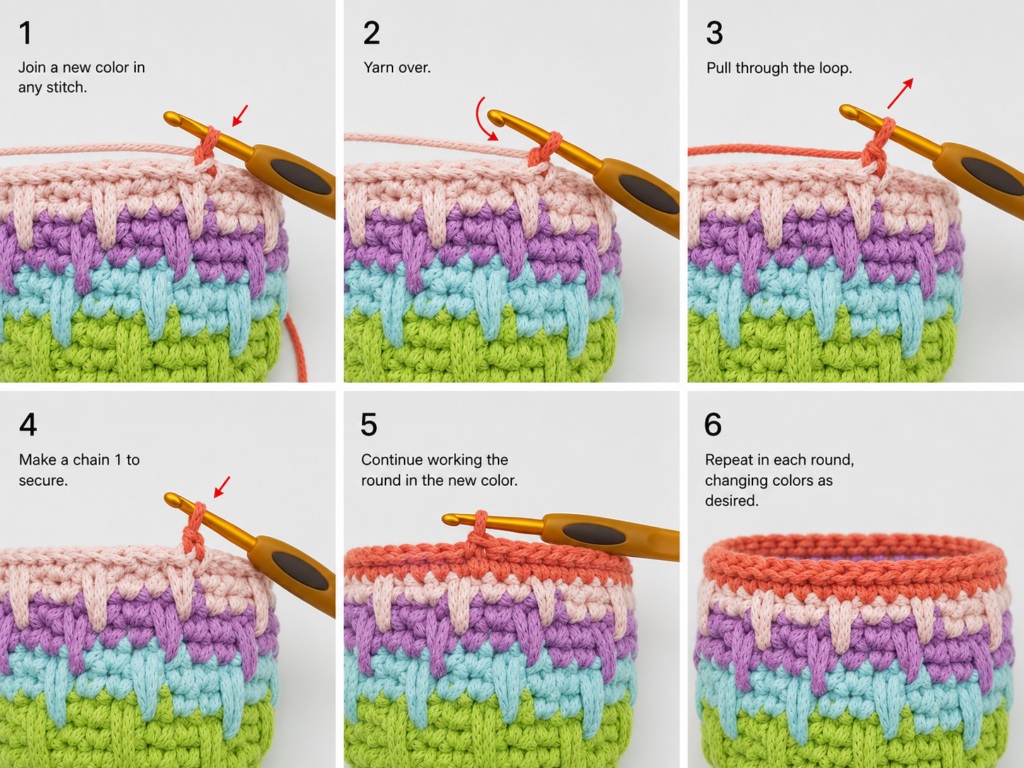
When changing color, begin the final single crochet with the old yarn. Before pulling through the final two loops, drop the old color and complete the stitch with the new color.
This produces a cleaner transition than fastening off after the round is already complete.
Step-by-Step Crochet Tutorial
Step 1: Make the Center Ring
With Color A, make a magic ring.
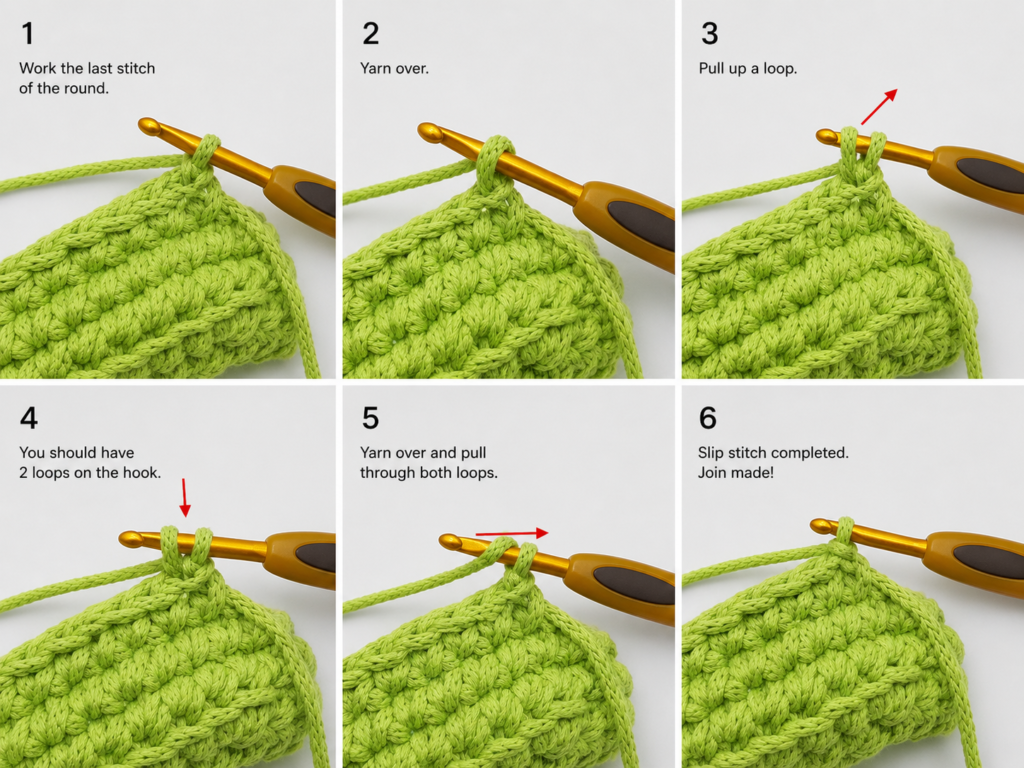
Round 1: Ch 1. Work 8 hdc into the ring. Pull the yarn tail to close the center. Join with a sl st to the first hdc. 8 sts
The beginning chain does not count as a stitch.
Count the tops of the eight half double crochets before continuing. The joining slip stitch is not counted.
Beginner tip: Pull the center ring mostly closed, but do not strain the yarn until the first round is complete. Leaving a small opening temporarily makes the stitches easier to see.
Common mistake to avoid: Do not place the hook through the joining slip stitch when beginning Round 2. Work into the first actual half double crochet.
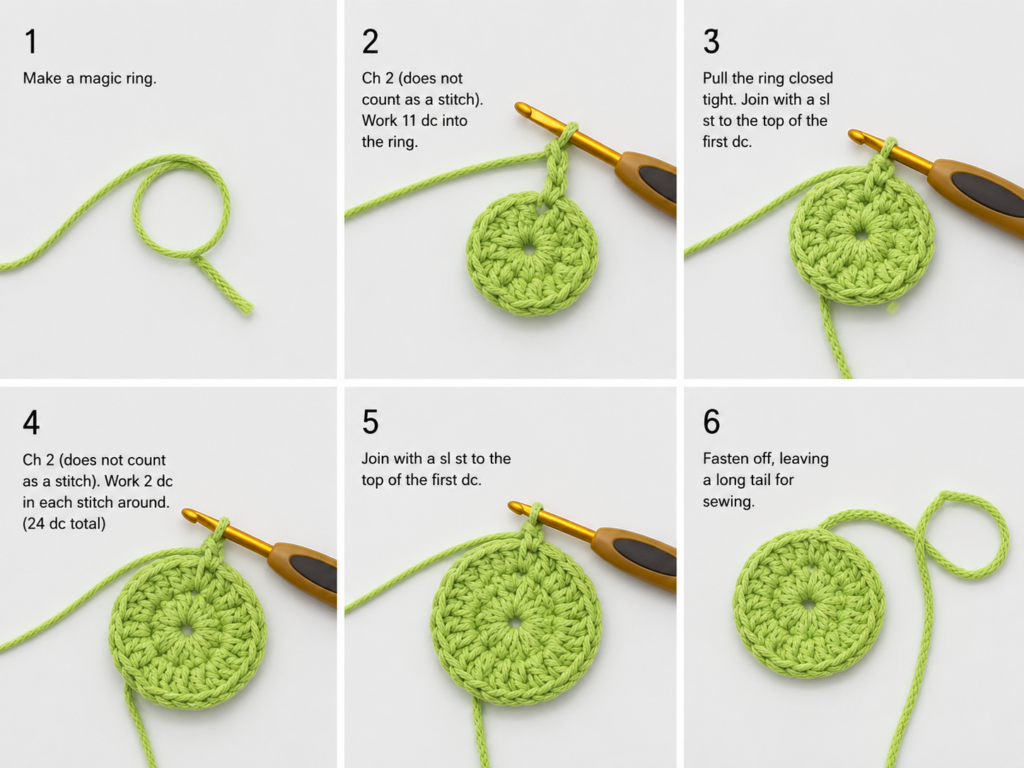
Step 2: Expand the Circular Base
Continue with Color A.
Round 2: Ch 1. Work 2 hdc in every stitch. Join. 16 sts
Round 3: Ch 1. Repeat: 1 hdc in the next stitch, 2 hdc in the next stitch. Join. 24 sts
Round 4: Ch 1. Repeat: 1 hdc in each of the next 2 stitches, 2 hdc in the next stitch. Join. 32 sts
Round 5: Ch 1. Repeat: 1 hdc in each of the next 3 stitches, 2 hdc in the next stitch. Join. 40 sts
The increases are distributed evenly, with eight increases in each round.
Lay the base flat after Round 5. It should form a smooth circle without waves or a bowl shape.
Beginner tip: Count in groups. In Round 5, each repeat contains five stitches: four ordinary half double crochets and the second stitch of the increase.
Common mistake to avoid: Do not work two half double crochets in every stitch after Round 2. Doing so will add far too many stitches and create ruffling.
Step 3: Create the Base-to-Wall Turn
Round 6: Ch 1. Work 1 sc in the back loop only of every stitch. Join. 40 sts
The unworked front loops create a horizontal ridge. This ridge marks the perimeter of the base and encourages the next rounds to stand upright.
After finishing the round, gently press the circular base flat while folding the working edge upward with your fingers. Do not block it yet.
Beginner tip: Turn the work toward you as you crochet so the back loop remains visible. Check every few stitches that only one strand is sitting over the hook.
Common mistake to avoid: Working through both loops will not ruin the organizer, but the base will curve more gradually and may feel less defined.
Step 4: Build the Lower Wall
Continue with Color A.
Rounds 7–9: Ch 1. Sc in every stitch around. Join. 40 sts
Keep all 40 stitches in each round. There are no more increases.
The work may look slightly soft after the first wall round. By Round 9, the cylindrical shape should become more obvious.
Beginner tip: Place the organizer on the desk after every round. If one side is lower, count the stitches around that area and check whether a stitch was skipped.
Common mistake to avoid: Do not crochet into the joining slip stitch. Doing so adds one stitch per round and gradually flares the top.
Step 5: Crochet the First Cream Band
Change to Color B during the final pull-through of the last single crochet in Round 9.
Round 10: Ch 1. Sc in every stitch around. Join. 40 sts
Round 11: Ch 1. Repeat the following eight times:
- Sc in each of the next 4 stitches
- Work 1 lsc into the stitch two rounds below the next stitch
Join to the first sc. 40 sts
The long stitches should form eight evenly spaced vertical accents.
Beginner tip: Before inserting the hook into the lower round, trace a straight vertical line down from the next unworked stitch. This keeps the texture aligned.
Common mistake to avoid: Do not make an ordinary single crochet in the top stitch after completing the long single crochet. The long stitch has already replaced it.
Step 6: Change to Terracotta
Change to Color C in the final pull-through of Round 11.
Carry the unused cream yarn loosely up the inside if you plan to use it again in two rounds. Do not pull the carried strand tightly.
Round 12: Ch 1. Sc in every stitch around. Join. 40 sts
A clean color change should appear directly after the joining point. The tails and carried strand remain on the wrong side.
Beginner tip: After working four or five stitches in the new color, pause and gently tighten the old-color tail. Stop as soon as the join closes; excessive pulling will distort the wall.
Common mistake to avoid: Never knot the two colors together on the outside. Knots create bumps and are harder to hide neatly.
Step 7: Offset the Terracotta Texture
Round 13: Ch 1. Repeat the following eight times:
- Sc in each of the next 2 stitches
- Work 1 lsc into the stitch two rounds below the next stitch
- Sc in each of the next 2 stitches
Join. 40 sts
The long stitches in this round are shifted relative to the cream texture. The offset makes the surface more interesting and avoids creating one stiff vertical line through the fabric.
Beginner tip: Count each repeat as five stitch positions: two ordinary stitches, one long stitch, and two ordinary stitches.
Common mistake to avoid: If the first and final repeats collide at the join, recount Round 12. It should contain exactly 40 stitches.
Step 8: Add the Final Cream Texture
Change back to Color B.
Round 14: Ch 1. Sc in every stitch around. Join. 40 sts
Round 15: Ch 1. Repeat eight times:
- Sc in each of the next 4 stitches
- Work 1 lsc into the stitch two rounds below the next stitch
Join. 40 sts
Cut Color B, leaving a 6-inch tail.
At this point, the organizer should have three clear decorative bands: cream, terracotta, and cream.
Beginner tip: Compare the height of the organizer at four points around the rim. Uneven height often indicates a missed stitch or an overly tight join.
Common mistake to avoid: Do not pull the long stitches shorter than the surrounding fabric. Each loop must rise naturally to the current working edge.
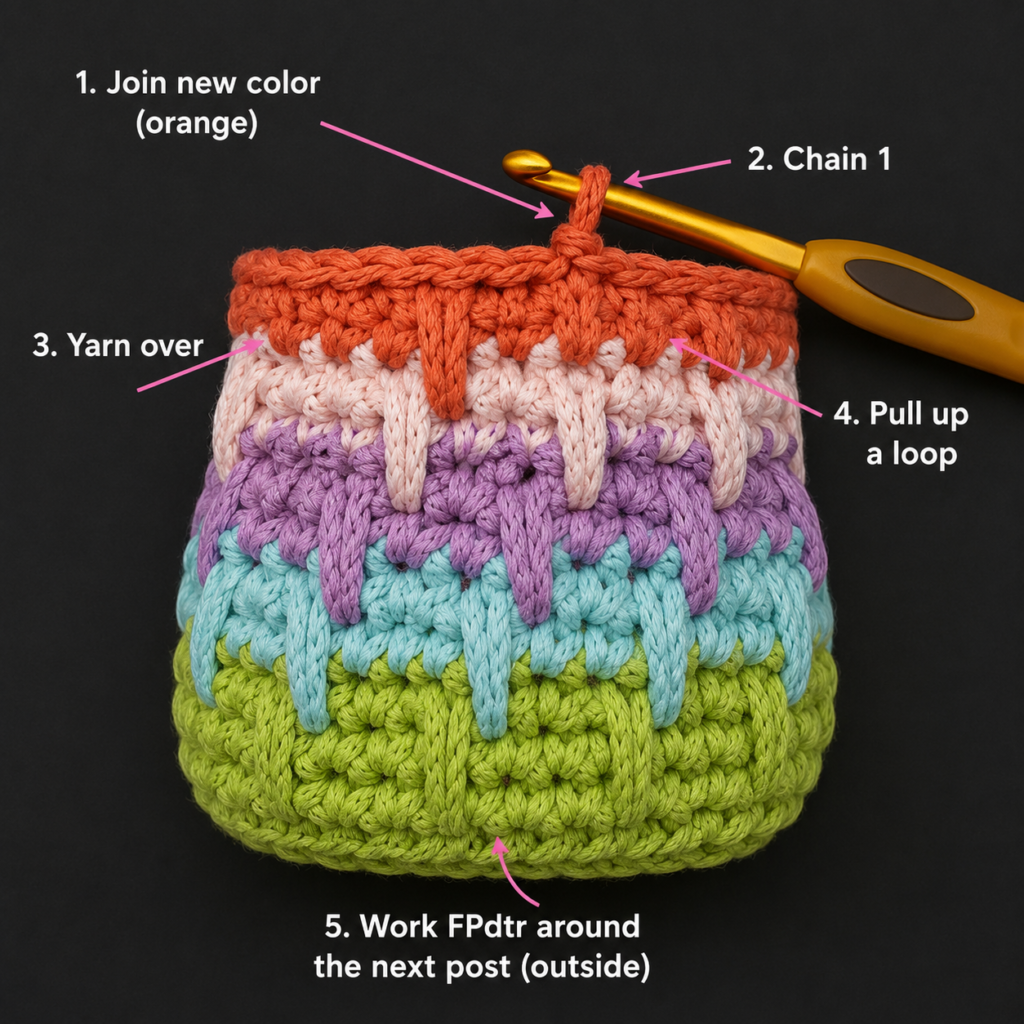
Step 9: Finish the Organizer Body
Continue alternating the texture every two rounds.
Rounds 13–14
Repeat Rounds 9–10:
- 2 FPdc
- 2 BPdc
Rounds 15–16
Repeat Rounds 11–12:
- 2 BPdc
- 2 FPdc
At the end of Round 16, the organizer should have four horizontal sections of basketweave blocks.
Measure from the back-loop ridge at the base to the upper edge. The wall should be approximately 3½–4 inches tall before the trim is added.
To make a taller organizer, continue working two-round block sections. Always reverse the stitch order after every two rounds.
Beginner tip:
Try the organizer with your intended supplies before adding the rim. Taller walls are useful for long knitting needles or paintbrushes, but a lower organizer makes sticky notes and small clips easier to reach.
Common mistake to avoid:
Do not finish after only one round of a block section. Each block should be two rounds high to preserve the woven proportions.
Step 10: Add the Top Edge and Optional Handles
Round 17: Firm rim
Ch 1.
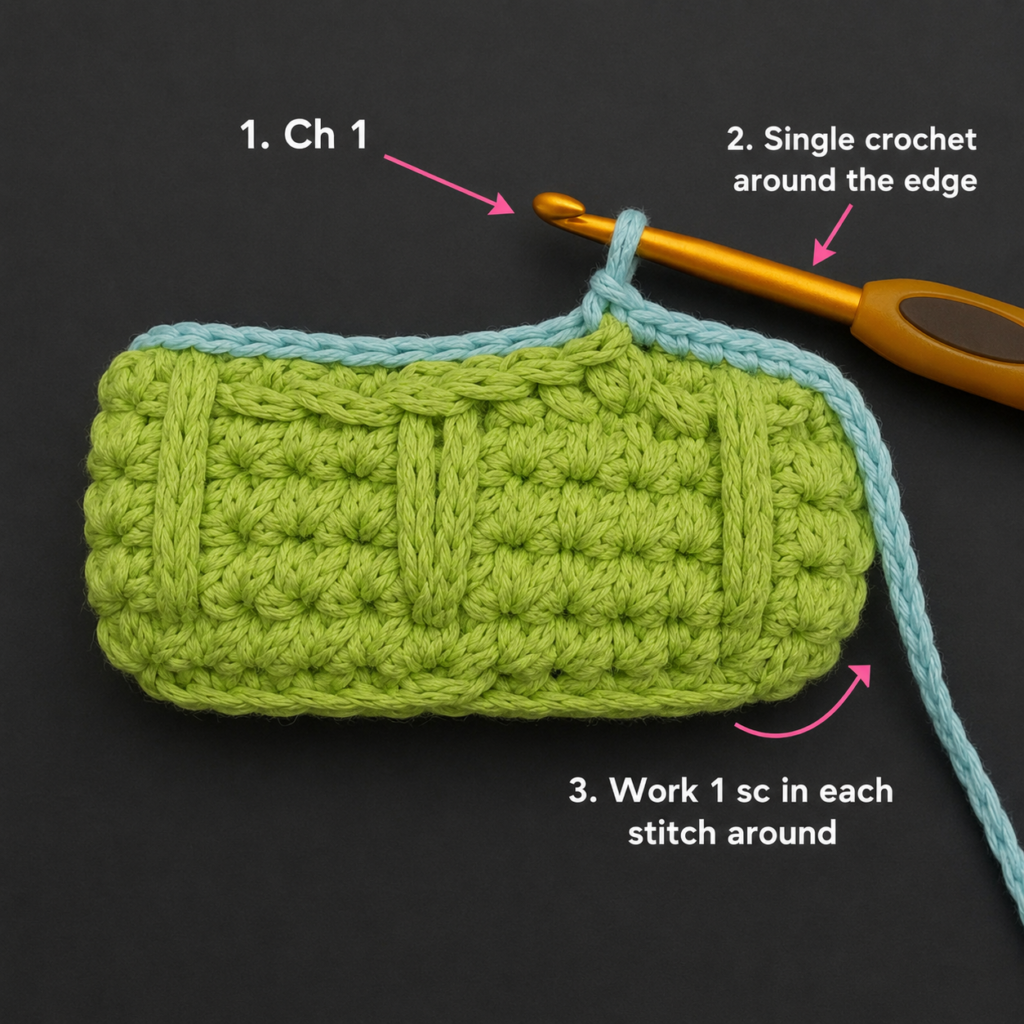
Work 1 sc in every stitch around.
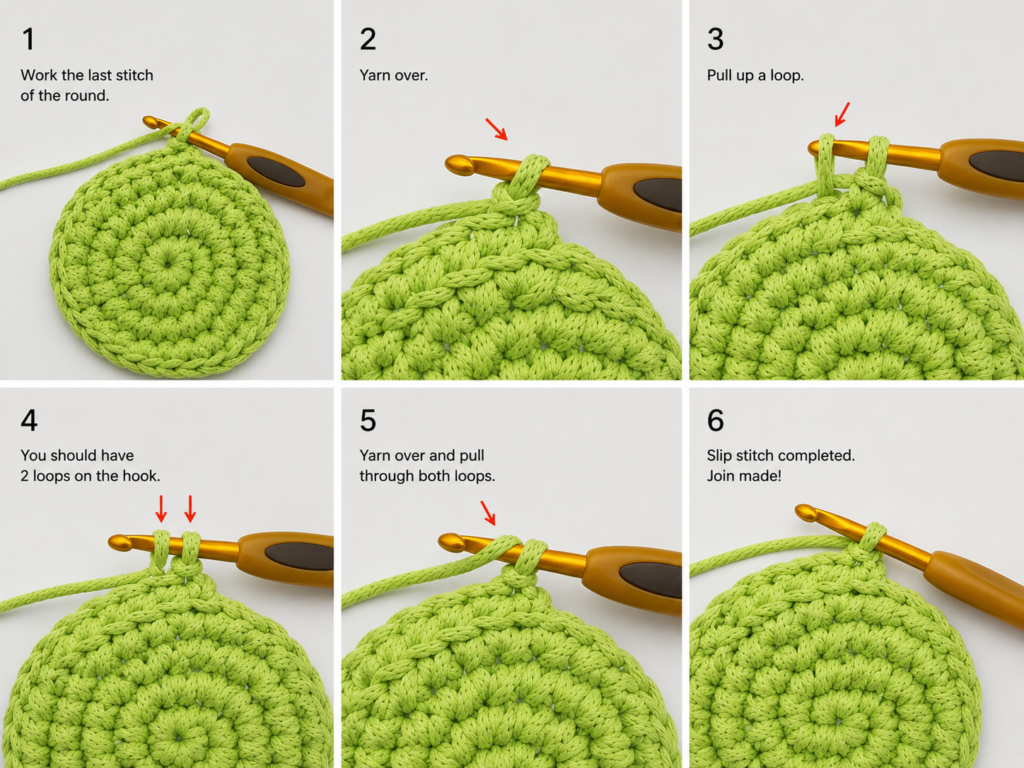
Join with a sl st to the first sc.
Stitch count: 48 sc
For an organizer without handles, work one additional sc round, fasten off, and continue to the finishing section.
Round 18: Handle openings
Ch 1.
- Sc in the next 8 stitches.
- Ch 10.
- Skip the next 6 stitches.
- Sc in the next 18 stitches.
- Ch 10.
- Skip the next 6 stitches.
- Sc in the final 10 stitches.
- Join to the first sc.
Keep both chain sections relaxed. They should have similar tension and height.
Round 19: Reinforce the handles
Ch 1.
- Sc in each regular sc.
- Work 12 sc around each ch-10 handle space rather than into the individual chain stitches.
- Join to the first sc.
Fasten off, leaving a tail approximately 8 inches long.
Beginner tip:
Before reinforcing the handles, place the basket flat and confirm that the openings are directly opposite each other.
Common mistake to avoid:
Do not pack too many stitches tightly around the chain space. The handle should curve smoothly rather than twisting or ruffling.
Pattern Notes or Stitch Notes
Beginning chains
- Ch 1 at the beginning of hdc and sc rounds does not count as a stitch.
- Ch 2 at the beginning of post-stitch rounds does not count as a stitch.
- Join to the first true stitch rather than to the beginning chain.
Stitch count
- The final base round contains 48 stitches.
- Every wall and textured-body round remains at 48 stitches.
- The basketweave repeat uses four stitches.
- Twelve repeats are worked around each texture round.
Basketweave repeat
First section:
- 2 FPdc
- 2 BPdc
- Repeat for two rounds
Second section:
- 2 BPdc
- 2 FPdc
- Repeat for two rounds
Continue alternating these two sections.
Right side and wrong side
The outside of the organizer is considered the right side. The project is worked with the right side facing throughout.
Size adjustment notes
To make a wider organizer, the final stitch count must remain divisible by four.
A simple larger base could continue with another increase round, but the exact increase spacing and finished proportions should be tested before publishing or producing several matching organizers.
To adjust only the height, add or remove complete two-round texture sections.
Common Beginner Mistakes
1. The base forms a bowl too early
Cause:
Tension is too tight, the hook is too small, or an increase was missed.
Fix:
Count every round. Move to a 6.5 mm hook if your doubled cotton fabric feels extremely dense. Correct missed increases before beginning the wall.
2. The base ruffles around the edge
Cause:
An extra increase was added, the joining slip stitch was treated as a regular stitch, or tension became loose.
Fix:
Verify the stitch count. Undo the affected round and remove accidental extra stitches.
3. The wall flares outward
Cause:
Extra stitches were added during joining or the post stitches became much looser than the base.
Fix:
Return to 48 stitches. Keep the post-stitch loops close to the hook shaft without pulling them excessively tall.
4. The basketweave blocks shift sideways
Cause:
A round began one stitch too early or too late.
Fix:
Mark the first post stitch. Each block must be exactly two stitches wide and directly aligned with the section below.
5. Front-post and back-post stitches look identical
Cause:
The hook may be traveling around the post in the same direction for both stitches.
Fix:
For FPdc, begin at the front and push the post toward you. For BPdc, begin behind the fabric and push the post away from you.
6. The seam has a deep gap
Cause:
The joining slip stitch or beginning chain is too tight.
Fix:
Keep the join snug but flexible. After joining, gently spread the first and final post stitches with your fingers.
7. The organizer collapses when filled
Cause:
The yarn is too soft, the hook is too large, or only one strand was used.
Fix:
Hold two strands of cotton together, add a felt or plastic-canvas base, or lightly apply fabric stiffener.
8. One yarn strand is missing from some stitches
Cause:
The hook caught only one of the two working strands.
Fix:
Inspect the loops before completing each stitch. Undo incomplete stitches immediately because a missed strand can create a weak, uneven section.
How to Customize This Crochet Project
Change the yarn
For the firmest organizer, use:
- 100% cotton
- Recycled cotton cord
- Cotton-acrylic home décor yarn
- Thin macramé cord suitable for crochet
Avoid fluffy chenille for this design because it hides the post stitches and produces a softer wall.
Change the colors
Try:
- One neutral color throughout
- A contrasting final rim
- Alternating color sections every two texture rounds
- A dark base with a lighter body
- Two strands in different shades for a marled effect
When changing colors, complete the final yarn-over of the last stitch with the new color.
Change the height
Add one two-round section for every additional woven block.
A short organizer works well for:
- Paper clips
- Washi tape
- Charging cables
- Erasers
- Sticky notes
A taller organizer works well for:
- Pencils
- Scissors
- Crochet hooks
- Rulers
- Paintbrushes
Add a border
Instead of the plain single crochet rim, try:
- Reverse single crochet
- Slip-stitch edging
- One contrasting-color single crochet round
- Surface slip stitches beneath the rim
Avoid a loose scalloped border because it may reduce the organizer’s structural stability.
Add an inner divider
Create a removable divider by cutting two strips of plastic canvas to fit the inside diameter. Cut halfway through the center of each strip and slide them together in a cross shape.
Cover the edges with felt or fabric before placing the divider inside the organizer.
For an entirely yarn-based option, crochet two narrow single crochet rectangles, cross them at the center, and hand-sew the ends to the inner wall.
Add a nonslip base
Cut a felt circle slightly smaller than the bottom and sew it to the underside with small whipstitches.
A nonslip shelf-liner circle can also be hand-sewn beneath the basket for use on glass or polished desks.
Gift ideas and uses
This organizer can be used as:
- A teacher desk gift
- A crochet-hook basket
- A home-office organizer
- A makeup-brush holder
- A remote-control basket
- A bedside accessory holder
- A craft-fair product
- A dorm-room storage basket
- A stationery gift filled with pens and sticky notes
Finishing Instructions
Fasten off
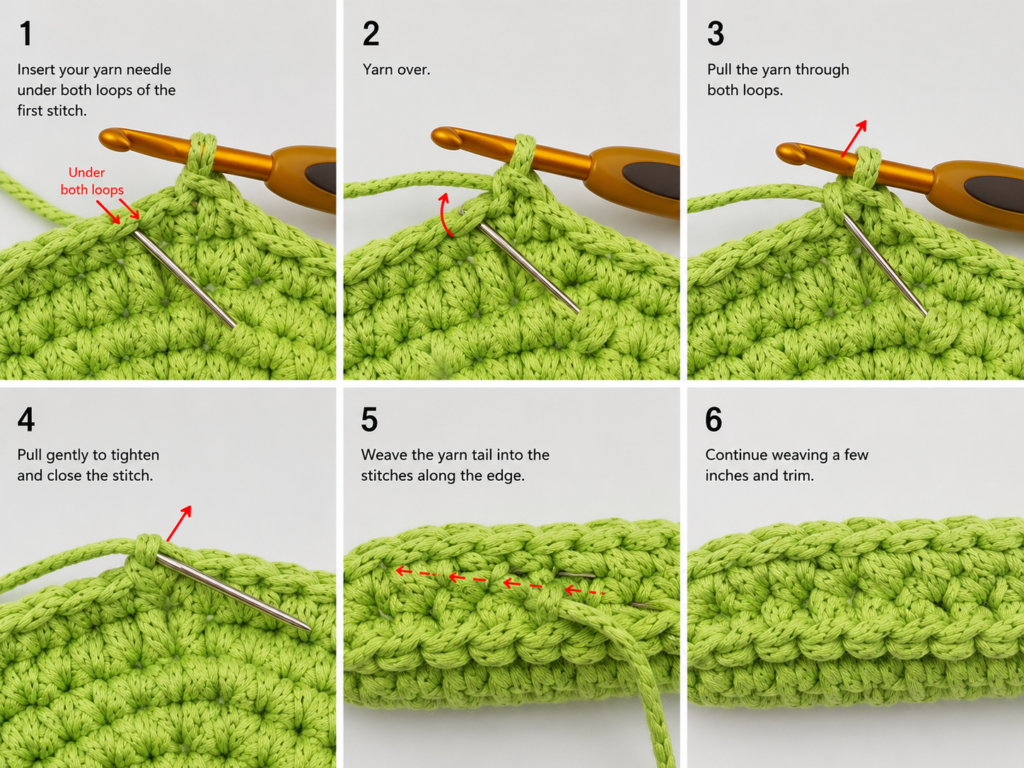
Cut both working strands, leaving an 8-inch tail.
Pull the tail completely through the final loop and tighten gently.
Weave in the ends
Thread both strands through a large tapestry needle.
Weave horizontally beneath several stitches on the inside of the organizer. Change direction and weave through another section before trimming.
Separate the two strands for the final inch and weave them in different directions for additional security.
Shape the organizer
Place the organizer on a flat surface.
Use both hands to:
- Flatten the base.
- Straighten the walls.
- Align the handles.
- Open the textured blocks.
- Smooth the rim.
Block the organizer
For light blocking:
- Mist the basket with clean water.
- Place it over an appropriately sized jar or container.
- Straighten the base and walls.
- Allow it to dry completely.
For additional firmness, use a small amount of fabric stiffener according to the product directions. Test the product on a yarn swatch first because some stiffeners can affect color or texture.
Washing and care
Check the care instructions on the yarn label.
For most cotton organizers:
- Hand-wash or spot-clean with cool water.
- Use a mild detergent.
- Avoid aggressive twisting.
- Press moisture out with a towel.
- Reshape over a container.
- Air-dry completely before replacing desk supplies.
If a stiffening product was used, follow its care instructions before washing.
Quick Printable-Style Summary
Skill level:
Confident beginner
Finished size:
Approximately 6–6½ inches wide and 4–4½ inches tall
Materials:
- 200–230 yards of #4 cotton yarn held double
- 6.0 mm hook
- Stitch marker
- Tapestry needle
- Scissors
- Optional fabric stiffener
Stitches:
- Magic ring
- Chain
- Slip stitch
- Single crochet
- Half double crochet
- Front post double crochet
- Back post double crochet
- Back loop only
Starting method:
8 hdc in a magic ring
Base:
Increase evenly to 48 hdc
Wall transition:
One BLO hdc round
Foundation wall:
One regular hdc round
Texture repeat:
- Two rounds of 2 FPdc, 2 BPdc
- Two rounds of 2 BPdc, 2 FPdc
- Repeat to desired height
Top edge:
One sc round, followed by optional handle rounds
Finishing:
Fasten off, weave in ends, shape, and block over a cylindrical container
FAQ
Can a complete beginner make this crochet desk organizer?
A beginner who already knows chain, slip stitch, half double crochet, and double crochet can make it. Front-post and back-post stitches are the only unfamiliar techniques, and both use the same yarn-over and pull-through movements as regular double crochet.
Practice the two post stitches on a small swatch before beginning if you are uncomfortable working around stitch posts.
What yarn makes the strongest crochet desk organizer?
Firm cotton, recycled cotton, or cotton cord provides the strongest natural structure. Medium-weight cotton held double offers a useful balance between stitch visibility, firmness, and accessibility.
Soft acrylic can be used, but the organizer may need a lining or stiffener.
Can I use one strand of bulky yarn instead of two strands?
Yes. Choose a bulky #5 yarn with a smooth texture and test it with a 6.0–7.0 mm hook.
Your gauge and finished size may differ, so stop increasing the base when it reaches the desired diameter. Make sure the final stitch count is divisible by four before beginning the basketweave pattern.
Why is my crochet organizer curling?
A slightly curved edge after the back-loop round is normal because the wall is beginning to rise.
If the original base curls before the back-loop round, the circle may have too few stitches or your tension may be too tight. Recheck the stitch count and consider using a larger hook.
How do I make the organizer stand up more firmly?
Use one or more of these methods:
- Hold two cotton strands together.
- Use a smaller hook for denser fabric.
- Add a felt or plastic-canvas base.
- Line the organizer with fabric.
- Block it over a container.
- Apply a light fabric stiffener.
Do not overapply stiffener because the basketweave texture should remain visible.
Can I make this organizer without handles?
Yes. After Round 17, work one more single crochet round and fasten off.
A handle-free version may be preferable when the organizer will remain permanently on a desk or shelf.
Can I make separate compartments?
Yes. Insert small recycled jars or cups inside the finished organizer, or make a removable cross-shaped divider using plastic canvas, felt, or crocheted strips.
Removable compartments are easier to wash and rearrange than permanent dividers.
Conclusion
A useful crochet project does not need complicated shaping. This organizer combines a basic circular base with a compact basketweave repeat to create a practical container for pens, hooks, scissors, tape, cables, and other small supplies.
The most important stages are keeping the base flat, maintaining 48 stitches in the walls, and aligning each two-stitch post block. Once those details are controlled, the texture becomes repetitive and satisfying.
Use one neutral color for a minimalist office accessory or add a contrasting rim for a brighter classroom or craft-room version. The pattern is also easy to adjust in height, making it suitable for everything from paper clips to long paintbrushes.






