A dorm room has to do several jobs at once. It may be your bedroom, study space, dressing area, snack station, and social space—all within a few square meters. That makes useful handmade décor especially valuable. Instead of crocheting something that occupies more desk or floor space, this tutorial turns a small amount of yarn into vertical storage.
This easy hanging basket is one of the most practical crochet dorm room decor patterns for a beginner. It can hold charging cables, scrunchies, pens, reading glasses, unopened stationery, clean face cloths, or other lightweight essentials. Its soft teardrop shape adds color and texture to a plain wall while the low front opening keeps frequently used items within reach.
The project begins with a small circular base. You will build a firm cup in continuous rounds, leave part of the front rim open, and then work a tapered back panel in turned rows. A reinforced crochet loop at the top lets the finished pocket hang from an appropriate removable wall hook.
The construction is forgiving. Gauge does not need to match perfectly, no complicated colorwork is required, and there are no separate pieces to sew together.
What You’ll Learn
- How to begin a sturdy project with a magic ring
- How to increase a single crochet circle evenly
- How to use back-loop-only stitches to define a basket base
- How to crochet firm walls without accidental increases
- How to mark a centered front opening
- How to shape a tapered back using decreases
- How to make and reinforce a hanging loop
- How to finish a rim without making it pucker
- How to adjust the project for different dorm-room uses
Project Details
Article type: Beginner project tutorial and pattern-style guide
Finished size: Approximately 7–8 inches wide and 10–11 inches tall, including the loop
Basket depth: Approximately 4–5 inches
Estimated time: 2–3 hours
Construction: Base and lower body worked in continuous rounds; upper back worked in turned rows
Terminology: US crochet terminology
Right side: The smooth side of the single crochet fabric is treated as the outside
Materials You’ll Need
Yarn
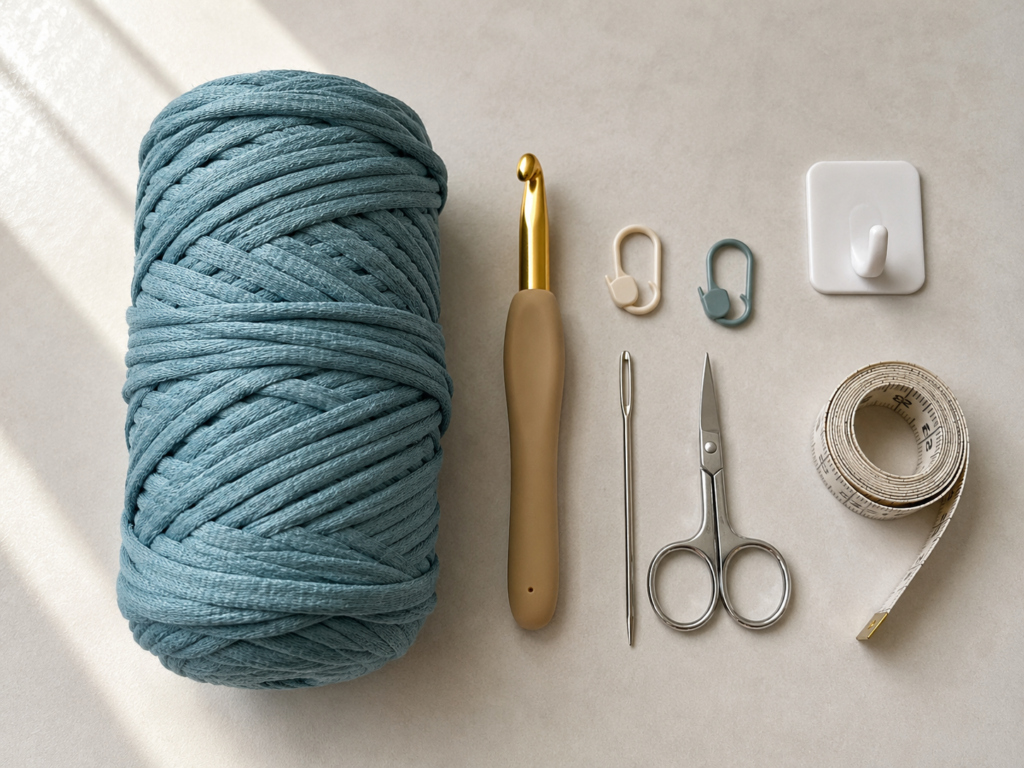
Use approximately 90–110 yards of category 5 bulky cotton yarn.
A firm cotton tube yarn, recycled cotton cord, or braided cotton yarn works particularly well because it produces a basket that holds its shape. Avoid very soft chenille, loosely spun roving, or slippery bamboo yarn for your first basket. Those fibers can stretch under the weight of stored items.
The tutorial color is dusty teal. This soft blue-green shade works with neutral bedding, light wood furniture, and warm dorm lighting without appearing too bright.
A category 5 bulky yarn is commonly paired with crochet hooks in roughly the 6.5–9 mm range, although the label and required fabric should guide the final hook choice. This project uses an 8 mm hook to create a firm but workable fabric.
Tools
- 8 mm crochet hook
- Two locking stitch markers
- Scissors
- Blunt yarn needle
- Flexible measuring tape
- One removable or housing-approved wall hook
- Optional additional yarn marker for the first stitch of each round
Yarn Substitute
Two strands of firm worsted-weight cotton held together may be used in place of one bulky strand. Make a small test circle first. The fabric should feel compact and resist stretching when held from one edge.
Yarns within the same numbered category are not automatically interchangeable. Fiber, twist, drape, and thickness can differ, so checking your fabric before making the whole basket is useful.
Dorm Safety Note
Use the basket only for light, dry objects. Do not fill it with water, hot styling tools, heavy books, glass containers, medication requiring controlled storage, or anything that could be damaged if the hook releases.
Follow the load rating printed on the removable hook and any wall-decoration rules supplied by your residence.
Crochet Abbreviations Used
The abbreviations follow standard US crochet terminology. The Craft Yarn Council’s abbreviation list also distinguishes between US and UK stitch names.
- ch = chain
- sc = single crochet
- sl st = slip stitch
- st/sts = stitch/stitches
- rep = repeat
- BLO = back loop only
- inc = work 2 single crochet stitches in the same stitch
- sc2tog = single crochet 2 stitches together
- rnd = round
- RS = right side
- WS = wrong side
US/UK Terminology Note
The pattern is written in US terms.
- US single crochet is called double crochet in UK terminology.
- US sc2tog is generally called dc2tog in UK terminology.
- Chain and slip stitch use equivalent basic names in both systems.
Special Stitches
Single Crochet Increase
Insert the hook into the indicated stitch and work one single crochet. Insert the hook into the same stitch again and work a second single crochet.
You have added one stitch.
Single Crochet Two Together — sc2tog
- Insert the hook into the next stitch.
- Yarn over and pull up one loop. Two loops are on the hook.
- Insert the hook into the following stitch.
- Yarn over and pull up one loop. Three loops are on the hook.
- Yarn over and pull through all three loops.
Two stitches have become one stitch.
Back Loop Only Single Crochet
Look at the top of the next stitch. You will see a V formed by two loops.
Insert the hook under only the loop farthest away from you. Complete a normal single crochet. The unused front loop creates a horizontal ridge around the base.
Before You Start
Gauge and Tension
Aim for approximately:
9 single crochet stitches × 9 rounds = 4 inches
Exact gauge is not critical, but the fabric must be firm. When you hold the crochet circle by one edge, it should not collapse like soft fabric.
Use a smaller hook when:
- Large gaps appear between stitches
- The basket feels loose
- The base stretches significantly
- Stored items would poke through the fabric
Use a larger hook when:
- Inserting the hook is painful
- The yarn splits repeatedly
- Your hands become tired after only a few stitches
- The base curls tightly despite correct stitch counts
How to Count Continuous Rounds
Place a marker in the first stitch of each round. Move it upward every time you reach it.
Do not join the early rounds with a slip stitch. You will crochet directly into the marked stitch and continue in a spiral.
Count every completed round before moving on. Increase errors made in the base will affect the width and symmetry of the entire basket.
How to Keep the Base Flat
A correct circle should lie mostly flat without being stretched.
- A wavy edge usually means there are too many increases.
- A bowl shape during the base rounds usually means increases are missing or the tension is too tight.
- A slightly uneven circle can often be smoothed by hand, but strong ruffling should be corrected before continuing.
How to Keep the Opening Centered
Do not guess where the front opening belongs while holding the basket in the air.
Set the basket upright on the table. Flatten it gently with the round marker positioned at the back. Identify the visual center of the front, count five stitches in each direction, and mark the ten-stitch opening.
Beginner Note
Read through Steps 5–8 before fastening off the body. The transition from continuous rounds to turned rows is simple, but understanding the final shape first makes marker placement easier.
Step-by-Step Crochet Tutorial
Step 1: Make the Magic Ring
Create an adjustable magic ring.
Round 1
Work 8 sc into the magic ring. Do not join. Pull the yarn tail until the center closes.
Place a marker in the first single crochet.
Stitch count: 8 sc
The ring should close firmly without pulling the stitches on top of one another. Leave a tail of at least 5 inches so it can be secured later.
Beginner Tip
Hold the crossing point of the ring between your thumb and middle finger while making the first few stitches. Once three or four stitches are inside the ring, the structure becomes easier to control.
Common Mistake to Avoid
Do not crochet over the short yarn tail so tightly that it can no longer slide. The tail must remain movable until all eight stitches are complete.
Chain-Start Alternative
When a magic ring feels too difficult:
- Ch 2.
- Work 8 sc into the second chain from the hook.
- Continue with Round 2.
The center may have a slightly larger opening, but the basket will still function properly.
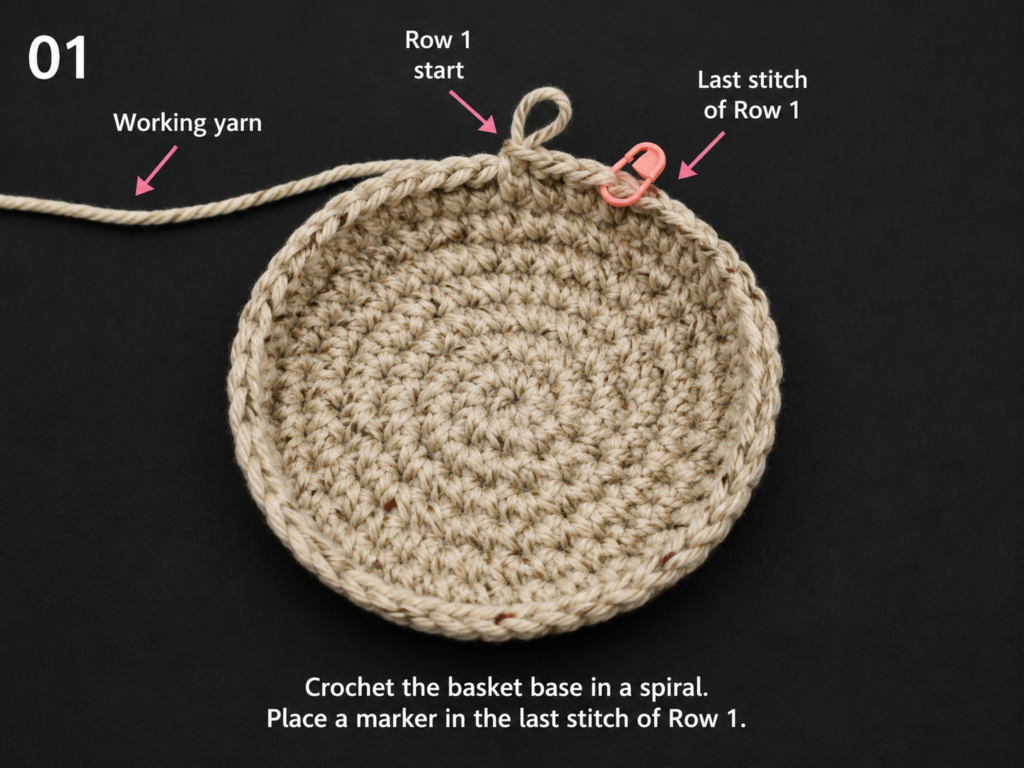
Step 2: Expand the Circular Base
The next three rounds increase the circle evenly.
Round 2
Work 2 sc in every stitch around.
Stitch count: 16 sc
Move the marker into the first stitch of the new round.
Round 3
Work:
(1 sc in next stitch, 2 sc in next stitch) eight times
Stitch count: 24 sc
Round 4
Work:
(1 sc in each of next 2 stitches, 2 sc in next stitch) eight times
Stitch count: 32 sc
Set the circle on the table. The edge should look smooth rather than heavily ruffled.
Beginner Tip
An increase consists of two complete stitches placed into one stitch. Do not mistake the two top loops of one stitch for two separate stitches.
Common Mistake to Avoid
Do not increase directly above every increase from the previous round without counting the plain stitches between them. Correct spacing distributes the added fabric around the circle.
Size Check
The circle should measure approximately 4½–5 inches across, depending on the yarn and tension.
A slightly smaller base produces a deeper, narrower pocket. A larger base produces a wider, shallower basket.
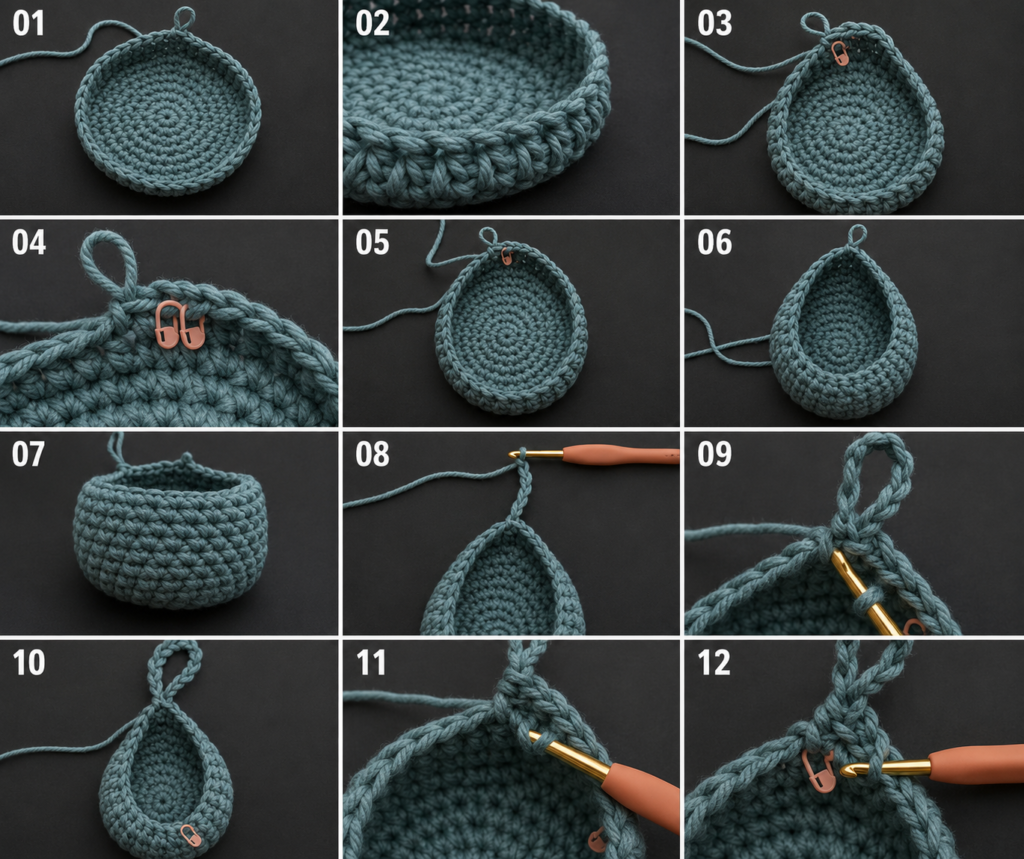
Step 3: Turn the Base into a Basket
The next round changes the direction of the fabric.
Round 5
Work 1 sc in the BLO of every stitch around.
Stitch count: 32 sc
Continue in a spiral. Do not join.
As this round progresses, the fabric should begin to stand above the circular base. The unused front loops create a subtle ridge that outlines the bottom.
Beginner Tip
Tilt the work toward you and look directly at the stitch tops. The back loop is the loop farthest from your body.
Common Mistake to Avoid
Do not accidentally work through both loops midway around. A few misplaced stitches will not destroy the basket, but the base ridge will look interrupted.
Right Side and Wrong Side
Keep the smoother side of the single crochet fabric facing outward. If the basket naturally curves in the opposite direction, gently turn it so the preferred side is outside before continuing.
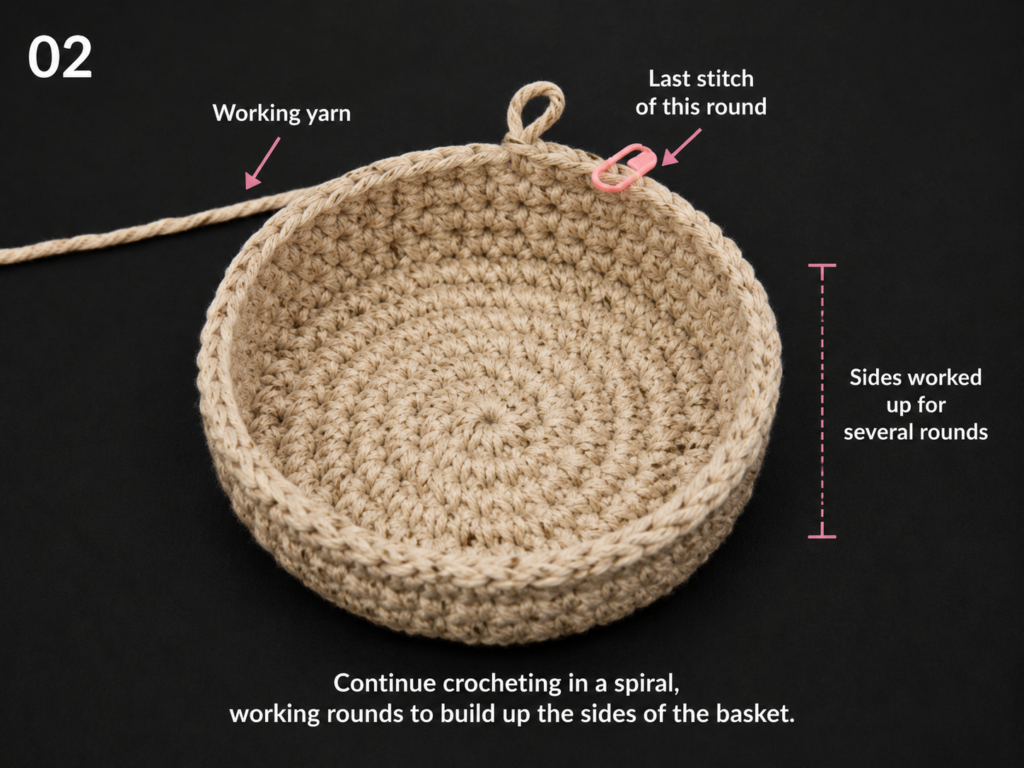
Step 4: Crochet the Straight Body
Work the next rounds through both loops.
Rounds 6–10
Work 1 sc in every stitch around.
Stitch count after every round: 32 sc
Continue moving the marker at the beginning of each round.
After Round 10, the basket should resemble a sturdy cup. The front and back are still the same height at this stage.
Beginner Tip
Count each round at least once. Because no increases are used here, every round must contain exactly 32 stitches.
Common Mistake to Avoid
The stitch immediately after the marker can hide beneath the working yarn. Missing it reduces the basket by one stitch and creates a gradual inward lean.
Adjusting Body Depth
For a deeper lower pocket, add one or two additional even rounds before proceeding.
For a shallow pocket designed for keys or small accessories, stop after Round 8.
Remember that adding rounds uses more yarn and increases the distance between the front opening and the base.
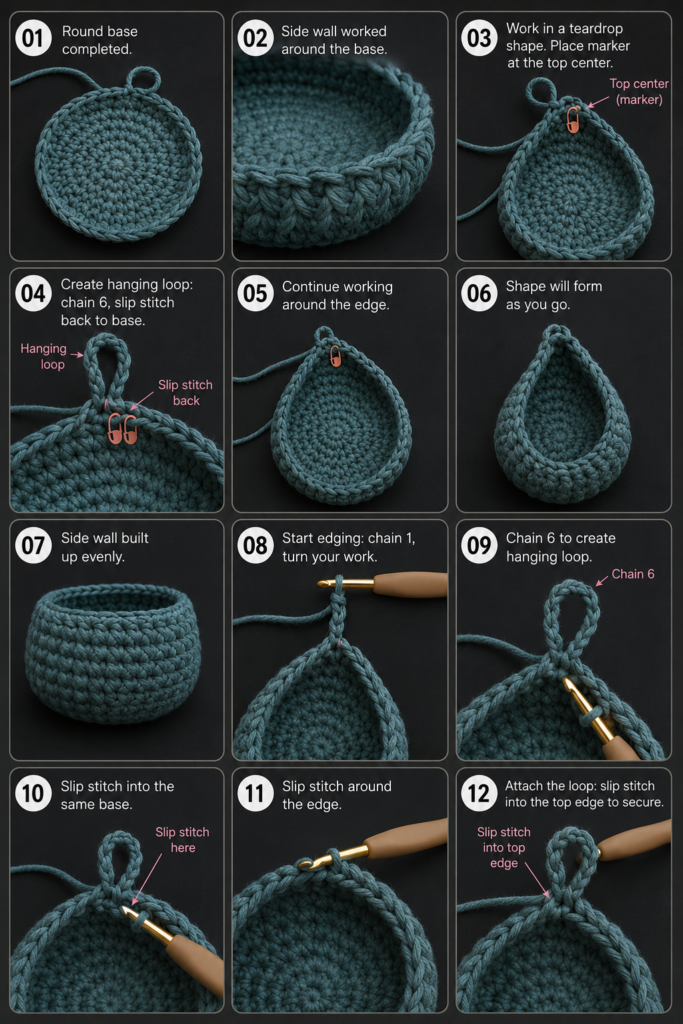
Step 5: Mark the Front Opening
After Round 10, fasten off the working yarn.
We will leave ten stitches unworked across the front and build the upper back across the remaining 22 stitches.
Locate the Front
- Place the basket upright.
- Position the original round marker at the center back.
- Flatten the basket gently from side to side.
- Find the visual center of the front.
- Count five stitches to the left and five stitches to the right.
- Place one marker at each side of this ten-stitch section.
The ten stitches between the markers form the low front opening.
The other 22 stitches form the back and sides.
Confirm the Placement
Hold the basket by the two markers. The original beginning-of-round line should sit approximately opposite the center of the marked opening.
Move the markers when the opening appears noticeably off-center.
Beginner Tip
Count the front section twice. It is much easier to correct marker placement now than after several shaped rows.
Common Mistake to Avoid
Do not place ten stitches between the markers and then count the two marked stitches again as part of the back. Decide whether the markers sit in the first and last front stitches or directly beside them.
For this tutorial, each marker sits in one of the ten front stitches. All ten marked-section stitches remain unworked.
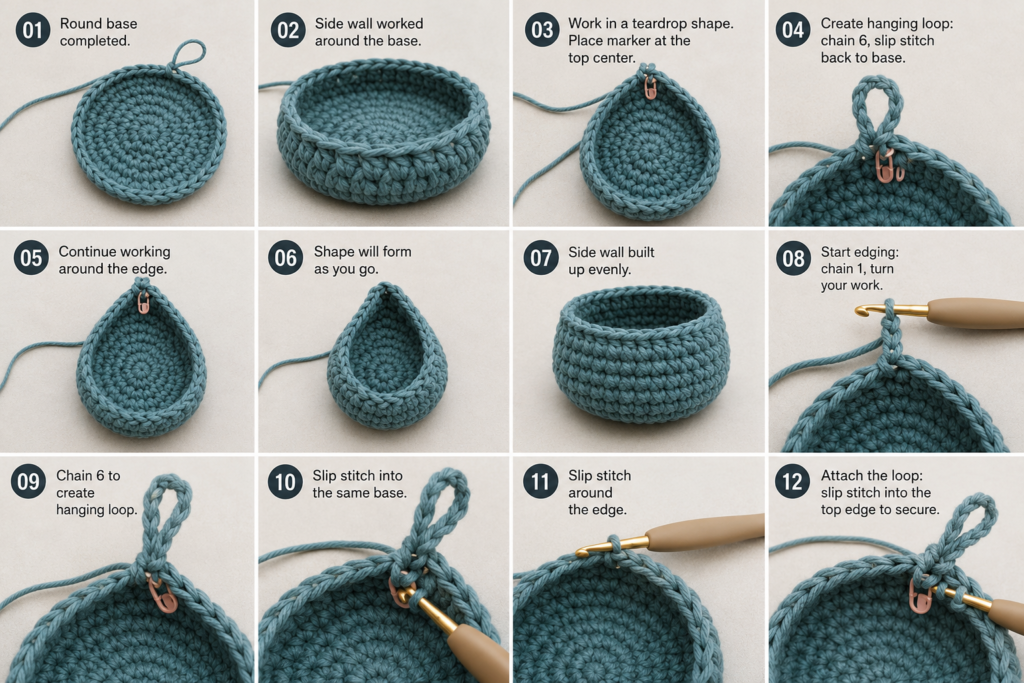
Step 6: Begin the Raised Back Panel
Turn the basket so the right side faces you.
Join the yarn in the first stitch immediately after one side of the front opening. Choose the side that allows you to crochet around the back toward the second marker.
Back Row 1
Ch 1. The chain does not count as a stitch.
Work 1 sc in each of the next 22 stitches, moving around the sides and back of the basket.
Stop before the ten front-opening stitches.
Stitch count: 22 sc
Turn the work.
You have now changed from spiral rounds to turned rows.
Beginner Tip
After completing the row, count the 22 stitches before turning. The first and last stitches sit close to the markers and can be easy to overlook.
Common Mistake to Avoid
Do not crochet into either of the ten front-opening stitches. Those stitches must stay low to create easy access to the basket.
What the Shape Should Look Like
The lower basket remains circular, but one side now has an extra row. That higher side is the back.
The difference may seem small now. It becomes more obvious as the following rows taper toward the hanging loop.
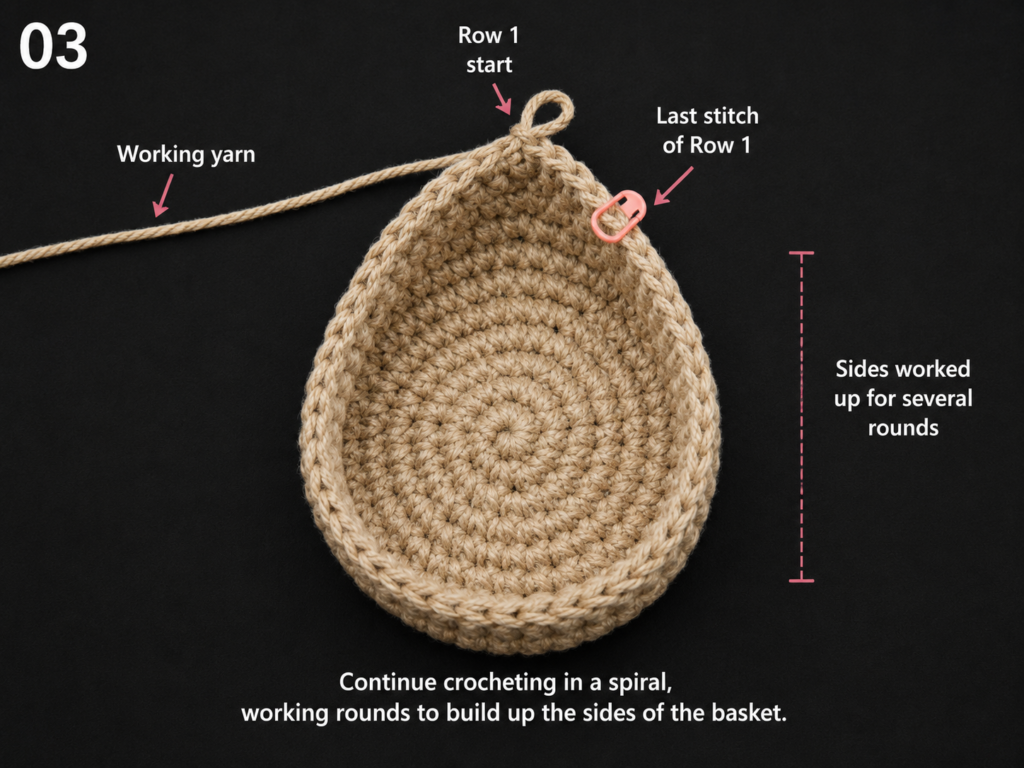
Step 7: Taper the Upper Section
Each following row removes one stitch from each side. This creates two smooth diagonal edges leading toward the loop.
The ch 1 at the beginning of each row does not count as a stitch.
Back Row 2
Ch 1, sc2tog, sc in each of the next 18 stitches, sc2tog.
Stitch count: 20 sc
Turn.
Back Row 3
Ch 1, sc2tog, sc in each of the next 16 stitches, sc2tog.
Stitch count: 18 sc
Turn.
Back Row 4
Ch 1, sc2tog, sc in each of the next 14 stitches, sc2tog.
Stitch count: 16 sc
Turn.
Back Row 5
Ch 1, sc2tog, sc in each of the next 12 stitches, sc2tog.
Stitch count: 14 sc
Turn.
Back Row 6
Ch 1, sc2tog, sc in each of the next 10 stitches, sc2tog.
Stitch count: 12 sc
Turn.
Back Row 7
Ch 1, sc2tog, sc in each of the next 8 stitches, sc2tog.
Stitch count: 10 sc
Turn.
Back Row 8
Ch 1, sc2tog, sc in each of the next 6 stitches, sc2tog.
Stitch count: 8 sc
Turn.
The back should now taper evenly from 22 stitches at its base to 8 stitches at the top.
Beginner Tip
Place a temporary marker in the first actual stitch of each row. The turning chain can resemble a stitch, especially in thick yarn.
Common Mistake to Avoid
Do not work the first sc2tog into the turning chain. Insert the hook into the first and second real stitches of the row.
Checking Symmetry
Lay the basket flat with the opening facing upward.
The top eight stitches should sit approximately above the center of the front opening. One side should not be visibly longer than the other.
A difference of a few millimeters is normal. A strong lean usually means one row lost only one stitch instead of two.
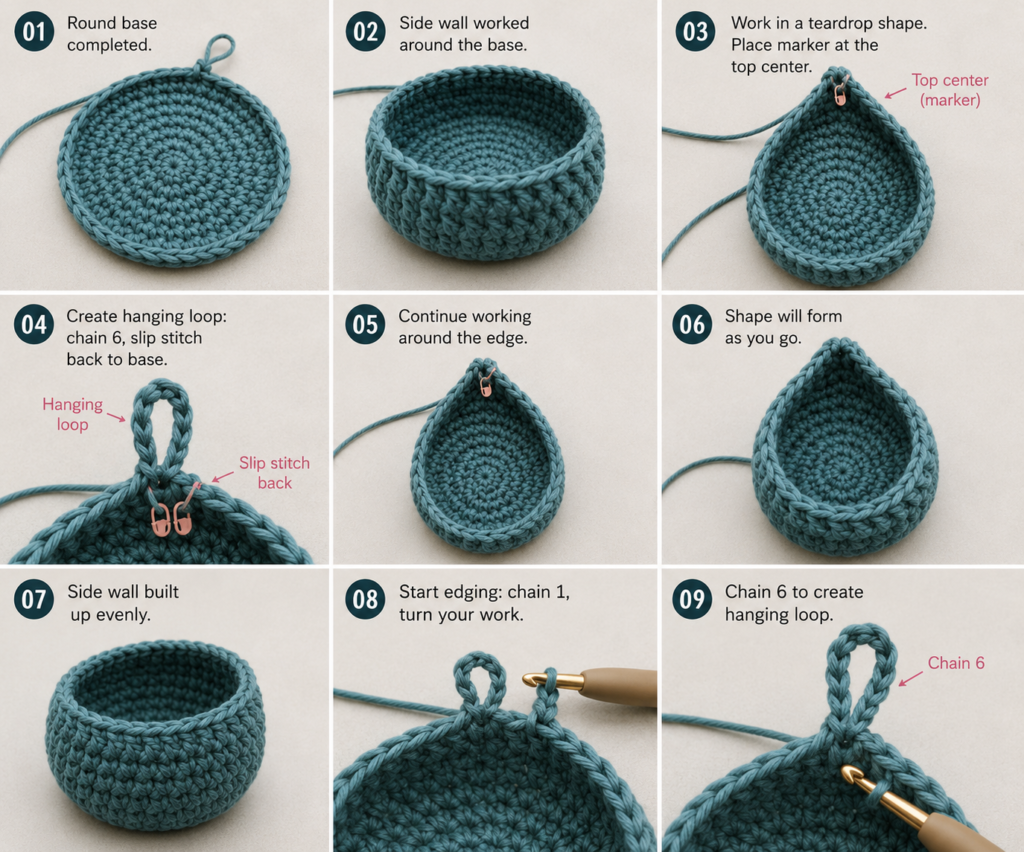
Step 8: Chain the Hanging Loop
The hanging loop is worked into the final eight stitches.
Back Row 9
Ch 1.
- Sc in each of the first 3 stitches
- Ch 10
- Skip the next 2 stitches
- Sc in each of the final 3 stitches
You now have:
6 sc plus one ch-10 loop
Do not allow the chain to twist.
Test the Loop
Before continuing, slide the chain over the removable hook you intend to use.
Add two or three chains when the hook is wide.
Remove two chains when the hook is narrow and the loop looks excessively long.
The loop should pass over the hook without being forced but should not be so loose that the basket falls off when lightly bumped.
Beginner Tip
Lay the chain flat against your finger. The small V shapes should all face the same direction before you make the final three stitches.
Common Mistake to Avoid
Do not pull the ten chains more tightly than your normal tension. A tight chain will be difficult to reinforce in the next row.
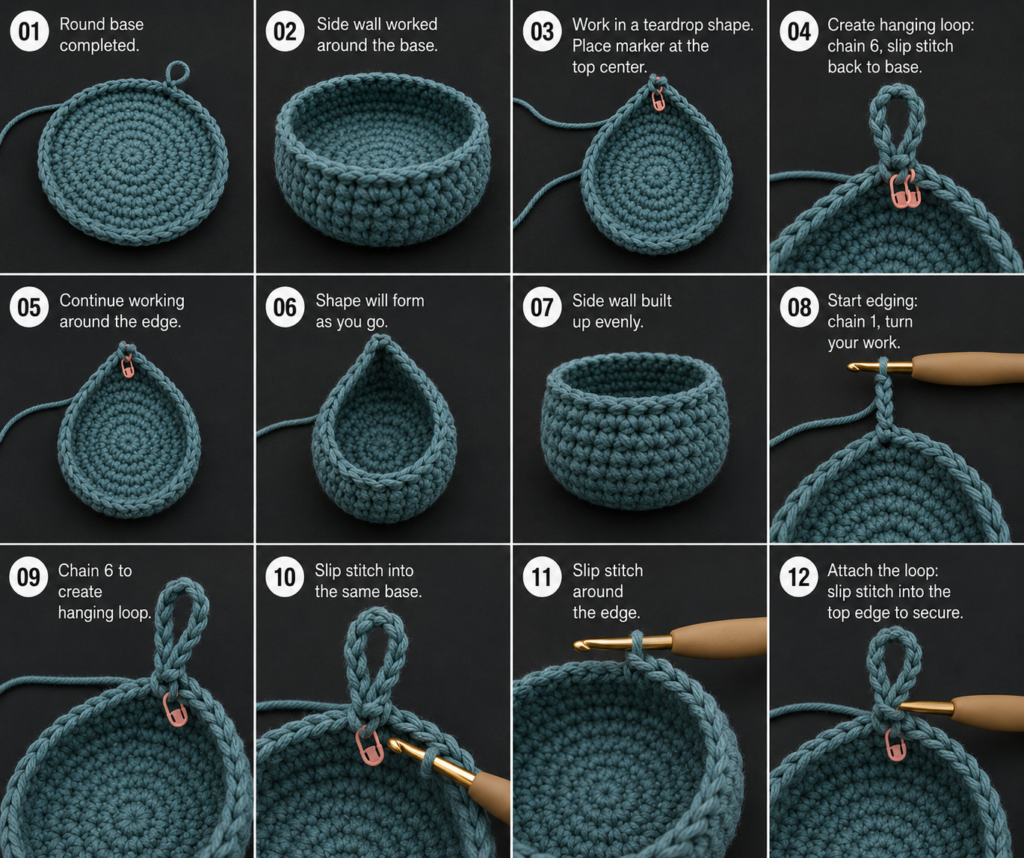
Step 9: Reinforce the Hanging Loop
Turn the work.
Back Row 10
Ch 1.
- Sc in each of the first 3 stitches
- Work 14 sc around the entire chain-10 arch
- Sc in each of the final 3 stitches
Stitch count: 20 sc
When working around the arch, insert the hook beneath the complete chain rather than into individual chain stitches. Slide the new stitches together as you work so they cover the chain evenly.
Do not fasten off until you examine the loop.
Why Use 14 Stitches Around a Ten-Chain Loop?
The extra stitches give the loop enough fabric to curve without pulling the top corners inward.
When the loop flares or looks crowded, remove one or two stitches.
When the original chain remains visible between stitches, add one or two stitches.
Beginner Tip
Spread the fourteen stitches around the loop only after all of them are complete. Trying to perfect the spacing after every stitch slows the process.
Common Mistake to Avoid
Do not work into the skipped two stitches beneath the loop. They remain below the arch and help the upper section bend cleanly.
Step 10: Edge the Opening
A loose slip-stitch border tidies the row ends and makes the opening more resistant to stretching.
Fasten off after Back Row 10, leaving a 6-inch tail.
With the right side facing you, join the yarn at one lower corner of the front opening.
Work the Border
- Sl st evenly up the first tapered side.
- Work one sl st in each top stitch.
- Work one sl st in each of the 14 stitches around the loop.
- Continue down the opposite tapered side.
- Sl st in each of the ten front-opening stitches.
- Stop when you return to the beginning.
Aim for approximately one slip stitch per row end along each slope. Add a stitch at a visible gap or skip a row end where the border begins to flare.
Keep the Slip Stitches Loose
Pull each new loop to the normal height of your single crochet stitches before completing the slip stitch. Tight slip stitches shorten the edge and cause the front opening to curl inward.
Beginner Tip
Use a hook 1 mm larger for the edging when your slip stitches are naturally tight.
Common Mistake to Avoid
Do not place two slip stitches into every row end. Thick yarn needs less edge density than fine yarn. Too many stitches create a rippled border.
Step 11: Finish with an Invisible Join
After the final slip stitch:
- Cut the yarn, leaving a 6-inch tail.
- Pull the tail completely through the final stitch.
- Thread the tail onto the yarn needle.
- Pass the needle from front to back under both top loops of the first border stitch.
- Bring the needle back through the center of the final slip stitch.
- Adjust the false stitch until it matches the surrounding edge.
- Weave the tail through several stitches on the inside.
This technique disguises the end of the round and avoids a visible knot at the front opening.
Secure the original magic-ring tail by weaving it in several directions across the base.
Beginner Tip
Do not pull the false stitch tighter than the neighboring stitches. It should imitate one normal V at the top of the border.
Common Mistake to Avoid
A single straight pass through the fabric is not enough for a functional basket. Change direction while weaving each tail so ordinary movement cannot pull it free.
Step 12: Shape and Hang the Basket
The basket usually does not require formal blocking, but hand shaping improves its presentation.
- Place one hand inside the basket.
- Smooth the circular base.
- Round the lower sides.
- Pull the two tapered edges upward evenly.
- Shape the loop into a smooth oval.
- Check that the opening is centered beneath the loop.
Hang the empty basket for several hours before filling it. This allows the stitches to settle.
Add lightweight items gradually and check that the removable hook remains secure.
Good Dorm-Room Uses
- Charging cables and wired earbuds
- Hair ties, clips, and scrunchies
- Pens, markers, and small stationery
- Clean reusable face cloths
- Sleep masks and fabric headbands
- Individually wrapped craft supplies
- Spare lanyards and ID-card accessories
- Small packets of tissues
Avoid Storing
- Hot hair tools
- Open drinks
- Heavy bottles
- Glass containers
- Large textbooks
- Wet washcloths
- Food that may leak
- Objects heavier than the wall hook’s approved load
Pattern Notes or Stitch Notes
Turning Chain Rule
The ch 1 at the beginning of every back-panel row does not count as a stitch.
Work the first sc or sc2tog into the first actual stitch directly below the hook.
Stitch Counts
The lower body remains at 32 stitches from Round 4 through Round 10.
The back panel decreases by two stitches in every shaping row:
- Row 1: 22
- Row 2: 20
- Row 3: 18
- Row 4: 16
- Row 5: 14
- Row 6: 12
- Row 7: 10
- Row 8: 8
Check these counts before beginning the handle.
Continuous Rounds
Rounds 1–10 are worked in a spiral. Do not slip stitch to join them.
A stitch marker is essential because there is no obvious beginning seam.
Turned Rows
The upper back is worked in rows rather than rounds. Turn after every shaping row.
This construction keeps the front low while lifting the back toward the hanging point.
Right Side and Wrong Side
The smoother side of the single crochet fabric is the right side and faces outward.
When turning the upper rows, you will alternate between the right and wrong sides. This slight difference in row texture is normal.
Size Adjustment Notes
Make the Basket Narrower
Stop the base after Round 3 with 24 stitches.
Work the body evenly, leave 8 front stitches unworked, and work the back across 16 stitches. Decrease each side until 6–8 stitches remain.
Make the Basket Wider
Add another increase round after Round 4:
(Sc in next 3 stitches, inc in next stitch) eight times — 40 stitches
Leave approximately 12–14 stitches open at the front and work the upper back across the remaining stitches.
Make the Basket Deeper
Add one to three straight rounds after Round 10.
Make the Opening Wider
Leave 12 stitches unworked instead of 10. The back begins with 20 stitches and becomes slightly narrower.
Make the Loop Longer
Add two chains for a larger hook. Reinforce the loop with two or three additional single crochet stitches.
Common Beginner Mistakes
1. Losing the Beginning of the Round
Problem: The round count becomes uncertain and the basket grows unevenly.
Fix: Place the marker in the first stitch, not between two stitches. Move it immediately after working into the marked stitch.
2. Creating a Wavy Base
Problem: The circular foundation ruffles.
Cause: Extra increases or very loose tension.
Fix: Count the round. Remove accidental increases. A strongly ruffled base will not become flat after the walls are added.
3. Creating a Bowl Before Round 5
Problem: The base curves upward during the increase rounds.
Cause: Missing increases, tight tension, or a hook that is too small.
Fix: Verify the stitch count and loosen the working loop. Move up one hook size when the count is correct but the circle remains tightly cupped.
4. Making a Floppy Basket
Problem: The filled basket stretches downward and loses its shape.
Cause: A soft yarn, large hook, or loose tension.
Fix: Choose firmer cotton, hold two strands together, or move down one hook size. The fabric should feel denser than fabric used for a scarf or garment.
5. Working Through the Wrong Loop
Problem: The base ridge appears only in sections.
Fix: During Round 5, pause before every stitch and identify the back loop. After that round, return to working under both loops.
6. Placing the Opening Off-Center
Problem: The finished loop leans to one side.
Fix: Position the beginning-of-round marker at the center back before marking the front. Count ten consecutive front stitches and compare the number of side stitches visually.
7. Missing One Edge Decrease
Problem: The upper back twists or one slope becomes longer.
Fix: Every shaping row begins and ends with sc2tog. Confirm that the stitch count drops by exactly two.
8. Twisting the Handle Chain
Problem: The reinforced loop turns sideways.
Fix: Lay the ten chains flat and confirm that all chain V shapes face the same direction before completing the row.
9. Making the Border Too Tight
Problem: The opening puckers and becomes smaller.
Fix: Lengthen each slip-stitch loop or use a hook one size larger for the edging.
10. Hanging the Basket Before the Tails Are Secure
Problem: The finishing join begins to loosen.
Fix: Weave every tail in multiple directions on the inside and test the empty basket before adding items.
How to Customize This Crochet Project
Yarn Changes
Cotton Tube Yarn
Produces the cleanest modern finish and is comfortable to crochet.
Braided Cotton Cord
Creates excellent structure but may be harder on the hands. Take regular breaks.
Recycled T-Shirt Yarn
Makes a thick, cushioned basket. Check that the yarn width is reasonably consistent.
Two Strands of Worsted Cotton
Useful when bulky yarn is unavailable. Wind the strands into separate balls to reduce tangling.
Acrylic Yarn
Can work when it has a firm twist, but soft acrylic may stretch. Use a smaller hook and store only very light accessories.
Color Changes
Solid Color
A single dusty teal, cream, black, sage, or terracotta shade creates a clean modern basket.
Color-Blocked Base
Use a neutral color for Rounds 1–5 and switch to the main color for the walls.
Contrasting Border
Work the slip-stitch border in cream or warm tan.
Dorm-Room Set
Make three baskets in related colors:
- One for cables
- One for hair accessories
- One for stationery
Keep the hook, yarn type, and construction identical so the group looks coordinated.
Texture Options
Front-Loop Ridge
Add another BLO round halfway up the body for a second decorative horizontal line.
Striped Body
Alternate colors every two even rounds.
Avoid changing colors during the tapered upper rows on the first basket. The row-end decreases make color changes more noticeable.
Surface Embroidery
After finishing, embroider a small initial, star, heart, or simple geometric line on the front.
Do not add large beads or heavy decorations that could pull the opening forward.
Border Options
- Loose slip-stitch edging for a compact finish
- One round of single crochet for a thicker rim
- Contrasting single crochet for color definition
- Crab stitch for an experienced crocheter seeking a corded appearance
Size Changes
A small version can hold keys or earbuds.
A medium version suits chargers, pens, and hair accessories.
A larger version can store clean rolled cloths, but it requires a stronger hook and denser fabric.
Gift Ideas
This basket can be included in:
- A college move-in gift
- A roommate welcome package
- A handmade study-station set
- A graduation gift
- A first-apartment bundle
- A crochet organizer set with matching coasters
Finishing Instructions
Fastening Off
Use the invisible join described in Step 11 where the border ends.
For less visible areas, pull the cut yarn through the final loop and tighten gently.
Weaving in Ends
Thread each tail through a blunt needle.
Weave horizontally through four or five stitch backs. Change direction and pass through another group of stitches. Trim the excess only after lightly pulling the fabric in several directions.
Do not cut the magic-ring tail close to the center without weaving it in. The base carries the weight of the stored items.
Shaping
Insert your hand into the pocket and smooth the walls.
Shape the front opening into a shallow curve rather than a sharp V.
Stretch the hanging loop only enough to form an even oval.
Blocking
Formal pin blocking is usually unnecessary.
When the basket looks uneven:
- Lightly dampen it with clean water.
- Press out moisture without twisting.
- Fill it loosely with dry towels to support the shape.
- Arrange the front opening and loop.
- Allow it to dry completely on a protected surface.
Do not hang the basket until it is dry.
Washing and Care
Follow the yarn-label instructions.
For most firm cotton baskets, gentle hand washing is safer than aggressive machine washing. Reshape the damp basket and dry it flat.
Remove all stored objects before washing.
Final Safety Check
Before regular use:
- Inspect the loop for stretched stitches.
- Confirm that yarn tails are secure.
- Check the wall hook’s adhesion.
- Add objects gradually.
- Stop adding weight when the loop or wall begins to distort.
Quick Printable-Style Summary
Project: Dorm-Drop Crochet Hanging Storage Pocket
Skill level: Easy beginner
Finished size: Approximately 7–8 inches wide × 10–11 inches tall including loop
Yarn: 90–110 yards category 5 bulky cotton yarn
Hook: 8 mm
Additional materials: Two stitch markers, scissors, yarn needle, measuring tape, approved removable hook
Stitches: Ch, sc, sl st, BLO sc, inc, sc2tog
Starting method: 8 sc in a magic ring
Base sequence:
- Rnd 1: 8 sc
- Rnd 2: 16 sc
- Rnd 3: 24 sc
- Rnd 4: 32 sc
Base transition: BLO sc around
Body: Five even rounds of 32 sc
Front opening: Leave 10 stitches unworked
Back panel: Begin with 22 sc; decrease one stitch at each end until 8 stitches remain
Handle: Sc 3, ch 10, skip 2, sc 3
Handle reinforcement: Sc 3, 14 sc around chain loop, sc 3
Edging: Loose slip stitch around the opening and handle
Finishing: Invisible join, weave in tails, shape by hand, hang empty before filling
FAQ
What are the most useful crochet dorm room decor patterns?
Useful options include hanging baskets, coasters, desk organizers, small wall hangings, bunting, cushion covers, cable ties, storage bowls, and narrow bedside pockets.
Projects that use vertical space or organize objects are especially practical in a compact room.
Is this hanging basket suitable for a complete beginner?
Yes. A beginner should already know how to make a chain and single crochet or be willing to practice those techniques first.
The newest skills are working in continuous rounds, making sc2tog decreases, and edging row ends.
What yarn is best for a crochet dorm-room basket?
A firm, low-stretch cotton yarn is the most reliable option.
Bulky cotton tube yarn, braided cotton cord, recycled cotton, and firm t-shirt yarn create more structure than soft, draping garment yarn.
Can I use worsted-weight yarn?
Yes. Hold two strands of worsted cotton together and begin with an 8 mm hook.
Check the fabric after the first four rounds. Use a smaller hook when the circle feels too loose or open.
How do I stop the basket from sagging?
Use a firm yarn, maintain compact tension, and avoid overloading it.
You can also:
- Reduce the hook size
- Hold two yarn strands together
- Make the lower body one round shorter
- Add a fabric insert
- Reserve the basket for lightweight objects
How can I hang crochet décor without damaging a dorm wall?
Use only the attachment methods permitted by the residence. A properly rated removable hook may be appropriate where permitted.
Clean and prepare the wall according to the hook manufacturer’s directions, allow the adhesive to set for the required time, and test the basket while empty.
Can I use this as a plant holder?
The structure can physically hold a very small lightweight container, but water can damage the yarn, wall, or belongings below it.
For a dorm room, dry accessories are a safer use. A faux plant may be used for decoration as long as the total weight remains low.
How do I make several baskets look like a matching set?
Use the same yarn type, hook size, border, and loop construction. Change only the yarn color or body depth.
A coordinated palette such as dusty teal, warm cream, and muted terracotta creates variety while keeping the collection visually consistent.
Conclusion
Crochet dorm-room décor works best when it adds personality without creating more clutter. This hanging storage basket uses a small area of wall space, organizes everyday accessories, and introduces handmade texture to an otherwise plain room.
The circular base provides stability, the low front keeps objects accessible, and the tapered back directs the weight toward the reinforced loop. Once the first basket is complete, the same construction can be adjusted into a small key pocket, a deeper cable organizer, or a coordinated set for a study area.
Save the tutorial with your back-to-school crochet ideas and make the first basket in a firm yarn that matches your bedding, desk accessories, or wall décor.





