A crochet witch hat does not have to be a complicated costume project. This small version uses basic stitches, a simple cone construction, and evenly spaced increases to create a pointed Halloween hat that can be finished in one sitting.
The completed hat is suitable for ornaments, garlands, plushie accessories, pumpkin toppers, gift decorations, hair clips, or miniature seasonal displays. Because it requires only a small quantity of yarn, it is also a practical way to use leftover worsted-weight yarn.
This tutorial walks through the entire process: starting the pointed cone, controlling the shape, changing colors for the hat band, separating the brim with front-loop stitches, adding increases without creating waves, and blocking the final hat.
The written pattern below is an original mini-witch-hat design. The selected external source was used only to plan the type and order of instructional photographs.
What You’ll Learn
- How to begin a narrow crochet cone with a magic ring
- How to join rounds without accidentally adding stitches
- How to space increases to form a gradual point
- How to make a clean color change
- How front-loop stitches separate the cone from the brim
- How to expand a flat half-double-crochet brim
- How to recognize ruffling and cupping
- How to weave in ends and block the finished hat
- How to adjust the height, width, color, and brim style
Finished Size
Using category 4 worsted-weight yarn and a 3.5 mm hook, the finished hat should measure approximately:
- Height: 4.25–4.75 inches
- Brim diameter: 4.5–5 inches
- Cone circumference at the band: approximately 5–5.5 inches
Your measurements may vary according to yarn thickness and tension.
Materials You’ll Need
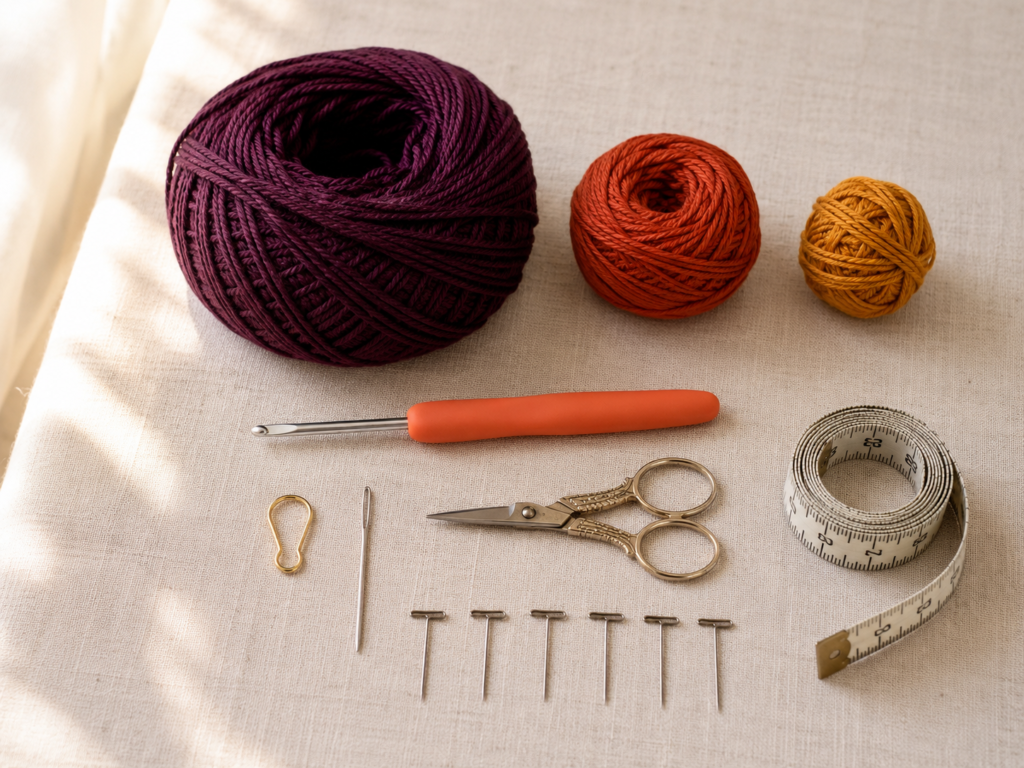
- Approximately 20–25 yards of category 4 worsted-weight yarn in deep plum
- Approximately 4–6 yards of burnt orange yarn for the band
- A small scrap of antique-gold yarn for the optional buckle
- 3.5 mm crochet hook
- Locking stitch marker
- Scissors
- Blunt tapestry needle
- Measuring tape
- Blocking mat or folded towel
- Rustproof pins, optional
A smooth cotton yarn creates a crisp, defined brim. Acrylic also works, especially for ornaments and decorations, but it may require more careful blocking.
The Craft Yarn Council classifies worsted and Aran yarns under category 4. Yarn labels and gauge still vary between manufacturers, so the stated yarn category should not be treated as a guarantee that every yarn will produce an identical result.
Crochet Abbreviations Used
- ch = chain
- FLO = front loop only
- hdc = half double crochet
- hdc inc = work 2 half double crochet stitches in one stitch
- inc = work 2 single crochet stitches in one stitch
- rep = repeat
- rnd = round
- sc = single crochet
- sl st = slip stitch
- st/sts = stitch/stitches
These abbreviations follow standard US crochet terminology. In UK terminology, a US single crochet is called a double crochet, while a US half double crochet is called a half treble crochet.
Before You Start
Gauge and tension
Exact gauge is not essential because this is not a fitted wearable. Structure, however, matters.
Aim for approximately nine single crochet stitches across two inches. Your fabric should feel firm enough to stand without being so tight that the hook is difficult to insert.
Move down to a 3.25 mm hook when:
- The cone collapses easily.
- Large holes appear between stitches.
- The brim feels loose or floppy.
Move up to a 4.0 mm hook when:
- Your hands become uncomfortable.
- The hook cannot enter the stitch tops easily.
- The cone becomes unusually narrow and rigid.
How to count joined rounds
This pattern uses joined rounds.
At the end of each round:
- Slip stitch into the first actual stitch.
- Chain one.
- Place the first stitch of the new round in the same stitch as the join.
- Do not crochet into the slip stitch or chain one.
- Move the marker into the first stitch of the new round.
The chain one does not count as a stitch.
How to identify an increase
An increase means working two stitches into the same stitch from the previous round. After making an increase, two new V-shaped stitch tops should emerge from one base.
How to control the cone
The hat point is formed by alternating an increase round with a plain round. The plain rounds add height; the increase rounds add circumference.
Do not worry if the first few rounds resemble a tiny cup. The recognizable cone develops gradually.
Color selection
Choose colors with enough contrast to make the band visible. Good combinations include:
- Black with purple
- Charcoal with orange
- Deep green with violet
- Plum with burnt orange
- Navy with mustard
- Cream with black for a softer neutral version
Step-by-Step Crochet Tutorial
Step 1: Make the Pointed Beginning
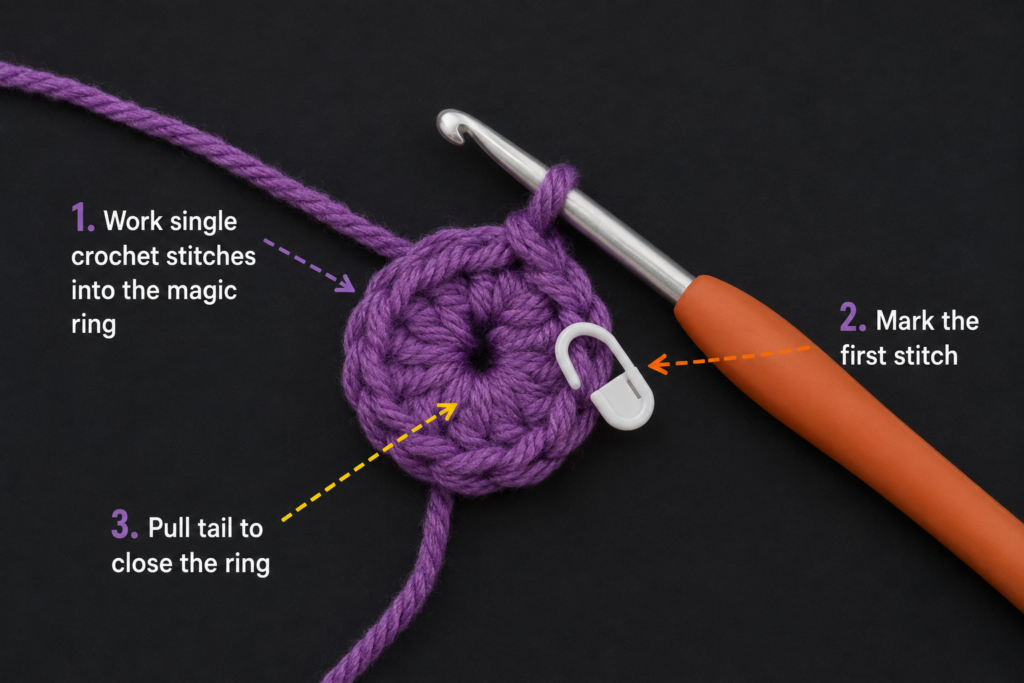
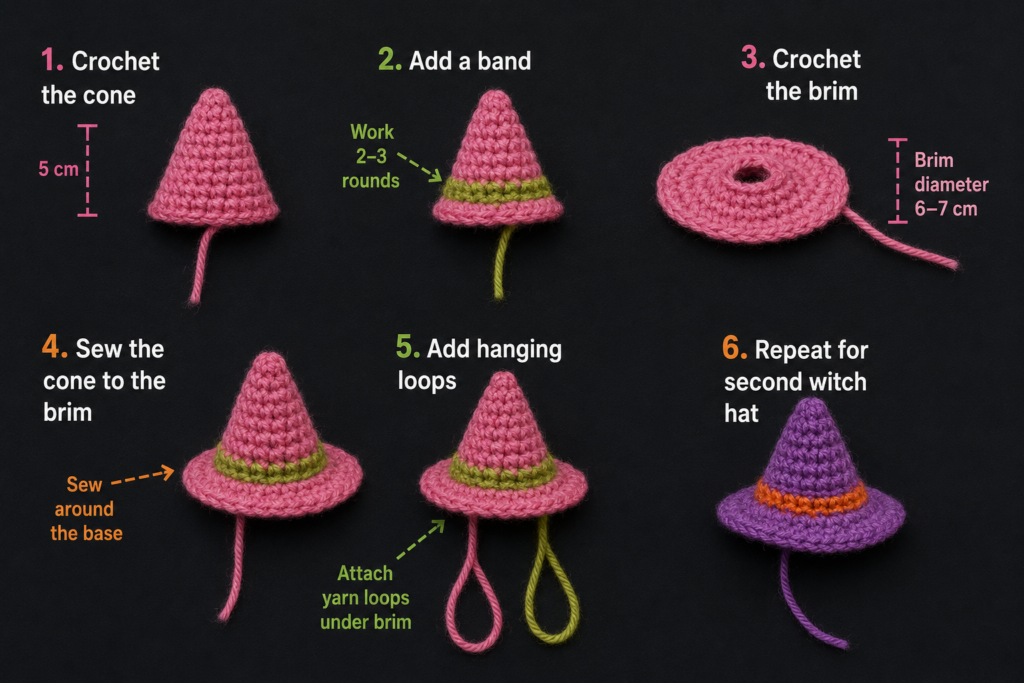
With deep plum yarn, make a magic ring.
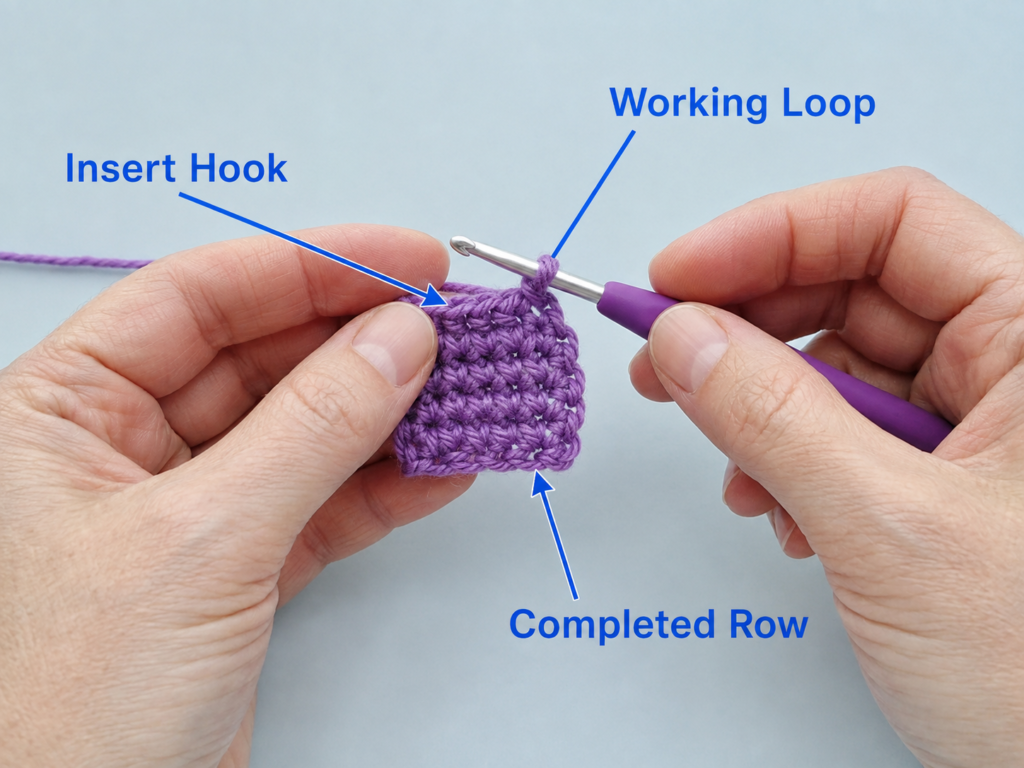
Round 1: Work 4 sc into the ring. Pull the yarn tail until the center closes. Join with a sl st to the first sc and ch 1. (4 sts)
Round 2: Sc in every stitch around. Join and ch 1. (4 sts)
Four stitches create a narrow tip. This beginning may feel small, so keep the first round loose enough that you can insert your hook again in Round 2.
Beginner tip:
Place a locking marker in the first single crochet, not in the chain one.
Common mistake to avoid:
Do not crochet into the slip-stitch join. Doing so creates an unwanted fifth stitch.
Step 2: Build the Narrow Upper Cone
Continue with deep plum.
Round 3: Rep (sc in next st, inc in next st) twice. Join and ch 1. (6 sts)
Round 4: Sc around. Join and ch 1. (6 sts)
Round 5: Rep (sc in next 2 sts, inc in next st) twice. Join and ch 1. (8 sts)
Round 6: Sc around. Join and ch 1. (8 sts)
Round 7: Rep (sc in next 3 sts, inc in next st) twice. Join and ch 1. (10 sts)
Round 8: Sc around. Join and ch 1. (10 sts)
Round 9: Rep (sc in next 4 sts, inc in next st) twice. Join and ch 1. (12 sts)
Round 10: Sc around. Join and ch 1. (12 sts)
The point should now resemble a narrow finger-shaped cone. The gradual increases prevent it from becoming a rounded dome.
Beginner tip:
Count at the end of every round. Fixing one missing stitch now is much easier than correcting the lower cone later.
Common mistake to avoid:
Do not place both increases directly above the previous round’s increases. Although a small amount of stacking is unavoidable, shifting their visual position keeps the cone smoother.
Step 3: Widen the Lower Cone
The next rounds use three increase points instead of two. This widens the lower half without producing a sudden flare.
Round 11: Rep (sc in next 3 sts, inc in next st) three times. Join and ch 1. (15 sts)
Round 12: Sc around. Join and ch 1. (15 sts)
Round 13: Rep (sc in next 4 sts, inc in next st) three times. Join and ch 1. (18 sts)
Round 14: Sc around. Join and ch 1. (18 sts)
Round 15: Rep (sc in next 5 sts, inc in next st) three times. Join and ch 1. (21 sts)
Round 16: Sc around. Join and ch 1. (21 sts)
Check that the lower edge contains exactly 21 stitches.
The cone should stand when placed upright, although its point may lean slightly. A small bend adds character and can be emphasized during blocking.
Beginner tip:
Turn the cone right side out if it has curled inward while you worked.
Common mistake to avoid:
Do not stuff the cone. This project is designed to remain hollow so it can sit on another decoration or be attached to a clip.
Step 4: Change Yarn and Crochet the Hat Band
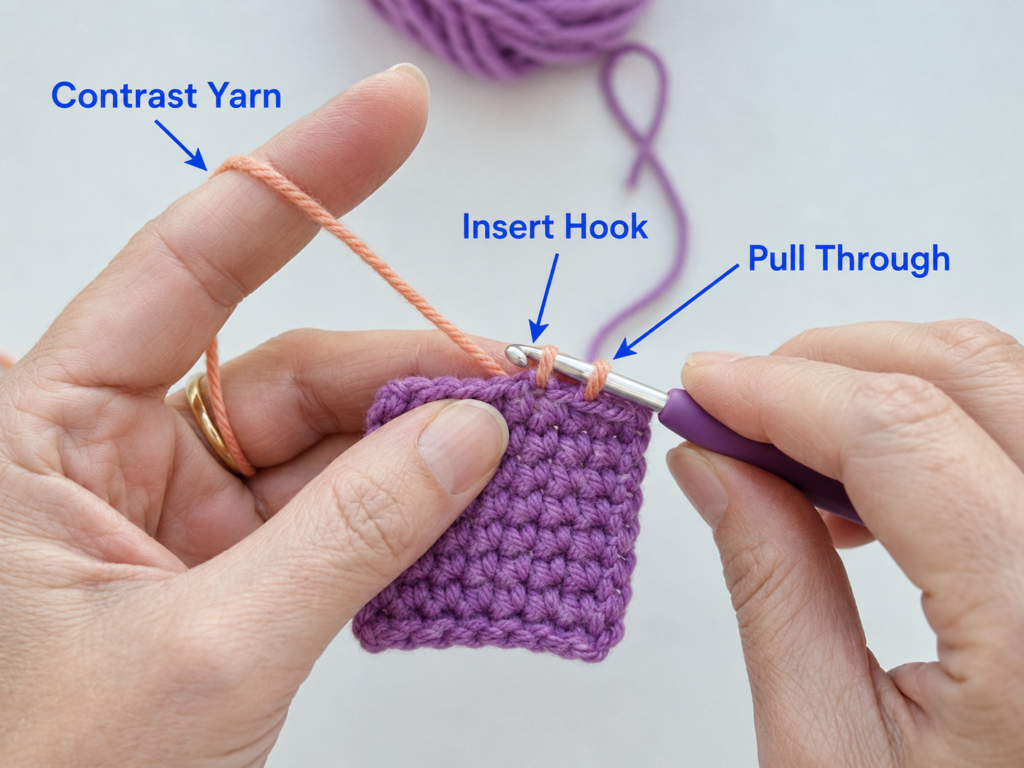
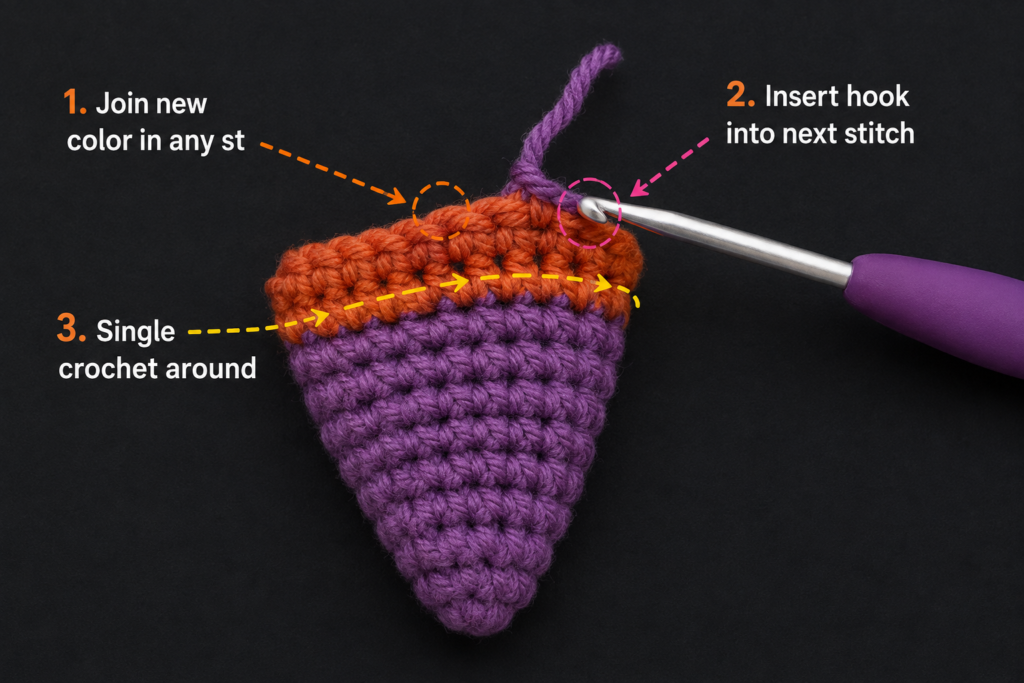
At the end of Round 16, begin the final yarn-over of the last single crochet with plum yarn but complete it with burnt orange. This produces a cleaner transition than changing colors after the join.
Cut the plum yarn, leaving a five-inch tail.
Round 17: With burnt orange, sc around. Join and ch 1. (21 sts)
Round 18: Sc around. Join and ch 1. (21 sts)
Do not cut the orange yarn until you have confirmed that the two rows are even.
Beginner tip:
Tie the plum and orange tails together with a loose temporary knot inside the cone. Remove or tighten it only after the stitches have been secured.
Common mistake to avoid:
Pulling the new color too tightly can pinch the cone where the band begins. Match the tension of the surrounding stitches.
Step 5: Separate the Brim with Front-Loop Stitches
Change back to deep plum during the final yarn-over of the last orange stitch.
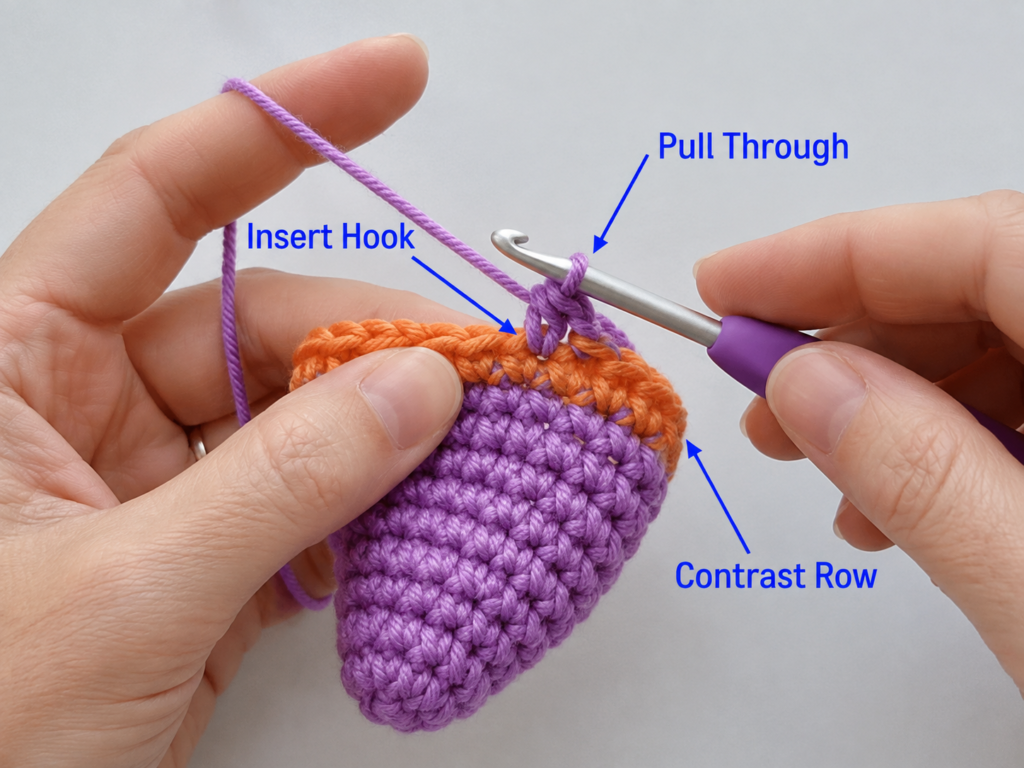
The first brim round is worked through the front loop only. When you look at the top of a stitch, you see a V formed by two loops. The loop nearest you is the front loop.
Leaving the back loop unworked creates a visible ridge and allows the brim to project outward instead of continuing straight down.
Round 19: Working in FLO, rep (hdc in next 2 sts, hdc inc in next st) seven times. Join to the first hdc and ch 1. (28 sts)
Spread the work with your fingers after completing the round. You should see the brim beginning to fold outward along the ridge.
Beginner tip:
Rotate the cone so the front loops face you rather than twisting your wrist to reach them.
Common mistake to avoid:
If you accidentally work through both loops, undo that stitch. A few two-loop stitches can pull the brim upward unevenly.
Step 6: Expand the Brim Evenly
Return to working through both loops.
Round 20: Rep (hdc in next 3 sts, hdc inc in next st) seven times. Join and ch 1. (35 sts)
Round 21: Rep (hdc in next 4 sts, hdc inc in next st) seven times. Join and ch 1. (42 sts)
Round 22: Rep (hdc in next 5 sts, hdc inc in next st) seven times. Join and ch 1. (49 sts)
Each round adds seven stitches. That steady expansion is what keeps the brim approximately flat.
Lay the brim on the table after every round.
- A slight upward curve is normal.
- A deeply cupped brim needs more increases.
- A strongly rippled brim has too many increases or overly loose tension.
Beginner tip:
Count the repeat groups rather than counting all 49 stitches at once. Seven correct groups produce the correct total automatically.
Common mistake to avoid:
Do not place an increase into the slip-stitch join. Work only into the identifiable V-shaped stitches.
Step 7: Add a Neat Outer Edge
Do not chain after the final joined half-double-crochet round.
Round 23: Slip stitch loosely in each stitch around. (49 sl sts)
Fasten off, leaving a six-inch tail.
The slip-stitch round makes the edge look finished and slightly firms the brim. Keep these stitches loose. Tight slip stitches can draw the edge inward and create a bowl shape.
Place the hat on a flat surface and inspect it from above.
Beginner tip:
If your slip stitches are naturally tight, use a 4.0 mm hook for this round only.
Common mistake to avoid:
Do not add extra slip stitches between the regular stitches. Follow the 49 stitch tops carefully.
Step 8: Add the Optional Buckle
Thread approximately 18 inches of antique-gold yarn onto a tapestry needle.
At the front center of the orange band:
- Make two short vertical stitches approximately one stitch-width apart.
- Connect their tops with one horizontal stitch.
- Connect their bottoms with another horizontal stitch.
- Repeat each side once when you want a thicker buckle.
- Secure both yarn ends inside the cone.
Keep the rectangle small so it does not overwhelm the band.
For a child’s toy or plushie intended for someone under three years old, use embroidered details rather than buttons, beads, or other removable decorations.
Pattern Notes or Stitch Notes
Turning-chain rule
The chain one at the beginning of a round does not count as a stitch. Place the first single crochet or half double crochet in the same stitch as the join.
Stitch-count checkpoints
- Round 2: 4 stitches
- Round 6: 8 stitches
- Round 10: 12 stitches
- Round 12: 15 stitches
- Round 14: 18 stitches
- Round 18: 21 stitches
- Round 19: 28 stitches
- Round 20: 35 stitches
- Round 21: 42 stitches
- Round 22: 49 stitches
Repeat pattern
The upper cone alternates between:
- One increase round
- One plain single crochet round
The lower brim increases seven times during each round.
Right side and wrong side
The outside surface is the right side. It normally shows tidy V-shaped stitches.
The inside is the wrong side. It may show yarn tails, knots, and a slightly different texture.
Seam position
Joined rounds produce a small seam. Keep the join at the back of the hat. When adding the buckle, position it directly opposite the seam.
Size adjustment notes
To make a taller cone, insert one additional plain sc round after Rounds 10, 12, and 14.
To make a shorter cone, omit one or two plain sc rounds.
To make a wider brim, add:
Optional Round 23 before the edging: Rep (hdc in next 6 sts, hdc inc in next st) seven times. (56 sts)
Then add the slip-stitch edging.
To make a smaller hat, use category 3 DK yarn with a 3.0 mm hook and follow the same stitch counts.
To make a larger plushie hat, use category 5 bulky yarn with a 5.0–5.5 mm hook.
Common Beginner Mistakes
1. The cone is turning into a flat circle
Cause: Increases were made too frequently.
Fix: Confirm that every increase round is followed by a plain round. Do not add unlisted increases.
2. The cone has large gaps
Cause: The hook is too large or the tension is too loose.
Fix: Move down by 0.5 mm and pull the working yarn gently after completing each stitch.
3. The stitch count increases unexpectedly
Cause: The slip stitch or beginning chain was mistaken for a regular stitch.
Fix: Mark the first actual stitch immediately. Count only the V-shaped stitch tops.
4. The color change has a visible step
Cause: The new yarn was attached after the final stitch was fully completed.
Fix: Introduce the new color during the final yarn-over of the previous color.
5. The brim points downward
Cause: The first brim round may have been worked through the back loops or both loops.
Fix: Check the ridge. The front-loop-only round should naturally project outward from the cone.
6. The brim is ruffling
Cause: Too many stitches, loose tension, or accidental extra increases.
Fix: Count each seven-repeat group. Mild waves may disappear during blocking, but strong waves usually require undoing the affected round.
7. The brim is cupping upward
Cause: Too few increases, tight tension, or an overly tight slip-stitch edge.
Fix: Redo the edge with a larger hook. For continued cupping, add a few evenly distributed increases before the final edge.
How to Customize This Crochet Project
Yarn changes
Smooth cotton gives the clearest stitch definition and most structured brim.
Acrylic creates a lighter, softer hat and is widely available in Halloween colors.
Chenille yarn can create a plush version, but the stitches will be harder to see. Use a marker and count carefully.
Avoid highly textured novelty yarn for a first attempt because it can conceal the stitch tops.
Color changes
Traditional combinations include black, orange, purple, and green, but the project also works in:
- Dusty rose with olive
- Navy with silver
- Cream with charcoal
- Burgundy with mustard
- Forest green with bronze
A variegated yarn can be used for the cone, but use a solid color for the band so the design remains readable.
Size changes
Changing yarn weight is the easiest adjustment. The same construction can become:
- A tiny earring charm in crochet thread
- A keychain ornament in DK yarn
- A standard decoration in worsted yarn
- A plushie hat in bulky yarn
- A pumpkin topper in super-bulky yarn
Border options
Replace the slip-stitch edging with:
- Reverse single crochet for a corded edge
- One plain single crochet round
- A picot every five to seven stitches
- A contrasting orange outer round
- Gold surface slip stitches
Texture options
Work occasional single crochet stitches through the back loop to add subtle horizontal ridges.
For a rustic hat, alternate one round of regular single crochet with one round of back-loop-only single crochet through the lower cone.
Uses and gift ideas
- Halloween garland
- Fall wreath attachment
- Plushie accessory
- Doll costume piece
- Pumpkin topper
- Gift-package decoration
- Hair clip
- Headband decoration
- Table-place marker
- Party-favor keychain
- Miniature shelf decor
- Halloween tree ornament
Finishing Instructions
Fastening off
After the final slip stitch, cut the yarn approximately six inches from the hook. Pull the tail completely through the active loop and tighten gently.
Weaving in ends
Thread each tail onto a tapestry needle.
For the cone and band:
- Run the needle through the backs of four or five nearby stitches.
- Reverse direction and pass through several stitches again.
- Trim the yarn close to the fabric.
For the brim:
- Weave horizontally along the underside.
- Avoid pulling tightly.
- Spread the brim flat again before trimming.
Blocking
Check the yarn label before exposing the project to water or heat. The Craft Yarn Council recommends retaining or sharing the yarn label because it contains the relevant care instructions and symbols.
For cotton:
- Lightly dampen the hat.
- Shape the cone with your fingers.
- Place the brim flat on a blocking mat.
- Pin the outer edge at evenly spaced points.
- Allow it to dry completely.
For acrylic:
- Pin the hat into shape.
- Hold gentle steam above the fabric without pressing the iron against it.
- Stop as soon as the fibers relax.
- Let the hat cool before removing the pins.
Do not apply direct high heat to acrylic because excessive heat can permanently flatten or damage the fibers.
Washing and care
For seasonal decorations, spot cleaning is usually sufficient. When a full wash is necessary, follow the yarn manufacturer’s care instructions.
Store the hat loosely rather than crushing it beneath heavier decorations. Place acid-free tissue inside the cone when it needs extra support during long-term storage.
Quick Printable-Style Summary
Skill level: Beginner to easy
Finished size: Approximately 4.25–4.75 inches tall
Yarn: Category 4 worsted-weight cotton or acrylic
Hook: 3.5 mm
Main stitches: sc, hdc, sl st
Starting method: 4 sc in a magic ring
Construction: Joined rounds from the tip downward
Cone repeat: Alternate increase rounds with plain rounds
Band: Two single crochet rounds in a contrasting color
Brim: First round in FLO, followed by four evenly increased hdc rounds
Final stitch count: 49 stitches before the slip-stitch edge
Finishing: Weave in ends, embroider optional buckle, and block brim flat
FAQ
Can a complete beginner make this crochet witch hat?
Yes, provided the beginner can make a magic ring, single crochet, half double crochet, slip stitch, and increase. The most important skills are counting stitches and recognizing the first stitch after a join.
Why does my witch hat look like a cone instead of bending?
The hat is intended to begin as a straight cone. After blocking, gently curve the upper section to one side. A taller cone bends more noticeably than a short one.
Can I use black yarn?
Yes, but black yarn makes individual stitches harder to see. Beginners may find plum, charcoal, dark green, or medium purple easier to work with.
Why is my brim curling upward?
A slight curve is normal before blocking. Strong curling can result from tight tension, missing increases, working through the wrong loop, or making the final slip-stitch round too tight.
Can I make the hat without a magic ring?
Yes. Chain two and work four single crochet stitches into the second chain from the hook. Pull the starting tail firmly when weaving it in to close the remaining opening.
How can I attach the hat to a plushie?
Position it securely and sew around the inner ridge beneath the band. Use multiple small stitches rather than attaching it at only one point. Avoid removable decorations when the plushie is intended for a young child.
Can this pattern be made into a wearable adult hat?
This stitch sequence is designed for a small decorative hat. Simply adding rounds will not reliably produce a properly fitted wearable hat because adult hats require head measurements, appropriate ease, more yarn, and a structurally supported brim.
Conclusion
This mini crochet witch hat combines several valuable beginner techniques in one manageable project. The gradual single crochet cone teaches controlled shaping, the contrasting stripe introduces clean color changes, and the front-loop half-double-crochet brim demonstrates how stitch placement changes the direction of crochet fabric.
Once the basic version is complete, try changing the cone height, enlarging the brim, adding an embroidered buckle, or attaching the hat to a pumpkin, garland, plushie, or Halloween wreath.
Save the tutorial with your seasonal crochet projects so the construction method is ready whenever you need a quick handmade Halloween accent.





