A handmade makeup bag is one of those crochet projects that is small enough to finish without a long commitment but useful enough to become part of your daily routine. It can hold cosmetics, travel toiletries, crochet notions, pens, charging cables, or any collection of small essentials that would otherwise disappear inside a larger bag.
This crochet makeup bag pattern uses a clever one-piece construction. Instead of crocheting several separate panels and trying to align multiple seams, you will make one shaped piece of dense crochet fabric. The piece is folded around a zipper, joined along two sides, and closed at four corners to create a structured pouch.
The stitch pattern is intentionally simple. You need only chains, single crochet stitches, and slip stitches. The challenge is not the stitch itself; it is learning how the flat shape transforms into a three-dimensional bag. Each construction stage is therefore explained separately, with planned tutorial photographs immediately beside the relevant instructions.
This is an original tutorial design using DK cotton yarn, a smaller hook for firm fabric, a cream zipper, and an approximately 8½-inch finished width.
What You’ll Learn
- How to crochet a dense, washable pouch fabric
- How to keep a rectangular panel straight
- How to leave side sections unworked
- How to add chain extensions at both ends of a row
- How to recognize the sections of a one-piece bag
- How to position and hand-sew a zipper
- How to close the side seams with crochet
- How to form boxed corners
- How to adjust the bag’s width, height, and depth
- How to add an optional fabric lining
Finished Size
Approximately:
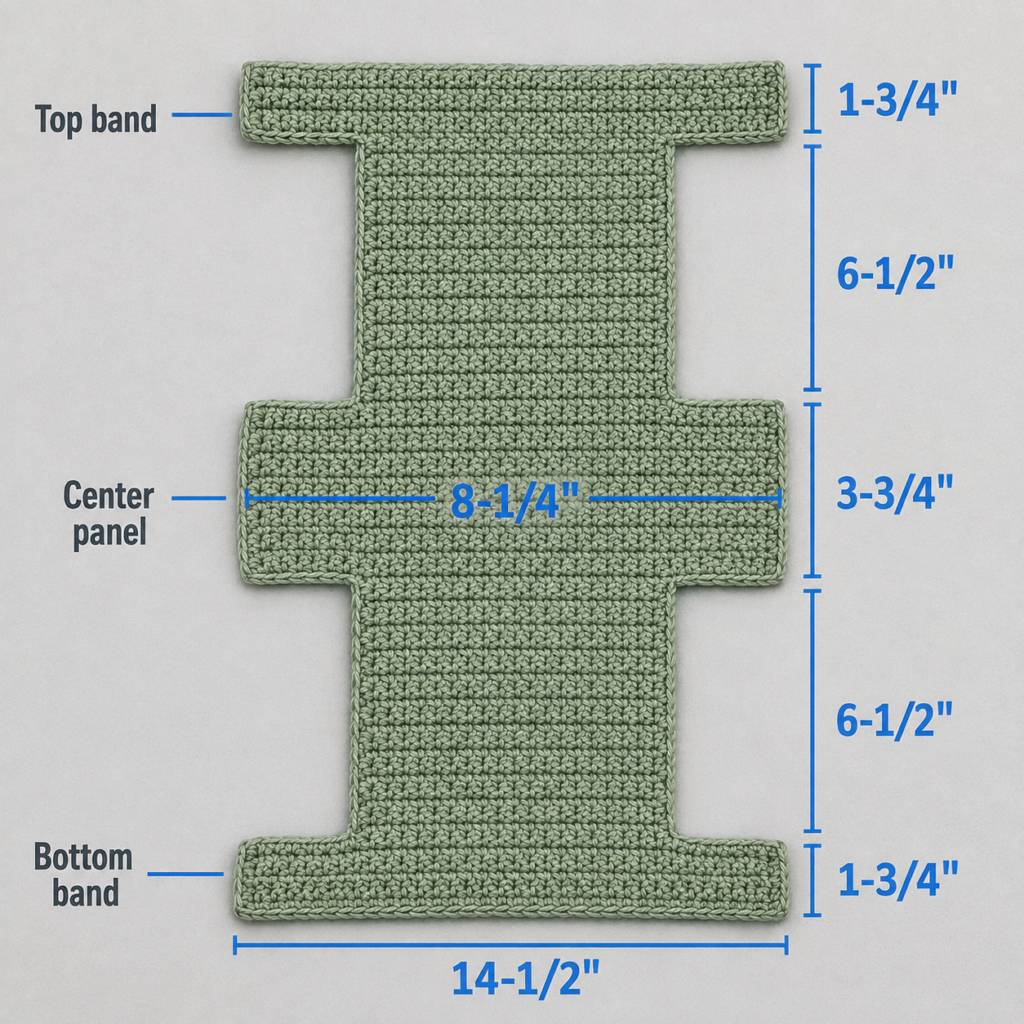
- Width: 8½ inches or 21.5 cm
- Height: 5 inches or 12.5 cm
- Depth: 2¼–2½ inches or 5.5–6.5 cm
The finished dimensions may vary slightly depending on your yarn, tension, and how firmly you shape the corners.
Materials You’ll Need
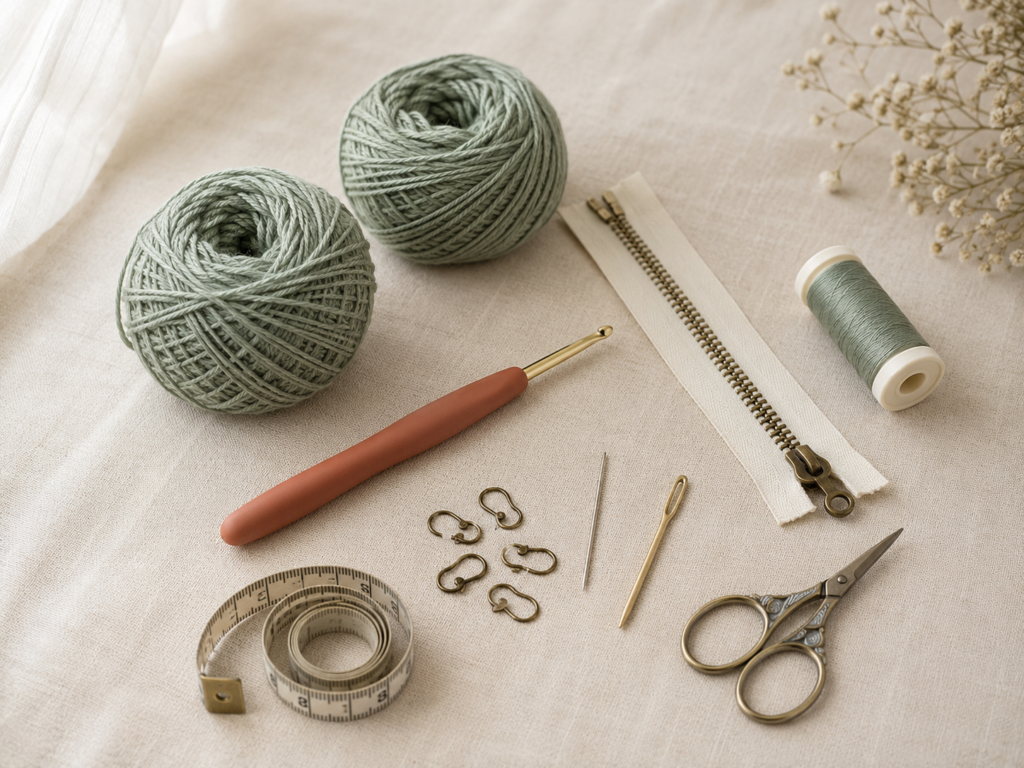
- Approximately 220–250 yards or 200–230 metres of DK or light worsted cotton yarn
- 4.0 mm crochet hook
- 9-inch or 23 cm zipper
- Matching sewing thread
- Sharp hand-sewing needle
- Blunt tapestry needle
- Scissors
- Four locking stitch markers
- Flexible measuring tape
- Sewing clips or pins
- Optional cotton fabric for lining
- Optional sewing machine
Cotton is a practical choice because it creates defined stitches and does not usually stretch as much as a soft acrylic yarn. Select a smooth, tightly spun cotton or cotton-blend yarn rather than a fuzzy yarn. A smooth surface will make the zipper easier to sew and will help the bag retain its shape.
The Craft Yarn Council’s yarn-weight charts are general guidelines rather than strict rules. This project deliberately uses a relatively small hook to produce a firmer fabric with fewer openings.
Crochet Abbreviations Used
- ch = chain
- sc = single crochet
- sl st = slip stitch
- st/sts = stitch/stitches
- rep = repeat
- RS = right side
- WS = wrong side
These abbreviations follow standard US crochet terminology. The Craft Yarn Council maintains a broader master list and a comparison of US and UK crochet terms.
US and UK Term Note
In US terminology, the main stitch in this pattern is called single crochet. The equivalent stitch is called double crochet in UK terminology.
Before You Start
Gauge
Aim for approximately:
18 single crochet stitches and 20 rows = 4 inches or 10 cm
Exact gauge is less important than fabric quality, but do not ignore it completely. A very loose fabric will stretch around heavy makeup containers and may allow narrow objects to push between the stitches.
Make a small swatch before beginning. Hold it up to the light and gently pull it in both directions. Small points of light are acceptable. Large openings indicate that you should use a smaller hook.
How to Count the Stitches
The turning chain does not count as a stitch.
At the beginning of every ordinary row:
- Chain one.
- Turn the work.
- Place the first single crochet in the first actual stitch.
- Work the last single crochet into the final stitch of the previous row.
Place a marker in the first and last stitch until you can recognize the edges confidently.
How to Keep the Edges Straight
Most accidental shaping happens when a beginner misses the final stitch. Stop every four or five rows and count.
The two main stitch counts in this pattern are:
- 40 stitches across the full-width sections
- 28 stitches across the narrow body sections
Never continue after an incorrect count. Correcting one row is much easier than correcting twelve rows.
How to Avoid Curling
A slight curl is normal when making dense single crochet fabric. Strong curling usually means that:
- The foundation chain is too tight.
- The hook is too small for your personal tension.
- Your working loops are being pulled excessively tight.
- The turning chain is shorter than the height of the edge stitch.
Use a hook one size larger for the foundation chain when necessary, then return to the 4.0 mm hook for the first row.
Right Side and Wrong Side
Single crochet looks similar on both sides, so mark the right side after completing the first row. Clip a locking marker to the side facing you before turning.
The marked side will become the outside of the finished bag.
Beginner Note
Read the full construction sequence before starting. The flat piece may look unusual while you are crocheting it. Its wider and narrower sections are intentional and form the pouch body, gusset, seam allowances, and corners after folding.
Step-by-Step Crochet Tutorial
Step 1: Crochet the Foundation Chain and First Full-Width Section
With dusty sage yarn, chain 41.
Work one single crochet in the second chain from the hook. Continue placing one single crochet in each chain across.
You should have 40 single crochet stitches.
For Rows 2–5:
- Chain one and turn.
- Single crochet in every stitch across.
- Count 40 stitches at the end of every row.
This five-row strip is the first full-width flange. It will later sit beside one side of the zipper.
Do not worry if the strip looks too narrow to become a bag. You are viewing only one construction section.
Beginner tip: Turn the foundation chain slightly toward you and work into the back bumps for a neat lower edge. Working under the usual top loops is also acceptable.
Common mistake to avoid: Do not count the skipped chain at the beginning as a stitch. Your first row must contain 40 actual single crochet stitches.
Step 2: Form the First Narrow Body Panel
Fasten off after Row 5.
Lay the work with the marked right side facing you. Count six stitches from the right edge and place a marker in the sixth stitch. Repeat from the left edge.
You should have:
- Six stitches reserved on the first side
- Twenty-eight center stitches
- Six stitches reserved on the opposite side
Join the yarn in the first of the 28 center stitches.
For Row 6:
- Chain one.
- Single crochet in the same stitch where you joined.
- Single crochet across the remaining center stitches.
- Stop after 28 stitches.
- Leave the six stitches at the opposite edge unworked.
For Rows 7–29:
- Chain one and turn.
- Single crochet in all 28 stitches.
This section should measure approximately 4¾–5 inches from the full-width flange.
This narrow panel becomes one broad side of the makeup bag.
Beginner tip: Place one marker in the first stitch and another in the last stitch of every row. Move them upward as you work.
Common mistake to avoid: Do not gradually crochet into the unworked side stitches. The narrow section must remain exactly 28 stitches wide.
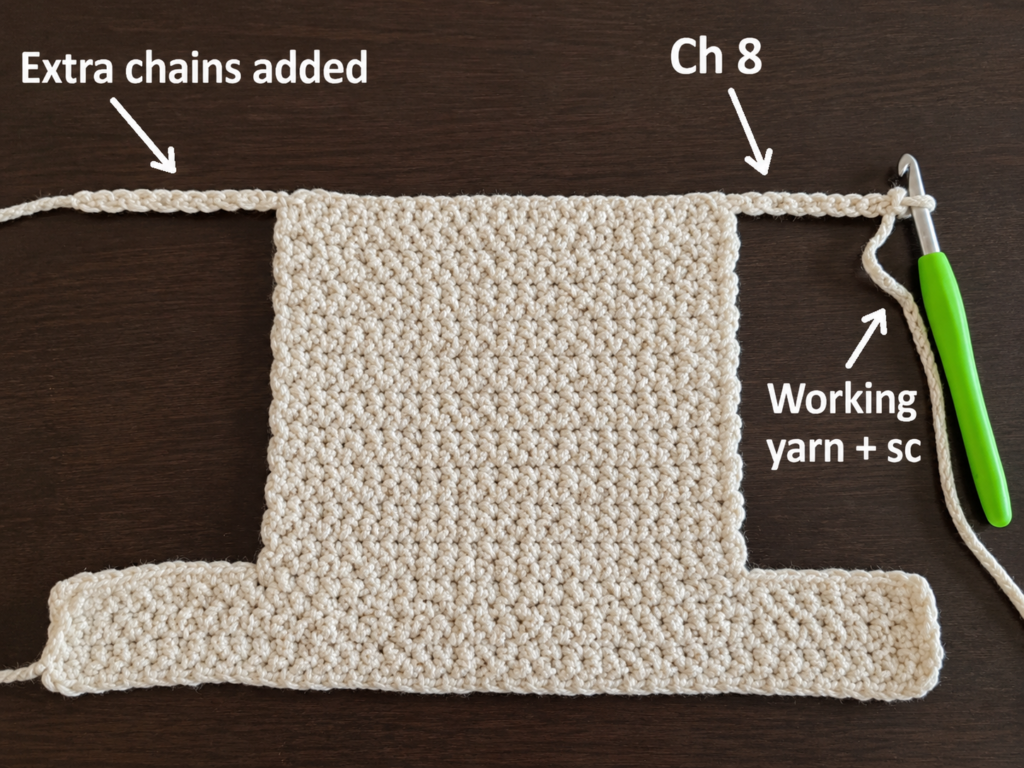
Step 3: Add the Chain Extensions
At the end of Row 29, leave the working yarn attached.
Remove the hook from the working loop temporarily and enlarge the loop so that it cannot unravel.
Cut a separate strand of yarn approximately 18 inches long.
Join the separate strand to the opposite upper corner of the narrow panel. Chain six and fasten off. These six chains create one side extension.
Return the hook to the original working loop. Chain seven and turn.
Single crochet in the second chain from the hook and in the following five chains. You have created six new stitches on the working-yarn side.
Single crochet across all 28 body stitches.
Finally, single crochet into each of the six chains made with the separate strand.
You now have 40 stitches again.
This is Row 30.
Beginner tip: Keep both chain extensions slightly loose. Tight chains will pull the corners inward.
Common mistake to avoid: The working side begins with seven chains because one chain acts as the turning chain. The separate extension needs only six chains.
Step 4: Crochet the Wide Center Gusset
Continue working across all 40 stitches.
For Rows 31–41:
- Chain one and turn.
- Single crochet in each stitch across.
- Confirm that every row contains 40 stitches.
Including Row 30, the center section contains 12 full-width rows.
This wider central block forms the base and side depth of the finished bag. It may look too short while lying flat, but it expands after the corners are opened.
Measure this section from the first extension row to Row 41. It should be approximately 2¼–2½ inches deep.
Beginner tip: Count after Rows 30, 31, 35, and 41. Errors are most likely near the chain extensions.
Common mistake to avoid: Do not work two stitches into the corner where an extension joins the body. That point still counts as one stitch.
Step 5: Crochet the Second Narrow Body Panel
Fasten off after Row 41.
With the right side facing you, leave the first six stitches unworked. Join the yarn in the seventh stitch.
Work one single crochet into that stitch and into each of the next 27 stitches.
You should again have 28 stitches, with six unworked stitches at both sides.
Continue for Rows 42–65, maintaining 28 single crochet stitches.
Compare this second body section with the first narrow section. They should have the same number of rows and approximately the same length.
Fold the work gently at the two edges of the wide center section. The narrow panels should align without one stretching beyond the other.
Beginner tip: Count rows using the horizontal ridges at the edges rather than trying to count every stitch top.
Common mistake to avoid: A one-row difference can twist the zipper area. Compare both panels before adding the final extensions.
Step 6: Add the Final Extensions and Flange
Repeat the extension process used earlier.
With a separate strand:
- Join at the opposite upper corner.
- Chain six.
- Fasten off.
With the working yarn:
- Chain seven and turn.
- Single crochet in the second chain and the next five chains.
- Single crochet across the 28 body stitches.
- Single crochet in each of the six chains at the opposite end.
You now have 40 stitches.
This is Row 66.
For Rows 67–70, single crochet in all 40 stitches.
Fasten off, leaving a tail long enough to weave in securely.
The crochet portion should now resemble a long capital “I,” with wider sections at the two ends and center.
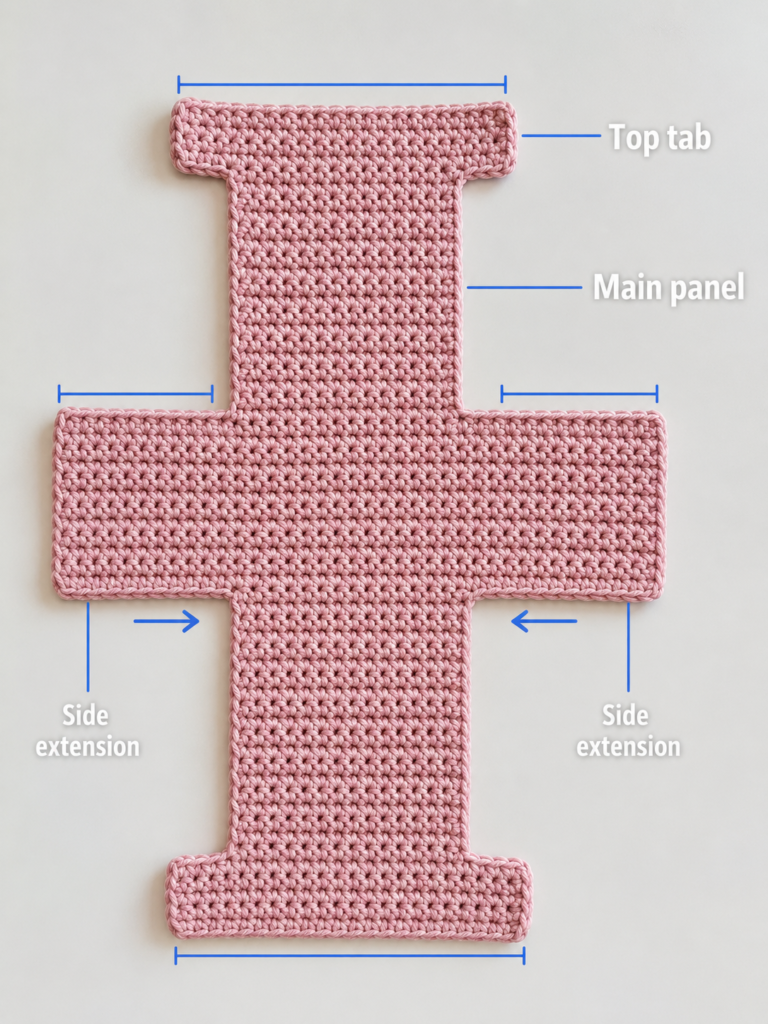
Step 7: Check the Shape Before Assembly
Lay the fabric flat without stretching it.
Confirm the following:
- Both narrow body panels contain the same number of rows.
- The two outer flanges are the same width.
- The chain-extension corners are firm and free from gaps.
- The 40-stitch sections measure approximately the same width.
- The center gusset is straight rather than slanted.
- No ends remain loose near the future zipper area.
The full-width sections should measure close to 9 inches. The narrow sections will measure approximately 6¼ inches across. Slight differences are acceptable as long as the shape is symmetrical.
Weave in the tails that will not be used for seaming.
Do not steam or aggressively block the piece. Lightly misting and flatteni ng it under a towel is sufficient.
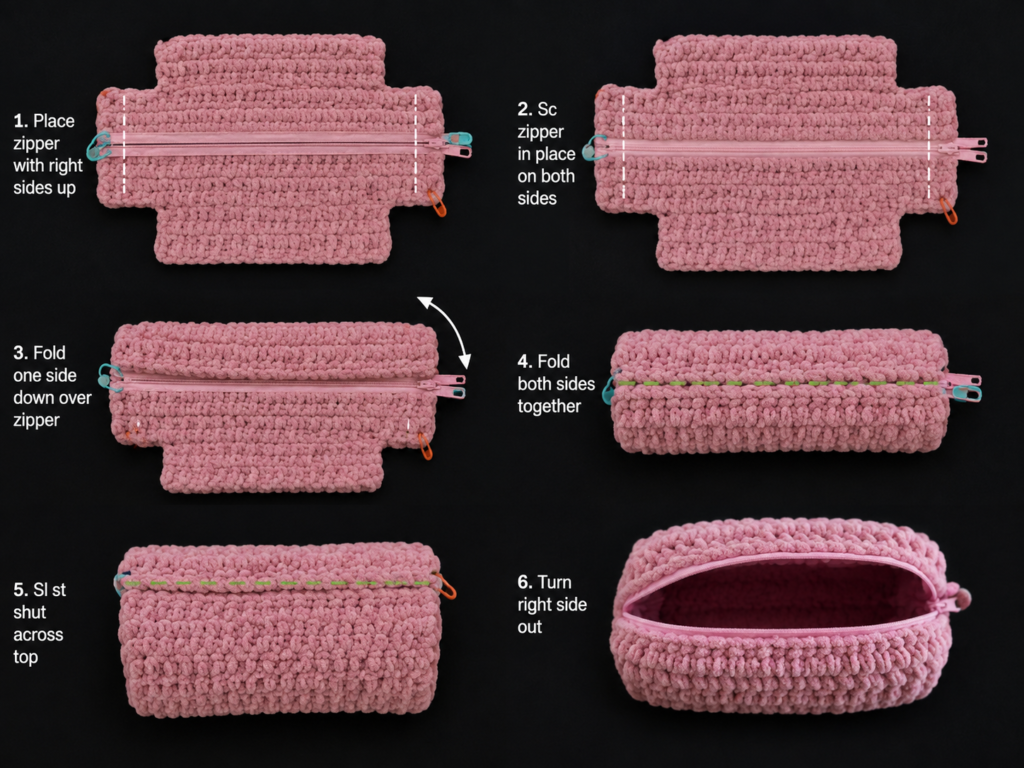
Step 8: Prepare and Position the Zipper
Close the zipper and mark its center with a removable pen or small piece of thread.
Mark the center of each outer crochet flange.
Place the crochet piece with the wrong side facing upward. Position the zipper horizontally over the middle of the piece with the zipper teeth facing upward.
Fold the two long body sections toward the zipper. The outer flange edges should meet beside the zipper teeth.
Align the center mark on each crochet edge with the center of the zipper.
Clip the first crochet edge to one side of the zipper tape. Add clips at:
- The center
- Both ends
- Halfway between the center and each end
Repeat on the opposite side.
Open and close the zipper slowly. Make sure no yarn loops touch the teeth.
Beginner tip: Leave approximately ⅛ inch or 3 mm of zipper tape visible between the crochet edge and the teeth.
Common mistake to avoid: Do not stretch the crochet edge while clipping it. Stretching creates a wavy zipper after sewing.
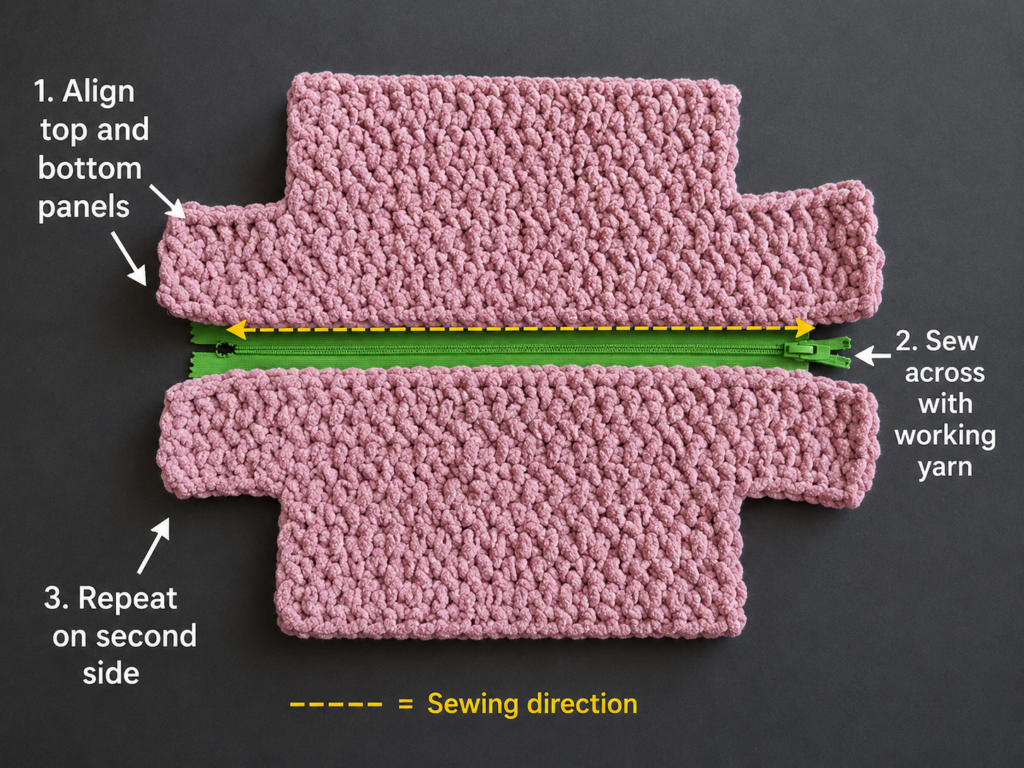
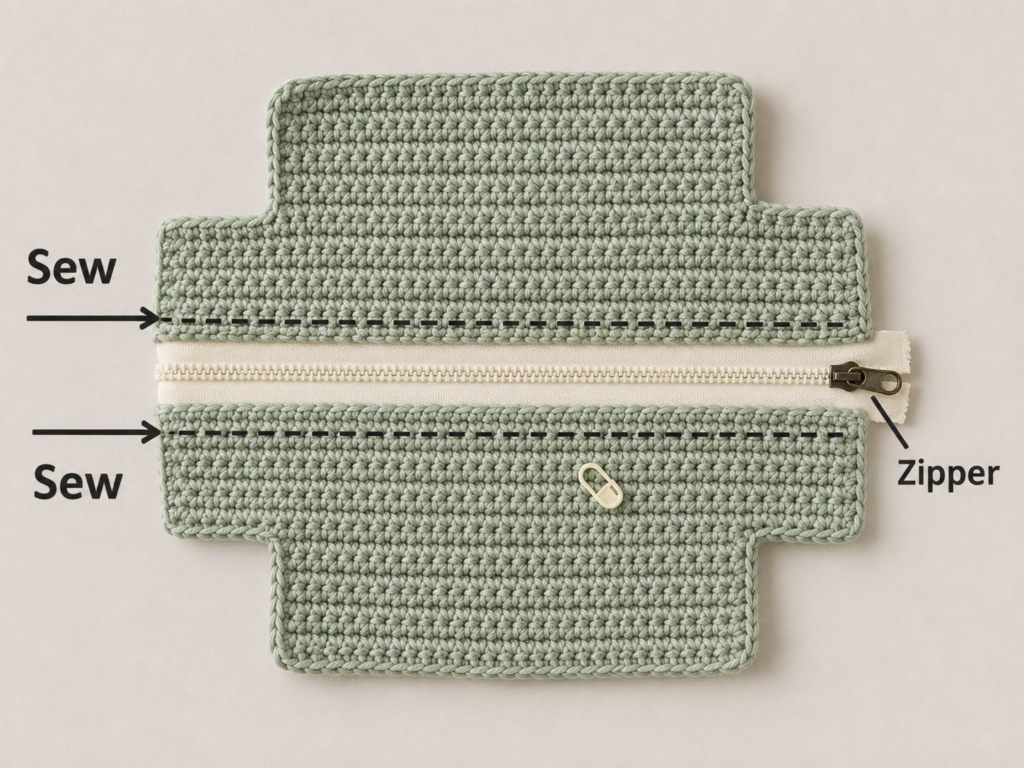
Step 9: Hand-Sew the Zipper in Place
Cut a comfortable length of matching thread. Very long thread tends to twist and knot, so use several shorter lengths rather than one extremely long strand.
Knot the thread and begin at one zipper end from the inside.
Use small backstitches or firm running stitches:
- Pass the needle through the zipper tape.
- Catch the upper loops or upper portion of one crochet edge stitch.
- Return the needle through the zipper tape.
- Move to the next crochet stitch.
Keep every stitch away from the zipper teeth.
Check the front every few inches. The crochet edge should form a straight line parallel to the teeth.
After sewing the first side, test the zipper. Then sew the second side in the same manner.
Do not pull the sewing thread so tightly that it gathers the zipper tape.
Beginner tip: Match one hand-sewn stitch to approximately one crochet stitch. This creates consistent spacing.
Common mistake to avoid: Never pass the needle around the entire crochet edge. Catching only the upper area makes the zipper seam less visible from outside.
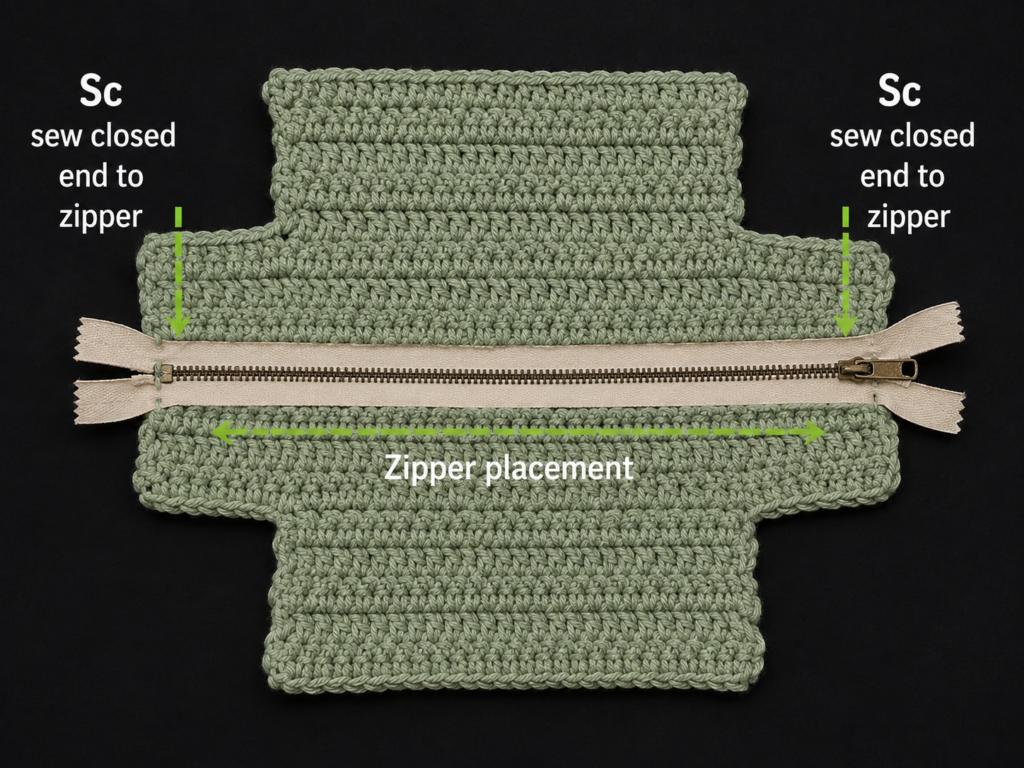
Step 10: Close the Side Seams
Open the zipper at least halfway. This is essential because you will soon turn the bag right side out.
Turn the crochet piece so the wrong side faces outward.
Align the layers at one side opening. Match the upper and lower corners, then place markers through both layers.
Join the yarn at one corner.
Work single crochet stitches evenly through both layers until the opening is closed. Use one stitch through each aligned edge position.
Fasten off securely.
Repeat on the opposite side.
Both side seams should be straight and similar in length.
Beginner tip: When the row ends are difficult to identify, distribute the stitches by measurement instead of forcing one stitch into every visible strand.
Common mistake to avoid: Confirm that the zipper pull is inside the bag and that the zipper remains partly open before closing the second side.
Step 11: Identify the Four Corner Openings
After closing the side seams, the project should resemble an inside-out pouch with four openings at the corners.
Place one hand inside the pouch and gently push one corner outward.
Each opening has two inner points. Pull those two points away from one another. The opening will flatten from a diamond-like shape into a straight line.
Place a marker through both layers at each end of the flattened line.
Repeat at the other three corners.
Before seaming, compare the four flattened corner lines. They should be approximately equal.
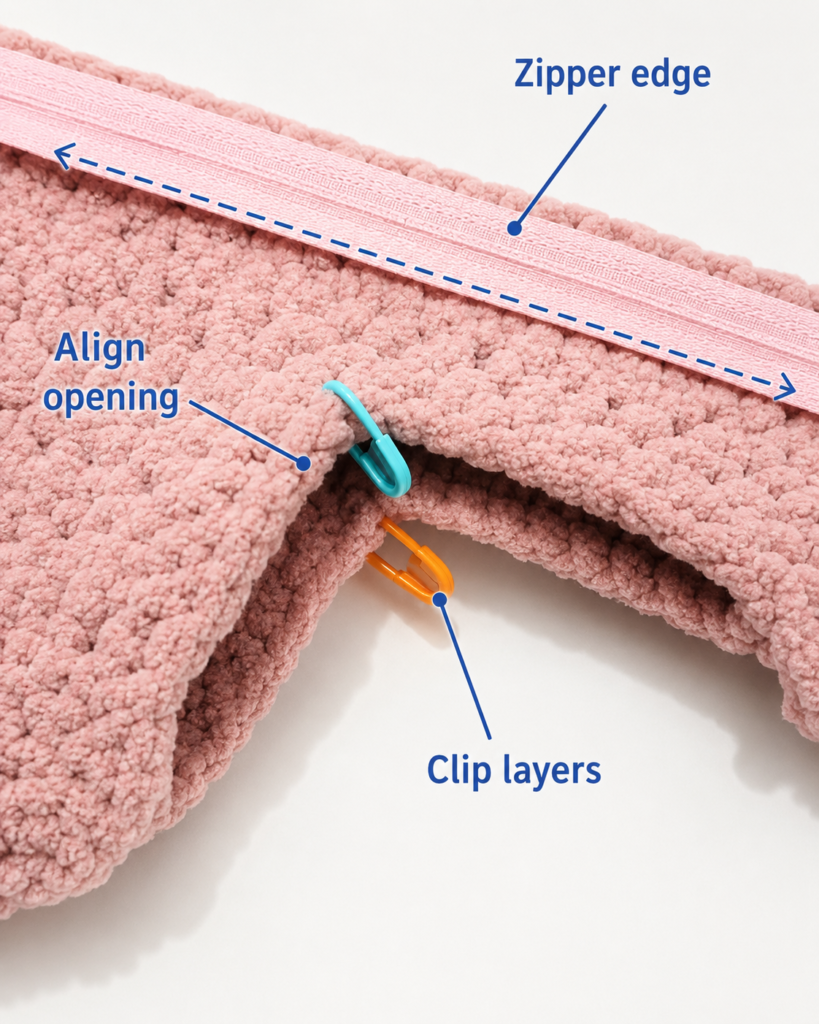
Step 12: Seam the Boxed Corners
Keep the first corner flattened.
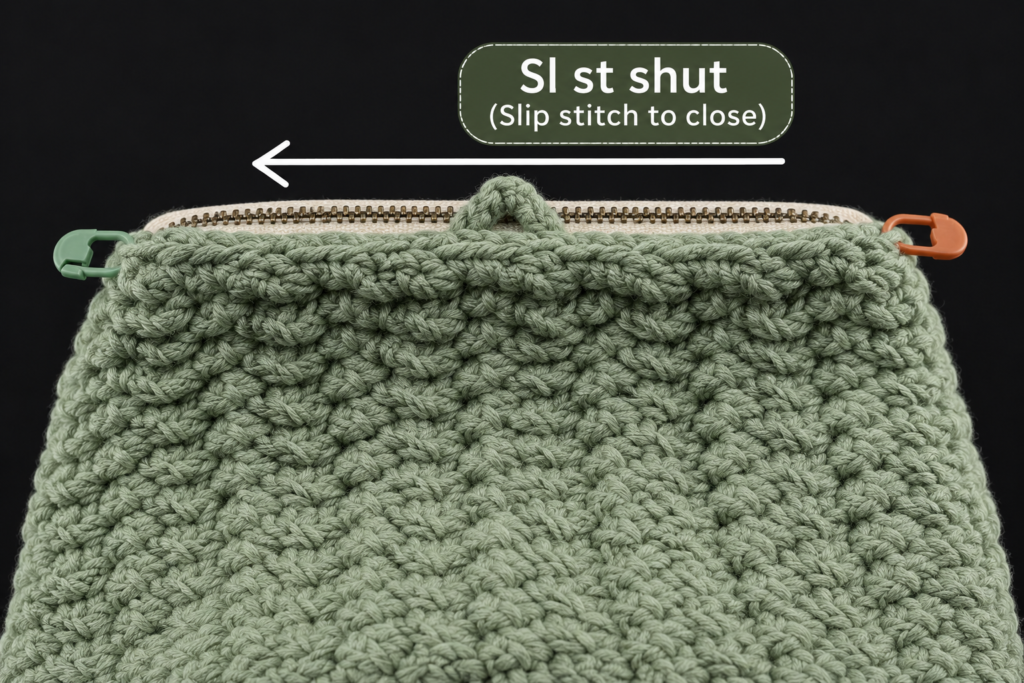
Join the yarn at one end of the straight opening. Slip stitch through both layers across the entire corner.
Fasten off and leave a secure tail.
Repeat for all four corners.
You can substitute single crochet for slip stitch, but slip stitch creates a flatter internal seam and reduces bulk.
After closing all four corners, examine the pouch before turning it right side out. No opening should remain between a side seam and a corner seam.
Beginner tip: Hold the two layers with a clip as you work. Cotton fabric can shift while the first two stitches are being formed.
Common mistake to avoid: Do not twist one corner before seaming. The side seam should remain centered when the corner is flattened.
Step 13: Secure the Zipper Ends
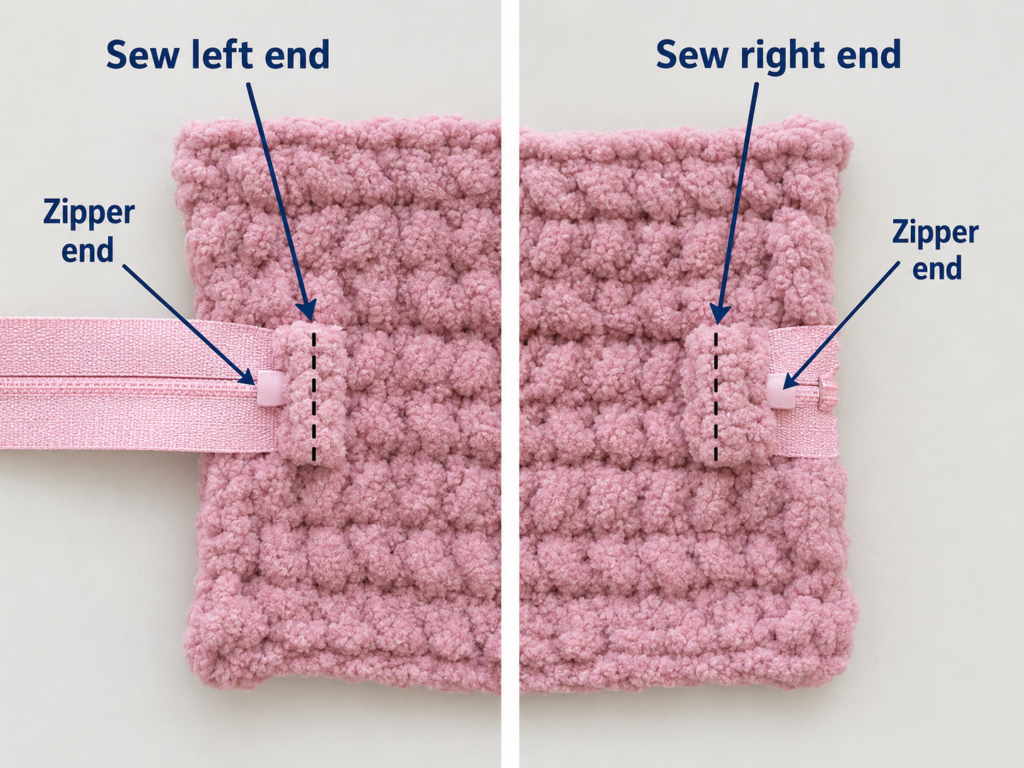
If your zipper is longer than the crochet opening, fold the excess zipper tape neatly toward the side seams.
Use strong sewing thread to make several closely spaced stitches immediately beyond the usable zipper opening. These stitches act as a replacement stop and prevent the slider from leaving the teeth.
Secure both zipper ends to the internal crochet seam allowance.
Do not cut a plastic zipper until a new stop has been sewn. Metal zippers should be shortened only with suitable tools and careful removal of excess teeth.
Open and close the zipper several times. Correct any point where yarn catches against the slider.
Step 14: Turn and Shape the Makeup Bag
Reach through the partly open zipper and pull the bag right side out.
Use your fingers to push gently into each corner. Avoid using scissors, hooks, or other sharp objects because they can split the stitches or damage the zipper tape.
Massage the side seams between your fingers so they sit evenly.
Place a folded towel inside the bag for several hours if the shape appears compressed. The towel supports the body while the crochet fabric settles.
Your bag should now have:
- Two broad rectangular faces
- A defined top zipper
- Two side panels
- A flat lower gusset
- Four shaped corners
Pattern Notes or Stitch Notes
Turning Chain
The chain-one turning chain does not count as a stitch. Place the first single crochet in the first actual stitch of every row.
Stitch Counts
Maintain these counts:
- Full-width flange: 40 stitches
- Narrow body panel: 28 stitches
- Extended center section: 40 stitches
- Second narrow body panel: 28 stitches
- Final flange: 40 stitches
Construction Sequence
The flat piece progresses through five principal sections:
- Full-width zipper flange
- First narrow body panel
- Full-width center gusset
- Second narrow body panel
- Final full-width zipper flange
Right Side and Wrong Side
Mark the right side immediately after Row 1. During zipper assembly, the wrong side faces upward and the right side becomes the finished exterior.
Repeat Pattern
There is no decorative stitch repeat. Every ordinary row is worked in single crochet. The only special construction action is restoring the width with six-chain extensions.
Size Adjustment Notes
To make the bag wider:
- Add stitches to the 40-stitch full width.
- Add the same number of stitches to each 28-stitch body section.
- Keep the difference between the full and narrow sections even so each side tab remains equal.
For example, adding four stitches to the overall width means adding four stitches to the body width as well:
- New full width: 44 stitches
- New body width: 32 stitches
- Side tabs remain six stitches each
To make the bag taller:
- Add the same number of rows to both narrow body panels.
To make it deeper:
- Add rows to the center gusset section.
- Consider increasing the side-tab width at the same time.
- Test the shape with clips before sewing the zipper permanently.
To create a smaller pencil pouch:
- Reduce the overall width.
- Shorten both body panels.
- Use a shorter zipper.
- Retain enough depth for the boxed corners.
Common Beginner Mistakes
1. Losing the Last Stitch
Problem: The panel becomes narrower as it grows.
Fix: Mark the first and last stitch of every row. Count at least every fifth row.
2. Crocheting Into the Unworked Side Sections
Problem: The narrow body panel gradually widens.
Fix: Keep markers at the boundaries between the 28 center stitches and six reserved side stitches.
3. Making Tight Chain Extensions
Problem: The transition corners curl or pull inward.
Fix: Make the extensions with relaxed loops or use a 4.5 mm hook for the chains only.
4. Stretching the Crochet While Attaching the Zipper
Problem: The zipper becomes wavy and the bag opening buckles.
Fix: Lay the crochet naturally and clip from the center toward both ends without pulling.
5. Sewing Too Close to the Zipper Teeth
Problem: Yarn or thread catches in the slider.
Fix: Keep a narrow, even strip of zipper tape visible beside the teeth.
6. Closing the Bag With the Zipper Shut
Problem: The finished pouch cannot be turned right side out.
Fix: Open the zipper halfway before completing the second side seam.
7. Uneven Boxed Corners
Problem: The bag leans or one side appears deeper.
Fix: Flatten and measure all four corner openings before seaming any of them.
8. Pulling Slip Stitches Too Tightly
Problem: Corner seams become hard, puckered ridges.
Fix: Form relaxed slip stitches and allow the hook head to determine loop size.
9. Ignoring the Yarn’s Care Instructions
Problem: The pouch shrinks, fades, or loses shape after washing.
Fix: Save the yarn label and follow its fiber-specific washing directions. Care symbols on yarn labels communicate the recommended washing and drying method.
How to Customize This Crochet Project
Yarn Changes
Cotton creates a practical, defined fabric, but other fibers can work:
- Cotton-acrylic blend for a slightly softer pouch
- Recycled cotton for a sturdy texture
- Mercerized cotton for extra sheen
- Light worsted acrylic for a lightweight organizer
Avoid loosely spun yarn that sheds fibers onto cosmetics.
Color Changes
Try:
- Sage with cream zipper
- Terracotta with beige zipper
- Black with gold zipper
- Dusty rose with blush zipper
- Navy with striped lining
- Two-color body panels with a neutral center gusset
For color blocking, change color at the beginning of a narrow body section or center gusset. Avoid changing color randomly in the middle of a row because the tails may add bulk around the zipper.
Size Changes
A short version can hold lip products and small accessories. A longer version can become a crochet-hook case or travel toiletry bag.
Measure the longest object you plan to store. Add approximately one inch for ease and seam shaping.
Border Options
Before installing the zipper, add one row of slip stitch along each flange edge. This can make the zipper edge slightly firmer.
A reverse single crochet border creates a decorative corded appearance, but it may be more difficult to sew to the zipper.
Texture Options
Once comfortable with the construction, replace plain single crochet with:
- Back-loop-only single crochet
- Moss stitch
- Extended single crochet
- Alternating rows of single and half double crochet
- Waistcoat stitch
Always make a new gauge swatch. Different textures change both stitch width and row height.
Optional Wrist Strap
Crochet a narrow strap approximately 10–12 inches long. Fold it in half and secure both ends into one side seam before closing that seam.
Reinforce the attachment with sewing thread if the bag will carry heavier items.
Gift Ideas and Uses
The finished pouch can be used as:
- Makeup storage
- Travel toiletries bag
- Crochet notions pouch
- Pencil case
- Charging-cable organizer
- Small first-aid pouch
- Manicure-tool case
- Bridesmaid gift
- Teacher gift
- Handmade holiday gift
Include the remaining yarn label when giving the pouch as a gift so the recipient knows how to wash it.
Finishing Instructions
Fastening Off
After the final corner seam, cut the yarn approximately six inches from the work. Pull the tail completely through the final loop.
Weaving in Ends
Use a blunt tapestry needle.
Weave each tail:
- Through at least five stitches in one direction
- Back through several stitches in the opposite direction
- Through a third short section when the tail is near a stressed seam
Trim only after gently stretching the fabric.
Optional Fabric Lining
A lining keeps narrow makeup tools from entering the crochet stitches and protects the yarn from spills.
To create a simple lining:
- Measure the inside width, height, and depth.
- Cut fabric with a ½-inch seam allowance.
- Sew the lining as a shallow rectangular pouch.
- Press the upper raw edge toward the wrong side.
- Insert the lining into the crochet bag.
- Slip stitch it by hand to the zipper tape.
Keep the lining stitches separate from the zipper teeth.
Blocking and Shaping
Aggressive blocking is unnecessary.
Lightly mist the exterior, shape the corners with your hands, and fill the bag with a folded towel. Allow it to dry naturally.
Washing and Care
Follow the yarn label first.
For a cotton bag with a hand-sewn zipper:
- Place it inside a mesh laundry bag.
- Use cool or lukewarm water.
- Select a gentle cycle or hand wash.
- Avoid high dryer heat.
- Reshape while damp.
- Allow the zipper to dry fully before storing the bag.
Spot-cleaning is usually sufficient for small marks.
Quick Printable-Style Summary
Project: One-piece crochet makeup bag with zipper
Skill level: Advanced beginner
Finished size: Approximately 8½ × 5 × 2½ inches
Yarn: DK or light worsted cotton
Hook: 4.0 mm
Main stitch: Single crochet
Additional stitches: Chain and slip stitch
Starting chain: Chain 41
Full-width stitch count: 40 stitches
Body stitch count: 28 stitches
Construction: Full flange, narrow body, center gusset, narrow body, final flange
Closure: Hand-sewn 9-inch zipper
Side seams: Single crochet through both layers
Corner seams: Slip stitch through flattened corner layers
Finishing: Weave in ends, secure zipper ends, turn, shape, and optionally line
FAQ
Is a crochet makeup bag suitable for a complete beginner?
A complete beginner should first practise making a small single crochet rectangle. Once you can maintain a consistent stitch count, this project is manageable. The stitches are basic, but the shaping and zipper installation require careful attention.
What yarn is best for a crochet makeup bag?
Smooth cotton or cotton-blend yarn is a practical choice because it creates defined stitches and relatively stable fabric. Avoid very fuzzy yarn and yarn that stretches significantly.
Can I make the bag without a zipper?
Yes. Replace the zipper with a buttoned flap, drawstring channel, magnetic closure, or two crochet ties. However, a zipper is more secure for small cosmetics and travel items.
Does the bag need a fabric lining?
A lining is optional. Dense crochet fabric can function without one, but a lining improves the interior finish and helps contain narrow objects, loose powder, or accidental spills.
Can I use worsted-weight yarn?
Yes. Make a gauge swatch first. A worsted yarn may produce a larger bag at the stated counts. Use a smaller hook for firm fabric or reduce the stitch and row counts.
How can I make the crochet fabric less stretchy?
Use cotton yarn, reduce the hook size, maintain consistent tension, and choose a dense stitch such as single crochet. A fabric lining adds further stability.
Why is my zipper wavy?
The crochet edge was probably stretched while being clipped or sewn. Remove the affected stitches, allow the fabric to relax, mark the centers again, and reattach the zipper without pulling either layer.
Conclusion
This crochet makeup bag begins as an unusual flat shape, but the construction becomes logical once the zipper, side seams, and corners are completed. The one-piece method reduces the number of separate crochet panels while still creating a roomy, structured pouch.
Make the first version in one solid color so you can concentrate on shaping. After learning the construction, adapt the dimensions, add stripes, install a lining, attach a wrist strap, or experiment with a textured stitch.
Save the tutorial with your crochet bag patterns so you can reuse the same construction for pencil cases, travel organizers, notion pouches, and handmade gifts.





