A handmade table does not have to mean crocheting an entire table runner before your guests arrive.
Sometimes a project that takes less than an hour can create just as much visual impact.
These crochet fall napkin rings are small, practical, reusable, and beginner-friendly. The ribbed texture gives them the cozy look of a miniature sweater cuff, while a burnt-pumpkin color instantly makes an ordinary linen napkin feel ready for autumn, Thanksgiving, Friendsgiving, or a harvest dinner.
Even better, you do not need to worry about matching an exact row gauge. We will crochet a narrow textured strip, measure it around the actual folded napkin you plan to use, then seam the ends together.
That makes this a particularly forgiving project if you are still learning to control crochet tension.
In this tutorial you will learn how to:
- make a short foundation chain;
- crochet an even first row;
- identify the back loop of a crochet stitch;
- create simple ribbing with back-loop-only single crochet;
- keep a narrow strip the same width;
- size the band for thin or bulky napkins;
- join the ends without twisting them;
- hide the seam;
- weave in your ends securely;
- adapt one simple pattern into an entire fall table set.
The sample tutorial uses burnt pumpkin rust, but mustard, olive, cinnamon, cream, burgundy, mushroom brown, or deep forest green would all work beautifully for fall.
What You’ll Learn
By the end of the project, you should understand:
- how a starting chain determines the width of a flat crochet band;
- how working through one loop changes the fabric texture;
- how BLO single crochet creates pronounced ribbing;
- why consistent stitch count matters on narrow projects;
- how to measure crochet without stretching it;
- how to determine the correct circumference for a napkin ring;
- how to seam a crochet strip;
- how to make several rings the same finished size.
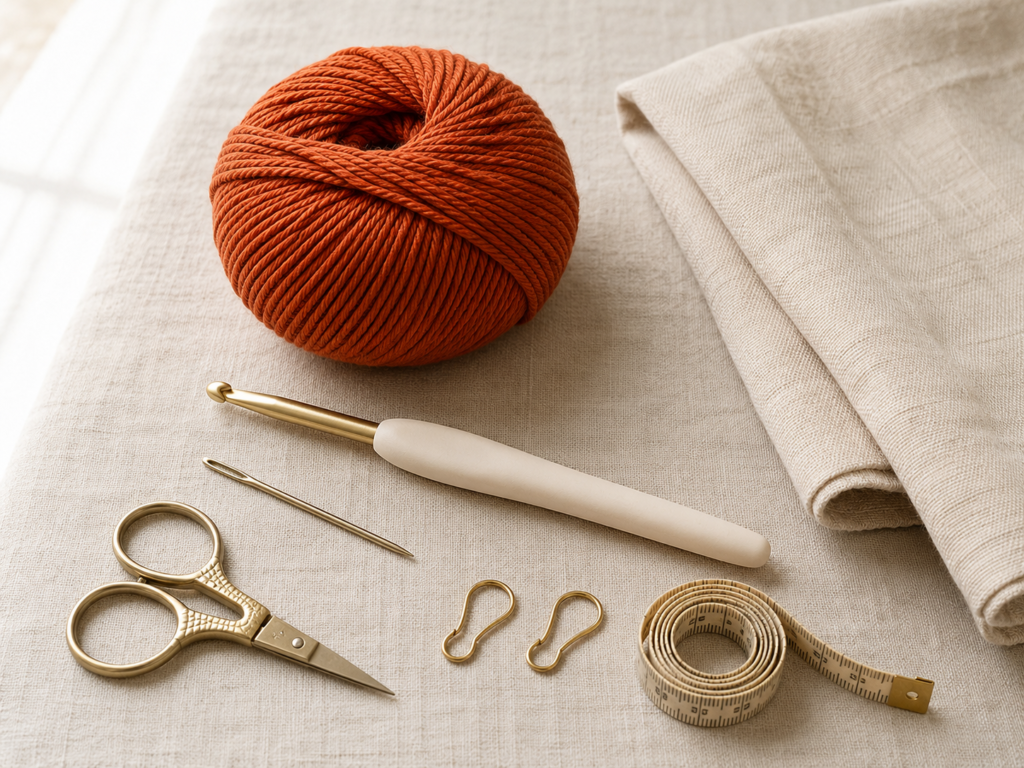
Materials You’ll Need
For one napkin ring, gather:
- approximately 8–12 yd / 7–11 m of worsted-weight category 4 yarn;
- 4.5 mm crochet hook;
- tapestry or yarn needle;
- scissors;
- flexible measuring tape;
- one stitch marker, optional;
- a cloth napkin for fit testing.
For table linens, I prefer a smooth cotton or cotton-blend yarn. Cotton shows the ribbing clearly, feels substantial without becoming fuzzy, and is convenient for a reusable household item.
The Craft Yarn Council classifies medium/category 4 as a standard yarn-weight category and provides recommended hook ranges as a starting point; your actual project hook can be adjusted to achieve the fabric you want.
For this small project, choose a hook that produces a firm but flexible fabric rather than a very loose one.
Fall color palette ideas
Try:
- burnt pumpkin + oatmeal;
- mustard + cream;
- olive + natural linen;
- cinnamon + ivory;
- burgundy + camel;
- three different autumn shades, with two rings in each shade for a set of six.
Avoid extremely fuzzy yarn for your first set. Fuzzy fibers can hide the two loops at the top of each stitch, making BLO crochet unnecessarily difficult for beginners.
Crochet Abbreviations Used
The abbreviations in this tutorial follow standard US crochet terminology. Standard crochet abbreviation references are also maintained by the Craft Yarn Council.
- ch = chain
- sc = single crochet
- BLO = back loop only
- sl st = slip stitch
- st = stitch
- sts = stitches
- rep = repeat
- RS = right side
- WS = wrong side
US/UK terminology note
This tutorial uses US crochet terms.
The stitch called single crochet (sc) in US terminology is called double crochet (dc) in UK terminology.
Chain and slip stitch terminology are effectively the same for this project.
Before You Start
Gauge and tension
There is no strict gauge requirement for this napkin ring.
That is intentional.
Rather than trying to duplicate a precise number of rows per inch, you will crochet until your strip comfortably fits your own napkin.
Still, tension matters.
Aim for stitches that are:
- firm enough that the ring holds its shape;
- loose enough that you can insert the hook without fighting the yarn;
- consistent from one row to the next.
Do not deliberately pull the yarn tight after every stitch. Let the hook shaft determine the size of each loop.
Finished size
The sample is designed to finish at approximately:
- 1.25–1.5 in / 3.2–3.8 cm wide
- 5.5–6 in / 14–15 cm inside circumference, depending on the napkin
Treat those measurements as a starting point, not a rigid rule.
A thin cotton napkin needs less room than a heavily folded linen dinner napkin.
Best sizing method
Fold or roll the napkin exactly as you intend to display it.
Wrap your unfinished crochet strip around the center.
Bring the short ends together.
You want them to meet comfortably without having to stretch the crochet aggressively.
If you have to pull hard, add rows.
If the ends overlap significantly, remove a few rows.
How to count your stitches
Your working width will contain 6 single crochet stitches.
At the top of a row, each stitch resembles a small V.
Count those Vs.
Your turning chain is not included in the stitch count.
If you finish a row with five stitches instead of six, you probably skipped the final stitch at the edge.
If you finish with seven, you may have accidentally crocheted into the turning chain.
How to keep the edges straight
The simplest habit is to count six stitches after every row.
For the first several rows, place a stitch marker in the first stitch if that helps you recognize the row edge.
A project this small is ideal for practicing edge recognition because mistakes become visible immediately.
How to avoid curling
A little curling while working BLO single crochet is normal.
Severe curling usually means one of three things:
- your foundation chain is too tight;
- your later rows are much looser than the foundation;
- you are pulling the turning chain too tightly.
Use relaxed, even chains and avoid tugging on the yarn after turning.
Step-by-Step Crochet Tutorial
Step 1: Make the Foundation Chain
Create a slip knot and place it on your 4.5 mm hook.
Now:
Ch 7.
These seven chains establish the width of the napkin ring.
Do not count the loop currently sitting on your hook as a chain.
Try to make each chain the same size. The foundation should be flexible enough to bend easily.
Beginner tip
Hold your hook more loosely while making the foundation chain than you think you need to.
A tight foundation chain can pull one long edge inward.
Common mistake to avoid
Do not make the seventh chain extremely tight just because you are about to start Row 1. It should look like the other chains.
Step 2: Crochet the First Row
Turn the foundation chain slightly so you can clearly see each chain.
Skip the chain nearest the hook.
Insert your hook into the second chain from the hook.
Now make a single crochet:
- Insert the hook into the chain.
- Yarn over.
- Pull the yarn back through the chain.
You should now have two loops on the hook.
- Yarn over again.
- Pull through both loops.
One single crochet is complete.
Continue making one sc into each remaining chain.
At the end of the row you should have:
6 sc.
Count them before moving on.
Step 3: Turn the Work Correctly
Ch 1.
The ch-1 is your turning chain.
It does not count as a stitch in this pattern.
Turn the crochet so that you are ready to work back across the six stitches.
Beginner tip
After turning, gently flatten the little rectangle.
Look at the top edge. You should see six distinct V-shaped stitch tops.
Common mistake to avoid
Beginners commonly crochet into the turning chain because it sits close to the final stitch.
Ignore the turning chain when counting your six stitches.
Step 4: Find the Back Loop
This is the technique that creates the cozy ribbed surface.
Normally, when you crochet into a stitch, your hook passes underneath both strands of the V at the top.
For back-loop-only crochet, you insert your hook underneath only the strand that sits farthest away from you.
That strand is the back loop.
Leave the front loop untouched.
Row 2
Work:
Sc BLO in each of the 6 sts.
Ch 1 and turn.
You still have six stitches.
Beginner tip
Before inserting the hook, tilt the top edge of the work slightly toward yourself.
That usually makes the front and back loops easier to distinguish.
Common mistake to avoid
Do not alternate randomly between BLO and both loops.
The pronounced ribbing depends on consistently leaving one loop unused on every textured row.
Step 5: Repeat the Ribbed Rows
Continue with the same repeat:
Every row: Ch 1, turn, sc BLO in each of the 6 sts.
That is the entire body repeat.
Simple projects are useful because they allow you to concentrate on consistency rather than constantly checking complicated instructions.
After approximately five or six rows, you should begin to see distinct raised ridges.
Continue until the strip measures approximately 5.5 in / 14 cm long, then start testing it around your napkin.
Do not stretch the strip while measuring.
Test the fit
Wrap the strip around your folded napkin.
The two short edges should meet.
For a little extra grip, it is fine if you need to stretch the strip very slightly to make the edges touch.
You should not need to pull hard.
If the band looks baggy, undo one or two rows.
If the ends cannot meet comfortably, add another row or two.
Beginner tip
Once the first ring fits perfectly, write down its finished row count.
Then use that count for the rest of your matching set, provided you keep the same:
- yarn;
- hook;
- tension;
- napkin style.
Tension check
Your fabric should remain flexible but should not have large holes between stitches.
Step 6: Fasten Off With a Seaming Tail
When the band is the correct length, finish the final stitch.
Cut the yarn while leaving approximately 10–12 in / 25–30 cm attached.
Pull the tail completely through the active loop.
That secures the crochet and gives you enough yarn to seam the two short ends.
Beginner tip
Leaving a long tail now saves you from attaching another piece of yarn later.
Common mistake to avoid
Do not trim the tail to one or two inches.
Short tails are difficult to thread and may not be long enough to sew the seam securely.
Step 7: Join the Band Into a Ring
Thread the long tail through a tapestry needle.
Bring the two short ends of the rectangle together.
Before sewing anything, check the ring from the side.
Make sure the strip is not twisted.
Align the first row with the final row.
Using the yarn needle, pass through corresponding edge stitches on both sides.
You can use:
- a simple whip stitch;
- a mattress-style seam;
- or another comfortable hand-sewing join.
For a first project, a neat whip stitch is perfectly adequate.
Work from one edge to the other.
Pull each stitch firmly enough to close the gap but not so tightly that the seam puckers.
Beginner tip
After every two or three sewing stitches, unfold the seam and check the front.
The ridges should meet neatly rather than shifting one row up or down.
Common mistake to avoid
Do not sew through random points along the edges.
Matching corresponding rows produces a much cleaner join.
Step 8: Weave In the Yarn Ends
When the seam is secure, weave the remaining yarn tail through the back of several nearby stitches.
Change direction once.
Pass through another few stitches.
Trim the excess yarn close to the fabric without cutting any crochet stitches.
Repeat with the starting tail at the other end if necessary.
Changing direction when weaving in the yarn helps the tail remain more secure than simply passing through one straight line.
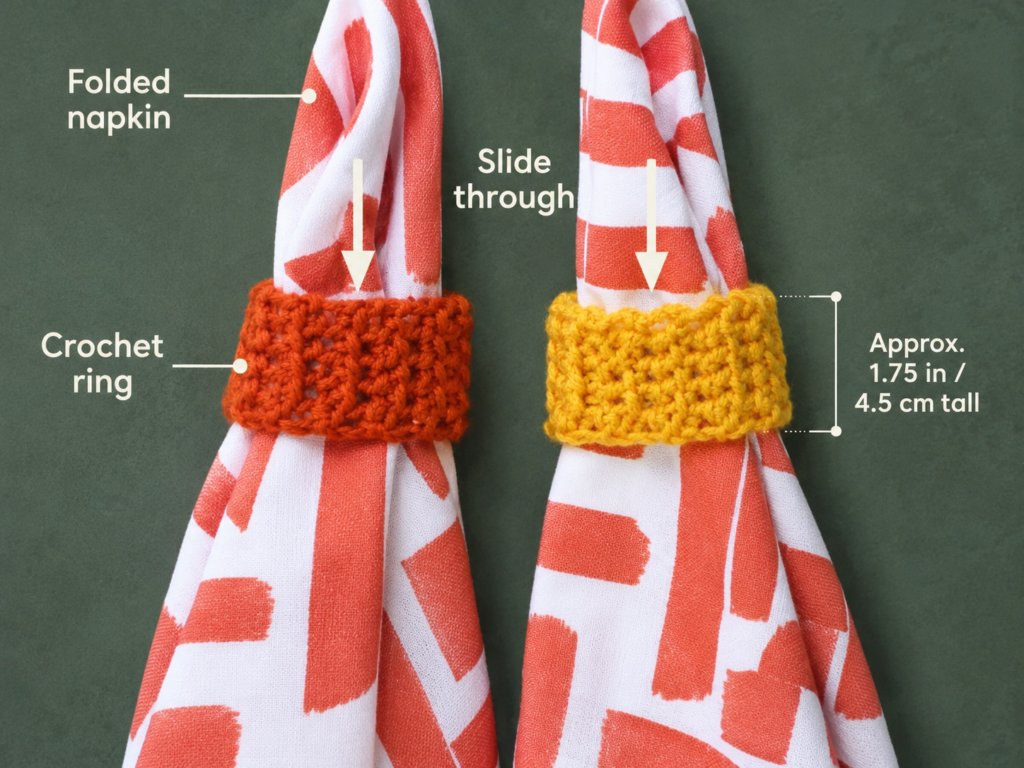
Step 9: Shape the Finished Napkin Ring
Turn the seam toward the inside or bottom of the ring.
Use your fingers to gently round the band.
Insert your folded napkin.
Adjust the crochet so the ribbing sits evenly around the fabric.
You now have a finished fall napkin ring.
Pattern Notes or Stitch Notes
Turning chain
The ch 1 at the beginning of every row does not count as a stitch.
Your working stitch count remains six.
Stitch count
Maintain:
6 sc per row.
Count frequently, especially during the first ten rows.
Repeat
After completing the first row:
Ch 1, turn, sc BLO across all 6 sts.
Repeat that row until the band reaches the required circumference.
Right side and wrong side
This simple ribbed fabric is visually attractive on either side.
There is no critical RS/WS requirement.
When finishing, simply position the side you prefer toward the outside and rotate the seam toward the back or underside.
Size adjustment
To make the ring wider
Increase the foundation chain.
For example:
- Ch 5 for a slim band.
- Ch 7 for the sample width.
- Ch 8 or 9 for a wider statement ring.
Whatever number you choose, remember that Row 1 will normally contain one fewer sc than the starting-chain count when you begin in the second chain from the hook.
To make the ring larger around
Add more BLO rows.
To make it smaller
Remove rows.
Sizing by length is more reliable than copying another crocheter’s row count because yarn thickness, hook choice, and personal tension can all affect the dimensions.
Common Beginner Mistakes
1. Losing a stitch at the end of the row
Problem: The band gradually narrows.
Cause: The last stitch is easy to miss because it sits close to the turning edge.
Fix: Count six stitches after every row. If necessary, mark the first stitch of each row.
2. Accidentally crocheting into the turning chain
Problem: The strip slowly becomes wider.
Cause: The turning chain is mistaken for a regular stitch.
Fix: Remember that the ch-1 does not count. Work only into the six actual stitches.
3. Working through both loops instead of BLO
Problem: A section of the band looks smoother and loses the ribbed effect.
Cause: The hook went underneath both strands of the top V.
Fix: Before every stitch, identify the loop farther away from you and insert the hook beneath that strand only.
A single accidental stitch is not catastrophic, but repeated full-loop stitches will interrupt the texture.
4. Making the foundation too tight
Problem: The first edge looks shorter than the opposite edge.
Cause: Foundation chains were much tighter than the later crochet.
Fix: Remake the chain with relaxed tension or use a hook 0.5 mm larger only for the starting chain.
Switch back to the project hook for Row 1.
5. Pulling the measurement tape while checking length
Problem: The finished ring becomes too loose.
Cause: The crochet strip was stretched during measurement.
Fix: Lay it flat and let the fabric rest naturally.
Measure without tension.
Then test it around the actual napkin.
6. Making the ring too tight
Problem: The napkin bunches badly or is difficult to pull through the ring.
Fix: Add one or two rows before seaming.
Remember that a napkin ring should hold fabric together, not compress it like an elastic band.
7. Twisting the strip before sewing
Problem: The finished band behaves like a twisted loop rather than a flat ring.
Fix: Place the strip flat, curve both ends toward each other, and check that both long edges remain continuous before inserting the needle.
8. Pulling the seam excessively tight
Problem: The seam becomes narrower than the rest of the ring.
Fix: Tighten only enough to bring the edges together. The sewing yarn should not cinch the fabric.
How to Customize This Crochet Project
One basic napkin-ring construction can support many table styles.
Change the yarn colors
For a traditional fall table:
- pumpkin;
- mustard;
- olive;
- burgundy;
- cinnamon brown.
For modern neutral autumn décor:
- oatmeal;
- camel;
- mushroom;
- warm taupe;
- charcoal.
For Thanksgiving:
- make two rust;
- two mustard;
- two olive.
The mixed set looks coordinated without every place setting being identical.
Add stripes
Change colors every two or four rows.
Because the rows become the visible ribs around the ring, narrow stripes can create a subtle color-block effect.
For the cleanest result, carry the unused yarn only when the distance is short; otherwise fasten off and weave in the ends carefully.
Make wider napkin rings
Instead of ch 7, begin with more chains.
A wider band gives the napkin ring more visual weight and provides room for embellishment.
Add a wooden button
A small decorative wooden button can be sewn to the center front after the ring is complete.
The button does not need to function as a closure if your band is already seamed.
For fall, look for:
- natural unfinished wood;
- dark walnut;
- leaf-shaped buttons;
- simple round coconut-shell buttons.
Make sure it is firmly sewn on if children will be handling the table setting.
Add an embroidered accent
With mustard or cream yarn, embroider:
- a tiny vertical wheat stalk;
- three small French-knot-style dots;
- a simple cross;
- a short leaf-vein shape.
Keep the embellishment small so the crochet texture remains visible.
Add a simple edging
If you want a firmer border, work a round of slip stitch around the long edges before seaming.
Keep the slip stitches loose.
Very tight slip stitches can make the band curl.
Try another texture later
Once you are comfortable with this construction, the same basic dimensions can become a practice project for:
- moss stitch;
- half double crochet;
- herringbone half double crochet;
- waistcoat stitch;
- alternating color stripes.
When testing a different stitch, always resize by measurement because stitch gauges differ.
Gift ideas
Make a set of four or six and pair them with:
- linen napkins;
- handmade placemats;
- a crochet trivet;
- wooden serving utensils;
- a fall table runner.
They can make a thoughtful handmade hostess gift without requiring the time commitment of a large crochet project.
Finishing Instructions
Fastening off
After completing the final row, leave enough yarn for your seam.
Secure the last loop by pulling the tail completely through.
Seaming
Align the first and final rows.
Sew through corresponding edge stitches.
Check the outside periodically so the ribs stay aligned.
Weaving in ends
Use a tapestry needle.
Travel through several stitches on the wrong side.
Change direction.
Continue through several more stitches.
Trim close to the surface.
Blocking
Heavy blocking is unnecessary.
If your band looks uneven:
- lightly dampen it;
- reshape it with your fingers;
- lay it flat;
- allow it to dry completely.
Do not aggressively stretch it longer, or you may change the fit.
Washing and care
Follow the care instructions printed on your yarn label.
For reusable table items, cotton is especially practical because many cotton yarns tolerate washing well, although the manufacturer’s specific yarn label should always take priority.
Reshape the napkin rings while damp and allow them to dry fully before storing.
Table safety
Crochet napkin rings are textile décor.
Keep yarn, napkins, dried leaves, and other fiber decorations safely away from candle flames, hot serving dishes, and other heat sources.
Quick Printable-Style Summary
Project: Ribbed Crochet Fall Napkin Ring
Skill level: Easy / confident beginner
Yarn: Worsted-weight/category 4 cotton or cotton blend
Hook: 4.5 mm
Other supplies: Yarn needle, scissors, measuring tape
Finished width: Approximately 1.25–1.5 in / 3.2–3.8 cm
Finished circumference: Approximately 5.5–6 in / 14–15 cm, adjusted to napkin
Stitches: ch, sc, BLO sc
Starting method
Ch 7.
Row 1
Sc in second ch from hook and each remaining ch.
6 sc.
Ribbed repeat
Ch 1, turn.
Sc BLO in each of the 6 sts.
Repeat until the strip wraps comfortably around the intended napkin with the short ends meeting.
Finishing
Leave a long yarn tail.
Fasten off.
Bring short edges together without twisting.
Sew corresponding rows together.
Weave in both ends.
Turn seam underneath and insert folded napkin.
FAQ
Is this crochet fall napkin ring pattern suitable for absolute beginners?
It is a good early crochet project once you can make a chain and basic single crochet.
The only additional technique is working through the back loop.
Because the project is tiny, you can practice BLO repeatedly without committing to a large scarf or blanket.
What yarn is best for crochet napkin rings?
A smooth worsted-weight cotton or cotton blend is an excellent option.
Smooth yarn makes the ribbing easy to see and creates a relatively crisp finished band.
Acrylic can also work, especially for practice or when using scraps.
Avoid highly textured novelty yarn until you are comfortable identifying stitch loops.
How much yarn do I need for one napkin ring?
Only a small quantity is required.
Approximately 8–12 yards is a practical amount to set aside for the sample-size ring, although actual use varies with width, circumference, yarn thickness, and tension.
This makes the project useful for small leftover balls of yarn.
How big should a crochet napkin ring be?
There is no universal size because napkins can be folded differently.
For this tutorial, start around 5.5–6 inches in circumference and fit the band directly around your napkin before seaming.
The correct ring should keep the napkin gathered without crushing the fabric.
Can I make the ring without sewing?
Yes.
An alternative is to join the two short edges with slip stitches using the crochet hook.
However, sewing with the long finishing tail is easy for beginners and can produce a flatter seam.
Why is my ribbing not showing clearly?
Check three things.
First, make sure you are working consistently in the back loop only.
Second, use a smooth yarn rather than a fuzzy fiber.
Third, avoid making the fabric so loose that the stitches lose definition.
The raised unused loops should form visible horizontal ridges.
Can I make these for Thanksgiving?
Yes.
The simple ribbed design works particularly well in pumpkin, mustard, olive, cinnamon, cream, and burgundy.
A coordinated set can be used for Thanksgiving, Friendsgiving, fall weddings, harvest dinners, or everyday autumn table décor.
Conclusion
A crochet fall napkin ring pattern is proof that seasonal crochet does not need to be large or complicated.
With one small ball of yarn and a basic crochet hook, you can practice chains, single crochet, back-loop-only texture, measuring, and seaming—and finish with something genuinely useful for the table.
Make the first ring in burnt pumpkin and use it to establish your preferred size. Once the fit is right, repeat the same dimensions in mustard, olive, cinnamon, or cream for a coordinated autumn set.
The small scale also makes this an excellent project for experimenting. Change the width. Add a button. Try stripes. Use a different fall color for every place setting.
And because the basic construction is only a ribbed rectangle joined into a loop, you can return to the idea whenever you need a quick handmade accent for a seasonal table.
Save the tutorial with your fall crochet projects so you have the measurements and image sequence ready when autumn hosting begins.





