A tiny crochet ghost is one of those projects that looks detailed but is surprisingly manageable once you understand the construction. The head and body are worked together, the wavy bottom is created directly from the final body round, and there are no arms, legs, or separate pieces to position.
This beginner-friendly crochet ghost keychain pattern uses basic amigurumi techniques and a small amount of yarn. You will begin at the top of the ghost, increase to form the rounded head, crochet several straight rounds for the body, and finish with a simple scalloped edge.
Behind that decorative edge, a second round of stitches closes the bottom and holds the stuffing securely. A reinforced hanging loop is then added to support the metal keyring.
The finished ghost is small enough for keys, backpacks, zipper pulls, Halloween gift bags, or market-stall accessories. Because the project uses very little yarn, it is also a practical way to use leftover cotton yarn.
What You’ll Learn
- How to begin amigurumi with a magic ring
- How to increase evenly in continuous rounds
- How to count stitches without joining each round
- How to crochet a smooth cylindrical body
- How to work a decorative edge in the front loops only
- How to find the unused back loops behind a ruffle
- How to decrease and close a stuffed amigurumi shape
- How to embroider a simple ghost face
- How to add reinforced keychain hardware
Materials You’ll Need
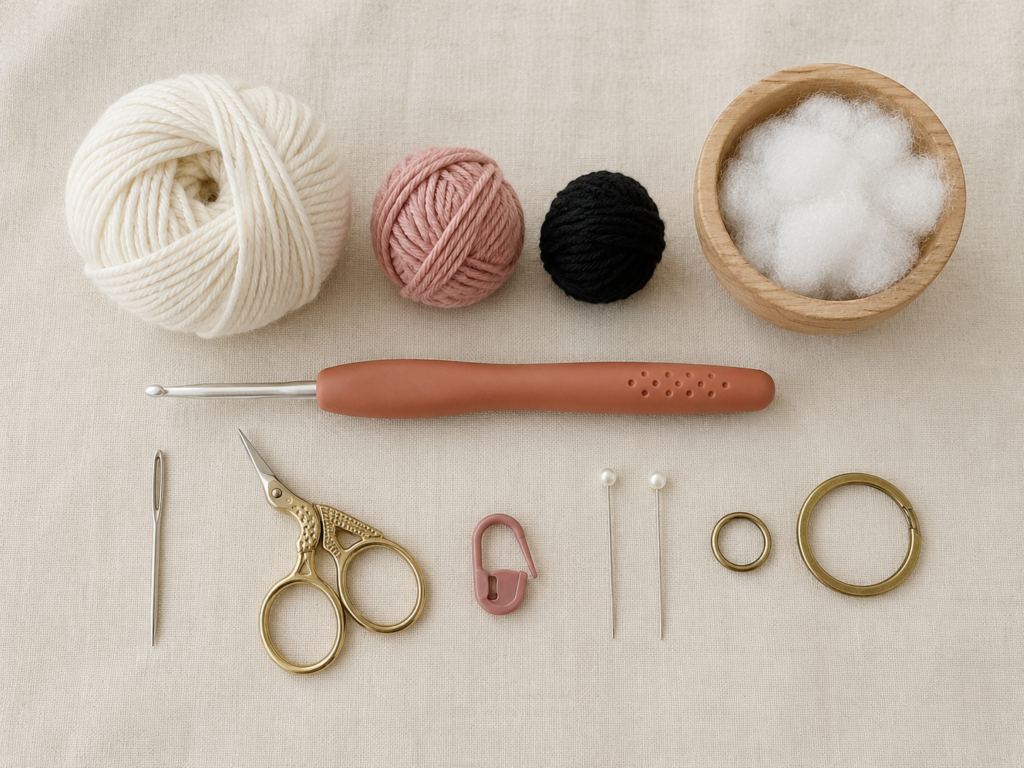
- Approximately 20–25 yards of DK or light worsted cotton yarn in warm ivory
- Small amount of black cotton yarn or embroidery floss
- Small amount of dusty rose yarn for cheeks
- 3.25 mm crochet hook
- Polyester fiberfill
- Locking stitch marker
- Blunt tapestry needle
- Embroidery scissors
- Two straight pins for checking face placement
- 12 mm metal jump ring
- 25 mm split keyring or small swivel clasp
- Smooth-jaw jewelry pliers, when using an open jump ring
- Optional: two 6 mm safety eyes
Smooth cotton is recommended for a keychain because it produces visible stitches and handles regular contact better than very fuzzy yarn. Acrylic yarn can also be used, but choose one with a smooth surface so that you can see the stitches clearly.
Crochet Abbreviations Used
This tutorial uses standard US crochet terminology.
- BLO = back loop only
- ch = chain
- FLO = front loop only
- hdc = half double crochet
- inc = increase by working two single crochet stitches in one stitch
- inv dec = invisible single crochet decrease
- MR = magic ring
- rep = repeat
- sc = single crochet
- sl st = slip stitch
- st/sts = stitch/stitches
The Craft Yarn Council lists these abbreviations as standard US crochet terminology and also explains the differences between common US and UK stitch names. In UK terminology, a US single crochet is called a double crochet, while a US half double crochet is called a half treble.
Before You Start
Gauge and tension
An exact gauge is not essential for this project. More important is creating a dense fabric that does not allow the stuffing to show.
Your stitches should be firm but not so tight that inserting the hook becomes uncomfortable. After completing the first four rounds, gently stretch the fabric. Go down to a 3 mm hook if large gaps appear between the stitches.
The Craft Yarn Council’s hook ranges are general yarn-weight guidelines rather than fixed rules. Amigurumi commonly uses a smaller hook than a yarn label might recommend because the fabric needs to remain compact.
How to count the rounds
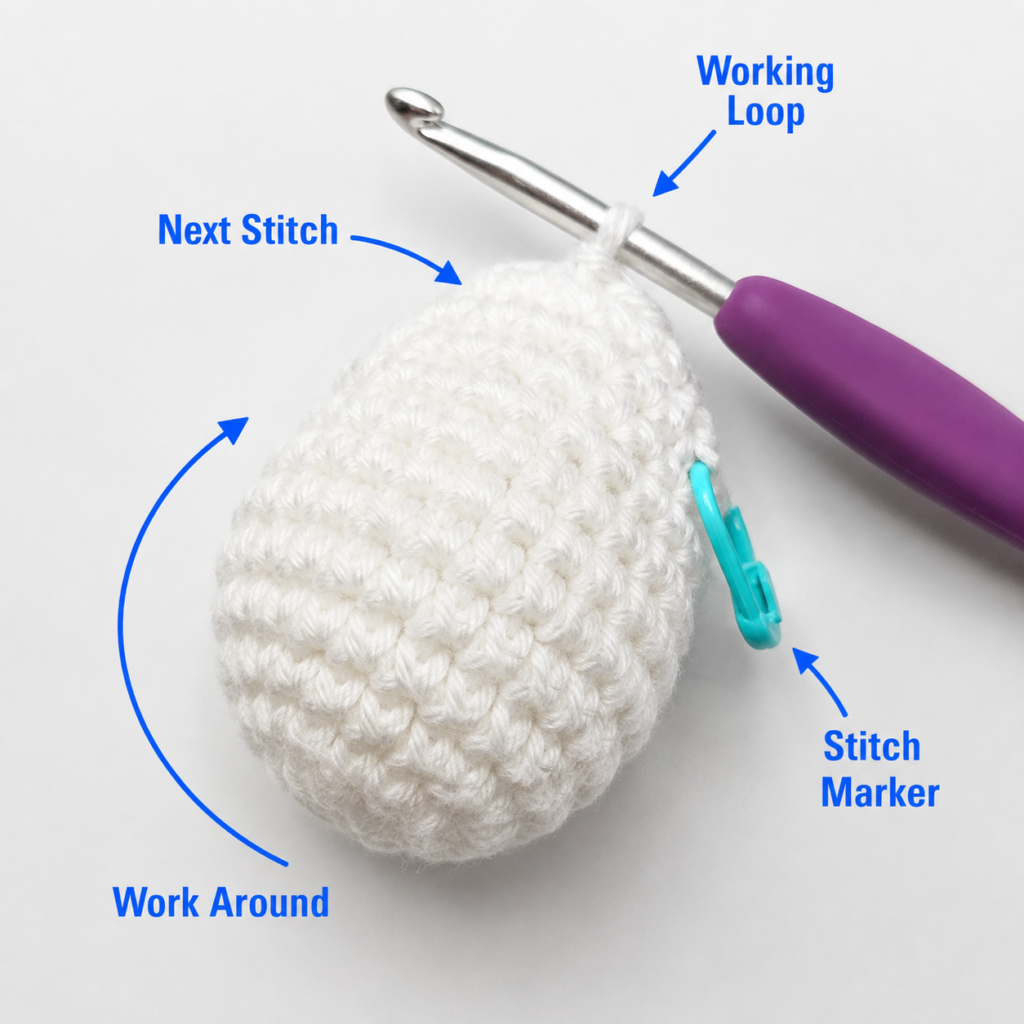
This pattern is worked in a continuous spiral. Do not join the end of each round unless instructed.
Place a stitch marker in the first stitch of every round. Move the marker up after completing each round. Count the stitches before beginning the next round, especially after an increase or decrease round.
Right side and wrong side
The outside of standard amigurumi fabric usually shows neat V-shaped stitches. The horizontal bars and more textured bumps remain inside the project.
If the fabric begins curling with the wrong side facing outward, gently turn the piece so that the yarn tail from the magic ring is inside the body.
Choosing the face
Embroidered features are recommended for a keychain that may be handled frequently. Plastic safety eyes can loosen if the keychain is repeatedly pulled, crushed, or caught inside a bag.
A small object containing plastic eyes or detachable metal hardware should not be treated as an infant toy. The US Consumer Product Safety Commission warns that small components can create choking risks for children under three. Use embroidered features and omit all keychain hardware when making an item for a very young child.
Step-by-Step Crochet Ghost Keychain Tutorial
Step 1: Make the Magic Ring
Leave an unusually long starting tail—approximately 10 inches. You will later use this tail to reinforce the top hanging loop.
Create a magic ring and work:
Round 1: Work 6 sc into the magic ring. (6 sts)
Pull the yarn tail until the center closes completely. Do not cut the tail.
Place your stitch marker in the first single crochet.
Beginner tip:
Count the six stitches before beginning Round 2. The loop on the hook does not count as a stitch.
Common mistake to avoid:
Do not leave a visible opening in the center. A loose magic ring can widen when the finished ghost hangs from a keyring.
Step 2: Increase the Rounded Head
The next three rounds expand the small circle evenly.
Round 2: Work 2 sc in every stitch around. (12 sts)
Round 3: Repeat [1 sc in the next stitch, inc in the next stitch] six times. (18 sts)
Round 4: Repeat [1 sc in each of the next 2 stitches, inc in the next stitch] six times. (24 sts)
The work may still look fairly flat after Round 4. It will begin curving into a dome during the straight body rounds.
Beginner tip:
An increase means placing two complete single crochet stitches into the same stitch.
Common mistake to avoid:
Do not place both stitches into only one loop unless the pattern specifically says FLO or BLO. Insert the hook beneath both top loops during these increase rounds.
Step 3: Crochet the Body
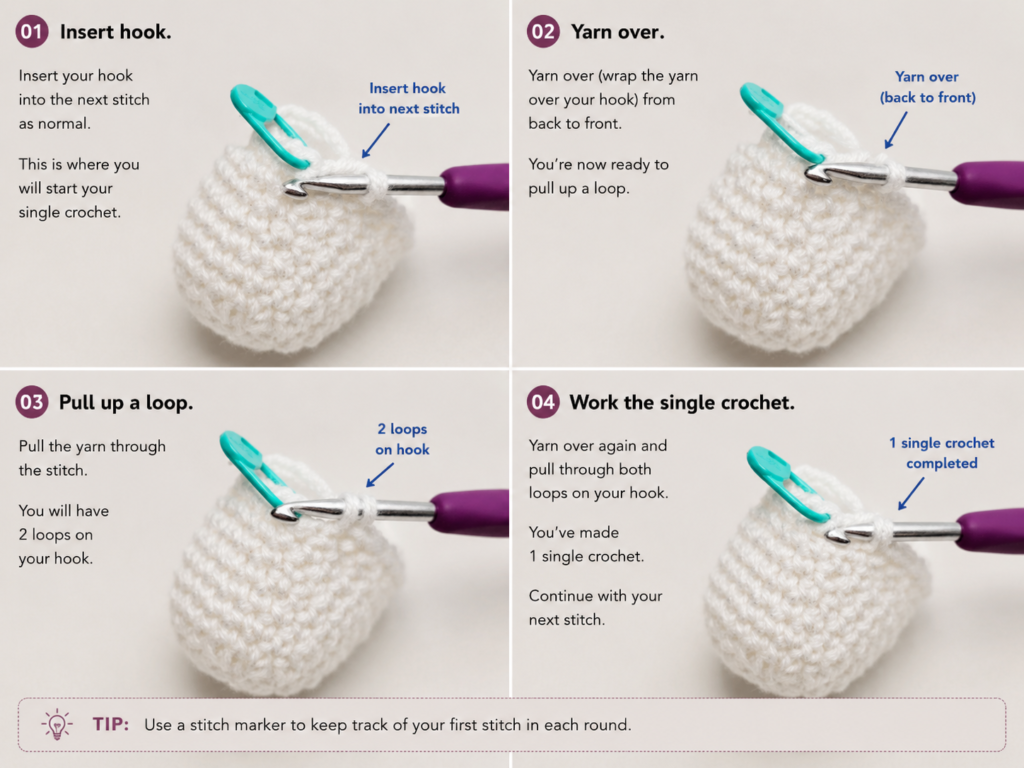
The stitch count now remains unchanged.
Rounds 5–10: Work 1 sc in every stitch around. (24 sts per round)
As you continue, the circle should curve downward and become a short cylinder with a rounded top.
Stop after Round 10 and check the height. The body should measure approximately 2 to 2.25 inches from the center of the magic ring to the active loop.
Add or remove one straight round when necessary. Remember that adding a round will also move the face and ruffle farther apart.
Beginner tip:
Count the stitches in at least every second round. A missed stitch will make the lower part of the body narrow unexpectedly.
Common mistake to avoid:
Do not accidentally work into the stitch marker. Remove the marker, crochet the marked stitch normally, and place the marker into the new first stitch.
Step 4: Mark or Install the Eyes
Before closing the bottom, identify the front of the ghost.
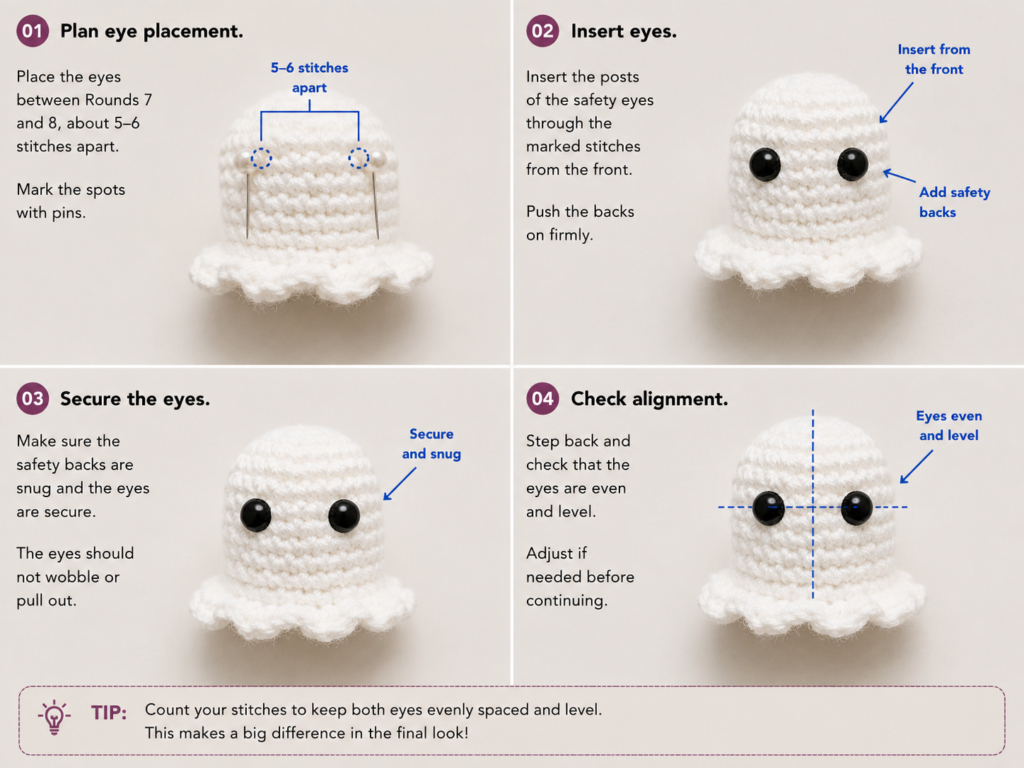
Position two pins between Rounds 6 and 7. Leave approximately five visible stitches between the pins.
Look at the ghost from the front and from above. Adjust the pins until they appear level.
For embroidered eyes, leave the pins in place temporarily and remove them when you begin embroidering.
For 6 mm safety eyes, insert the posts at the marked locations and install the washers inside the body now. Confirm the placement before pressing the washers down because they are difficult to remove.
Beginner tip:
The beginning-of-round line can be positioned toward the back of the ghost.
Common mistake to avoid:
Do not position the eyes too close to the ruffle. Leaving several rounds beneath the face gives the ghost a softer, more balanced expression.
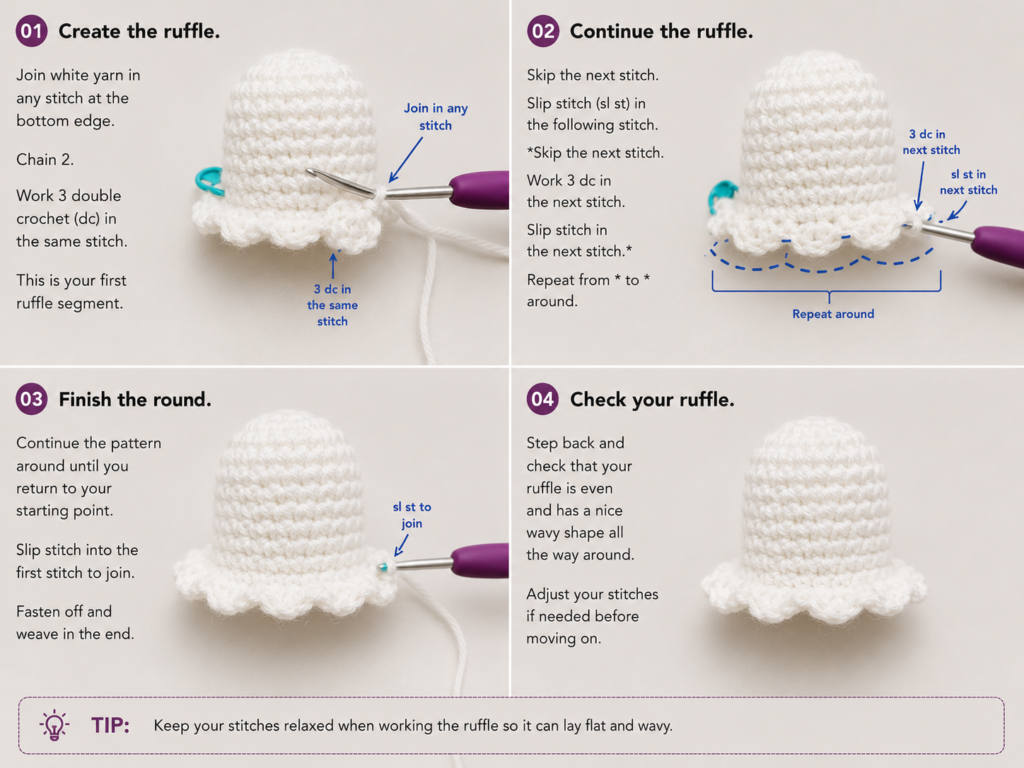
Step 5: Crochet the Wavy Ghost Edge
The decorative edge is worked through the front loops of Round 10.
A stitch has two loops across its top. The loop closest to you is the front loop. The loop farther away is the back loop.
Round 11: Working in FLO, repeat the following sequence eight times:
[Sl st in the next stitch, ch 2, work 2 hdc in the next stitch, ch 2, sl st in the next stitch].
You should have eight rounded scallops around the lower edge.
After the final slip stitch, fasten off and leave a 5-inch tail. Do not close the bottom through the scallops. The unused back loops behind the edge will form a separate inner round.
Beginner tip:
Fold each completed scallop downward so you can see the unused back loops behind it.
Common mistake to avoid:
Do not crochet the scallops beneath both loops. You need the back loops to remain free for the closing section.
Step 6: Rejoin the Unused Back Loops
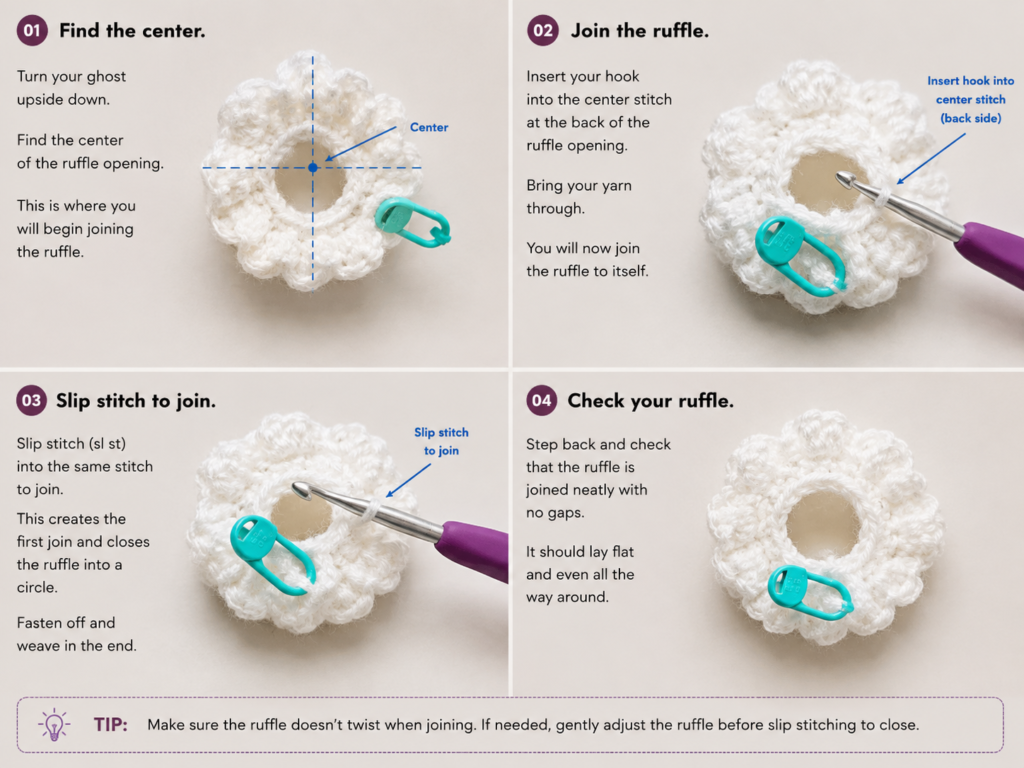
Turn the ghost upside down and fold the scallops outward.
Locate the 24 unused back loops behind the ruffle. They should look like a circular dotted or braided line.
Join the ivory yarn to the first unused back loop with a slip stitch. Place a stitch marker in that loop.
Round 12: Repeat [inv dec, 1 sc in each of the next 2 stitches] six times. (18 sts)
Round 13: Repeat [inv dec, 1 sc in the next stitch] six times. (12 sts)
An invisible decrease is made by inserting the hook through the front loop of the next stitch and then through the front loop of the following stitch. Yarn over, pull through both front loops, yarn over again, and pull through the two loops on the hook.
Beginner tip:
Rotate the ghost rather than forcing your wrist around the small opening.
Common mistake to avoid:
Make sure you are crocheting through the unused loops of Round 10, not into the chains or half double crochet stitches of the ruffle.
Step 7: Stuff the Ghost
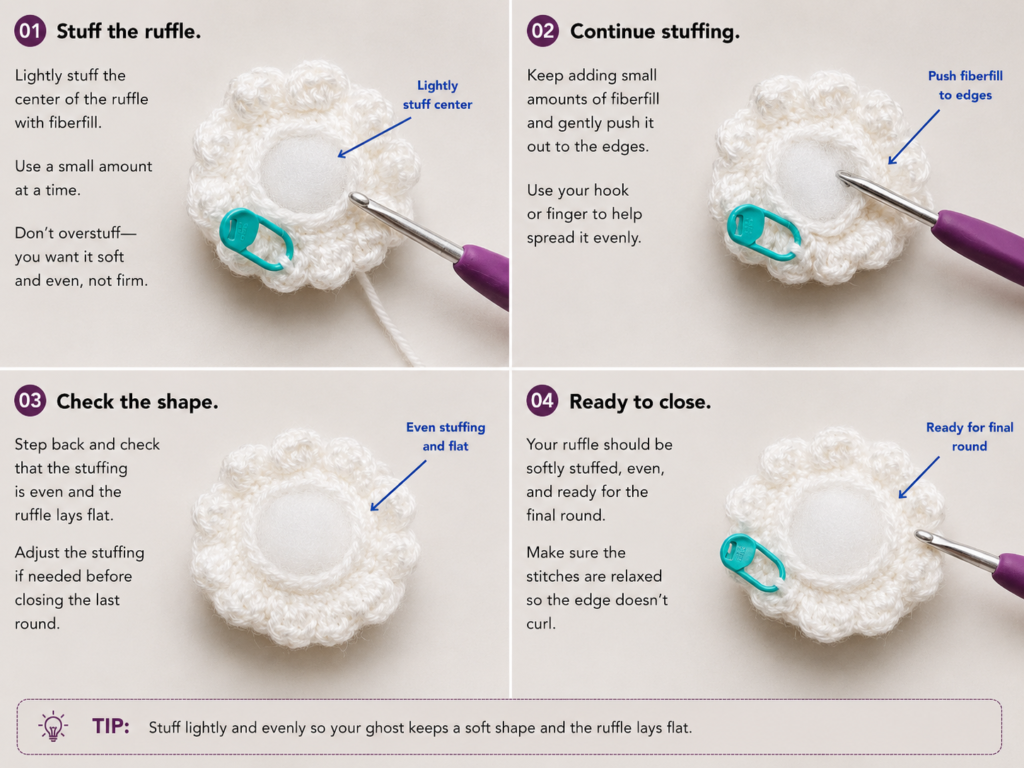
Tear the fiberfill into several small pieces rather than pushing one large ball into the body.
Add the first pieces to the rounded top. Use your fingertip or the blunt end of a stuffing tool to push the filling into the upper edges of the head.
Continue adding small portions until the ghost holds its shape. The sides should feel springy rather than rigid.
Leave the final closing stitches visible.
Beginner tip:
Rotate the ghost and inspect it from every side. Add a small amount of filling wherever the fabric looks hollow.
Common mistake to avoid:
Do not pack the bottom firmly. Excess stuffing will push against the closing round and make the scallops flare upward.
Step 8: Close the Bottom
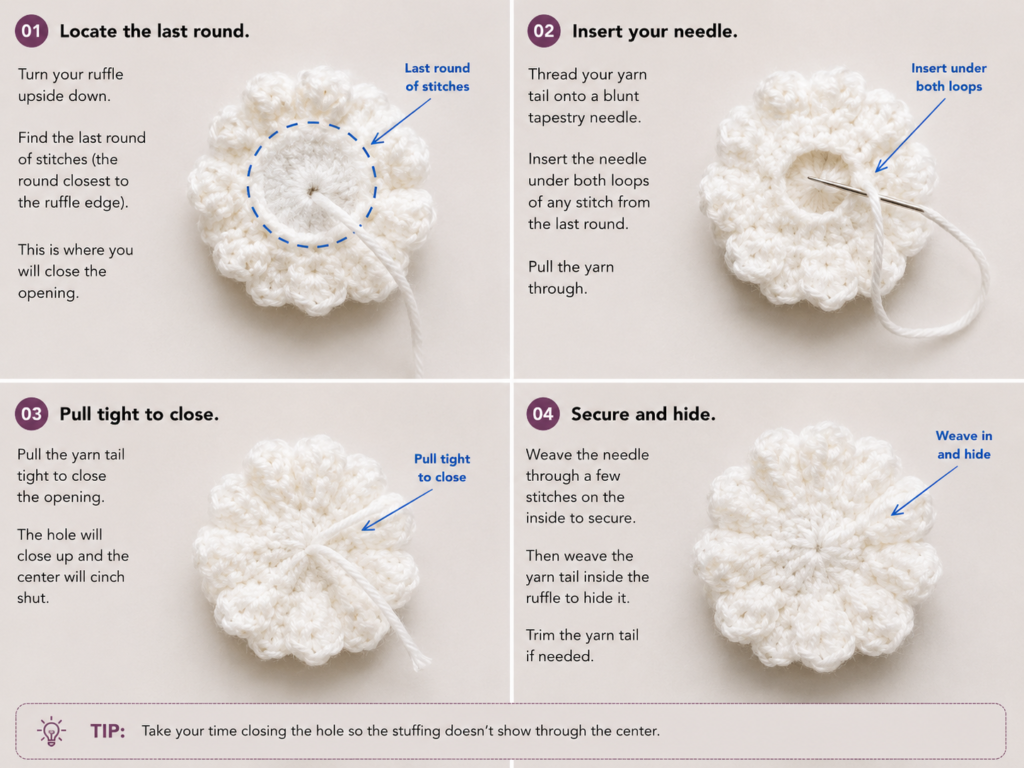
Complete the final decrease round.
Round 14: Work 6 invisible decreases. (6 sts)
Cut the yarn, leaving a 7-inch tail, and pull the tail through the final loop.
Thread the tail onto a tapestry needle. Pass the needle through the front loop of each remaining stitch. Pull slowly until the opening closes.
Insert the needle through the center of the closure and bring it out through the side of the body. Pull gently, trim the yarn close to the fabric, and massage the stitches until the tail disappears inside.
Arrange the scallops around the bottom so that each one points downward.
Beginner tip:
Pull the gathering yarn in two or three small stages instead of one hard movement.
Common mistake to avoid:
Do not knot the yarn on the outside. A visible knot can catch on keys or bag fabric.
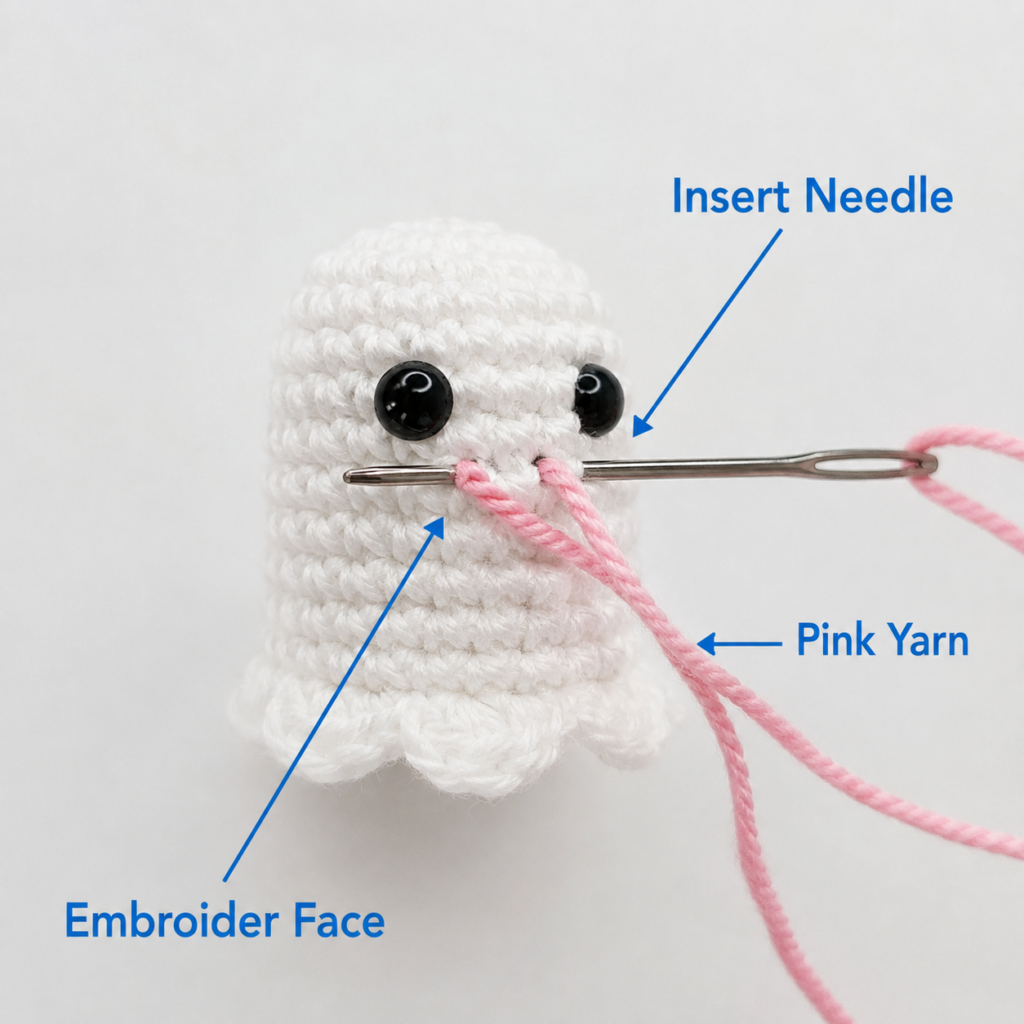
Step 9: Embroider the Face
Remove one eye-placement pin.
Thread a tapestry needle with black yarn. Insert the needle through the bottom or back of the ghost and bring it out at the lower part of the marked eye position.
Create a small vertical oval by making three or four straight stitches over approximately one crochet round. Place each stitch beside the previous one rather than stacking them exactly on top of one another.
Repeat for the second eye.
For each cheek, use dusty rose yarn to make two short horizontal stitches directly beneath the outer half of each eye.
Optional expressions include:
- A tiny black V-shaped smile
- A small round surprised mouth
- One winking eye
- Short black eyelashes
- No cheeks for a simpler ghost
Secure each yarn color by passing the needle through several internal stitches. Avoid bulky external knots.
Beginner tip:
Complete one eye, then compare it with the remaining placement pin before embroidering the second.
Common mistake to avoid:
Do not pull the embroidery yarn tightly. Tight stitches can sink into the stuffing and distort the face.
Step 10: Add the Reinforced Keychain Loop
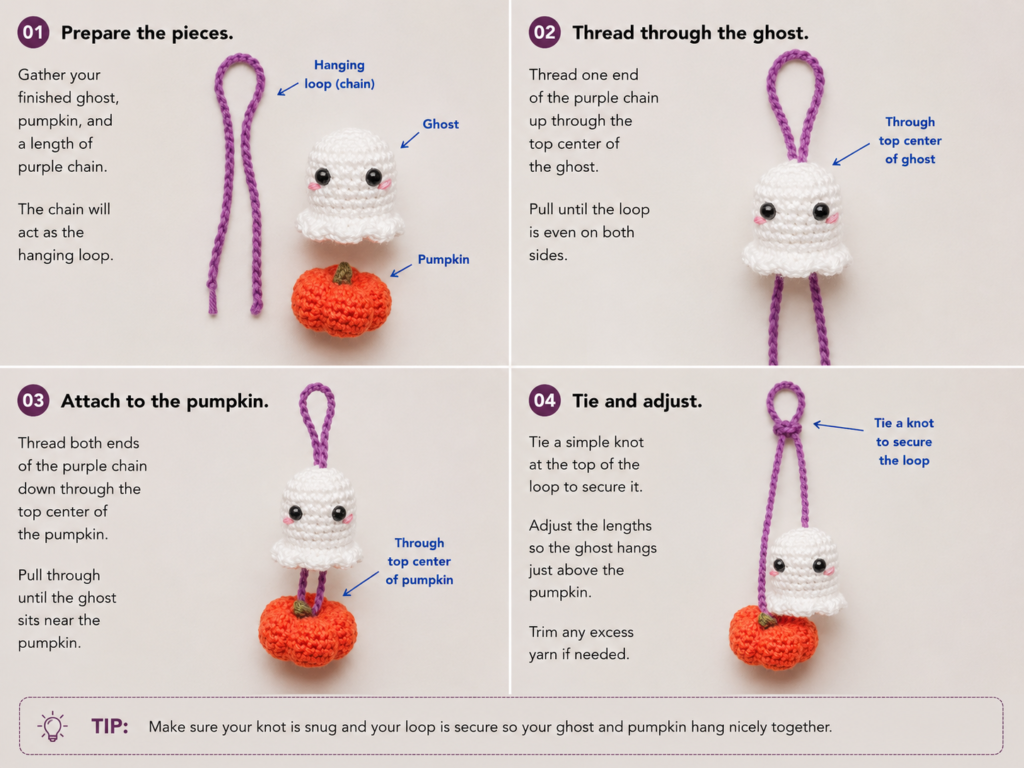
Locate the long starting tail from the magic ring. Thread it onto the tapestry needle and bring it out through the top center of the ghost.
Cut a separate 12-inch length of ivory yarn.
Insert the crochet hook beneath two adjacent stitches beside the center of the magic ring. Pull the new yarn through and leave a 5-inch tail.
Chain 7 firmly.
Pass the chain through the 12 mm jump ring or the bottom loop of a swivel clasp. Slip stitch back beneath the same two top stitches to form a closed hanging loop.
Fasten off, leaving another 5-inch tail.
Thread each tail separately through several top stitches and into the body. Send the tails in opposite directions so that tension is distributed across more than one stitch.
Use the original magic-ring tail to wrap around the base of the hanging loop three times. Pass the needle through the body and bury the remaining tail.
Attach the larger split keyring to the small jump ring. When using an open jump ring, twist its ends sideways with two pairs of pliers. Do not pull the ring apart vertically because that can weaken its circular shape.
Beginner tip:
Test the loop by pulling it gently in several directions before attaching the final keyring.
Common mistake to avoid:
Do not attach a heavy metal ring through only one strand of one crochet stitch. Regular pulling may stretch or break that stitch.
Step 11: Shape and Inspect the Finished Ghost
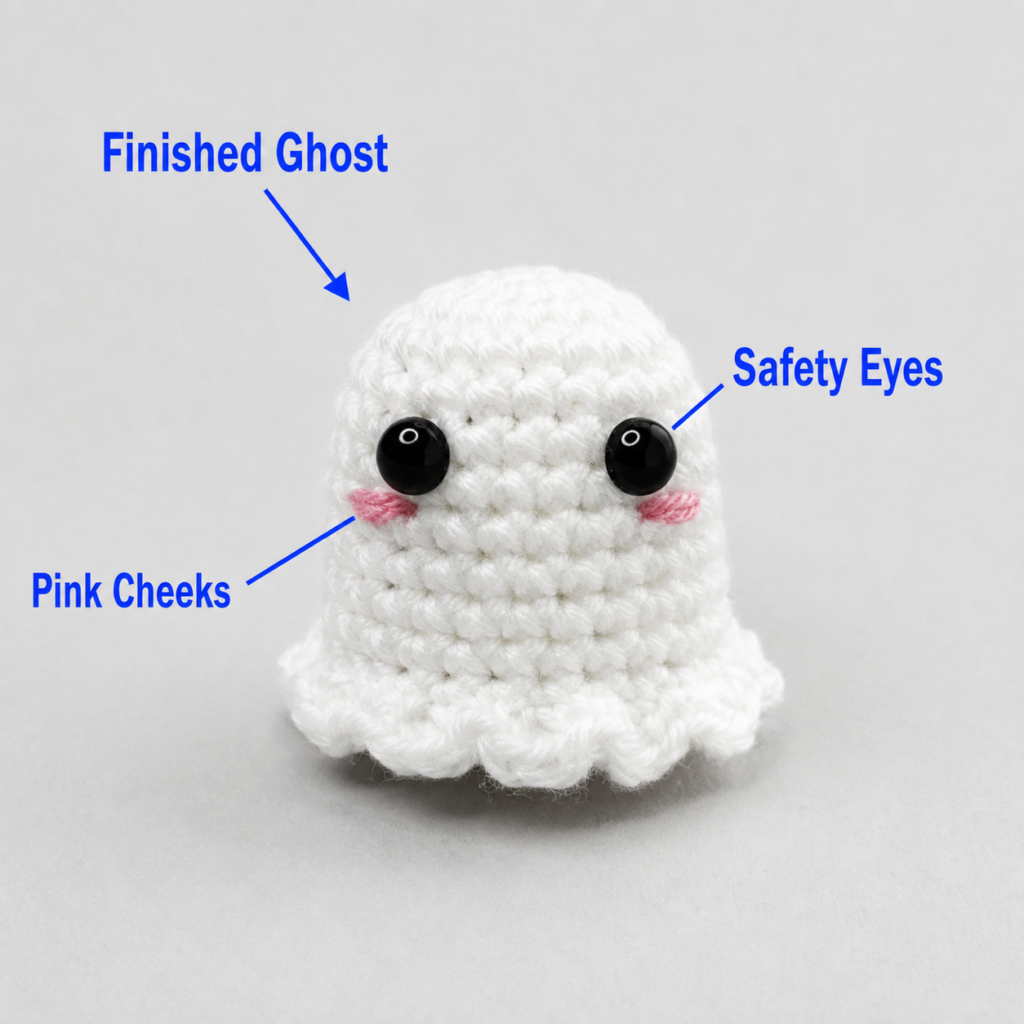
Roll the ghost gently between your palms to distribute the stuffing. Press the top lightly until the head looks rounded rather than pointed.
Pull each scallop downward and separate neighboring scallops with your fingertips.
Inspect the following areas:
- The magic-ring center is fully closed.
- The eyes are level.
- No stuffing is visible between stitches.
- The bottom closure is hidden.
- The hanging loop does not stretch excessively.
- The jump ring is completely closed.
- All yarn tails are buried.
Your crochet ghost keychain is now ready to attach to a zipper, backpack, pencil case, tote bag, or set of keys.
Pattern Notes and Stitch Notes
Turning and joining
There are no turning chains in the body. Rounds 1–10 are worked continuously without joining.
Round 11 forms the decorative edge and ends with a fasten-off. The closure yarn is then rejoined to the unused back loops.
Stitch counts
- Round 1: 6 stitches
- Round 2: 12 stitches
- Round 3: 18 stitches
- Round 4: 24 stitches
- Rounds 5–10: 24 stitches
- Decorative round: 8 scallops
- Round 12: 18 stitches
- Round 13: 12 stitches
- Round 14: 6 stitches
Repeat notes
Instructions inside square brackets are repeated the stated number of times.
For example:
[1 sc in the next stitch, inc in the next stitch] six times
means that the two-part sequence is completed six times around the round.
Front-loop and back-loop construction
The ruffle and bottom are both connected to Round 10, but they use different loops:
- The scalloped edge uses the front loops.
- The structural closure uses the unused back loops.
This creates a decorative skirt on the outside while allowing the stuffed body to close behind it.
Size adjustments
For a slightly taller ghost, add one or two straight single crochet rounds between Rounds 9 and 10.
For a wider ghost, add another increase round after Round 4:
[1 sc in each of the next 3 stitches, inc] six times. (30 sts)
The scallop repeat and decrease sequence must then be recalculated for 30 stitches.
The easiest beginner adjustment is changing yarn thickness rather than altering the stitch count.
Common Beginner Mistakes
1. Stuffing shows through the stitches
Cause: The hook is too large or the tension is too loose.
Fix: Use a hook 0.25–0.5 mm smaller and keep the working loop close to the hook shaft.
2. The body leans to one side
Cause: One or more stitches were accidentally added or skipped during the straight rounds.
Fix: Count all 24 stitches at the end of each round. A slight spiral shift is normal, but the circumference should remain unchanged.
3. The eyes look uneven
Cause: The placements were judged from only one angle.
Fix: Mark both eyes with pins and inspect the ghost from the front, top, and side before embroidering.
4. The unused back loops cannot be found
Cause: Round 11 was worked beneath both loops.
Fix: Undo the decorative round and work each scallop through the front loop only.
5. The ruffle curls upward
Cause: The body is overstuffed or the chain spaces in the scallops are too tight.
Fix: Remove a little stuffing and gently stretch each chain space with the tip of the hook.
6. The bottom closure forms a bump
Cause: The final gathering tail was pulled to one side.
Fix: Pass the needle through all six front loops and tighten the opening gradually from the center.
7. The hanging loop feels weak
Cause: The loop was attached through only one surface strand.
Fix: Attach it beneath two full stitches, bury both tails in opposite directions, and reinforce the base with the long magic-ring tail.
How to Customize This Crochet Ghost Keychain
Change the yarn color
The ghost does not need to be white. Try:
- Pale lavender with dark purple eyes
- Mint green with black eyes
- Soft peach with brown eyes
- Charcoal gray with silver embroidery
- Glow-in-the-dark yarn for Halloween
- Striped scrap yarn for a playful look
Keep the entire body in one color when making your first ghost. Color changes are easier after you understand the round structure.
Make a smaller ghost
Use sport-weight cotton and a 2.5–2.75 mm hook. Retain the same stitch counts but reduce the amount of stuffing.
Very thin yarn produces a smaller ghost, but it can also make the keychain loop more delicate. Reinforce the top with sewing thread when necessary.
Make a larger bag charm
Use medium-weight yarn and a 3.75–4 mm hook. Increase the hanging loop from seven chains to approximately nine chains.
Use a lobster clasp instead of a standard split ring for a removable bag charm.
Change the lower border
Replace the standard scallops with:
- Alternating short and tall scallops
- Simple chain-three loops
- Small picot points
- A contrasting-color ruffle
- A straight edge for a minimalist ghost
Add texture
Work one or two straight rounds in BLO to create a subtle horizontal ridge.
Avoid highly textured stitches near the face because they can make the embroidery difficult to position.
Gift and display ideas
Use the finished ghost as:
- A Halloween party favor
- A backpack charm
- A zipper pull
- A pencil-case decoration
- A teacher gift
- A market-stall impulse item
- A miniature ornament
- A crochet garland component
- A place-card decoration
- A gift-wrap accessory
Finishing Instructions
Fastening off
Pull the cut yarn completely through the final loop. Leave a long enough tail for the required finishing technique rather than trimming immediately.
Weaving in ends
Bury each yarn end through several internal stitches. Change direction once before trimming so the tail is less likely to pull free.
Blocking and shaping
Traditional blocking is not required. Finger-shape the rounded head and scallops after stuffing.
When using cotton, a light mist of water can help settle the ruffle. Allow the ghost to dry completely before attaching hardware.
Do not apply a hot iron directly to acrylic yarn.
Washing and care
Spot cleaning is the safest option for a finished keychain.
For a detachable keyring version:
- Remove the metal clasp when possible.
- Hand wash the ghost in cool water.
- Press out water gently without twisting.
- Reshape the scallops.
- Air dry completely on a towel.
Do not place the keychain in a dryer. Heat and tumbling can distort the stuffing, scratch the hardware, and weaken the hanging loop.
Safety note
This keychain is a decorative accessory, not an infant toy. Metal rings, safety eyes, and small finished crochet items can present hazards to young children. Use embroidered features and omit detachable hardware when creating an item intended for a child under three.
Quick Printable-Style Summary
Project: Mini crochet ghost keychain
Skill level: Beginner
Finished size: Approximately 2.75 inches tall
Yarn: DK or light worsted cotton
Hook: 3.25 mm
Main stitches: MR, ch, sl st, sc, hdc, inc, inv dec
Starting method: Six single crochet stitches in a magic ring
Head shaping: Increase from 6 to 24 stitches
Body: Six straight rounds of 24 single crochet stitches
Border: Eight front-loop scallops
Closure: Rejoin to the unused back loops and decrease from 24 to 6 stitches
Face: Embroidered black eyes and dusty rose cheeks
Hardware: Reinforced chain loop, small jump ring, and split keyring
Finishing: Stuff lightly, gather the final six stitches, bury all yarn ends, and test the hanging loop
Frequently Asked Questions
Can a complete beginner make this crochet ghost keychain?
Yes, provided the beginner already knows—or is willing to practice—the magic ring and single crochet. The decorative edge introduces half double crochet, while the closure introduces invisible decreases and loop-specific construction.
Can I start with a chain instead of a magic ring?
Yes. Chain 2 and work six single crochet stitches into the second chain from the hook. This method may leave a slightly larger opening at the top, so reinforce it carefully before adding the keychain loop.
Which yarn is best for a crochet keychain?
Smooth cotton or a cotton-acrylic blend works well because the stitches remain visible and the fabric resists excessive fuzzing. DK yarn keeps the ghost compact without making the stitches too small for a beginner.
Can I use safety eyes?
Safety eyes can be used for an adult accessory, but embroidered eyes are more secure for an item that may be compressed or pulled inside a bag. Never rely on safety eyes for an item intended for an infant or very young child.
Why is the ruffle worked in front loops only?
Using only the front loops leaves a second line of back loops behind the ruffle. Those back loops become the structural round that closes the stuffed body.
How can I stop stuffing from showing?
Use a smaller hook, maintain firm tension, and add stuffing in small pieces. Do not stretch the fabric by overfilling the ghost.
Can I sell finished ghost keychains made from this tutorial?
The pattern instructions in this article are original, but sellers remain responsible for their own product safety, labeling, hardware testing, photography, and local commercial requirements. Do not use or republish the selected source’s photographs.
Conclusion
This tiny ghost combines several useful amigurumi techniques in one manageable project: working in continuous rounds, increasing, using front and back loops separately, stuffing a small shape, embroidering a face, and creating a secure hanging point.
Make the first ghost in smooth ivory yarn so that every stitch is easy to see. Once the construction feels familiar, try lavender, mint, orange, glow-in-the-dark yarn, or a striped scrap-yarn version.
Save the tutorial with your Halloween crochet ideas or beginner keychain projects so you can return to the stitch counts when making a matching set.





