A reusable bottle is convenient until you have to carry it through a long walk, a busy market, a day at the park, or an afternoon of sightseeing. This easy crochet water bottle holder solves that problem with a snug cotton sleeve and a comfortable crossbody strap.
The construction is deliberately simple. You will begin with a flat circle, turn that circle into a cylinder, and then crochet a narrow strap directly from the upper edge. There are no separate panels to measure, no zipper to install, and no complicated shaping.
This is also a useful first project for learning how flat crochet circles behave. Regular increases make the base expand. Stopping those increases makes the fabric rise vertically. By the end, you will have practiced continuous rounds, stitch counting, back-loop crochet, working in rows, measuring for fit, and attaching two crochet layers.
The written pattern below is an original beginner variation created for this article. It uses standardized stitch counts and a defined turning round so that your bottle holder is easier to reproduce and resize.
What You’ll Learn
- How to crochet a flat single-crochet circle.
- How to prevent a circular base from cupping or ruffling.
- How to create a clean corner between the base and body.
- How to work continuous rounds with a stitch marker.
- How to size the holder around your own bottle.
- How to crochet an integrated crossbody strap.
- How to attach the strap without twisting it.
- How to finish and reinforce a practical crochet accessory.
Project Specifications
Skill level: Beginner
Construction: Bottom-up in continuous rounds
Finished base diameter: Approximately 2¾–3 inches
Finished body height: Approximately 7–8 inches
Suggested strap length: 36–44 inches before loading
Bottle capacity: Designed around a 500–750 ml reusable bottle
Yardage: Approximately 120–160 yards
Terminology: US crochet terms
The measurements are adjustable. Check the holder against the intended bottle rather than depending only on the listed dimensions.
Materials You’ll Need
Yarn
Use approximately 120–160 yards of smooth worsted-weight cotton yarn.
Cotton is a practical choice because it creates a firm fabric, shows the stitches clearly, and does not usually stretch as dramatically as some soft acrylic yarns. A cotton-acrylic blend can also work, but test the strap before making it very long.
The Craft Yarn Council classifies worsted, Afghan, and Aran yarns in the medium or category 4 group. Recommended hook ranges are guidelines rather than guarantees, so the fabric and bottle fit should determine your final hook choice.
Hook
Use a 4.5 mm crochet hook.
Metric sizing is the clearest specification because US letter designations can differ slightly among manufacturers. The Craft Yarn Council recommends referring to the millimeter measurement printed on the hook or packaging.
Additional Tools
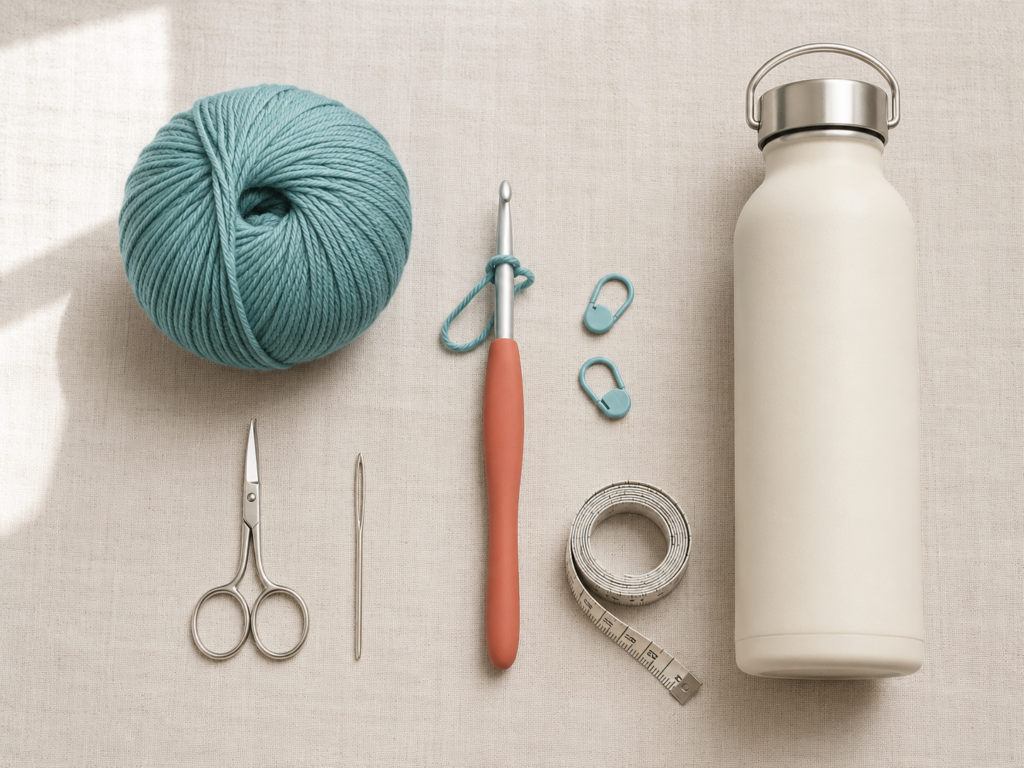
- One locking stitch marker.
- Scissors.
- Blunt tapestry needle.
- Flexible measuring tape.
- The bottle you want the finished holder to carry.
- Two additional stitch markers for marking the strap attachment position, if desired
Crochet Abbreviations Used
- BLO = back loop only
- ch = chain
- inc = work two single crochets in the same stitch
- MR = magic ring
- rep = repeat
- sc = single crochet
- sl st = slip stitch
- st/sts = stitch/stitches
These abbreviations follow standard US crochet usage. In UK terminology, the US single crochet is called a double crochet.
Before You Start
Gauge and Tension
A suggested working gauge is approximately:
16 sc and 18 rounds = 4 inches
Gauge is not as critical here as it would be for a fitted garment, but it still affects the holder’s diameter, height, firmness, and strap stretch.
Your stitches should be:
- Firm enough that a full bottle does not sag deeply.
- Loose enough that you can insert the hook without forcing it.
- Even enough that the base remains flat.
- Flexible enough that the bottle slides in without excessive stretching.
Make the first five or six base rounds, place the intended bottle over the circle, and adjust before beginning the body.
How to Count Continuous Rounds
This pattern is worked in a spiral. You will not join each body round with a slip stitch.
Place a locking marker in the first stitch of every round. When you return to the marker:
- Count the stitches.
- Remove the marker.
- Work the first stitch of the new round.
- Replace the marker in that new stitch.
Never count the loop on your hook as a completed stitch.
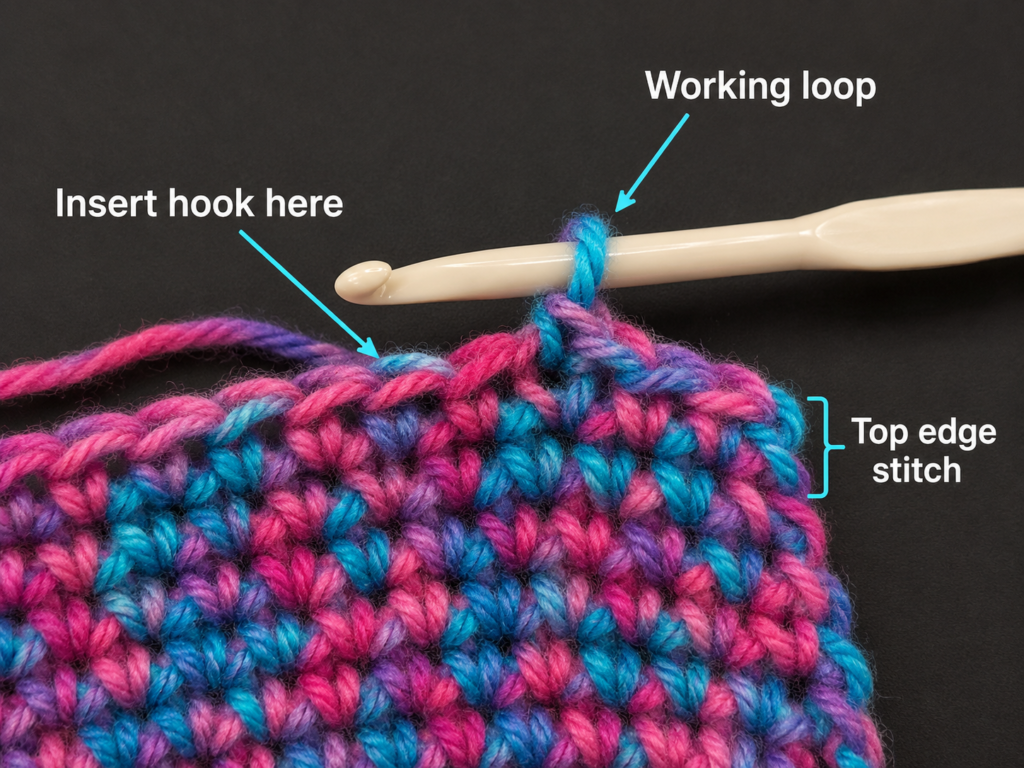
Understanding the Stitch Top
The top of a single crochet looks like a small letter V.
For ordinary single crochet, insert the hook beneath both loops of that V. When the pattern says BLO, insert the hook beneath only the loop farthest from you.
Right Side and Wrong Side
The outside surface of the spiral cylinder is treated as the right side. The interior is the wrong side.
The strap is worked back and forth, so its rows naturally alternate. It is almost reversible, although the turning edges may look slightly different.
Beginner Note
Crochet the holder for one specific bottle the first time. Once you understand where the base should stop increasing and how much the strap stretches, it becomes much easier to make additional sizes.
Step-by-Step Crochet Tutorial
Step 1: Make the Starting Ring
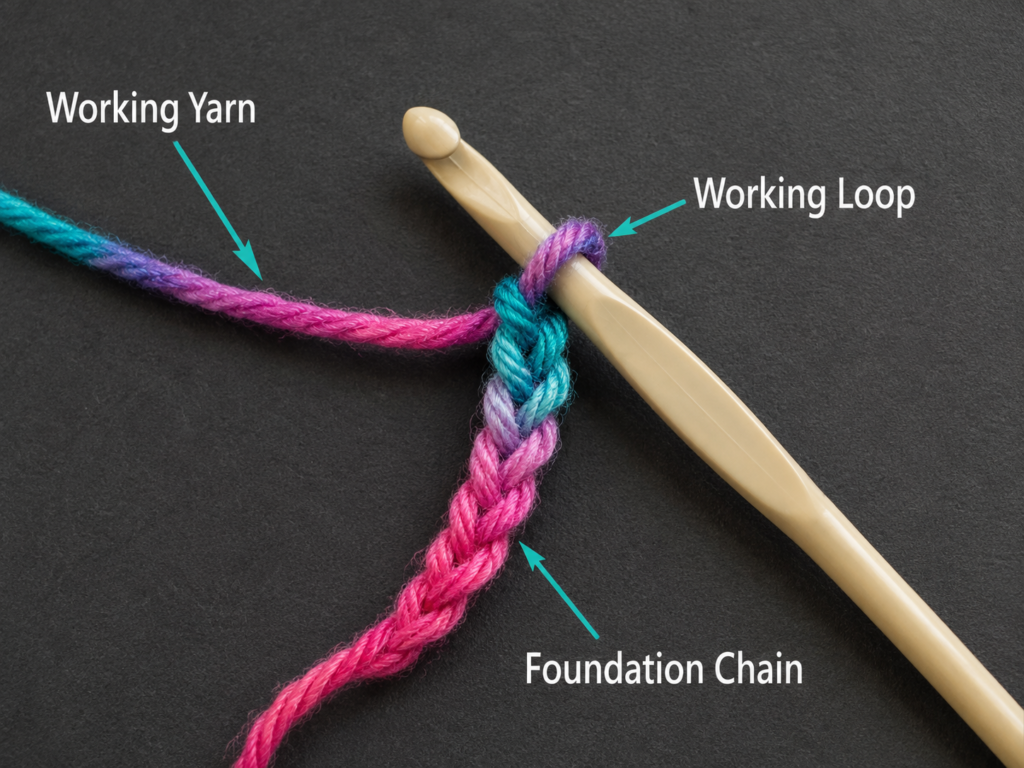
Create a slipknot and place it on your hook.
Make a magic ring. If a magic ring feels too difficult, chain 3 and slip stitch into the first chain to form a small ring. The center may be slightly more visible, but it will still function as the bottom of the holder.
Do not tighten the magic ring completely until the first round has been worked.
Beginner tip:
Keep the slipknot and working loop relaxed. The hook should move through the loop without scraping or pulling.
Common mistake to avoid:
Do not count the slipknot as a chain or stitch.
Step 2: Crochet the Center of the Base
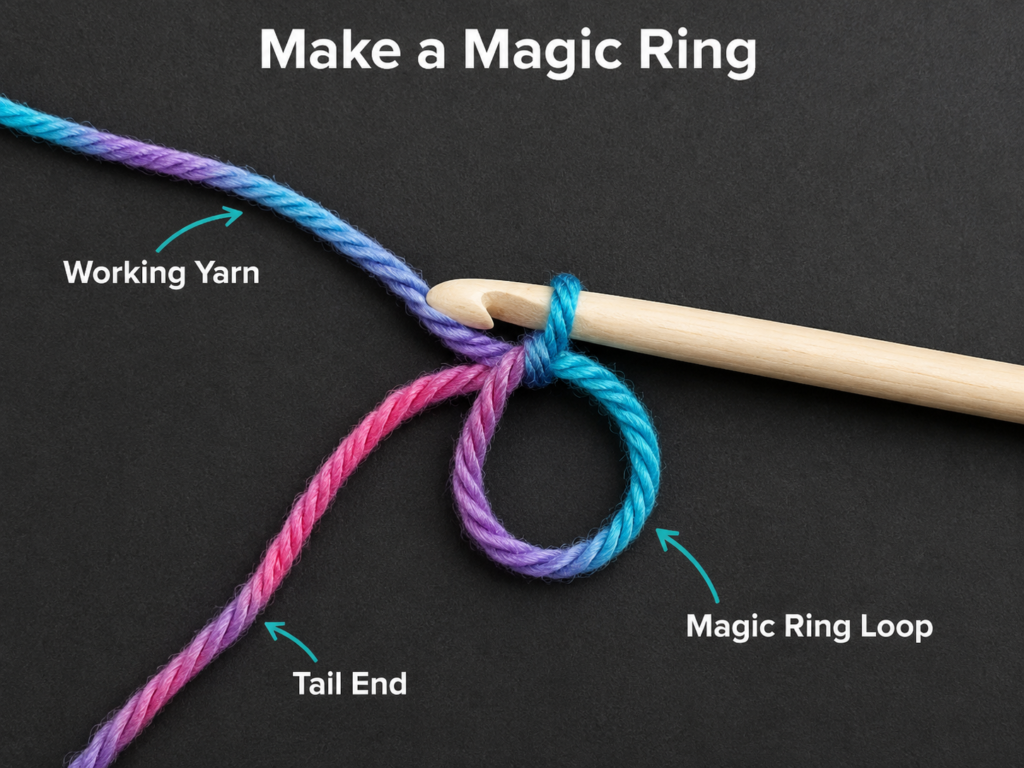
Work 6 sc into the magic ring.
Pull the beginning tail gently until the center closes. Place a marker in the first single crochet.
Round 1: 6 sts
The first round may look very small. That is correct. The following rounds will expand it evenly.
Beginner tip:
Before tightening the center, count the six stitch tops. Counting becomes harder after the ring is closed.
Common mistake to avoid:
Do not accidentally work into the beginning yarn tail. Work around the ring itself while carrying the tail beneath the stitches.
Step 3: Increase the Circular Base
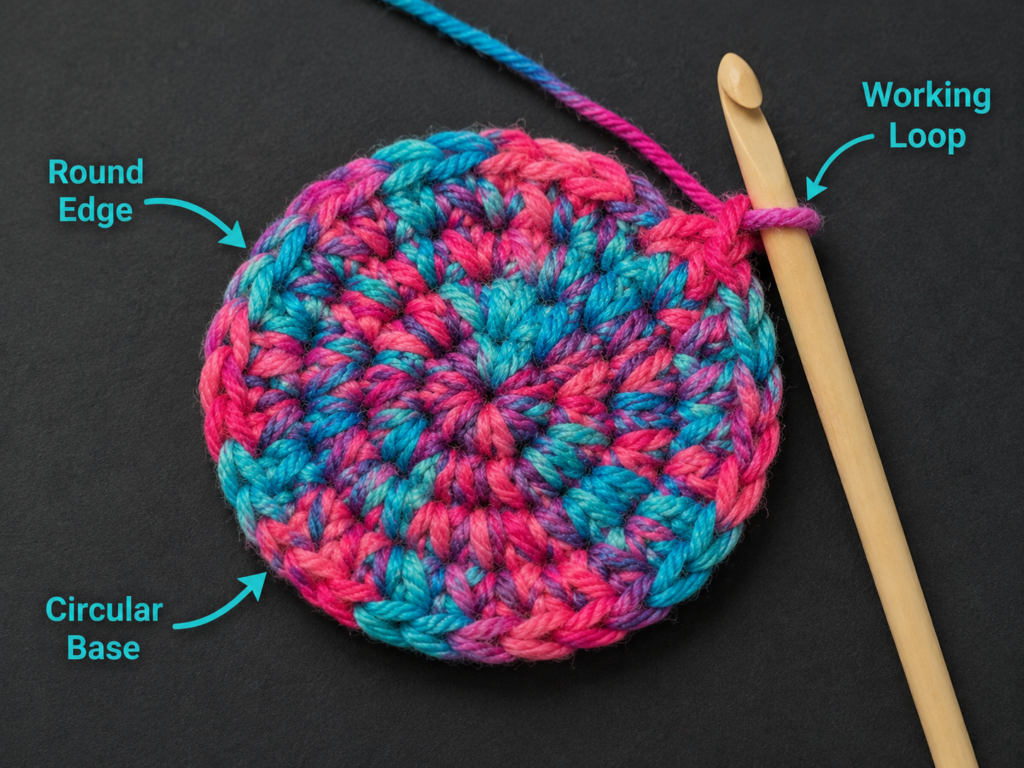
Continue working in a spiral.
Round 2: Inc in each stitch around. 12 sts
Round 3: Sc in the next stitch, inc in the next stitch. Rep around. 18 sts
Round 4: Sc in each of the next 2 stitches, inc in the next stitch. Rep around. 24 sts
Round 5: Sc in each of the next 3 stitches, inc in the next stitch. Rep around. 30 sts
Round 6: Sc in each of the next 4 stitches, inc in the next stitch. Rep around. 36 sts
After every round, place the circle on a flat surface. A well-balanced base should lie mostly flat without deep ripples or a raised bowl shape.
Beginner tip:
The number of ordinary single crochets between increases grows by one in each round:
- Round 3 has one sc between increases.
- Round 4 has two.
- Round 5 has three.
- Round 6 has four.
This sequence makes the increase pattern easier to remember.
Common mistake to avoid:
Do not put an increase into every stitch after Round 2. Too many increases will make the circle ruffle.
Step 4: Check the Base Against Your Bottle
Center the intended bottle over the crochet circle.
For a close-fitting holder, the crochet base should be approximately the same width as the bottle base or extend no more than about ⅛ inch beyond it.
Cotton fabric relaxes slightly with handling, so an oversized base can produce a loose body.
If the circle is too small, add another increase round:
Optional Round 7: Sc in each of the next 5 stitches, inc in the next stitch. Rep around. 42 sts
For an especially wide tumbler, continue the same progression. Add one more ordinary sc between increases in every new round.
If the base is only slightly too large, consider restarting with a smaller hook rather than removing a random number of stitches. Random decreases can distort the circle.
Beginner tip:
Make this fit check with the bottle full. A full bottle helps you understand how firmly the finished holder needs to support the weight.
Common mistake to avoid:
Do not stretch the crochet circle aggressively around the bottle during the test. Lay it flat and compare the diameters naturally.
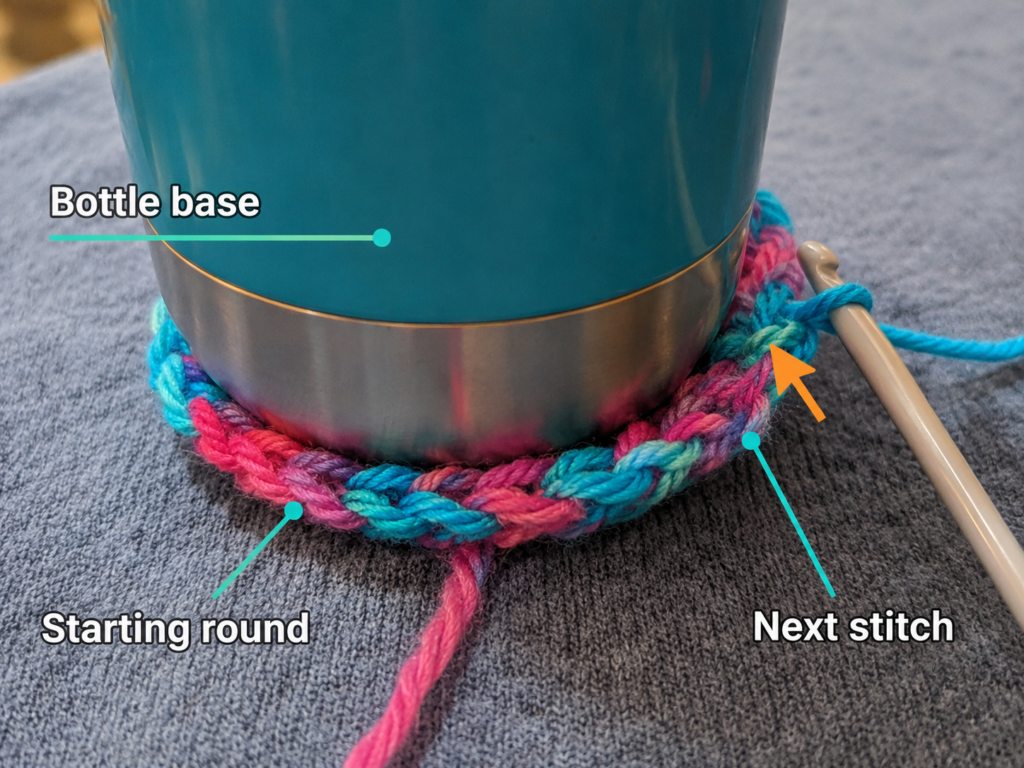
Step 5: Turn the Base into a Cylinder
Once the base fits, stop increasing.
Work the next round in the back loops only:
Turning Round: Sc BLO in each stitch around. 36 sts, or the stitch count selected for your bottle.
The unused front loops create a subtle ridge. This ridge gives the bottom edge a more defined shape and encourages the next rounds to rise vertically.
After the turning round, return to ordinary single crochet beneath both loops.
Body Round 1: Sc in each stitch around.
Continue working one sc in every stitch. Do not increase.
After two or three rounds, the work should resemble a shallow bowl.
Beginner tip:
Keep the stitch marker in place. The first stitch after the marker can hide beneath the last stitch of the previous round.
Common mistake to avoid:
If the sides continue spreading outward, check whether you are accidentally working two stitches into one stitch.
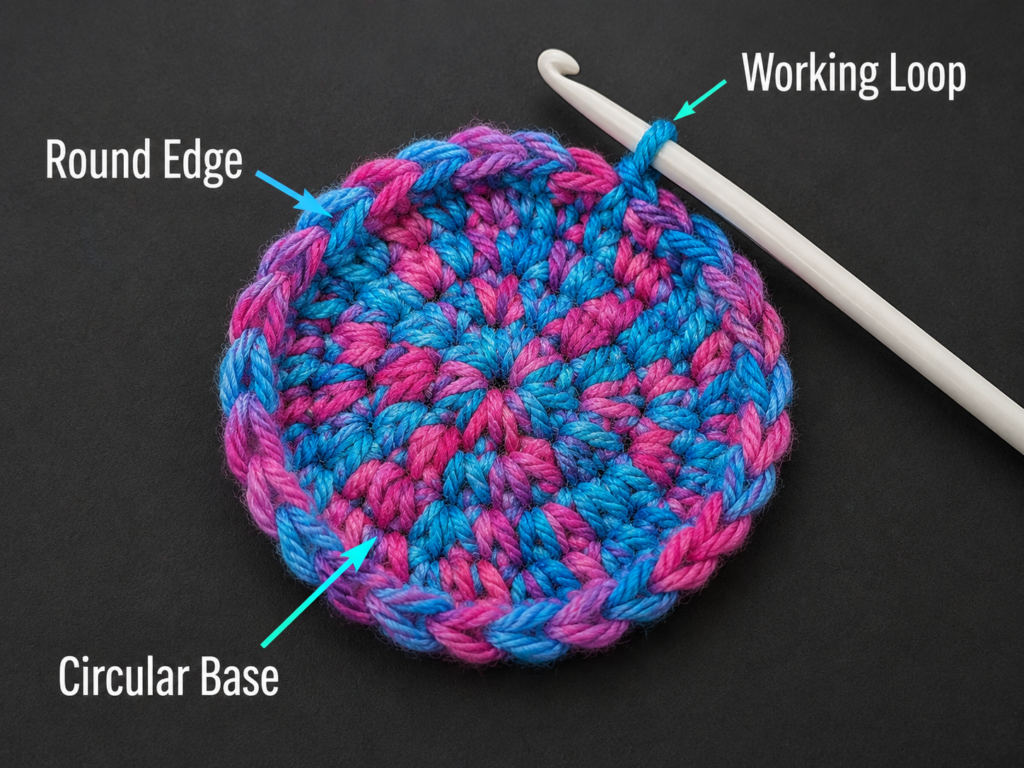
Step 6: Crochet the Body to the Correct Height
Continue working one sc in every stitch around.
For a typical 650 ml bottle, work approximately 28–34 body rounds after the BLO turning round. The exact number depends on your yarn, tension, and bottle shape.
Insert the bottle every five or six rounds to check the fit.
Stop when the upper edge reaches approximately 1½–2 inches below the top of the bottle. The holder should support most of the bottle without covering the cap.
A straight-sided bottle can be covered higher. For a bottle with a narrow neck and broad shoulder, stop near the point where the bottle begins to taper.
What the Fit Should Feel Like
The empty holder may look slightly narrow. That is acceptable.
The bottle should:
- Slide into the holder without forcing.
- Remain upright when lifted.
- Feel supported around the bottom.
- Avoid wobbling excessively inside the body.
- Remain easy to remove for washing.
Beginner tip:
Count the body stitches every four or five rounds. Finding one missing stitch early is much easier than correcting a narrowing cylinder later.
Common mistake to avoid:
Do not pull the yarn tightly after every stitch. Excessively tight tension makes the bottle difficult to insert and makes the strap uncomfortable to crochet.
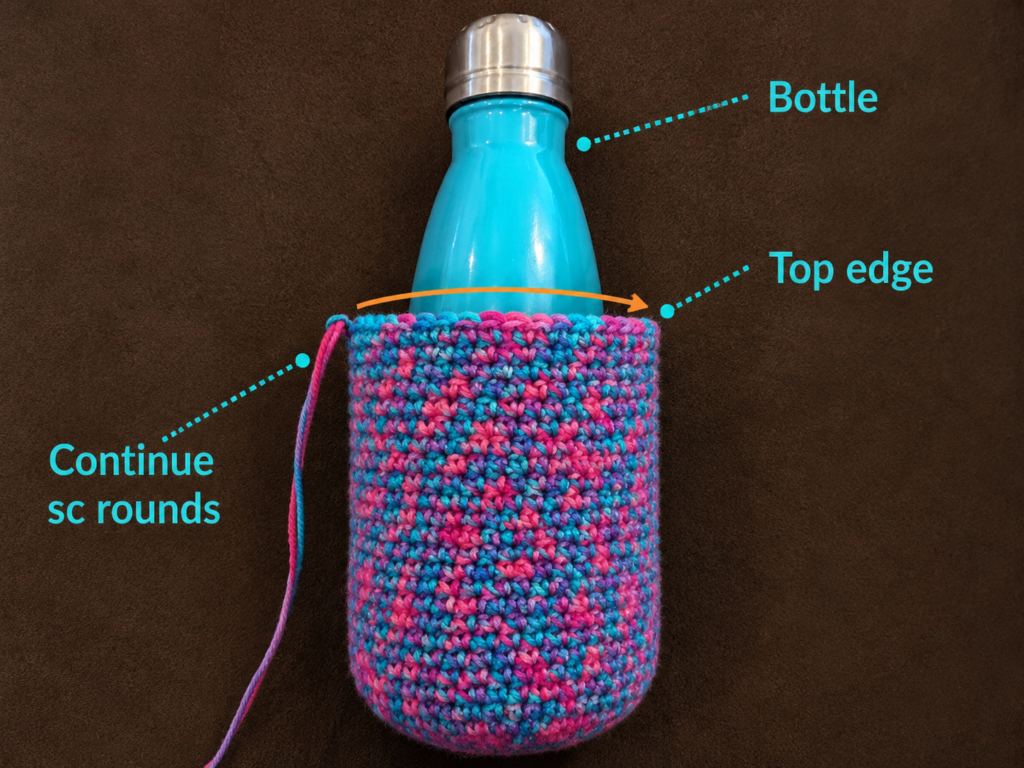
Step 7: Begin the Integrated Strap
Remove the bottle temporarily.
From your current position, sc in each of the next 7 stitches.
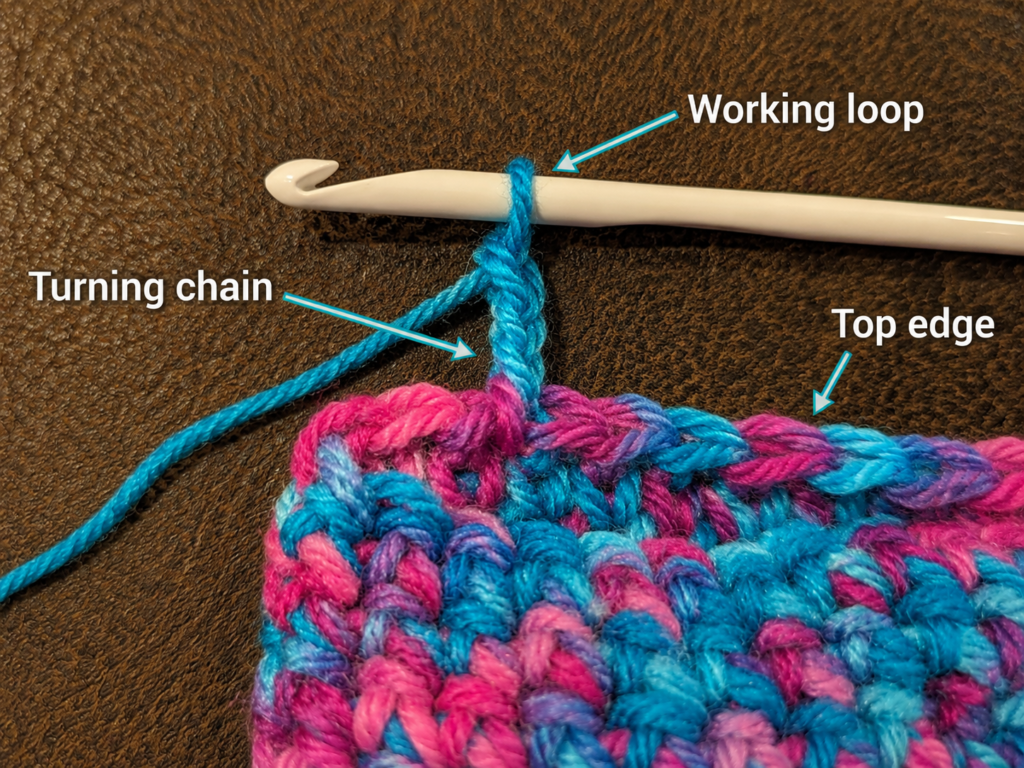
Strap Row 1: Sc in next 7 sts. Ch 1 and turn. 7 sts
Strap Row 2: Sc in each stitch across. Ch 1 and turn. 7 sts
The chain 1 is a turning chain only. It does not count as a stitch.
Continue working seven single crochets in every row.
A seven-stitch strap is wide enough to distribute the bottle’s weight more comfortably than a narrow cord. It also gives you enough fabric to create a secure attachment at the opposite side.
Beginner tip:
Count the seven stitches at the end of every row. Strap edges show missing stitches quickly.
Common mistake to avoid:
Do not insert the hook into the turning chain unless you deliberately want an extra stitch. The first stitch goes into the first visible single crochet.
Step 8: Continue the Strap and Test Its Length
Repeat Strap Row 2 until the strap reaches the desired length.
For an adult crossbody holder, begin checking the fit when the unstretched strap measures approximately 36 inches.
Many people will prefer a finished unstretched length between 38 and 44 inches, but the correct measurement depends on height, clothing, preferred carrying position, and yarn stretch.
Place the bottle inside the holder before making the final decision. Hold the unattached strap end against the opposite side and try the carrier on carefully.
Cotton straps often lengthen under the weight of a full bottle. Make the strap slightly shorter than the final length you think you need.
For a shoulder-length carrier, a shorter strap may be sufficient. For a child, measure directly and keep the strap well above the knees.
Safety note:
A long strap can catch on playground equipment, bicycle components, doors, or branches. Children should use the carrier under appropriate supervision, and the strap length should suit the intended activity.
Beginner tip:
Write down the finished row count. That will make it easier to reproduce a matching holder later.
Common mistake to avoid:
Do not measure the strap while pulling it firmly. Let it rest naturally on the table.
Step 9: Position and Attach the Strap
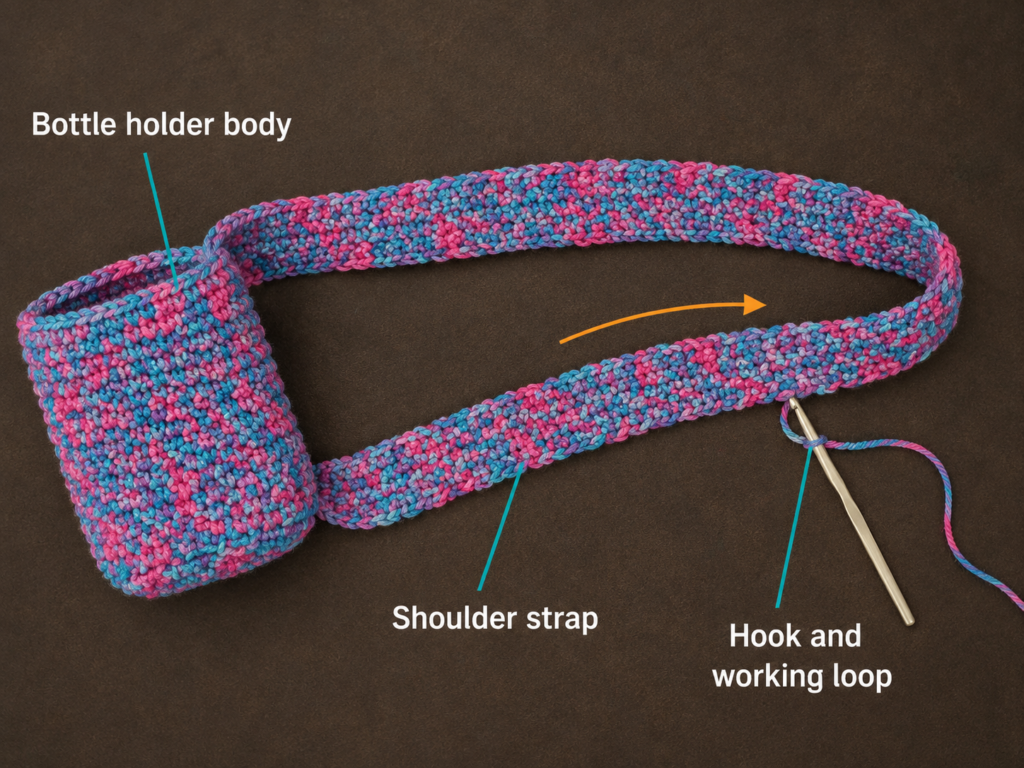
Place the holder flat with the first strap connection centered at one side.
For a 36-stitch body, count approximately 18 stitches around the rim to locate the opposite side. Mark the center of the attachment area.
Lay the free strap end against the inside of the holder rim. Confirm that the strap is not twisted.
Align the seven strap stitches with seven consecutive rim stitches.
Insert the hook through:
- The next stitch of the strap.
- The corresponding stitch on the holder rim.
Work a single crochet through both layers.
Continue across all seven stitches. This creates a visible but strong crocheted join.
For extra security, leave a long tail after fastening off and sew through the attachment area once more with the tapestry needle.
Beginner tip:
Insert the bottle and hold the strap in position with stitch markers before making the permanent join.
Common mistake to avoid:
Check the entire strap for a twist, not only the last few inches near the attachment point.
Pattern Notes or Stitch Notes
Turning Chain
The chain 1 used at the end of every strap row does not count as a stitch.
Begin the next row in the first visible single crochet.
Continuous Rounds
The base and body are worked continuously without joining. The stitch marker identifies the first stitch.
A slight diagonal movement at the round beginning is normal in spiral crochet.
Stitch Counts
The standard version uses:
- 6 stitches after Round 1.
- 12 stitches after Round 2.
- 18 stitches after Round 3.
- 24 stitches after Round 4.
- 30 stitches after Round 5.
- 36 stitches after Round 6.
- 36 stitches in every standard body round.
- 7 stitches in every strap row.
The wider optional version uses 42 stitches after Round 7 and keeps 42 stitches throughout the body.
Right Side and Wrong Side
The body’s outward-facing surface is the right side.
Attach the free strap end to the inside of the upper rim so the join is less prominent from the outside.
Size Adjustment Formula
To enlarge the base, continue the established increase pattern:
- Add one additional ordinary sc between every increase.
- Keep six evenly spaced increases in each new round.
- Stop when the base matches the bottle.
Once the base is the correct width, stop increasing and maintain that final stitch count throughout the body.
Strap Width Adjustment
For a narrower strap, use five stitches.
For a wider and more comfortable strap, use nine stitches.
An odd number makes it easy to identify the center stitch when positioning the attachment.
Common Beginner Mistakes
1. The Base Forms a Bowl Before the Turning Round
Cause: Too few increases, overly tight tension, or a hook that is too small.
Fix: Confirm the round count. If the stitch count is correct, loosen your tension or move up by 0.5 mm in hook size.
2. The Base Develops Waves or Ruffles
Cause: Too many increases.
Fix: Check that you are making only six increases per round. Do not increase in every stitch after Round 2.
3. The Body Narrows Gradually
Cause: A stitch is being skipped near the round marker.
Fix: Count the body stitches regularly. Move the marker into the first stitch immediately after making it.
4. The Holder Is Too Loose
Cause: The base was made wider than the bottle, the yarn is highly elastic, or the hook is too large.
Fix: Use a smaller base, a smaller hook, or a firmer cotton yarn.
5. The Bottle Is Difficult to Insert
Cause: The body tension is too tight or the base is too small.
Fix: Test the bottle after the first four or five body rounds. Restart before completing the full height if necessary.
6. The Strap Becomes Narrower
Cause: The first or last stitch is being missed.
Fix: Count seven stitches in every row. Place a temporary marker in the first stitch when learning to recognize the edges.
7. The Finished Strap Is Too Long
Cause: The strap was measured without the bottle’s weight.
Fix: Test the holder with a full bottle before joining. Cotton and acrylic can both relax under load.
8. The Strap Is Twisted
Cause: The free end rotated before attachment.
Fix: Lay the entire holder and strap flat. Follow one strap edge visually from the first attachment to the free end.
9. The Strap Join Pulls Apart
Cause: The attachment passed through only one loop or too few body stitches.
Fix: Crochet through both complete stitch tops and reinforce the join with the fastening tail.
10. The Base Has a Small Center Hole
Cause: The magic ring was not fully tightened.
Fix: Pull the starting tail firmly, then weave it through several stitches in different directions.
How to Customize This Crochet Project
Change the Yarn
Smooth cotton is the most predictable option, but you can also use:
- Cotton-acrylic blend for a slightly softer holder.
- Recycled cotton for a rustic appearance.
- Firm mercerized cotton for greater stitch definition.
- Light worsted yarn with a smaller hook for a less bulky result.
Avoid fragile novelty yarns and fibers that become very heavy when wet.
Add Stripes
Change color at the round marker.
For a clean transition:
- Begin the final single crochet of the old color.
- Stop before the last yarn-over.
- Complete the stitch with the new color.
- Continue with the new color.
Carry the unused color inside only for short stripe intervals. Otherwise, cut and weave it in.
Add a Contrasting Base
Crochet the six increase rounds in one color. Change to the main color during the BLO turning round.
This visually emphasizes the round bottom without changing the construction.
Adjust the Height
For a short plastic bottle, stop earlier.
For a tall insulated bottle, continue the body until it reaches just below the bottle shoulder. Do not cover a threaded cap or drinking mechanism that needs to remain accessible.
Add a Decorative Top Edge
Before beginning the strap, work one round of slip stitches around the upper edge.
Keep the slip stitches loose. Tight slip stitches can make the opening smaller.
A crab-stitch or reverse-single-crochet edge can also be used, but it adds an extra technique and may make the strap transition more complicated.
Add Texture
After mastering the plain version, replace selected body rounds with:
- BLO single crochet.
- Alternating ordinary and BLO rounds.
- Waistcoat stitch.
- Moss stitch, provided the stitch count is adjusted correctly.
Dense texture is usually safer than very open mesh when the holder will carry a narrow bottle.
Make a Removable Strap
Instead of crocheting the strap directly from the body, make a separate strip and attach swivel hooks or sturdy rings.
Hardware must be rated appropriately and attached through reinforced crochet sections.
Gift Ideas and Uses
A handmade water bottle holder can be useful for:
- Walking and hiking.
- Theme-park visits.
- Farmers’ markets.
- School field trips.
- Travel days.
- Outdoor festivals.
- Gardening.
- Dog walking.
- Teacher appreciation gifts.
- Summer craft-fair products.
Include the bottle dimensions and yarn-care information when giving or selling the holder.
Finishing Instructions
Fasten Off
After completing the last attachment stitch, cut the yarn while leaving a tail approximately 8–10 inches long.
Pull the tail completely through the active loop.
Reinforce the Strap Join
Thread the tail into a tapestry needle.
Pass the needle through the dense strap attachment several times. Change direction at least once so the tail cannot slide back through the same path.
Do not pull so tightly that the rim puckers.
Weave In the Base Tail
Turn the holder inside out.
Thread the magic-ring tail into the needle and pass it beneath several stitches near the center. Change direction and pass through another group of stitches.
Trim only after the center remains closed when gently stretched.
Check the Holder
Insert a full bottle and lift the holder over a soft surface.
Inspect:
- The center of the base.
- The first strap connection.
- The second strap connection.
- The strap edges.
- The upper rim.
Repair any loose area before regular use.
Blocking
Heavy blocking is usually unnecessary.
If the base is slightly uneven:
- Follow the yarn label’s care instructions.
- Lightly dampen the holder.
- Insert the bottle after protecting it with a clean plastic covering.
- Shape the base and body gently.
- Remove the bottle when the holder is nearly dry.
- Allow the holder to finish drying flat.
Do not use high heat unless the yarn manufacturer specifically permits it.
Washing and Care
Keep the original yarn label. It contains the fiber-specific washing and drying instructions.
The Craft Yarn Council recommends keeping yarn-label care information with handmade gifts so the recipient knows how to wash the item correctly.
Remove the bottle before washing. Reshape the holder while damp and dry it thoroughly before storing.
Quick Printable-Style Summary
Pattern name: Easy Crochet Water Bottle Holder
Skill level: Beginner
Yarn: Worsted-weight cotton, approximately 120–160 yards
Hook: 4.5 mm
Additional tools: Stitch marker, scissors, tapestry needle, measuring tape
Gauge: Approximately 16 sc and 18 rounds per 4 inches
Stitches: Chain, single crochet, slip stitch, increase, BLO single crochet
Construction: Base in continuous rounds, straight body, integrated strap
Base
- Round 1: 6 sc in MR. 6
- Round 2: Inc around. 12
- Round 3: (Sc 1, inc). Rep around. 18
- Round 4: (Sc 2, inc). Rep around. 24
- Round 5: (Sc 3, inc). Rep around. 30
- Round 6: (Sc 4, inc). Rep around. 36
- Optional Round 7: (Sc 5, inc). Rep around. 42
Body
- Turning Round: Sc BLO around.
- Continue sc in each stitch without increasing.
- Stop approximately 1½–2 inches below the bottle top.
Strap
- Sc across 7 rim stitches.
- Ch 1 and turn.
- Continue in seven-stitch sc rows until the strap reaches the required length.
- Attach across seven stitches on the opposite rim without twisting.
Finishing
- Fasten off with a long tail.
- Reinforce the strap join.
- Weave in all ends in more than one direction.
- Test with a full bottle.
- Wash according to the yarn label.
FAQ
What is the best yarn for a crochet water bottle holder?
Smooth cotton or a firm cotton blend is usually the most practical choice. It creates visible stitches, handles repeated use well, and generally produces a sturdier strap than a very soft or elastic yarn.
How much yarn is needed?
Plan for approximately 120–160 yards of worsted-weight yarn. A taller bottle, wider base, longer strap, or wider strap will require more.
Can I make this holder with acrylic yarn?
Yes, but acrylic may stretch differently under a full bottle. Make the strap slightly shorter, test it with the bottle’s weight, and follow the yarn label’s washing instructions.
How do I resize the base?
Continue the established increase formula. Add one more single crochet between the six increases in every additional round. Stop increasing when the circle matches the bottle base.
Why is my crochet circle curling?
A circle that cups upward may have too few increases or excessively tight tension. A circle that ripples may have too many increases. Confirm the stitch count before changing hook size.
How long should the strap be?
For an adult crossbody holder, 38–44 inches unstretched is a useful starting range, but direct measurement is more reliable. Test the strap with a full bottle because it may lengthen under load.
Can I use a mesh stitch for the body?
Yes. A mesh body uses less yarn and works faster, but it requires a compatible stitch count and careful bottle testing. Very open mesh may allow narrow bottles to tilt or small items to protrude.
Should the holder cover the entire bottle?
No. Stop below the cap or drinking mechanism. For a tapered bottle, stopping below the shoulder also makes insertion and removal easier.
How can I stop the strap from stretching?
Use firm cotton yarn, maintain consistent tension, make the strap wider, and stop slightly short of the final desired length. A fabric lining or woven tape can be sewn to the back of the strap for additional stability.
Conclusion
This crochet water bottle holder turns a small amount of cotton yarn into something you can use on walks, trips, errands, and outdoor days. The pattern is simple enough for a beginner, but it teaches several important construction principles: controlled circular increases, continuous rounds, fit testing, straight body shaping, row edges, and secure strap attachment.
Make the first holder for a bottle you already own and record your final base stitch count, body rounds, and strap rows. Those three measurements become a reusable sizing guide for future versions.
Save the tutorial with your project notes so you can return to the same measurements when making striped holders, gifts, matching family sets, or a shorter shoulder-strap variation.





