A crochet tablet sleeve is one of the most useful beginner projects you can make because it teaches real construction without becoming overwhelming. You are not just crocheting a practice rectangle. You are learning how to measure an object, build fabric to fit it, crochet around a foundation chain, create a pocket shape, and finish the top with a simple button loop.
This easy crochet tablet sleeve pattern is designed for a standard 10-inch tablet, but the method is adjustable. You can make it shorter for an e-reader, wider for an iPad, slimmer for a notebook tablet, or taller for a device with a thick protective case.
The sleeve is worked from the bottom up. You begin with a foundation chain that matches the width of your tablet. Then you single crochet into one side of the chain, rotate the work, crochet along the opposite side, and continue upward in rounds. This creates a seamless bottom edge with no separate side panels to sew together.
The selected visual reference source uses the same general construction idea: it begins with a chain sized to the tablet, works single crochet into the back bumps, continues around the chain instead of turning, builds the sleeve in the round, adds a button loop, and finishes with a sewn button.
This new tutorial uses original measurements, stitch counts, yarn choices, and finishing notes so you can make a practical, beginner-friendly tablet sleeve with a fresh look.
What You’ll Learn
You will learn how to:
- Measure a tablet before starting.
- Choose yarn that creates a protective fabric.
- Make a foundation chain to fit your device.
- Crochet into the back bumps of a chain.
- Work around both sides of a foundation chain.
- Build a sleeve body in continuous rounds.
- Use back-loop-only single crochet for ridged texture.
- Switch to both-loops single crochet for a smoother upper section.
- Add a chain button loop.
- Strengthen the loop with single crochet.
- Sew on a button securely.
- Customize the sleeve for different tablets and e-readers.
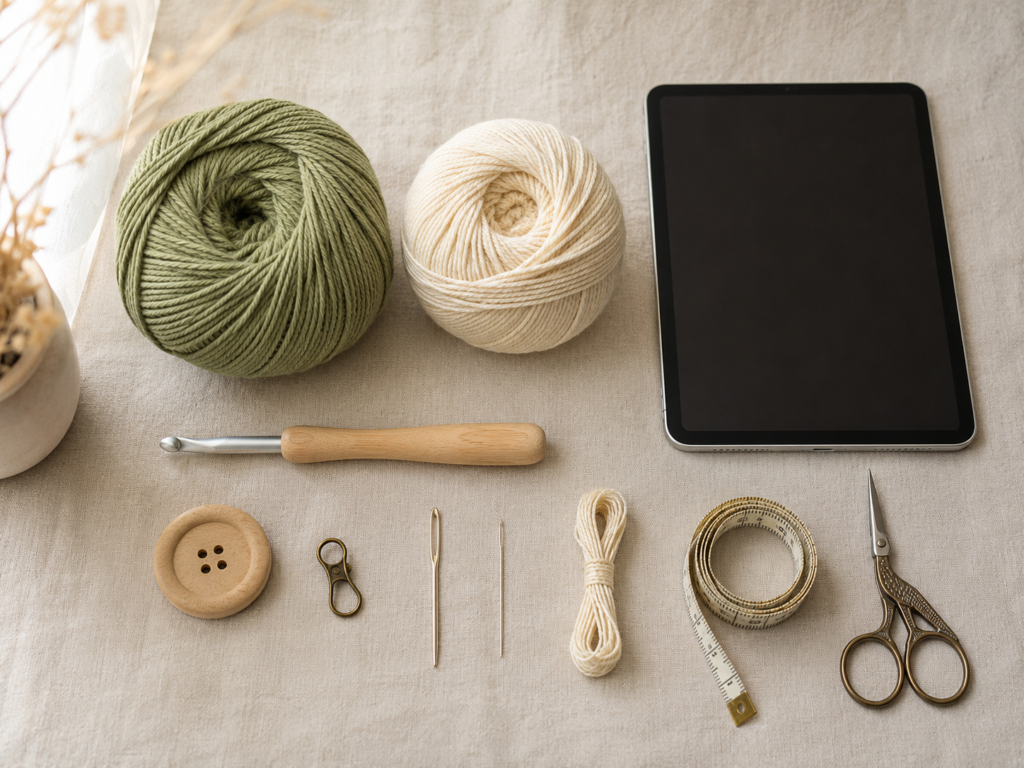
Materials You’ll Need
For one tablet sleeve:
- 150–200 yards of worsted-weight cotton or cotton-blend yarn
- 4.5 mm / US 7 crochet hook
- One 1-inch wooden or plastic button
- Locking stitch marker
- Tapestry needle
- Sewing needle
- Matching sewing thread
- Scissors
- Measuring tape
- Your tablet for sizing
Use smooth yarn for your first sleeve. Fuzzy yarn hides stitch placement and makes the foundation chain harder to read.
The source tutorial uses self-striping yarn, a hook smaller than the yarn label recommendation, a darning needle, scissors, button, sewing thread, and sewing needle. It also explains that a smaller hook can create a denser fabric for tablet protection.
For this original version, the sample look is sage green with one optional warm cream accent stripe. The color palette is simple enough for beginners but still polished for everyday use.
Finished Size
The sample sleeve fits a tablet approximately:
- Tablet width: 6.75–7 inches
- Tablet height: 9.5–10 inches
- Finished sleeve width: approximately 7.25 inches flat
- Finished sleeve height: approximately 10.25 inches before closure stretch
Your exact size depends on your tablet, case thickness, yarn, hook, and tension.
Always measure your actual device before starting. A tablet with a protective case may need a longer starting chain and slightly more height.
Crochet Abbreviations Used
This tutorial uses U.S. crochet terminology:
- ch = chain
- sc = single crochet
- sl st = slip stitch
- st/sts = stitch/stitches
- rep = repeat
- BLO = back loop only
The Craft Yarn Council lists common crochet abbreviations including ch for chain, sl st for slip stitch, sc for single crochet, hdc for half double crochet, and dc for double crochet.
Before You Start
Choose a dense fabric
A tablet sleeve should feel protective, not loose and floppy. Use a hook that creates firm stitches. If your yarn label suggests a 5 mm hook, try 4.5 mm. If your fabric feels too stiff and uncomfortable to crochet, go back up slightly.
Measure before chaining
Measure the short width of your tablet. Then make a chain that matches that width without stretching.
The sleeve should be snug enough to hold the device but not so tight that you have to force the tablet inside.
Keep the first round calm
The first round is the hardest part because you are working into a chain, rotating the foundation, and using the unused side of the chain. Once that foundation round is finished, the rest becomes repetitive.
Use a stitch marker
Place a marker in the first stitch of every round. This prevents accidental increases or decreases.
Step-by-Step Crochet Tutorial
Step 1: Make the Foundation Chain
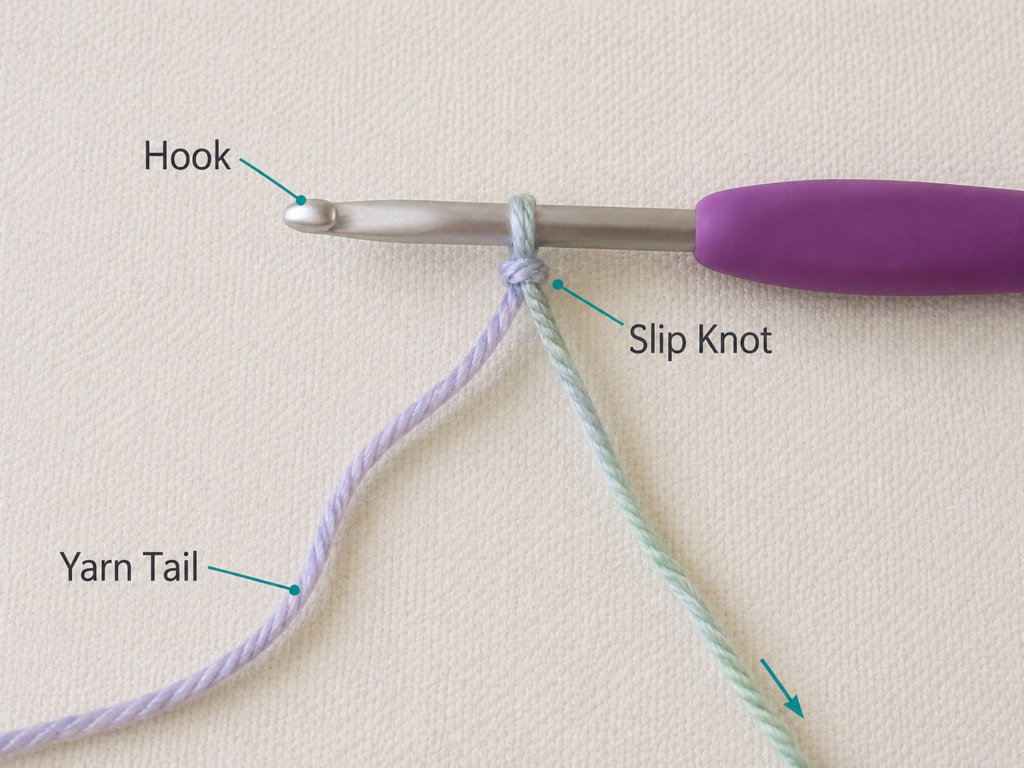
Make a slip knot on your hook.
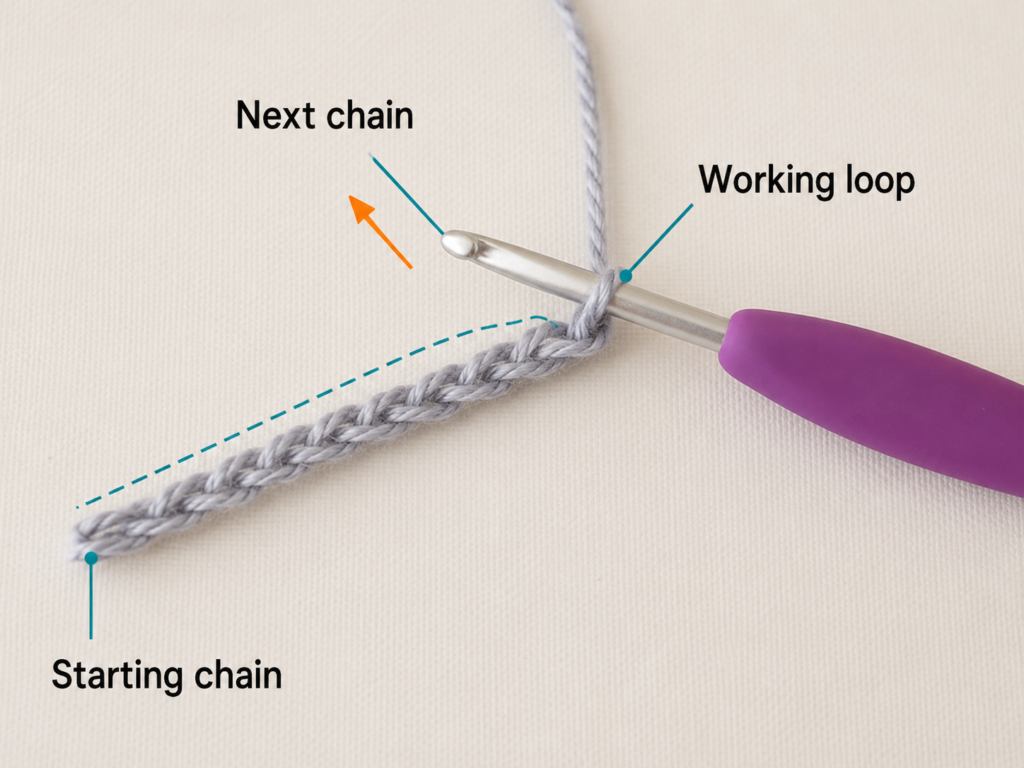
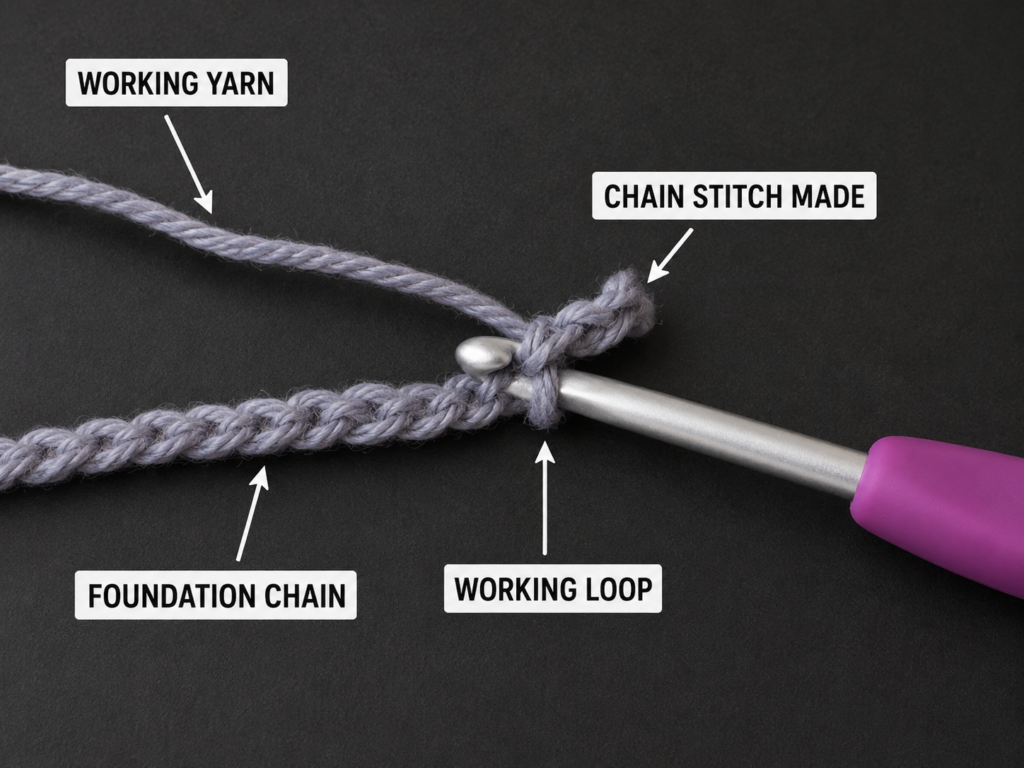
For the sample size, ch 37.
This gives you 36 working chains after you skip the first chain from the hook.
Before moving on, lay the relaxed chain across the short width of your tablet. It should be close to the tablet width, not stretched tight.
For a different tablet, adjust the starting chain:
- Smaller e-reader: try 27–31 chains.
- Standard tablet: try 35–39 chains.
- Larger tablet with case: try 40–46 chains.
Your exact number depends on yarn and tension.
Beginner tip:
Make the foundation chain slightly loose. Tight chains make the back bumps difficult to crochet into.
Common mistake to avoid:
Do not measure the chain while pulling it tight. A stretched chain will create a sleeve that is too narrow.
Step 2: Single Crochet Into the Back Bumps
Turn the chain slightly so you can see the small bumps running along the underside.
Work 1 sc in the second chain from the hook.
Then work 1 sc into each back bump across.
For the sample:
36 sc across the first side.
This creates a neat lower edge. The front loops of the chain remain available for the opposite side.
The selected source also demonstrates crocheting the first row into the back bumps of the chain.
Beginner tip:
If you cannot see the back bumps clearly, rotate the chain under good light. The top side looks like little V shapes; the back side has raised bumps.
Common mistake to avoid:
Do not accidentally skip a chain near the beginning. The first few chains are usually the hardest to see.
Step 3: Crochet Around the Opposite Side of the Chain
Do not turn your work like a normal flat row.
Instead, rotate around the end of the foundation chain.
Work 1 sc into each unused loop along the opposite side.
For the sample:
36 sc along the second side.
You now have:
72 sc total around the foundation.
Do not join. Place a stitch marker in the first stitch of the next round.
This construction creates a seamless bottom fold. Your work should look like a very narrow pocket beginning to form.
The selected source also shows continuing around the starting chain rather than turning the project.
Beginner tip:
Count both sides separately first: 36 on one side and 36 on the other side.
Common mistake to avoid:
Do not add extra stitches at the ends unless you intentionally want a rounded oval base. This version keeps the bottom flatter and more sleeve-like.
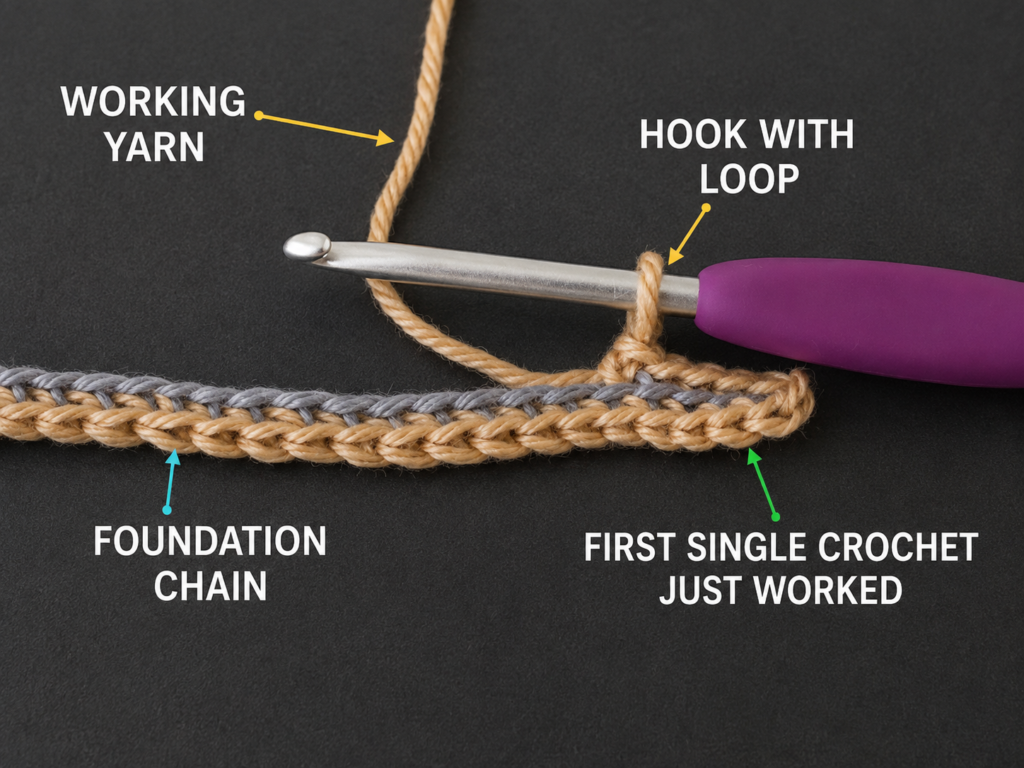
Step 4: Work the Ridged Lower Section
Rounds 2–10:
Work 1 sc BLO in each stitch around.
Keep moving the stitch marker up at the beginning of each round.
Working in the back loop only creates a subtle ridged texture. It gives the lower part of the sleeve a little visual interest and helps beginners see their rounds more clearly.
At the end of Round 10, your sleeve should be starting to rise into a pocket.
Beginner tip:
Flatten the sleeve after every few rounds. The two side edges should line up.
Common mistake to avoid:
If the sleeve starts twisting, stop and flatten it before continuing. Make sure you are working around the tube in the same direction each round.
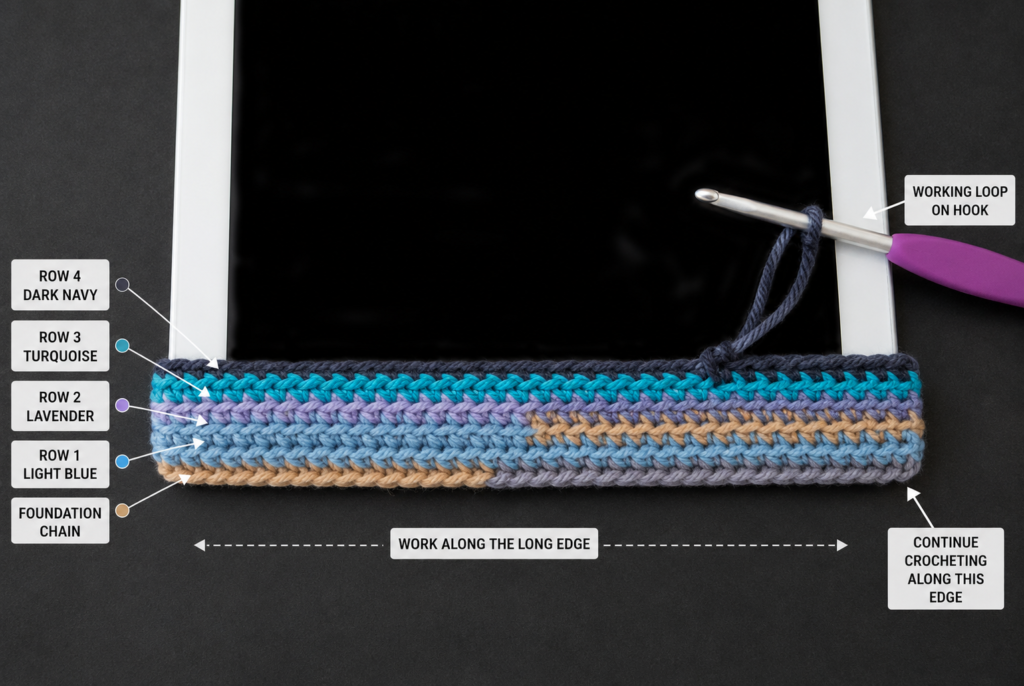
Step 5: Continue the Main Sleeve Body
From Round 11 onward, switch to working through both loops.
Work:
1 sc in each stitch around.
Continue until the sleeve is approximately 0.5 inch shorter than your tablet height.
For a standard 10-inch tablet, this may be around 34–42 total rounds, depending on your gauge.
Try the sleeve on the tablet every few inches.
It should fit snugly but not strain. The stitches should not stretch open dramatically.
If you want one cream accent stripe, change color for two rounds about two-thirds of the way up the sleeve, then switch back to sage green.
Beginner tip:
Do not wait until the very end to check fit. Test the sleeve while it is still easy to adjust.
Common mistake to avoid:
If the sleeve is too tight at the halfway point, do not keep going and hope it relaxes. Pull back and restart with a slightly longer foundation chain or a larger hook.
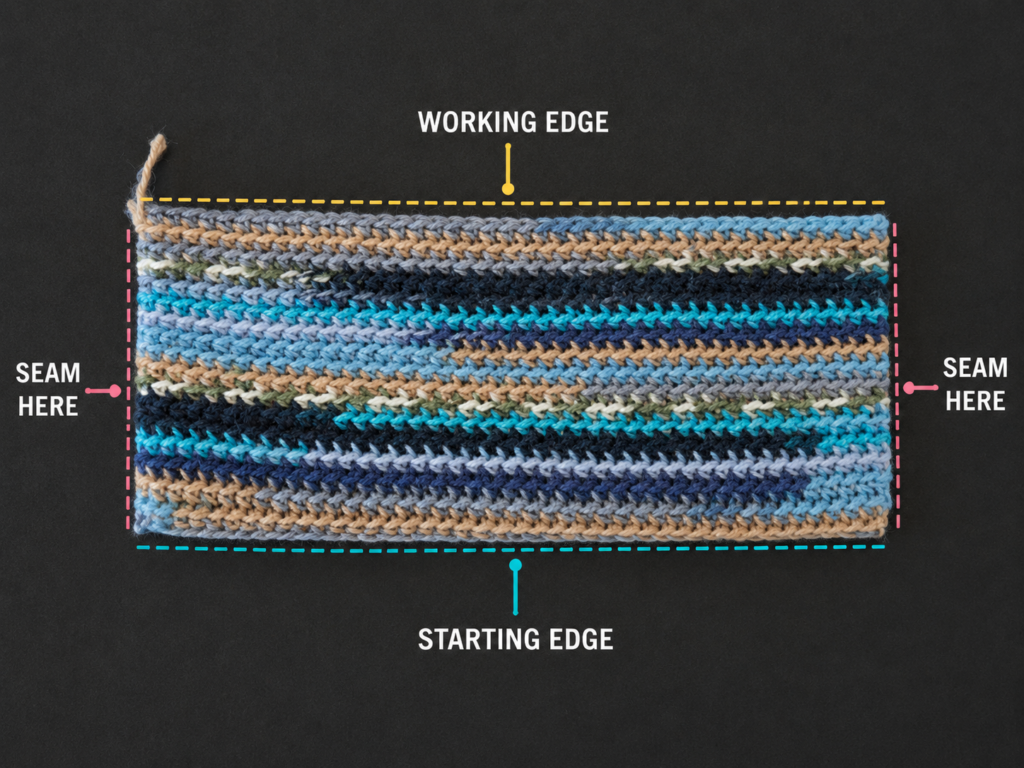
Step 6: Make the Button Loop
Flatten the sleeve with the opening at the top.
Find the center of the back side. Mark that stitch.
Continue crocheting until you reach the marked back-center position.
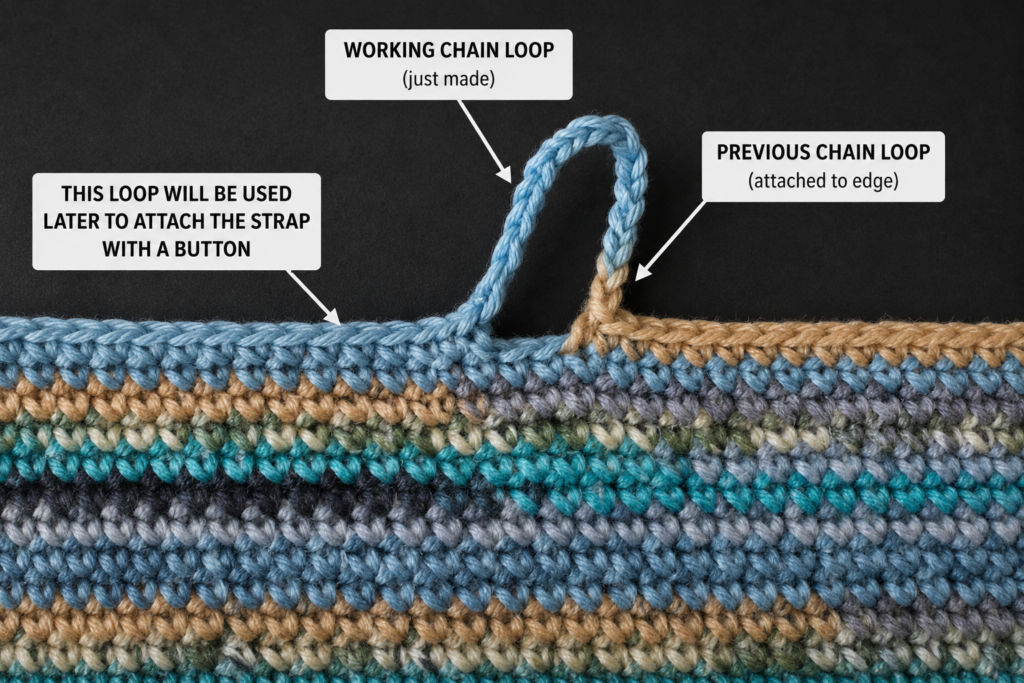
Make:
Ch 18.
Skip the next stitch.
Work 1 sc in the following stitch and continue around.
This creates a loop that will stretch over the button.
For a larger button, chain 20–22.
For a smaller button, chain 14–16.
The selected source also creates a button loop near the top of the sleeve by chaining and then continuing the round.
Beginner tip:
Before continuing, pull the chain loop gently over the button you plan to use. It should fit over the button without being loose.
Common mistake to avoid:
Do not make the loop too long. A loose loop will not hold the tablet securely.
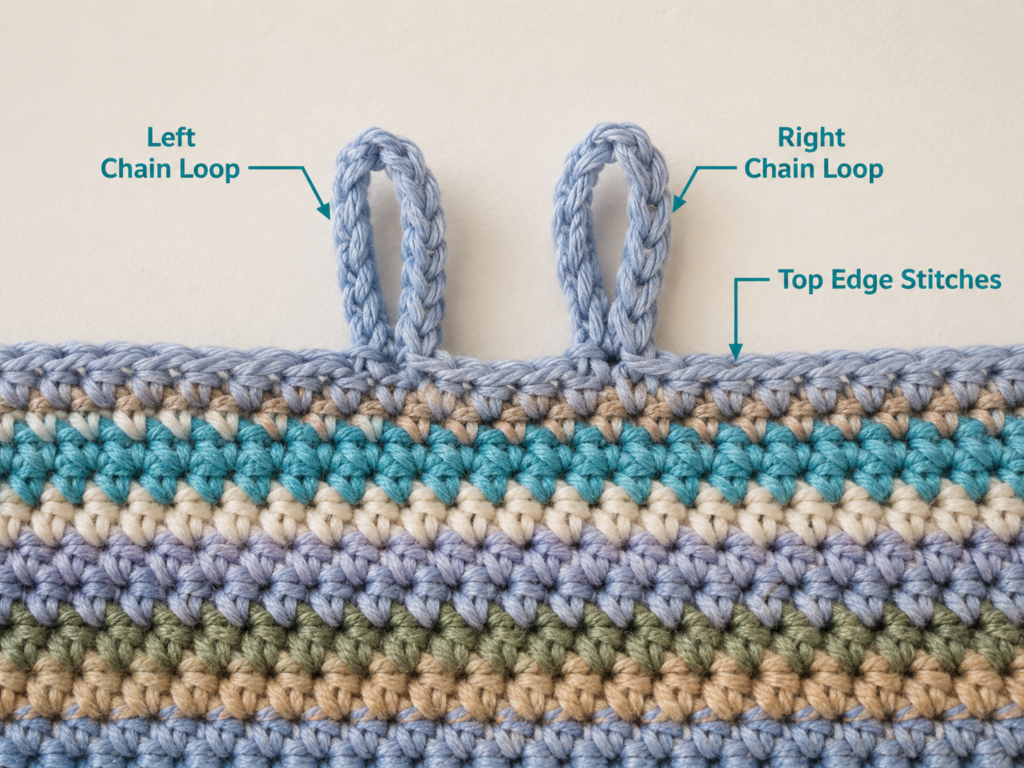
Step 7: Strengthen the Button Loop
Work one more round.
When you reach the button loop, work 1 sc into each chain of the loop.
Then continue around the sleeve opening.
This makes the loop sturdier and more comfortable to use.
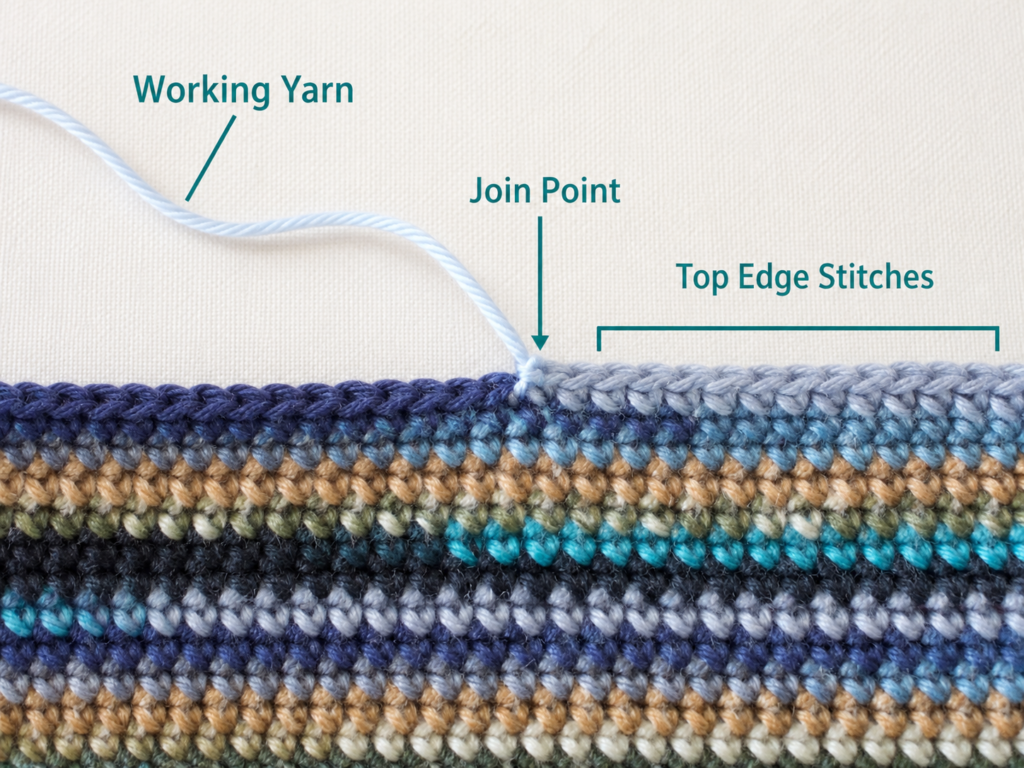
After completing the round, sl st into the next stitch to smooth the edge.
Fasten off, leaving a 6-inch tail.
Beginner tip:
Crochet into the chain loop slowly. Keep the stitches even so the loop does not twist.
Common mistake to avoid:
Do not put too many stitches into the loop. One single crochet per chain is enough.
Step 8: Weave in Ends and Check the Fit
Use a tapestry needle to weave in the final yarn tail on the inside of the sleeve.
Also weave in the beginning tail at the bottom.
Slide the tablet inside.
The tablet should go in smoothly, but the sleeve should not sag.
If the top edge feels too loose, add one more round of single crochet with slightly tighter tension.
If the sleeve is too short, you can rejoin yarn at the side and add additional rounds before sewing the button.
Beginner tip:
Always check the fit before sewing the button. Button placement depends on how the fabric stretches around the tablet.
Common mistake to avoid:
Do not sew the button onto an empty sleeve without testing it around the actual tablet first.
Step 9: Sew on the Button
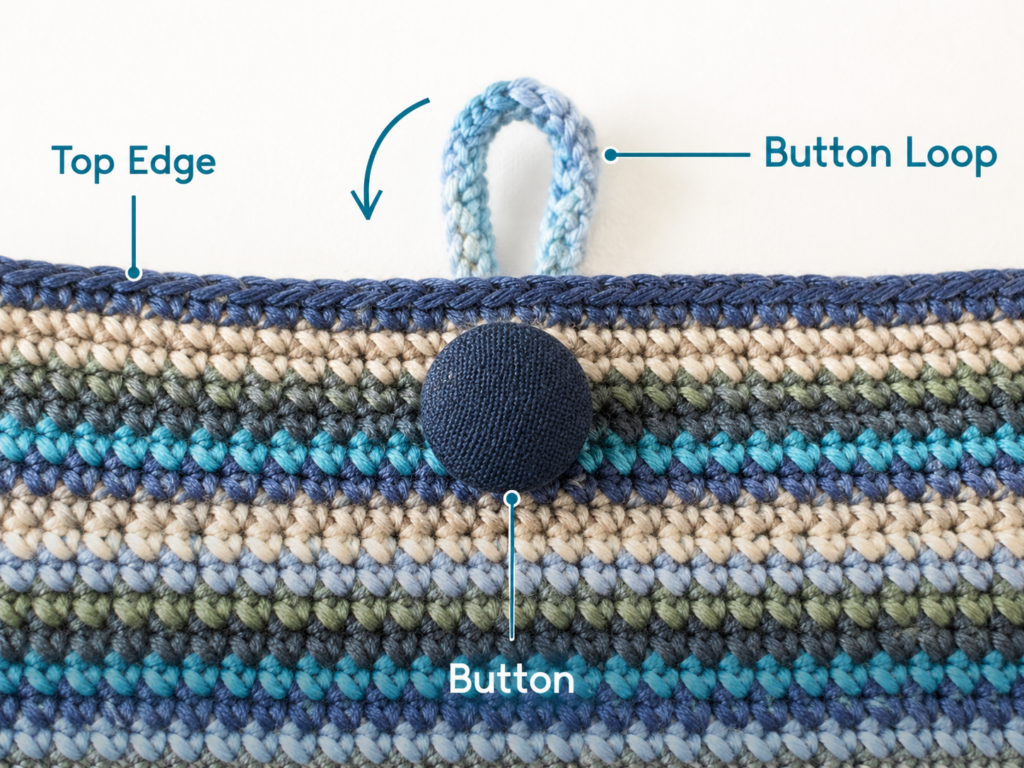
With the tablet inside the sleeve, pull the button loop over the front.
Mark the place where the button should sit.
Remove the tablet before sewing.
Thread a sewing needle with matching thread.
Sew the button firmly to the front center of the sleeve.
Pass through the buttonholes several times.
Secure the thread on the inside.
Insert the tablet again and test the closure.
The loop should pull over the button with gentle tension.
The selected source also checks button placement with the tablet in the sleeve before sewing on the button.
Beginner tip:
Sew the button through several layers of thread, not just once or twice. A tablet sleeve closure gets repeated use.
Common mistake to avoid:
Do not sew the button too low. If it sits too low, the top of the sleeve may gap open.
Pattern Notes or Stitch Notes
Turning chain rules
This sleeve is worked in continuous rounds after the foundation chain, so there is no turning chain for the main body.
Stitch count
For the sample:
- Foundation chain: 37 chains.
- First side: 36 sc.
- Opposite side: 36 sc.
- Total around: 72 sc.
Keep 72 stitches in every plain body round before the button-loop shaping.
Repeat pattern
Lower ridged section:
Sc BLO in each stitch around.
Main body section:
Sc through both loops in each stitch around.
Row and round notes
This sleeve begins from a foundation chain and is worked around both sides of that chain. After the foundation round, the project grows upward in continuous rounds.
Right side and wrong side
The outside of the sleeve is the right side.
Keep woven ends and thread knots on the inside.
Size adjustment notes
To adjust width:
- Make a foundation chain that matches the tablet width.
- Add more chains for a tablet in a thick case.
- Remove chains for an e-reader or smaller device.
To adjust height:
- Work fewer rounds for an e-reader.
- Work more rounds for a taller tablet.
- Stop about 0.5 inch below the tablet height before forming the button loop.
Common Beginner Mistakes
1. Starting chain is too tight
Problem: The first round is hard to work and the sleeve becomes narrow.
Fix: Remake the chain with looser tension or use a hook one size larger for the chain only.
2. Sleeve is too loose
Problem: The tablet slides around inside.
Fix: Use a smaller hook, make a shorter foundation chain, or choose a firmer yarn.
3. Sleeve is too tight
Problem: The tablet is difficult to insert.
Fix: Restart with a slightly longer foundation chain or use a larger hook.
4. Accidentally increasing or decreasing
Problem: The sleeve changes width as it grows.
Fix: Use a stitch marker and count your stitches every few rounds.
5. Button loop is too large
Problem: The closure does not hold securely.
Fix: Remove the loop round and remake it with fewer chains.
6. Button loop is too small
Problem: The loop will not fit over the button.
Fix: Use a smaller button or remake the loop with more chains.
7. Fabric is too holey
Problem: The tablet feels less protected.
Fix: Use a smaller hook or switch to a firmer yarn.
How to Customize This Crochet Project
Yarn changes
Cotton gives the sleeve structure and stitch definition.
Acrylic can also work, especially if you want more color choices.
Cotton-acrylic blends are a good middle ground because they are usually softer than pure cotton but firmer than very stretchy acrylic.
Color changes
Try:
- Solid sage green.
- Cream and terracotta stripes.
- Navy with a wooden button.
- Warm gray with a leather-style button.
- School colors.
- Self-striping yarn for automatic color changes.
Size changes
Use the same measuring method for:
- iPad Mini.
- Amazon Fire tablet.
- Kindle.
- Galaxy tablet.
- Drawing tablet.
- Small notebook computer.
Always measure the actual device with its case if you plan to keep the case on.
Border options
For a cleaner top edge, add one final round of slip stitch.
For a stronger opening, add two rounds of single crochet.
Avoid bulky scalloped borders for a tablet sleeve because they can catch on the device.
Texture options
After you understand the basic construction, try:
- All back-loop-only single crochet.
- Waistcoat stitch.
- Moss stitch.
- Alternating stripe rounds.
- A contrasting flap.
- Surface slip-stitch decoration.
Gift ideas
A crochet tablet sleeve makes a useful gift for:
- Students.
- Teachers.
- Digital artists.
- Travelers.
- Readers.
- Remote workers.
- Crochet friends who use tablets for patterns.
Add a matching small pouch for charging cables or earbuds if you want a coordinated handmade set.
Finishing Instructions
Fasten off by cutting the yarn and pulling the tail through the final loop.
Use a tapestry needle to weave the tail through several stitches on the inside.
Change direction once and weave through a few more stitches.
Trim the yarn close to the fabric.
Check the bottom tail as well. Since the tablet slides against the inside, no loose ends should remain.
Light blocking may help the sleeve look flatter, but heavy blocking is not usually necessary. If using cotton, you can lightly mist the sleeve, shape it around a towel or blocking mat, and let it dry flat.
Do not aggressively stretch the sleeve while blocking. It should remain snug.
For care, follow your yarn label. If a button is sewn on, gentle hand washing and flat drying are safer than rough machine washing.
Quick Printable-Style Summary
Skill level: Beginner to Easy
Finished size: Custom fit to tablet; sample fits a standard 10-inch tablet.
Materials: Worsted cotton or cotton-blend yarn, 4.5 mm hook, stitch marker, tapestry needle, button, sewing needle, thread, scissors, measuring tape.
Stitches: Chain, single crochet, slip stitch.
Starting method: Make a foundation chain that matches tablet width. Sample: ch 37.
Foundation round: Sc into back bumps across, then sc into unused loops on opposite side. Sample total: 72 sc.
Lower texture: Work sc BLO for 9 rounds.
Main body: Work sc through both loops until sleeve is about 0.5 inch shorter than tablet height.
Closure: Chain a button loop at the back center, strengthen it with single crochet, then sew a button to the front.
Finishing: Fasten off, weave in ends, sew button, test fit, lightly shape if needed.
FAQ
Is a crochet tablet sleeve good for beginners?
Yes. This project uses mostly chain, single crochet, and slip stitch. The only slightly tricky part is crocheting around both sides of the foundation chain.
What yarn is best for a crochet tablet sleeve?
Cotton or cotton-blend yarn is a strong choice because it creates a firmer fabric with clear stitch definition. A smooth worsted-weight yarn is easier for beginners than fuzzy or novelty yarn.
Should a crochet tablet sleeve be tight or loose?
It should be snug but not strained. The tablet should slide in without force, but the sleeve should not sag or stretch open.
Can I make this pattern for an iPad?
Yes. Measure the width and height of your iPad, then adjust the starting chain and number of rounds.
Can I make it without a button?
Yes. You can leave the top open, add a flap, use snaps, sew in a zipper, or make a drawstring edge.
Why is my sleeve twisting?
The foundation or early rounds may be twisted. Flatten the sleeve often during the first few rounds and keep your stitch marker in the first stitch.
Can I line the crochet tablet sleeve with fabric?
Yes. A fabric lining can add extra protection and reduce stretch. Sew the lining separately, insert it into the sleeve, and hand-stitch it near the top opening.
Conclusion
This easy crochet tablet sleeve pattern is a practical beginner project because it teaches more than just stitch repetition. You learn how to measure, customize, build a seamless pocket, shape a closure, and finish something useful.
Start with a smooth yarn and a firm hook size. Take your time with the foundation chain and first round. Once the sleeve begins growing upward, the pattern becomes relaxing and repetitive.
After finishing one tablet sleeve, you can adapt the same construction for e-readers, notebooks, crochet hook cases, pencil pouches, and small device sleeves.





