A study session feels a little more inviting when everything you need has a place. This crochet study pillow pattern combines a comfortable 16-inch cushion with a roomy front pocket where you can keep a paperback, notebook, reading journal, flash cards, or small study supplies.
There is also an optional narrow compartment for a pen or pencil, which makes this version especially useful beside a desk, on a reading chair, or in a student bedroom.
The construction is intentionally simple. Instead of complicated colorwork or advanced textured stitches, you will make a few flat rectangles using half double crochet, attach the pocket, and join the pieces around the outside. The back uses an overlapping envelope closure, so the pillow insert can be removed without installing a zipper.
That makes this a good first large home-decor project for a crocheter who already knows how to chain and work basic stitches but wants to practice straight rows, consistent tension, measuring, and simple assembly.
What You’ll Learn
By the end of the tutorial, you will know how to:
- Crochet a square pillow panel with straight edges.
- Check gauge before making a fitted item.
- Make an overlapping envelope-style pillow back.
- Add a large book or notebook pocket.
- Divide part of the pocket into a pencil compartment.
- Align several crocheted layers accurately.
- Join a pillow cover with a simple single-crochet border.
- Adjust the pattern for a different pillow size.
Skill Level and Finished Size
Skill level: Easy / Confident Beginner
Finished size: Designed for a 16 x 16 inch pillow form.
The crocheted panels should measure close to 16 inches square before assembly. A cover that is slightly smaller than the pillow insert usually produces a fuller-looking cushion, so do not worry if your finished panel is around 15½–16 inches instead of being larger than the insert.
Estimated crochet time: Around 9–12 hours, although a new crocheter may prefer to spread the project over several evenings.
Materials You’ll Need
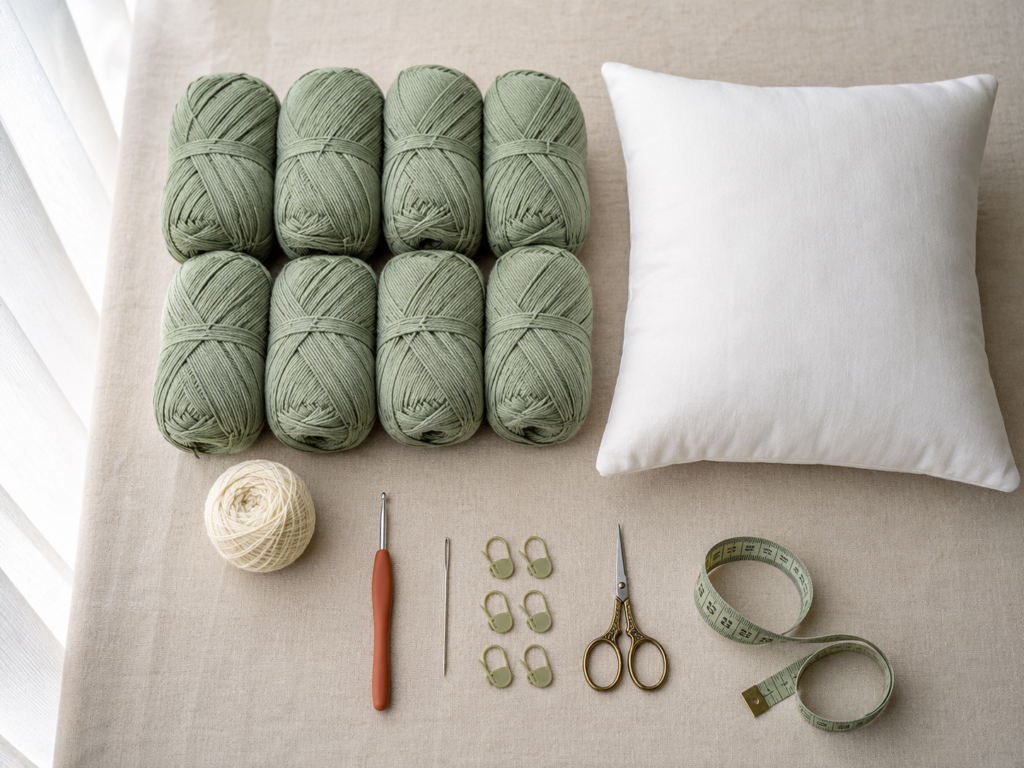
For one study pillow you will need:
- Approximately 750–900 yards of #4 medium/worsted yarn total.
- Approximately 650–800 yards dusty sage or another main color.
- Approximately 75–100 yards warm ivory or another accent color.
- 5.0 mm crochet hook.
- 16 x 16 inch pillow form.
- Tapestry needle.
- Scissors.
- 8–12 locking stitch markers.
- Measuring tape.
- Optional extra marker for identifying the right side.
A smooth cotton-acrylic blend is particularly useful for this project because the stitches remain easy to see and the pocket has enough structure to hold a lightweight book. Acrylic is also perfectly suitable if you prefer a softer pillow.
The Craft Yarn Council classifies worsted/aran yarn in the medium #4 category. General yarn-weight hook recommendations are only starting points; your project gauge should determine the final hook size.
Crochet Abbreviations Used
This tutorial is written using US crochet terminology.
- ch = chain
- hdc = half double crochet
- sc = single crochet
- sl st = slip stitch
- st/sts = stitch/stitches
- RS = right side
- WS = wrong side
- FO = fasten off
The Craft Yarn Council’s abbreviation standards use these same US terms and note an important terminology difference: US sc corresponds to UK dc, while US hdc corresponds to UK htr.
Gauge
For this tutorial, aim for:
14 hdc stitches x 11 rows = 4 inches
using your chosen #4 yarn.
Make a small swatch before beginning the full panel.
If your 14 stitches measure more than 4 inches, your stitches are too large. Try a 4.5 mm hook.
If they measure less than 4 inches, your stitches are too small. Try a 5.5 mm hook.
Metric hook measurements are the most reliable way to compare hooks because letter or number sizing can vary between manufacturers.
Gauge matters more for a fitted pillow than it does for a scarf. If your panel grows to 18 inches wide instead of 16 inches, the finished cushion will look loose.
Before You Start
Count your stitches
Each main row contains 56 stitches.
Place a locking marker in the first and last stitch if you frequently lose stitches at the edges. When you turn, crochet into the actual first stitch—not accidentally into the turning chain.
Turning chains
The ch 2 at the beginning of a half double crochet row does not count as a stitch in this tutorial.
Your first hdc therefore goes directly into the first stitch.
Keep the edges straight
If your panel slowly narrows, you are probably missing the final stitch.
If it grows wider, you may be crocheting into the turning chain as if it were another stitch.
Counting every five or six rows is faster than discovering a large sizing problem at the end.
Curling
A little curling while crocheting is normal. Strong curling usually means your foundation chain is substantially tighter than the rest of your fabric.
If necessary, make the starting chain with a hook 0.5 mm larger and switch back to the pattern hook for Row 1.
Choosing colors
A study pillow works especially well with a calm main color and a lighter contrasting pocket edge. Dusty sage and warm ivory create a subtle look, but navy and cream, rust and oatmeal, charcoal and mustard, or lavender and soft gray would also work well.
Step-by-Step Crochet Tutorial
Step 1: Make the Foundation Chain
Using the dusty sage main color and your 5.0 mm hook:
Ch 58.
Keep the chains relaxed and similar in size.
For Row 1, make an hdc in the third chain from the hook. Continue making one hdc in every remaining chain.
You should have:
56 hdc
The skipped chains create the height needed to begin the row but do not count as one of your 56 stitches.
Beginner tip
Before continuing, spread the first row flat and count every stitch. Correcting the count now is much easier than correcting a panel after twenty rows.
Common mistake to avoid
Do not pull the starting chain tightly. A foundation edge that is significantly shorter than the rest of the panel can make the finished pillow bow outward.
Step 2: Crochet the Full Front Panel
Continue in dusty sage.
Row 2: Ch 2, turn. Hdc in the first stitch and in every stitch across. 56 hdc.
Rows 3–44: Repeat Row 2.
Check the width and height occasionally rather than relying only on row count.
Your target is approximately:
16 inches wide x 16 inches tall.
If you reach 16 inches before Row 44 because your row gauge is slightly different, stop when the panel is square.
If you need another row or two, add them.
The physical measurement is more important than forcing your project to match the suggested row number.
Beginner tip
Move the first and last stitch markers upward every few rows. This makes it almost impossible to lose the edge stitches.
Common mistake to avoid
Do not assume that because the starting chain measured 16 inches, the finished panel will also measure 16 inches. Crochet fabric can change width after several rows, so measure the actual fabric.
Fasten off when the front panel is square, leaving a tail long enough to weave in comfortably.
Step 3: Crochet Two Envelope Back Panels
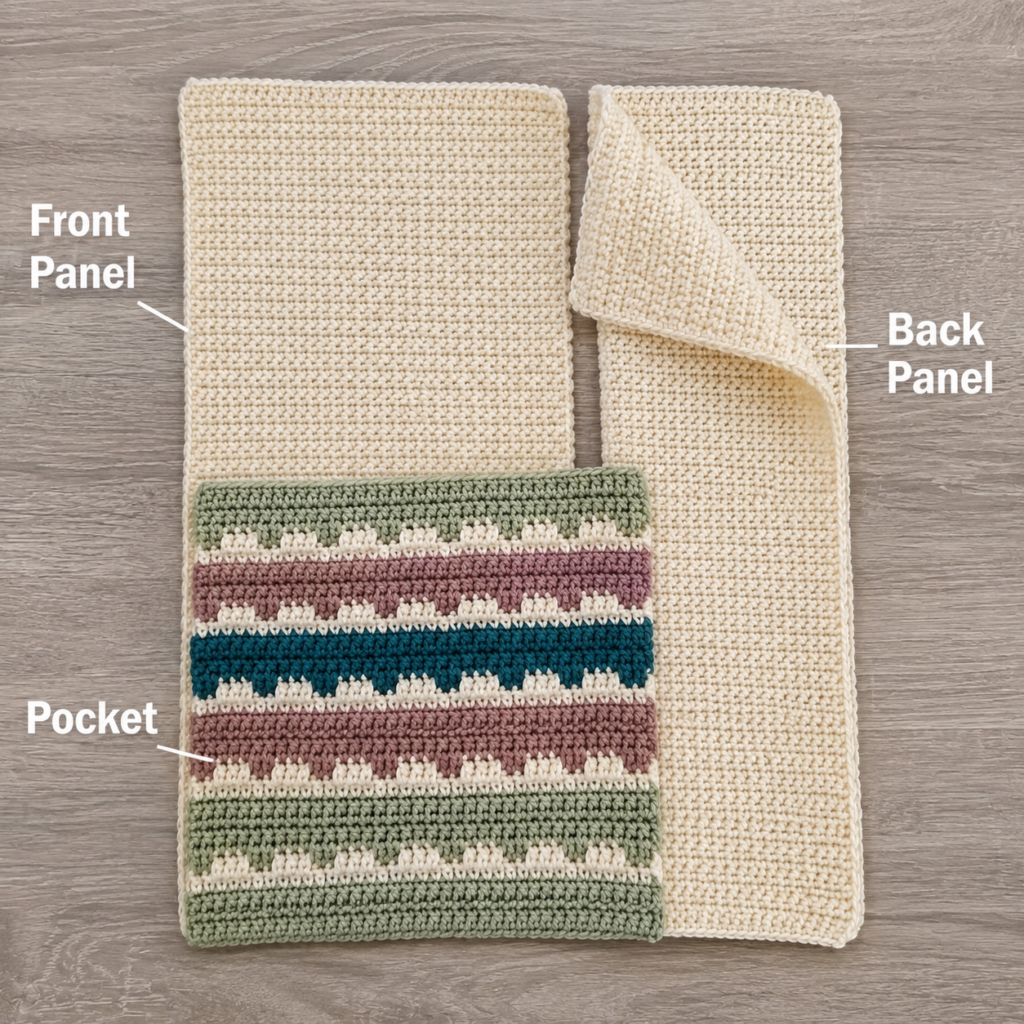
Instead of making one solid back panel, you will crochet two shorter rectangles. They will overlap in the center and form a removable envelope closure.
Make two identical pieces.
For each panel:
Ch 58.
Row 1: Hdc in the third chain from the hook and each chain across. 56 hdc.
Row 2: Ch 2, turn. Hdc in each stitch across. 56 hdc.
Rows 3–28: Repeat Row 2.
Each rectangle should measure approximately:
16 inches wide x 10 inches tall.
Two 10-inch panels covering a 16-inch back create roughly 4 inches of overlap after assembly.
Beginner tip
Lay both pieces on top of each other after finishing. If one is visibly taller than the other, count your rows before weaving in all the tails.
Common mistake to avoid
Do not make each back panel only 8 inches tall. Two 8-inch pieces would meet in the center without enough overlap and could expose the pillow insert during use.
Step 4: Crochet the Book and Notebook Pocket
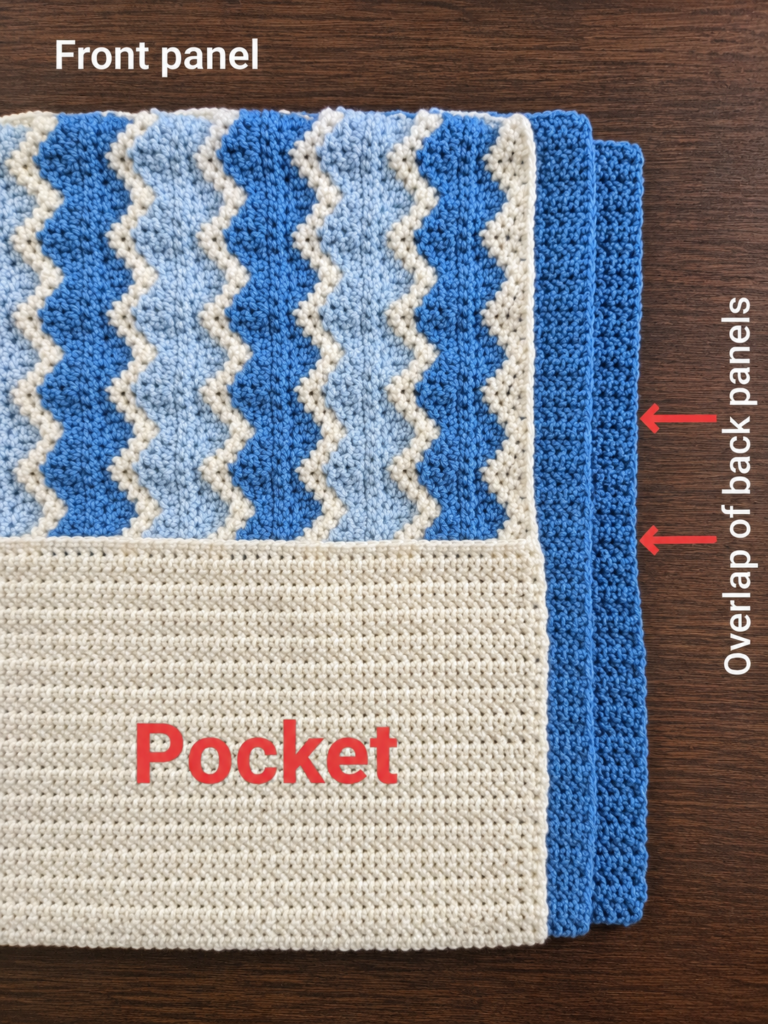
The large front pocket gives this project its study function.
Using dusty sage:
Ch 58.
Row 1: Hdc in the third chain from the hook and each chain across. 56 hdc.
Rows 2–20: Ch 2, turn, hdc in every stitch across. 56 hdc.
The pocket should be roughly 7–7½ inches tall at this stage.
Change to warm ivory.
Row 21: Ch 1, turn. Sc in each stitch across. 56 sc.
Row 22: Ch 1, turn. Sc in each stitch across. 56 sc.
Fasten off.
The two single-crochet rows create a firmer opening and make the top edge easier to see when inserting a notebook or book.
Beginner tip
Test the pocket against the front panel before assembly. Its lower and side edges should align with the front panel edges.
Common mistake to avoid
Avoid making the pocket extremely tall. If it covers almost the entire front, it becomes harder to insert and remove a book. Around half the pillow height works well for everyday study supplies.
Step 5: Add an Optional Pen or Pencil Channel
This small modification turns a regular reading pocket into a more practical study pillow.
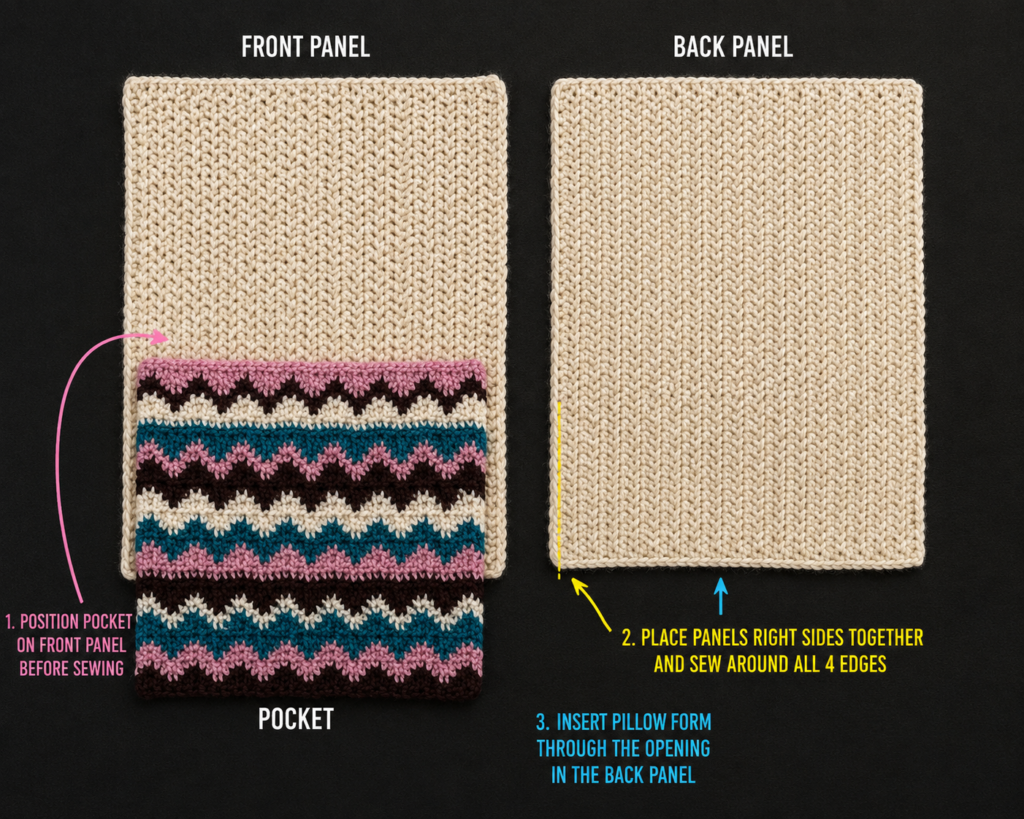
Lay the pocket on the right side of the front panel.
Align:
- The pocket bottom with the panel bottom.
- The pocket left edge with the panel left edge.
- The pocket right edge with the panel right edge.
Secure it temporarily with stitch markers.
Measure approximately 3 to 3½ inches inward from the right edge.
Thread a tapestry needle with a long piece of dusty sage yarn.
Starting at the bottom, sew a straight vertical line through both the pocket and front panel, ending immediately below the ivory pocket border.
A simple running stitch or backstitch works well.
This creates one narrow compartment for pens, pencils, a small ruler, or highlighter while leaving most of the pocket open for books and notebooks.
Tie off securely on the wrong side.
Beginner tip
Place a pencil on the pocket before sewing. That gives you a visual check that the compartment is wide enough.
Common mistake to avoid
Do not make the compartment too narrow. Crochet fabric has thickness, and a channel that looks wide enough when empty can become tight when the pillow is stuffed.
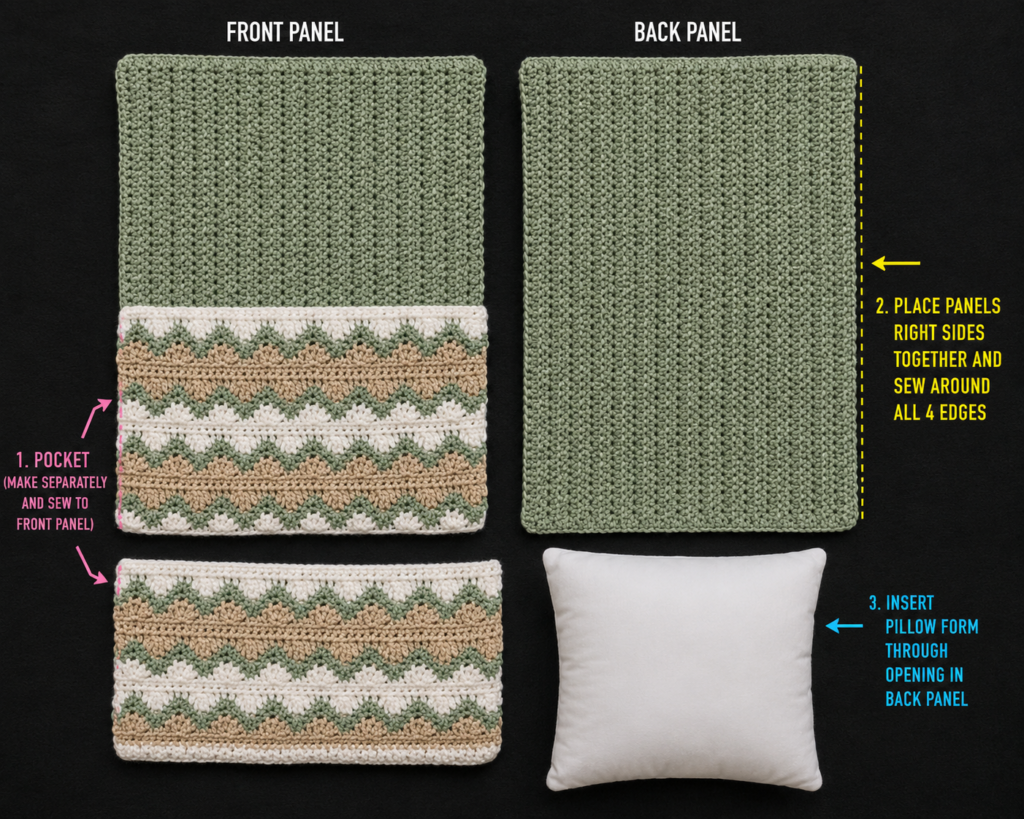
Step 6: Layer the Pillow Cover
Before joining anything permanently, weave in loose ends.
Now place the completed front-and-pocket unit right side facing down on your work surface.
Position the two back rectangles over it with their right sides facing upward.
One back panel should align with the top edge of the front.
The second should align with the bottom.
Allow the two back panels to overlap in the middle.
Because the front faces down and the back pieces face upward, the wrong sides will be enclosed inside the finished pillow.
Use plenty of stitch markers around the perimeter.
At the lower half of the pillow, make sure your markers catch:
- Front panel.
- Pocket layer.
- Back panel.
Along the upper portion, you will generally catch only front and back.
Beginner tip
Check all four corners before crocheting the border. If the corners match, the remaining edges are much easier to manage.
Common mistake to avoid
Do not accidentally stitch across the upper opening of the front pocket. Only the two sides and bottom of the pocket are supposed to be secured.
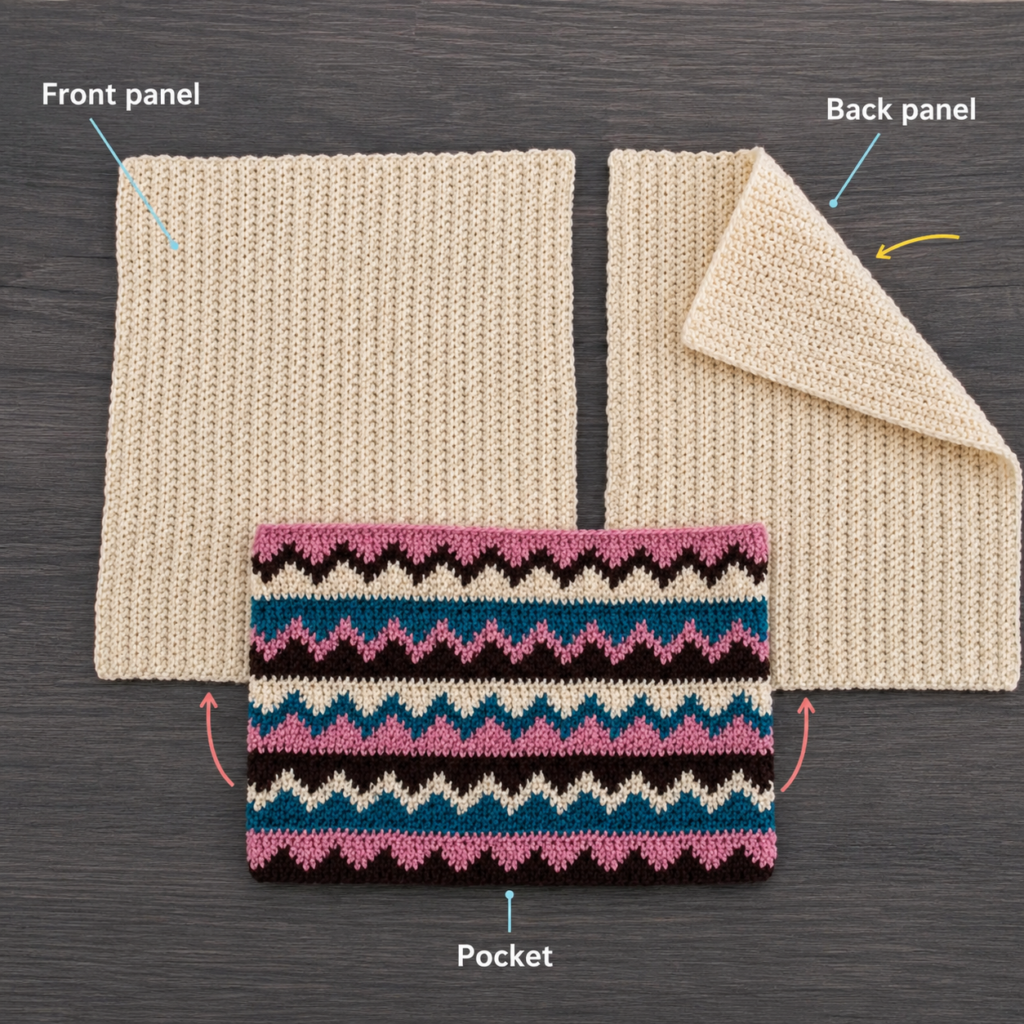
Step 7: Single Crochet Around the Perimeter
Attach dusty sage yarn at any corner.
Ch 1.
Work single crochet evenly around the entire outside edge.
Along horizontal edges, work approximately one sc into each available stitch.
Along row ends, place stitches evenly without overcrowding them.
At each corner, work 3 sc in the corner space to help the border turn without pulling.
When you reach the sections containing the study pocket, make sure the hook passes through all three layers.
At the envelope overlap, make sure the edge stitches securely catch the appropriate back-panel layers.
Continue around all four sides.
Join to the first sc with a slip stitch.
Fasten off.
Beginner tip
Stop every few inches and lay the edge flat. If the border begins ruffling, you may be adding too many stitches. If the edge pulls inward, the stitches may be too tight or too widely spaced.
Common mistake to avoid
Do not use an extremely tight single crochet for the border. A tight perimeter can make the pillow corners curl inward.
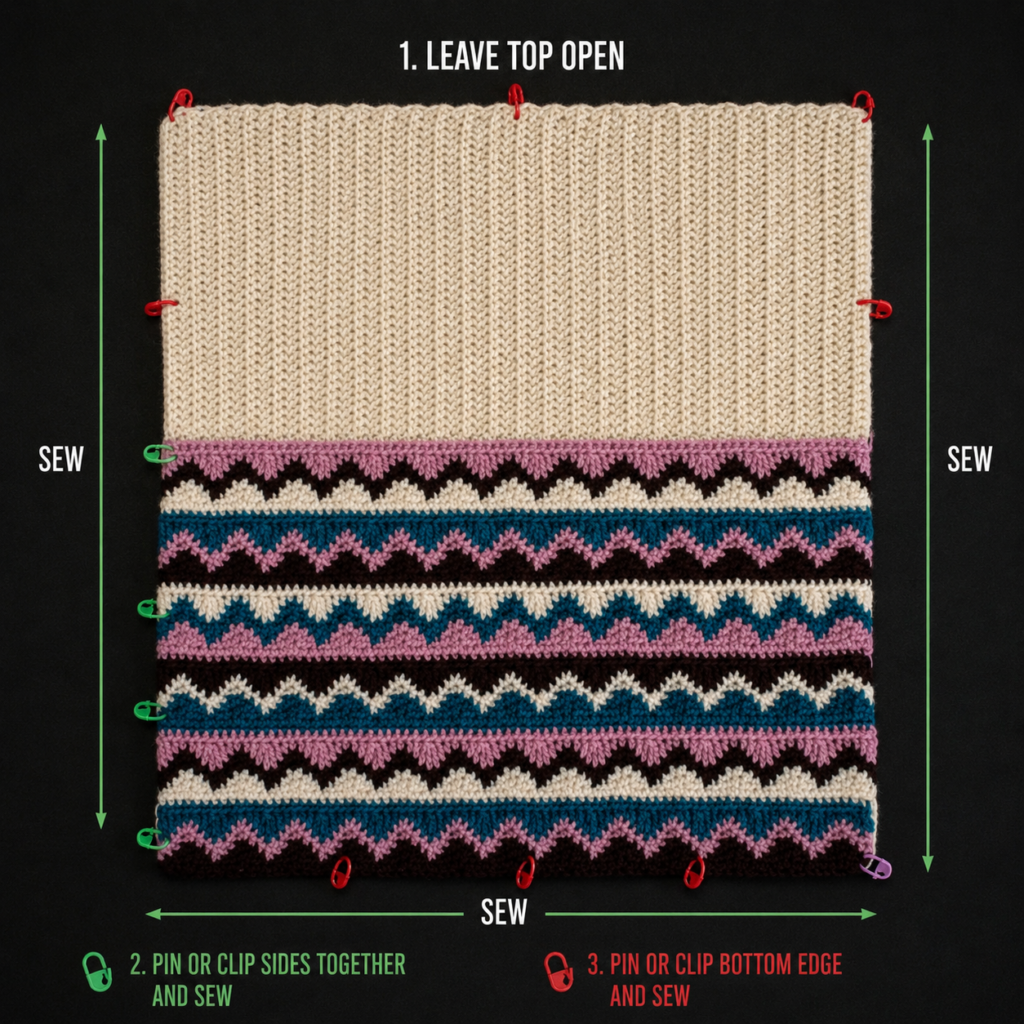
Step 8: Insert the Pillow Form
Your cover is now completely assembled.
Open the overlapping envelope panels at the back.
Compress one side of the 16-inch pillow insert and gently guide it through the opening.
Push the insert into each corner one at a time rather than trying to force the entire pillow through at once.
Once the form is inside:
- Smooth the corners.
- Pull the front fabric evenly across the cushion.
- Straighten the pocket.
- Check that the envelope panels overlap completely.
The back should close naturally without buttons or a zipper.
Beginner tip
If the pillow looks uneven, the insert is often simply folded or compressed inside one corner. Massage the filling before deciding the crochet cover is the problem.
Pattern Notes and Stitch Notes
Turning chain rule
The beginning ch 2 does not count as an hdc.
Always work the first actual hdc into the first stitch of the previous row.
Stitch count
Front panel: 56 sts
Each back panel: 56 sts
Pocket body: 56 sts
If you change the width, maintaining exactly 56 stitches is no longer necessary. What matters is that the front, back, and pocket pieces all finish at compatible widths.
Right side and wrong side
Plain half double crochet looks attractive from either direction, so there is no highly obvious right side.
Choose one side of the completed front panel as the RS before attaching the pocket.
A stitch marker is useful for identifying it.
Repeat
The main fabric repeat is extremely simple:
Ch 2, turn, hdc across.
Size adjustment
To adapt this pattern for another square pillow:
- Crochet a gauge swatch.
- Determine how many stitches equal one inch.
- Multiply that figure by the desired pillow width.
- Make the front panel square.
- Make each back panel approximately 60–65% of the pillow height so the two pieces overlap.
- Make the front pocket approximately 45–50% of the pillow height.
For example, the 10-inch back rectangles in this tutorial are about 62.5% of a 16-inch pillow height.
Common Beginner Mistakes
1. The panel becomes narrower
Cause: Missing the last stitch of several rows.
Fix: Put a marker in the first and final stitch and count periodically.
2. The panel becomes wider
Cause: Treating the turning chain as an additional stitch.
Fix: Remember that ch 2 does not count as a stitch in this pattern.
3. The finished cover is too loose
Cause: Ignoring gauge or making the panels larger than the pillow form.
Fix: Measure the actual crochet fabric while working. A slightly snug cover generally produces better shape than an oversized one.
4. The envelope back pulls open
Cause: The back rectangles are too short and do not overlap sufficiently.
Fix: Aim for roughly four inches of overlap on a 16-inch cushion.
5. The book pocket separates at the corners
Cause: The pocket layer was missed when crocheting the perimeter seam.
Fix: Check that the hook passes through the front, pocket, and back layers along the pocket’s bottom and side edges.
6. The border ripples
Cause: Too many single crochet stitches were squeezed around the perimeter.
Fix: Remove the affected section and space the edge stitches more evenly.
7. The pocket stretches after holding heavy books
Cause: Crochet naturally has some stretch.
Fix: Use the pocket primarily for paperback books, notebooks, journals, flash cards, e-readers, or small study supplies rather than repeatedly storing very heavy textbooks.
How to Customize This Crochet Study Pillow
Change the yarn
A cotton-acrylic blend creates good pocket structure.
Acrylic makes a softer pillow.
Cotton creates a firmer, more defined fabric but can become heavier.
Whatever you substitute, crochet a gauge swatch first. Yarn labels within the same weight category are not automatically interchangeable; yarn structure and actual gauge can differ.
Add stripes
Instead of a plain sage pocket, alternate sage and ivory every two or four rows.
Keep the full pillow panels solid if you want the pocket to remain the focal point.
Make the pen compartment wider
For markers or a small calculator, make the vertical division 4–5 inches from the side instead of 3 inches.
Add a second division
Two vertical seams can create three compartments:
- Book section.
- Notebook section.
- Pen/highlighter section.
Avoid dividing the pocket into so many narrow sections that it loses flexibility.
Add texture
Once you are comfortable with the basic version, the front panel could be worked in:
- Hdc BLO.
- Moss stitch.
- Lemon peel stitch.
- Suzette stitch.
- Alternating textured stripes.
Check gauge again if you replace the stitch pattern.
Make it a gift
Pair the finished pillow with:
- A favorite novel.
- Reading journal.
- Notebook.
- Pencil set.
- Bookmark.
- Study planner.
- Gift card for a bookstore.
A children’s version could hold a bedtime book and a small soft toy.
Finishing Instructions
Weave every remaining yarn tail securely into the wrong side of the fabric.
Because this project contains long flat panels, gentle blocking can improve the shape before inserting the pillow.
For acrylic yarn, avoid excessive direct heat.
For cotton or cotton-blend yarn, follow the washing instructions printed on your specific yarn label.
The envelope back allows you to remove the pillow insert before washing the crochet cover.
After washing, reshape the cover to its measurements and allow it to dry thoroughly before replacing the form.
If using the pocket for tablets or electronic readers, avoid storing a hot or charging device inside a thick textile pocket for extended periods. The pillow is designed primarily as a soft storage cushion, not as a heat-dissipating laptop support.
Quick Printable-Style Summary
Project: Crochet Study Pillow with Book Pocket
Skill level: Easy / Confident Beginner
Finished size: Fits approximately 16 x 16 inch pillow form
Yarn: #4 medium/worsted
Hook: 5.0 mm
Gauge: 14 hdc x 11 rows = 4 inches
Stitches: ch, hdc, sc, sl st
Front:
Ch 58. Work 56 hdc per row until approximately 16 inches square.
Back:
Make two 56-stitch rectangles measuring approximately 16 x 10 inches.
Pocket:
Work 56 hdc wide until approximately 7–7½ inches high. Add two sc rows in contrast color.
Optional study feature:
Sew one vertical seam approximately 3–3½ inches from one pocket edge to create a pen compartment.
Assembly:
Attach pocket to front, position overlapping envelope-back panels, mark all edges, and single crochet around the full perimeter.
Finishing:
Weave in ends and insert a 16-inch pillow form through the envelope opening.
FAQ
Is a crochet study pillow the same as a crochet reading pillow?
They are closely related. A reading pillow normally includes a front pocket for a book. This study version keeps the same useful concept but adds space for a notebook and an optional narrow compartment for pens or pencils.
Is this crochet study pillow pattern suitable for beginners?
Yes. The main fabric uses repeated half double crochet rows, and the border uses single crochet. The most challenging part for a beginner is aligning the pieces accurately before assembly.
What size pillow form should I use?
This tutorial is designed for a 16 x 16 inch form.
A 15–16 inch finished crochet cover should create a comfortably full cushion.
Can I use chunky yarn?
Yes, but you cannot use the same stitch count.
Make a gauge swatch with the chunky yarn and calculate the number of stitches needed to reach 16 inches. You will also need fewer rows.
Can I make the pocket large enough for a textbook?
You can increase its height, but very heavy textbooks can stretch crochet fabric over time.
The design works best for notebooks, paperback books, journals, e-readers, flash cards, and lightweight study accessories.
Do I have to add the pen compartment?
No.
Leave out the vertical seam and the entire front pocket becomes one large storage compartment.
Can I make the cover removable?
Yes. That is why this tutorial uses an envelope-style back instead of permanently sewing the pillow insert inside.
Conclusion
This crochet study pillow is a useful way to practice the skills that turn basic crochet rectangles into a finished home accessory.
The front and back panels give you plenty of repetition for improving tension. The pocket introduces simple assembly without complicated shaping, and the envelope closure avoids the need for buttons or a zipper.
Once you understand the construction, it is easy to personalize the idea. Make one for a reading chair, a child’s bedroom, a college study corner, or as a book-lover gift. Change the yarn colors, add extra pocket divisions, or experiment with a textured stitch on the front while keeping the same basic construction.
Save the tutorial so you can return to the measurements when you are ready to make another version.





