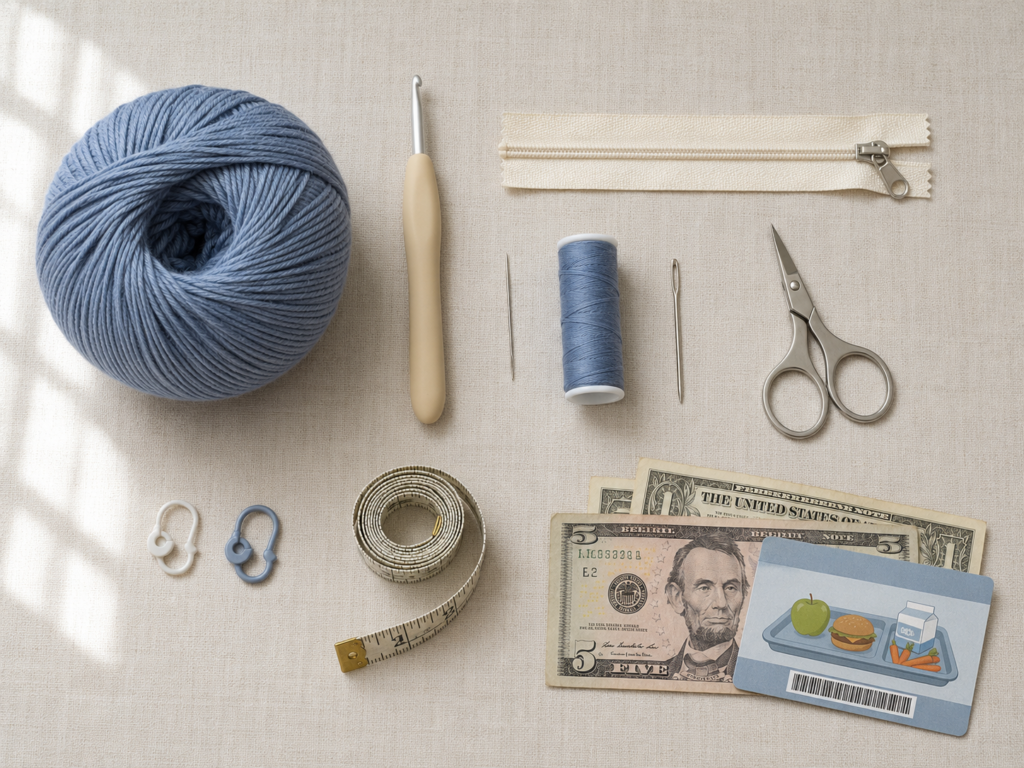
A small pouch is one of those crochet projects that becomes useful almost immediately.
This crochet lunch money pouch pattern is designed for school lunch cash, coins, a cafeteria payment card, bus money, or other small essentials that are easy to lose inside a backpack. The finished pouch is compact enough to slip into a lunch bag or backpack pocket but large enough for folded bills and standard cards.
It is also an approachable first zipper project.
Instead of crocheting several shaped pieces, you will make one simple rectangle in single crochet, fold it in half, sew in a zipper, and close the two side seams. There are no increases, decreases, complicated stitch repeats, or crochet-in-the-round techniques.
The dense single crochet fabric is deliberate. Money pouches need more structure than a scarf or soft accessory, and closely worked stitches reduce the gaps through which small objects can escape.
This tutorial uses US crochet terminology and explains the zipper installation in detail, with image placements at every important construction stage.
What You’ll Learn
- How to size a small crochet pouch around a zipper.
- How to crochet a straight single-crochet rectangle.
- How to recognize the first and last stitch of every row.
- How to maintain firm, even tension.
- How to fold one panel into a pouch instead of making two separate pieces.
- How to center and hand-sew a zipper.
- How to prevent zipper puckering.
- How to whip stitch clean side seams.
- How to adjust the pouch for cash, cards, coins, or small school essentials.
Materials You’ll Need
For one pouch approximately 5½ × 3¾ inches:
- Approximately 45–55 yd / 41–50 m of #4 medium cotton or cotton-blend yarn.
- 4.0 mm / G-6 crochet hook.
- One 5-inch zipper.
- Blunt tapestry needle.
- Sharp hand-sewing needle.
- Sewing thread close to the yarn color.
- Scissors.
- Two or four sewing clips or pins.
- Two locking stitch markers, optional but recommended.
- Measuring tape.
- Removable fabric pencil or tailor’s chalk, optional.
A smooth cotton is particularly useful here because it produces visible stitches and a relatively firm fabric. Whatever yarn you choose, prioritize a fabric dense enough that coins cannot easily push between stitches.
Crochet Abbreviations Used
This tutorial follows US crochet terminology. The Craft Yarn Council’s standard abbreviation list uses ch for chain, sc for single crochet, sl st for slip stitch, st/sts for stitch/stitches, and rep for repeat.
- ch = chain
- sc = single crochet
- sl st = slip stitch
- st / sts = stitch / stitches
- rep = repeat
- RS = right side
- WS = wrong side
US/UK terminology note
This pattern uses US terms. A US single crochet corresponds to a UK double crochet. The Craft Yarn Council also records US sl st as UK ss.
Before You Start
Gauge
Aim for approximately:
16 single crochet stitches × 18 rows = 4 inches / 10 cm
Exact gauge is less critical than it would be for a fitted garment, but width matters because the zipper needs to fit properly.
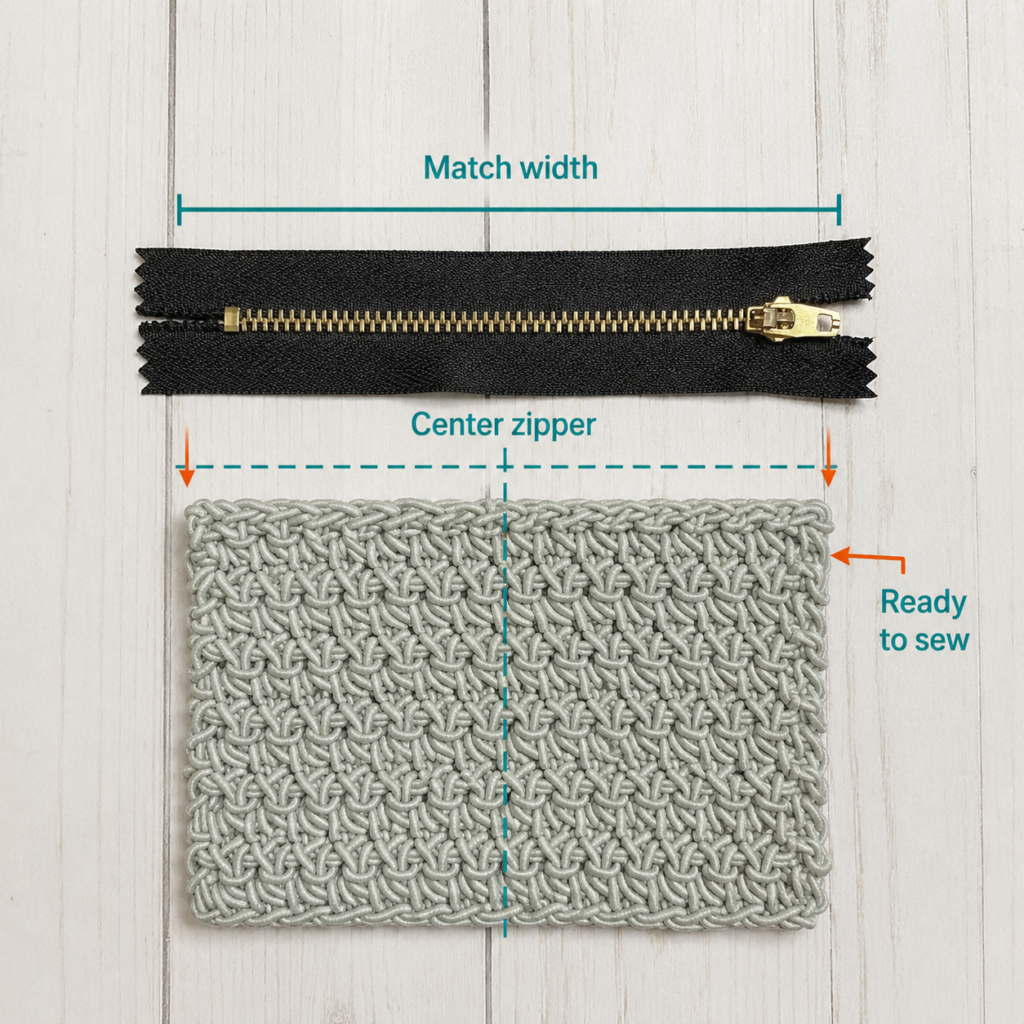
The easiest test is practical: crochet several rows, place your zipper above the work, and confirm that the crochet width is approximately half an inch wider than the zipper teeth from stop to stop.
Finished size
The sample is approximately:
5½ inches wide × 3¾ inches tall
That gives enough room for folded cash and common wallet-sized cards without turning the project into a bulky pencil case.
How to count your stitches
The turning chain does not count as a stitch.
Each row should contain 22 single crochet stitches.
Place a locking stitch marker in the first and last stitch for your first several rows if you struggle with straight edges.
How to keep the edges straight
The most common reason a beginner’s rectangle grows narrower is skipping the final stitch.
At the end of every row:
- Stop.
- Count 22 stitches.
- Check that the last stitch sits directly above the last stitch of the previous row.
- Chain one.
- Turn.
Do not add an extra single crochet into the turning chain.
How to avoid curling
A little curl during the first several rows is normal. Severe curling usually means your foundation chain is much tighter than your single crochet rows.
If necessary, make the foundation chain with a 4.5 mm hook and switch to the 4.0 mm hook for Row 1.
Beginner note
The zipper is sewn after all crochet is finished, so you can concentrate on one skill at a time.
Step-by-Step Crochet Tutorial
Step 1: Crochet the Foundation Chain
With dusty-blue yarn and the 4.0 mm hook:
Chain 23.
Try to make every chain similar in size. The chain should be tidy but flexible rather than pulled tight against the hook.
For Row 1, insert the hook into the second chain from the hook.
Work one single crochet in that chain.
Continue placing one single crochet into every remaining chain.
You should have:
22 sc
Do not count the loop currently on the hook as a stitch.
Beginner tip:
Turn the foundation chain slightly toward yourself so you can see each chain opening clearly. Counting the stitches now is much easier than discovering a missing stitch after ten rows.
Common mistake to avoid:
Do not crochet into the first chain directly beneath the hook. Doing so would create an unwanted extra stitch and an uneven edge.
Step 2: Build the Single-Crochet Rectangle
Row 2: Ch 1 and turn. Work 1 sc in the first stitch and 1 sc in every stitch across. 22 sc.
Repeat Row 2 until the rectangle measures approximately 7½ inches long.
At the suggested gauge, this should be around 34 rows total, including Row 1.
Measurements are more important than blindly matching the row number.
Why 7½ inches?
The rectangle will eventually fold in half, making the finished body approximately 3¾ inches tall.
Every few rows, lay the work flat and make sure:
- Both sides remain parallel.
- You still have 22 stitches.
- The fabric does not flare outward.
- There are no large holes caused by accidentally skipping strands of a stitch.
Beginner tip:
Use a marker in the first stitch after turning. When you return to that end, you immediately know where the final stitch belongs.
Common mistake to avoid:
Do not accidentally work two stitches into the first stitch. This often happens when the turning chain is mistaken for a stitch.
Step 3: Measure and Fold the Panel
When the rectangle reaches approximately 7½ inches long, fasten off.
Leave a yarn tail about 24–30 inches long. You can use this tail later to seam one side.
Lay the rectangle flat.
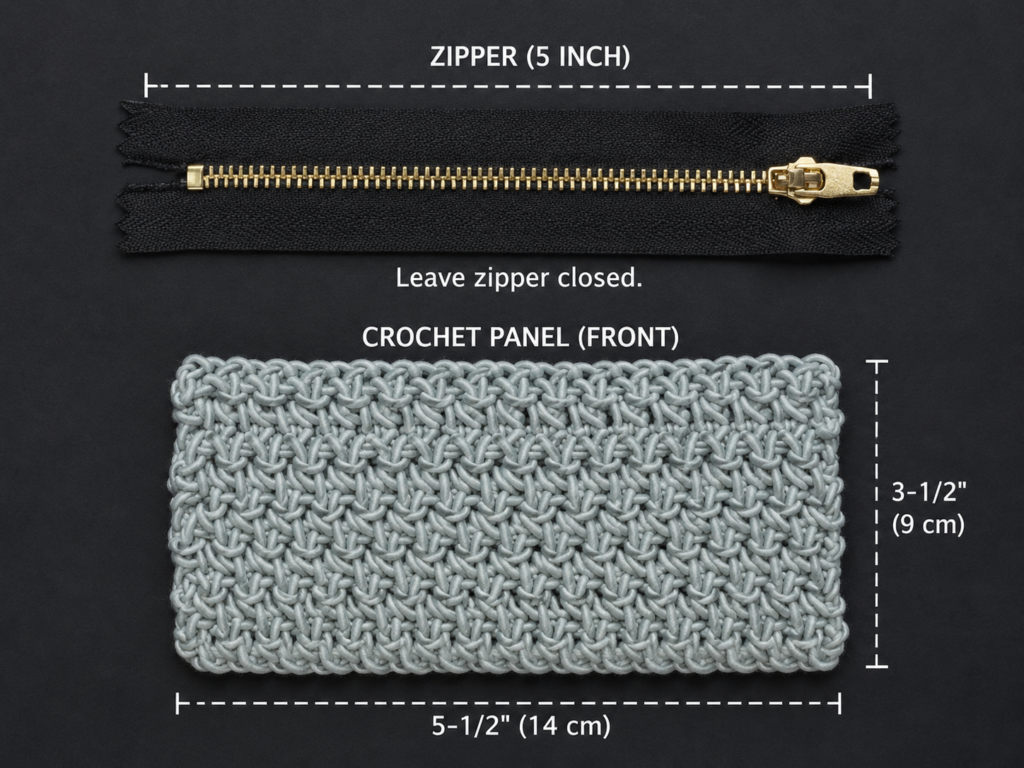
Check that it measures approximately:
5½ inches wide × 7½ inches long
Now fold the lower short edge upward until it meets the upper short edge.
The fold becomes the bottom of the pouch.
The final body should measure approximately:
5½ inches wide × 3¾ inches tall
Place the closed zipper along the open top.
The zipper teeth should be slightly shorter than the width of the crochet body, leaving a modest margin at each side.
Beginner tip:
Do not sew anything yet. This dry-fitting stage is where you correct alignment problems.
Common mistake to avoid:
Do not stretch the crochet fabric to make it fit the zipper. The fabric will spring back later and cause the zipper to ripple.
Step 4: Center and Secure the Zipper
Open the zipper about halfway.
Opening it now makes later handling easier and prevents you from accidentally sewing the pouch permanently shut.
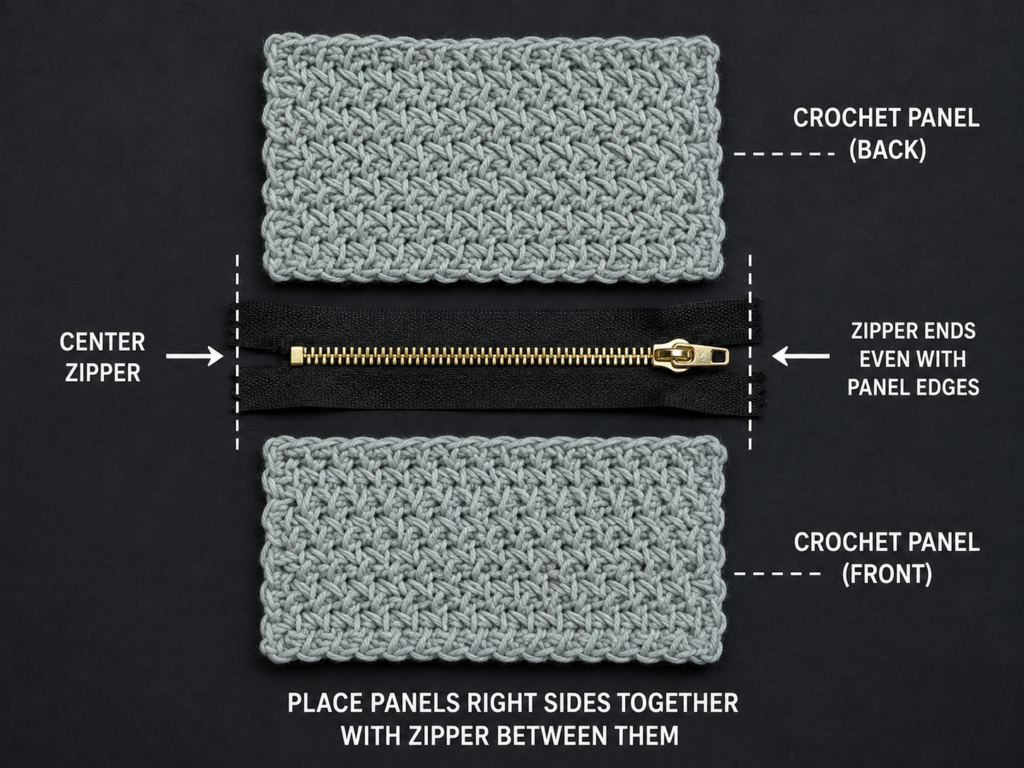
Position one zipper tape edge behind one crochet top edge.
Keep the zipper teeth visible above the crochet fabric.
Center the zipper so that an equal amount remains at both ends.
Use sewing clips to hold it in place.
Repeat along the opposite side temporarily and inspect the pouch from the front.
The zipper should lie straight without pulling either crochet edge toward the center.
A removable pencil line on the zipper tape can provide a consistent hand-sewing guide. The reference tutorial similarly uses a guide line on the zipper tape to control placement.
Beginner tip:
Clip from the center outward rather than starting at one end. This makes it easier to distribute the fabric evenly.
Common mistake to avoid:
Never place one zipper side noticeably higher than the other. A small mismatch becomes much more obvious after the side seams are closed.
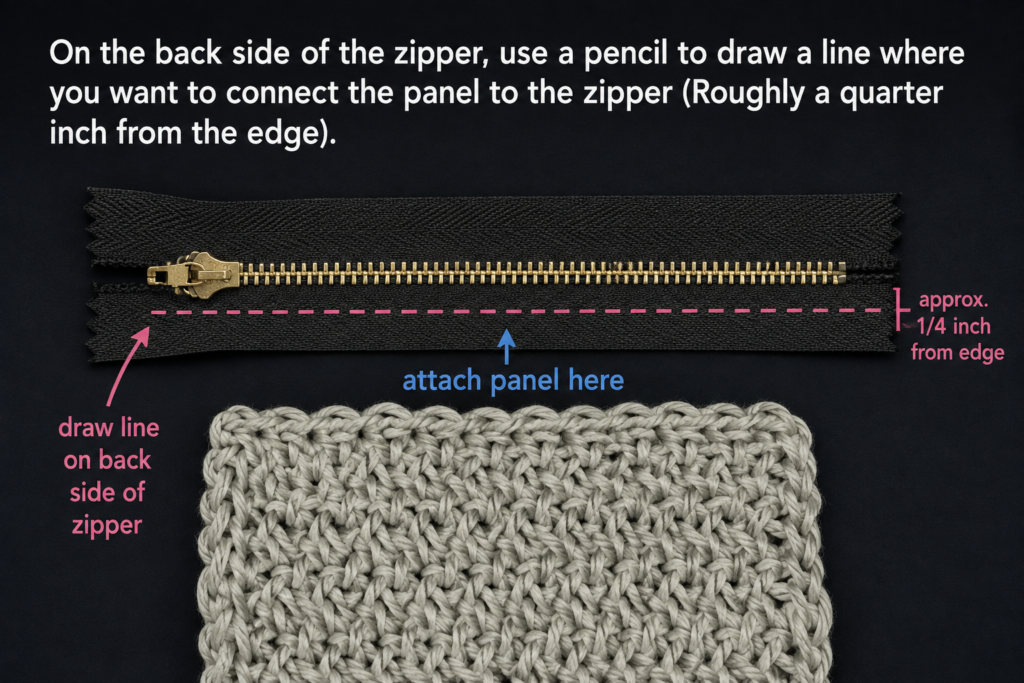
Step 5: Hand-Sew the First Side of the Zipper
Thread a sharp hand-sewing needle with approximately 24 inches of matching sewing thread.
Knot the end.
Beginning close to one end of the zipper, bring the needle up from the underside so the knot remains hidden.
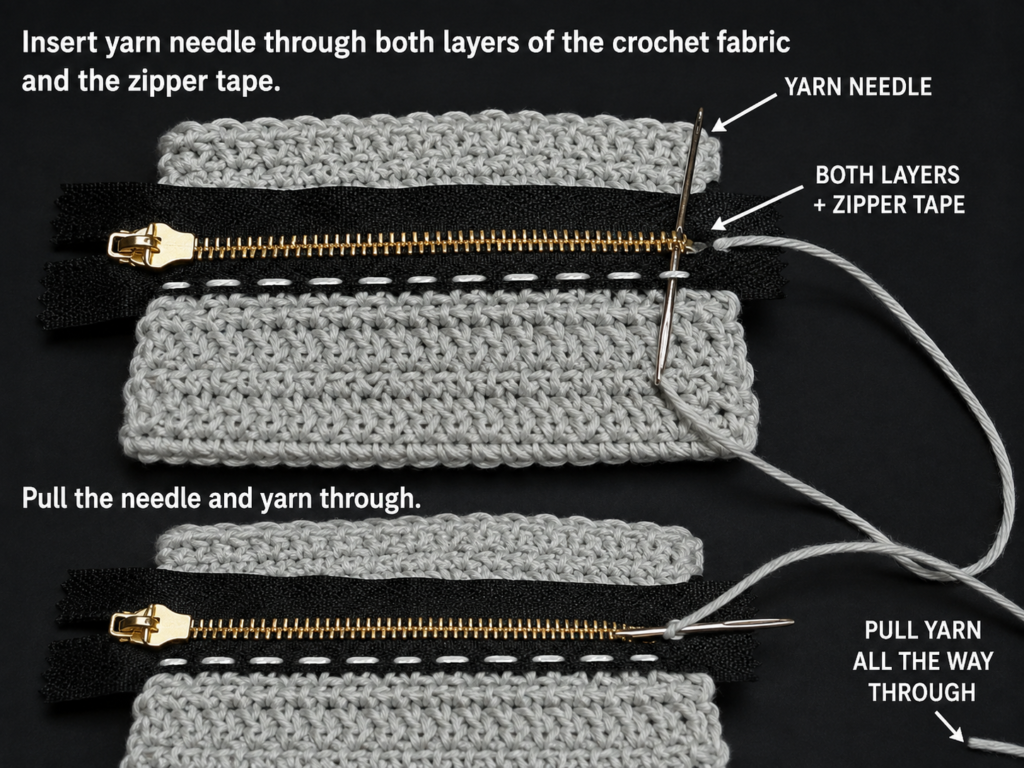
Catch a small portion of the crochet edge, then pass the needle through the zipper tape.
Work small, evenly spaced stitches across.
The stitches do not need to penetrate huge sections of crochet. Catching a secure portion immediately below the top loops is enough.
Keep the thread snug but not tight.
Your goal is to secure the zipper without compressing the crochet edge.
Beginner tip:
Stop every inch and lay the work flat. If the zipper remains smooth, continue.
Common mistake to avoid:
Pulling sewing thread too tightly makes the zipper tape gather. If you notice rippling, remove the last few stitches and resew them with gentler tension.
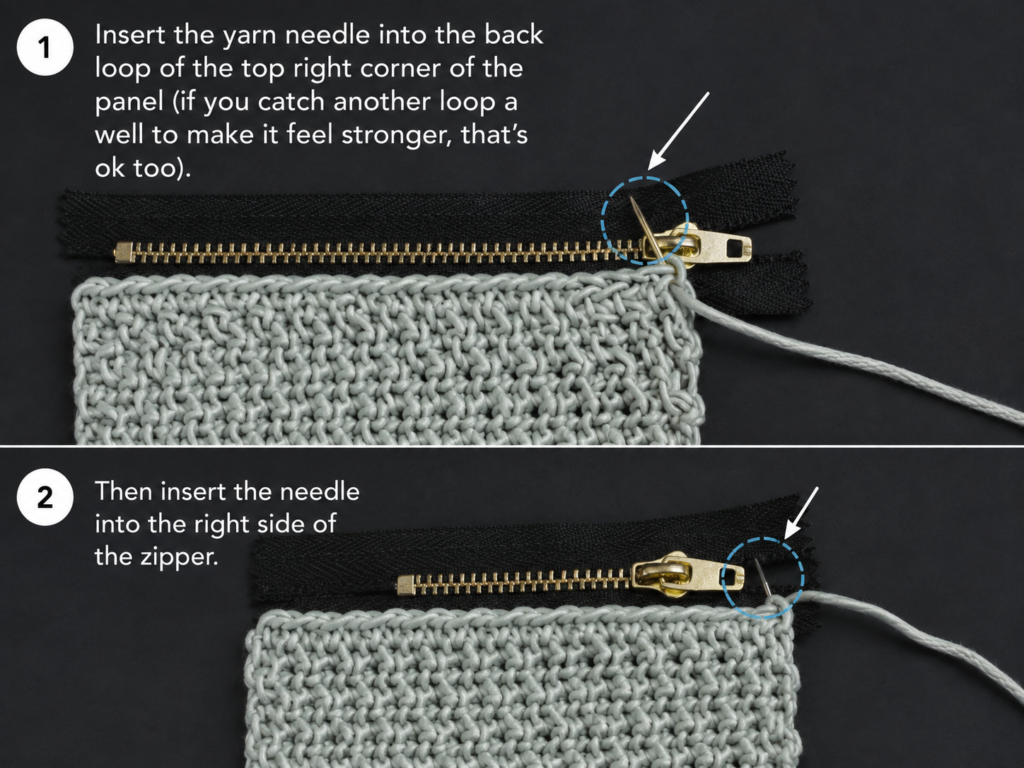
Step 6: Keep the Zipper Seam Even
Continue sewing toward the opposite end.
Try to keep each stitch approximately the same distance from the zipper teeth.
Do not worry if the stitches are not machine-perfect. They simply need to be secure and reasonably even.
Before tying off, close and reopen the zipper.
It should move freely.
Look at the pouch from the front.
The zipper teeth should remain in a straight line.
If part of the crochet edge has crept too close to the teeth, correct it now.
The source tutorial’s process photography is particularly useful at this stage because it shows how an evenly spaced zipper seam should progress across the fabric.
Beginner tip:
A zipper does not need to be pulled tight while sewing. Let it rest naturally.
Common mistake to avoid:
Do not stitch through the zipper teeth or too close to the slider path.
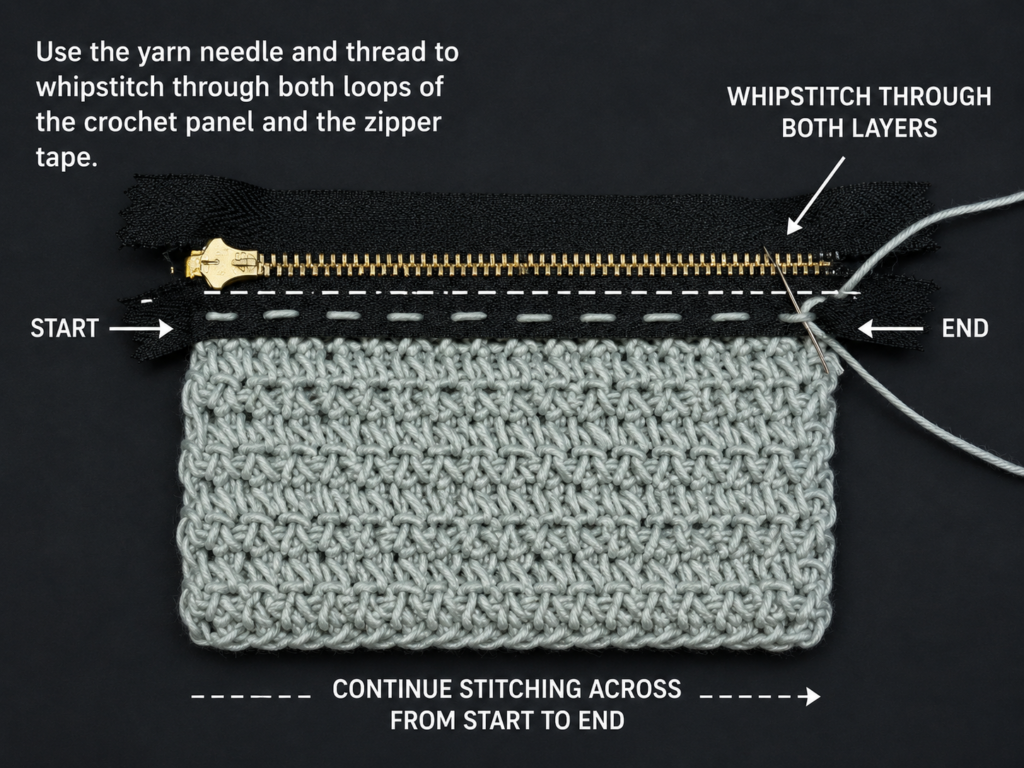
Step 7: Sew the Second Zipper Side
Now attach the opposite crochet edge to the other side of the zipper.
This is where beginners sometimes accidentally twist the pouch.
Before clipping:
- Open the rectangle flat.
- Confirm the bottom fold is not twisted.
- Position the second crochet edge against the remaining zipper tape.
- Match the two pouch corners.
- Clip the center.
- Clip each end.
- Add extra clips between them.
Sew the second side using the same small stitches.
When finished, operate the zipper several times.
The pouch should open symmetrically.
Beginner tip:
Check alignment from the front before making the first stitch.
Common mistake to avoid:
Do not assume the second side will automatically line up because the first side is straight. Measure both ends.
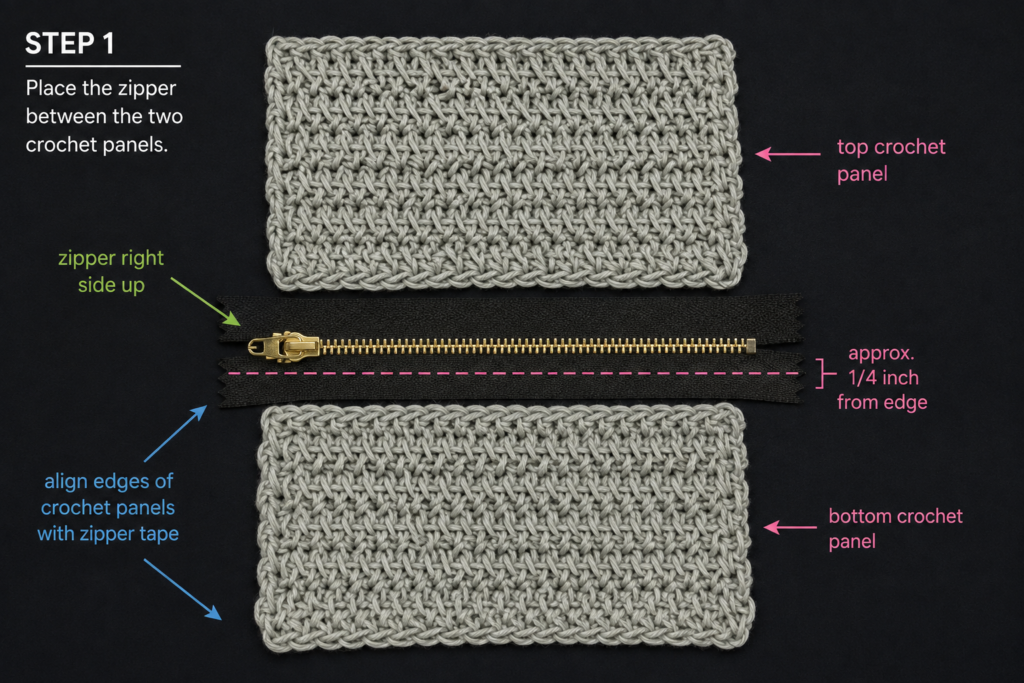
Step 8: Whip Stitch the Side Seams
Important: leave the zipper partly open before closing the side seams.
If you accidentally leave it fully closed, turning the pouch right side out becomes unnecessarily difficult.
Turn the pouch wrong side out.
Align the first pair of side edges.
Thread the long yarn tail onto your tapestry needle.
Beginning near the zipper, whip stitch downward through corresponding edge loops.
Continue to the bottom fold.
Fasten the seam securely.
Repeat on the second side with another yarn length.
Try not to make the seam extremely bulky. Consistent moderate tension is more important than pulling every stitch as tight as possible.
The original visual source also finishes its pouch by sewing matching crochet edges together, and its close-up makes the loop alignment particularly clear.
Beginner tip:
Match rows before you begin. You can place a temporary stitch marker halfway down both edges so the fabric cannot shift significantly.
Common mistake to avoid:
If one side becomes shorter as you sew, you are probably passing through unevenly spaced edge loops.
Step 9: Turn and Shape the Pouch
Turn the pouch right side out through the open zipper.
Use your fingers to push the lower corners gently into shape.
Do not use scissors or another sharp object for this job because the tool can split the yarn.
Run your fingers along both side seams.
The pouch should lie flat without twisting.
Inspect the zipper one final time.
If the slider operates smoothly and both sides sit at approximately the same height, the construction is complete.
Pattern Notes or Stitch Notes
Turning chain
The chain 1 at the beginning of each row is for height only.
It does not count as a stitch.
Stitch count
Maintain 22 sc per row.
If your stitch count becomes 21, you probably skipped the final stitch.
If it becomes 23, you likely crocheted into the turning chain or worked twice into the first stitch.
Repeat
Rows after Row 1 are simple:
Ch 1, turn, sc in every stitch across.
Continue until the panel measures approximately 7½ inches long.
Right side and wrong side
Because ordinary single crochet looks similar from both sides, you can choose the cleaner-looking surface as the outside.
Once you decide, keep that side facing outward during zipper placement.
Size adjustment
To make the pouch wider, increase the foundation chain.
Rather than relying on a specific stitch number, crochet a starting chain approximately ½ inch wider than the zipper teeth from stop to stop.
To make it taller, simply add rows before folding.
For a child who carries only folded bills, you can shorten the panel.
For coins plus cards, maintain enough height that objects sit below the zipper comfortably.
Common Beginner Mistakes
1. Losing a stitch at the row edge
Problem: The rectangle becomes narrower.
Fix: Mark the first and last stitch and count every few rows.
2. Adding stitches
Problem: The panel widens or develops a slanted side.
Fix: Remember that the turning chain does not count as a stitch.
3. Making the foundation chain too tight
Problem: The starting edge curves inward.
Fix: Make the chain more loosely or use a hook 0.5 mm larger for the foundation only.
4. Stretching crochet while attaching the zipper
Problem: The zipper becomes wavy after the clips are removed.
Fix: Lay both materials flat and sew without stretching either one.
5. Pulling hand-sewing thread too tightly
Problem: Zipper tape gathers.
Fix: Keep the thread firm enough to secure the fabric but not tight enough to compress it.
6. Sewing the zipper too close to its teeth
Problem: The slider catches the crochet fabric or thread.
Fix: Position the crochet edge far enough from the teeth that the slider moves freely.
7. Closing the zipper before seaming
Problem: Turning the finished pouch right side out becomes awkward.
Fix: Always leave the zipper partially open before closing the final side seam.
How to Customize This Crochet Project
Change the yarn color
For a school-themed pouch, try:
- Dusty blue
- Sage green
- Mustard yellow
- Terracotta
- Navy
- Lavender
- School colors
A contrasting zipper can make the finished pouch look intentionally designed rather than purely functional.
Make it larger
Use a 6- or 7-inch zipper and extend your foundation chain until the fabric is about half an inch wider than that zipper.
Then crochet the rectangle to twice the desired finished height.
Make a card-only version
Reduce the height to approximately 3 inches after folding.
Before seaming, test the crochet against the card you intend to carry.
Add stripes
Change colors every four or six rows.
For the cleanest result, keep all yarn tails on the side that will become the inside of the pouch.
Add a simple surface detail
After the panel is finished but before installing the zipper, add a small embroidered initial, heart, star, apple, or simple lunch-themed motif.
Avoid bulky appliqués near the zipper because they can interfere with opening the pouch.
Gift ideas
This tiny pouch can also work as:
- School lunch-money holder
- Coin purse
- Gift-card pouch
- Small allowance purse
- Backpack emergency-money pouch
- Earbud case
- Locker key pouch
- Small teacher gift
Finishing Instructions
After the pouch is turned right side out:
- Inspect both seams.
- Weave each yarn tail through several stitches on the inside.
- Change direction once and weave through several more stitches.
- Trim the remaining yarn close to the fabric.
- Check the hand-sewing thread around the zipper.
- Make an extra securing stitch at each zipper end if necessary.
- Shape the lower corners gently with your fingers.
Blocking
Heavy blocking is unnecessary.
If the finished pouch looks slightly uneven, lightly dampen the crochet portion, shape it flat with your fingers, and allow it to dry completely with the zipper open.
Do not expose the zipper to excessive heat.
Washing and care
Follow the care instructions supplied with your chosen yarn. The Craft Yarn Council recommends preserving the yarn label because its care information helps determine how a completed handmade item should be washed.
For a pouch with a zipper, gentle hand washing and air drying are generally the safest conservative option unless the yarn and zipper manufacturers explicitly permit another method.
Quick Printable-Style Summary
Pattern: Crochet Lunch Money Pouch
Skill level: Easy / confident beginner
Finished size: Approx. 5½ × 3¾ in
Yarn: 45–55 yd #4 medium cotton or cotton blend
Hook: 4.0 mm / G-6
Zipper: 5 inches
Main stitch: Single crochet
Starting chain: Ch 23
Row 1: Sc from second chain across — 22 sts
Following rows: Ch 1, turn, sc across — 22 sts
Panel length: Approx. 7½ in / about 34 rows at stated gauge
Construction: Fold rectangle in half, sew zipper to open edges, whip stitch side seams
Finishing: Turn right side out and weave in ends
FAQ
Can a beginner make a crochet lunch money pouch?
Yes. The crochet portion requires only chains and single crochet. The zipper installation is the most unfamiliar part, but it consists of ordinary hand sewing rather than an advanced crochet technique.
What yarn is best for a crochet money pouch?
A smooth cotton or cotton-blend yarn works well because a small pouch benefits from relatively dense, stable fabric. Avoid very fuzzy yarn because it makes individual stitches harder to see and may catch around the zipper.
Do I need to line the pouch?
Not necessarily.
A densely crocheted single-crochet pouch is sufficient for folded bills, cards, and larger coins.
If you plan to carry many very small objects, an optional fabric lining gives additional security.
Can I make the pouch without a zipper?
Yes. You can extend one side into a flap and add a button, snap, or loop closure.
A zipper is preferable when the pouch will regularly hold loose coins because the entire opening can be closed.
How do I change the size?
Choose your zipper first.
Make the crochet width about half an inch wider than the zipper teeth, then crochet the rectangle until its length equals approximately twice the desired finished pouch height.
That method is more reliable than copying stitch counts when using different yarn.
Why is my zipper wavy?
The crochet fabric was probably stretched during sewing, the thread was pulled too tightly, or the zipper tape was not evenly distributed.
Remove the affected sewing stitches, lay everything flat, clip again, and resew with gentler tension.
Can this be used for more than lunch money?
Yes. The same small pouch can hold gift cards, allowance money, earbuds, locker keys, small craft notions, or other compact items.
Final Result
Once everything is secure, add a few folded bills or a school lunch card and make sure the zipper closes without resistance.
The finished pouch should feel compact rather than floppy, with straight sides, a smooth zipper, and enough room inside that cash does not have to be forced beneath the slider.
Conclusion
A lunch money pouch does not need complicated shaping to feel polished and useful. A firm single-crochet rectangle provides the structure, the fold eliminates an unnecessary bottom seam, and the zipper keeps small contents secure.
More importantly for a beginner, each stage can be handled separately: first crochet a clean rectangle, then check the dimensions, then install the zipper, and finally seam the sides.
Once you have made one, the same construction method can easily become a coin purse, gift-card holder, miniature notions pouch, or backpack organizer.
Save the tutorial for back-to-school crochet season, and consider making a second pouch in contrasting colors for another small backpack essential.





