Small items have a habit of collecting exactly where you do not want them: on the bathroom counter, beside the front door, across a child’s dresser, or underneath a pile of yarn.
This crochet hanging basket gives those everyday items a proper place without requiring shelf space. Hang it from a wall peg, door hook, bedpost, closet rail, or sturdy cabinet handle and use it for washcloths, scarves, craft supplies, reusable shopping bags, or lightweight accessories.
The construction is less complicated than the finished shape suggests. You will crochet one solid triangular panel, attach a reinforced hanging loop, fold the two side corners across the front, and sew the lower edge closed. There are no separate side panels and no complicated circular shaping.
The pattern uses half double crochet because it creates fabric more quickly than single crochet while remaining compact enough for a practical storage basket. Two increase rows followed by one plain row form the triangle gradually, giving the panel enough width to overlap without becoming excessively long.
This is an independently written pattern. The selected source article is used only as a visual reference for the general photo-tutorial flow and folded-basket concept; its published stitch sequence has not been reproduced.
What You’ll Learn
- How to begin a solid crochet triangle from its lower point
- How to increase cleanly at both edges
- How to follow a simple three-row shaping repeat
- How to count half double crochet stitches
- How to create a separate reinforced hanging loop
- How to fold a flat triangle into a storage pocket
- How to whipstitch several crochet layers without puckering
- How to adjust the basket’s width, length, and loop size
Project Details
Tutorial type: Pattern-style project tutorial
Skill level: Easy beginner
Finished size: Approximately 8½ inches wide by 11 inches tall, excluding the hanging loop
Estimated time: 2–4 hours
Construction: One flat triangular panel, folded and seamed
Gauge: Approximately 10 hdc and 7 rows = 4 inches
Yarn amount: Approximately 170–190 yards of bulky category 5 yarn
The finished dimensions can vary because basket fabric is intentionally firm and yarns within the same weight category are not always interchangeable. The Craft Yarn Council recommends making a gauge sample when substitution affects the size or structure of a project.
Materials You’ll Need
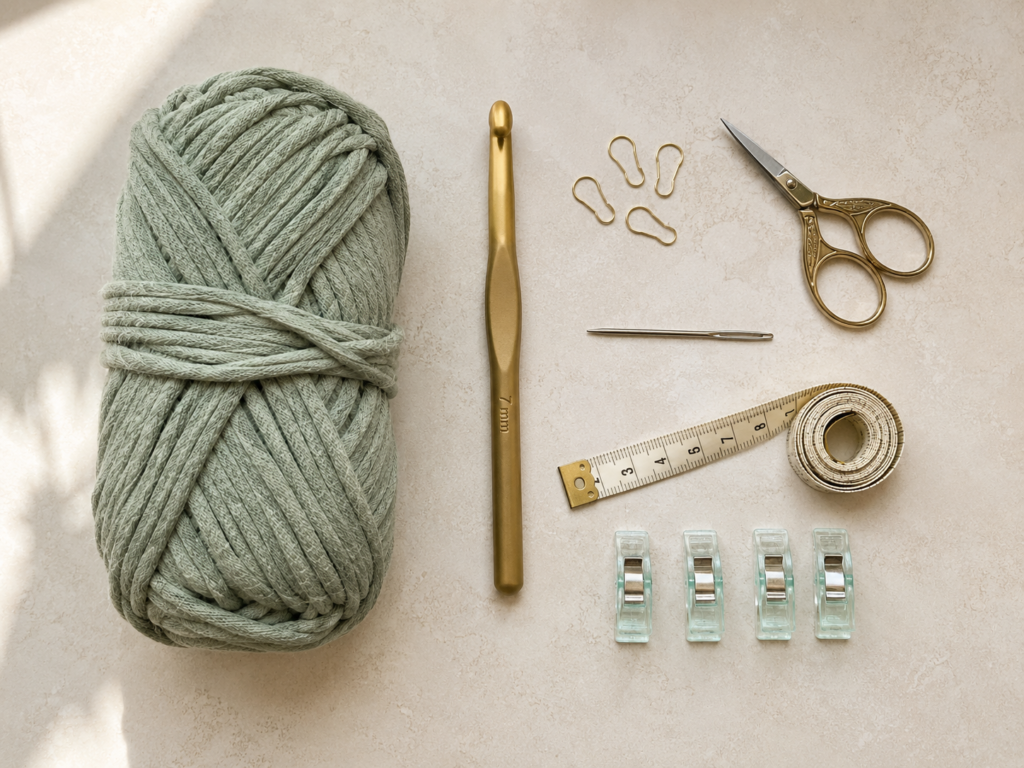
- 170–190 yards of category 5 bulky yarn
- 7 mm crochet hook
- Scissors
- Blunt tapestry needle
- Four locking stitch markers or sewing clips
- Flexible measuring tape
- One removable marker for identifying the right side
- Optional smaller hook for weaving in short ends
Yarn recommendation
Choose cotton, recycled cotton, a firm cotton-acrylic blend, or another low-stretch yarn. Soft draping yarn may produce a basket that stretches downward when filled.
Avoid delicate loosely spun roving if the basket will receive regular use. Repeated contact with hooks and handles can abrade soft fibers.
A tightly twisted bulky cotton is especially suitable for:
- Bathroom storage
- Entryway accessories
- Children’s lightweight belongings
- Craft supplies
- Rolled cloths
- Small yarn remnants
Crochet Abbreviations Used
These abbreviations follow standard US crochet terminology. The Craft Yarn Council maintains a standardized crochet abbreviation list and notes that US and UK terminology differs for several basic stitches.
- ch = chain
- hdc = half double crochet
- sc = single crochet
- sl st = slip stitch
- st/sts = stitch/stitches
- rep = repeat
- RS = right side
- WS = wrong side
US and UK Terminology Note
This tutorial uses US crochet terms.
The stitch called a US half double crochet is commonly called a half treble crochet in UK terminology. Check the terminology printed on any pattern before beginning.
Before You Start
Gauge and fabric firmness
Exact gauge is not critical in the same way it would be for a fitted garment. It does matter for structure, however.
Your fabric should be:
- Firm enough to support its shape
- Flexible enough to fold without a hard ridge
- Dense enough that small objects do not push through large spaces
Make a small sample approximately four inches square. When you hold it upright, it should bend slightly but should not collapse like thin fabric.
Use a smaller hook when the swatch feels loose or stretchy. Use a larger hook when the stitches are painfully difficult to enter or the fabric feels like cardboard.
How to count half double crochet
Look at the top edge of the row. Every completed half double crochet has one V-shaped pair of top loops.
Do not count:
- The active loop on the hook
- The turning chain
- Gaps between stitches
Place a marker in the first and last stitch when you are learning. These two stitches are easy to overlook, and missing them will make one side of the triangle slope more sharply than the other.
Turning-chain rule
Chain 1 at the beginning of every row. The chain raises the hook to the correct working height, but it does not count as a stitch.
Work the first half double crochet into the first actual stitch directly below the chain.
How to avoid uneven edges
At the end of each row:
- Stop and spread the fabric gently.
- Find the final V at the edge.
- Work the last stitch or increase into that V.
- Count before turning.
A basket can tolerate small variations, but repeated missed edge stitches will interfere with folding.
Right side and wrong side
The fabric is reversible enough that either face can become the outside. After approximately six rows, choose the side whose stitches look neater to you and attach a removable marker. Treat that face as the right side.
Beginner note
Do not judge the final shape from the first several rows. The panel begins as a small wedge and develops into a wider triangle as the shaping repeat continues.
Step-by-Step Crochet Tutorial
Step 1: Crochet the First Row
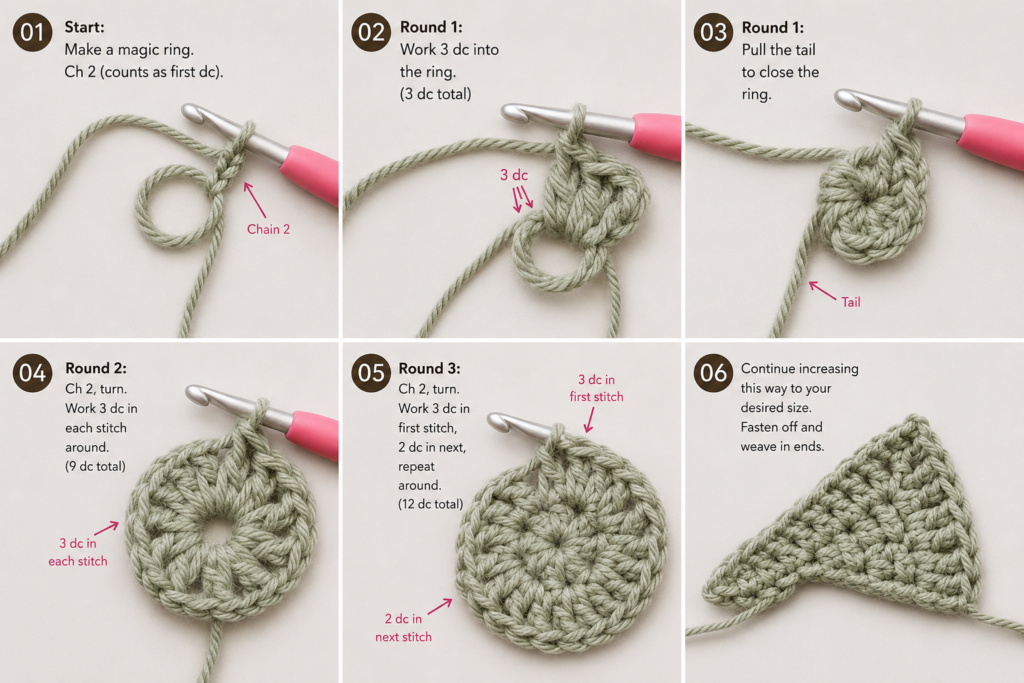
Make a slip knot and chain 2.
Work 3 hdc into the second chain from the hook.
Turn.
Stitch count: 3 hdc
This tiny three-stitch row forms the lower point of the triangular panel.
To make one half double crochet:
- Yarn over.
- Insert the hook into the designated chain.
- Yarn over and pull up a loop.
- You should have three loops on the hook.
- Yarn over and pull through all three loops.
Beginner tip:
Keep the beginning chain relaxed. An extremely tight chain makes it difficult to place all three stitches into the same opening.
Common mistake to avoid:
Do not work into the slip knot itself. Use the second chain from the hook.
Step 2: Make the First Increase Row
Chain 1 and turn.
Work:
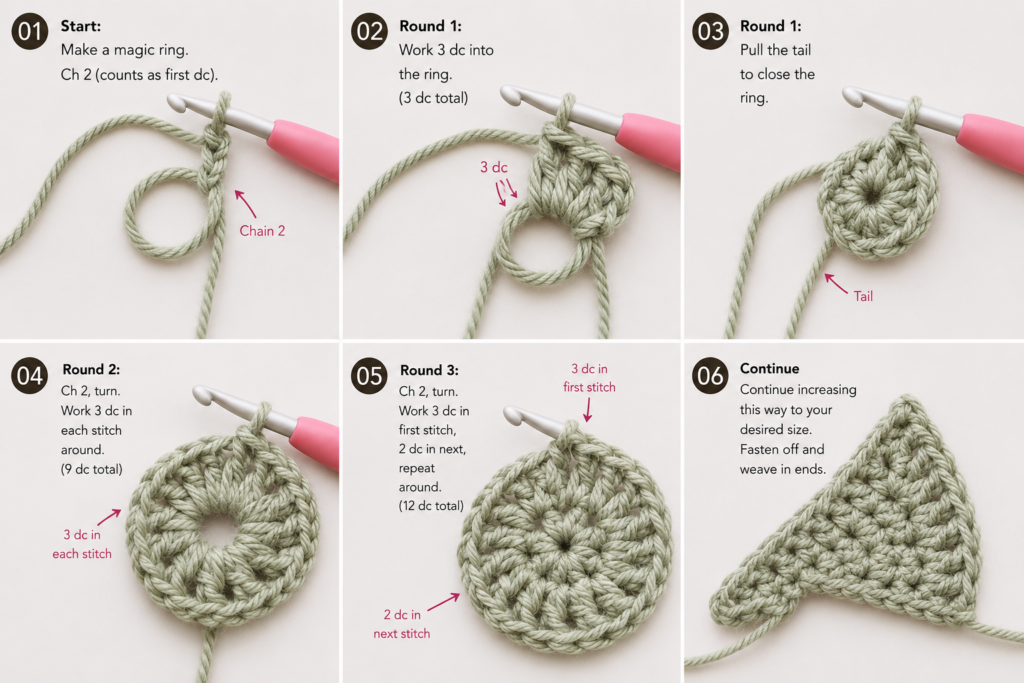
- 2 hdc in the first stitch
- 1 hdc in the center stitch
- 2 hdc in the final stitch
Stitch count: 5 hdc
Working two stitches into each outer edge makes the panel wider by two stitches.
Beginner tip:
Mark the first and last stitch before beginning the row. Remove each marker only when you work the increase into that stitch.
Common mistake to avoid:
Do not place the first two stitches around the turning chain. Both hdc stitches go into the first actual stitch.
Step 3: Establish the Three-Row Shaping Repeat
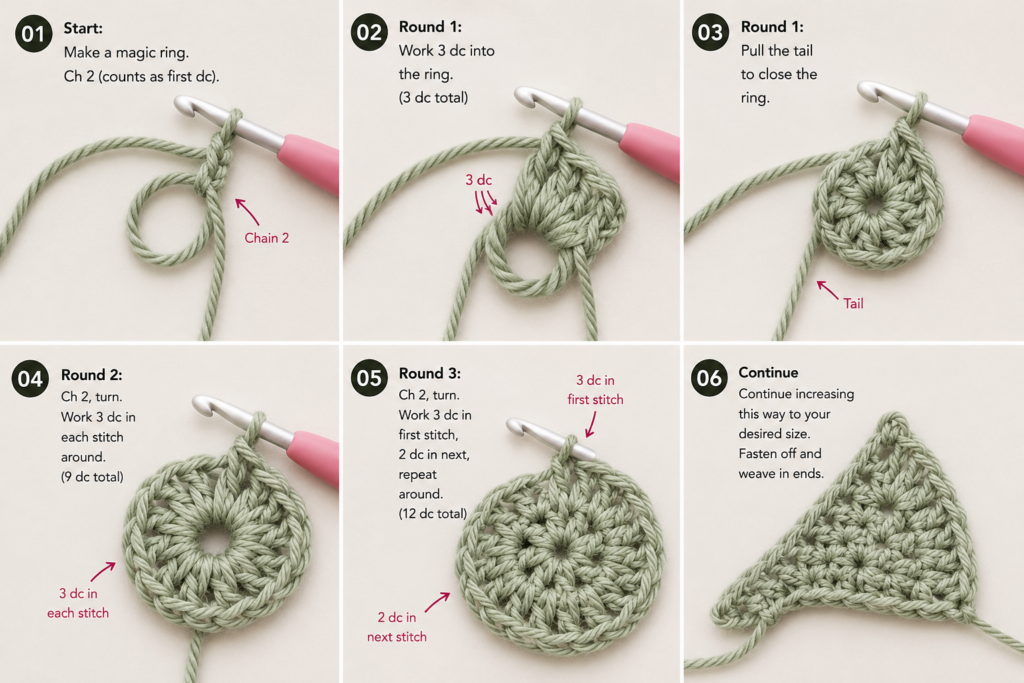
The triangle is made with the following repeat:
Increase Row A
Chain 1 and turn.
Work 2 hdc in the first stitch, 1 hdc in every stitch until one stitch remains, and 2 hdc in the last stitch.
The row increases by two stitches.
Increase Row B
Repeat Increase Row A.
The panel increases by another two stitches.
Even Row C
Chain 1 and turn.
Work 1 hdc in every stitch across.
The stitch count remains unchanged.
You have now completed one complete shaping repeat.
After the first three-row repeat, you should have 7 hdc.
Beginner tip:
Use a row counter or write three letters on paper: A, B, C. Cross off one letter after each row and begin again after C.
Common mistake to avoid:
Do not add increases on the even row. The plain row controls the angle of the triangle and prevents the fabric from becoming too wide too quickly.
Step 4: Continue Growing the Triangle
Repeat the three shaping rows eight more times:
- Increase at both edges.
- Increase at both edges again.
- Work one even row.
After nine complete repeats, including the first repeat already completed, you will have worked 28 rows in total and should have 39 hdc across the final row.
The count develops as follows:
- After Repeat 1: 7 sts
- After Repeat 2: 11 sts
- After Repeat 3: 15 sts
- After Repeat 4: 19 sts
- After Repeat 5: 23 sts
- After Repeat 6: 27 sts
- After Repeat 7: 31 sts
- After Repeat 8: 35 sts
- After Repeat 9: 39 sts
Measure the panel occasionally. Aim for approximately:
- 15–16 inches across the final edge
- 12–14 inches from the center of the final edge to the lower point
A difference of an inch is acceptable. The folding stage is adjustable.
Beginner tip:
Count after every increase row. Each increase row must contain exactly two more stitches than the previous row.
Common mistake to avoid:
Do not pull the first and last stitch too tightly. Tight edge stitches make the sides curl inward.
Step 5: Check and Finish the Main Panel
Lay the triangle flat without pulling it.
Check that:
- The lower point is centered.
- Both sloping edges are approximately equal.
- The final edge is wide enough to overlap across the front.
- The fabric feels firm rather than drapey.
- The final stitch count is 39.
Fasten off, leaving a normal six-inch tail. The hanging loop will be added separately with a fresh length of yarn.
The panel does not need aggressive blocking. Light shaping is enough. Pin the three corners into position and mist the fabric lightly only when the yarn label permits it.
Beginner tip:
Before fastening off, hold the two upper corners across one another. They should overlap comfortably without pulling the lower point upward.
Common mistake to avoid:
Do not stretch the panel while measuring. A basket measured under tension may become narrower after it relaxes.
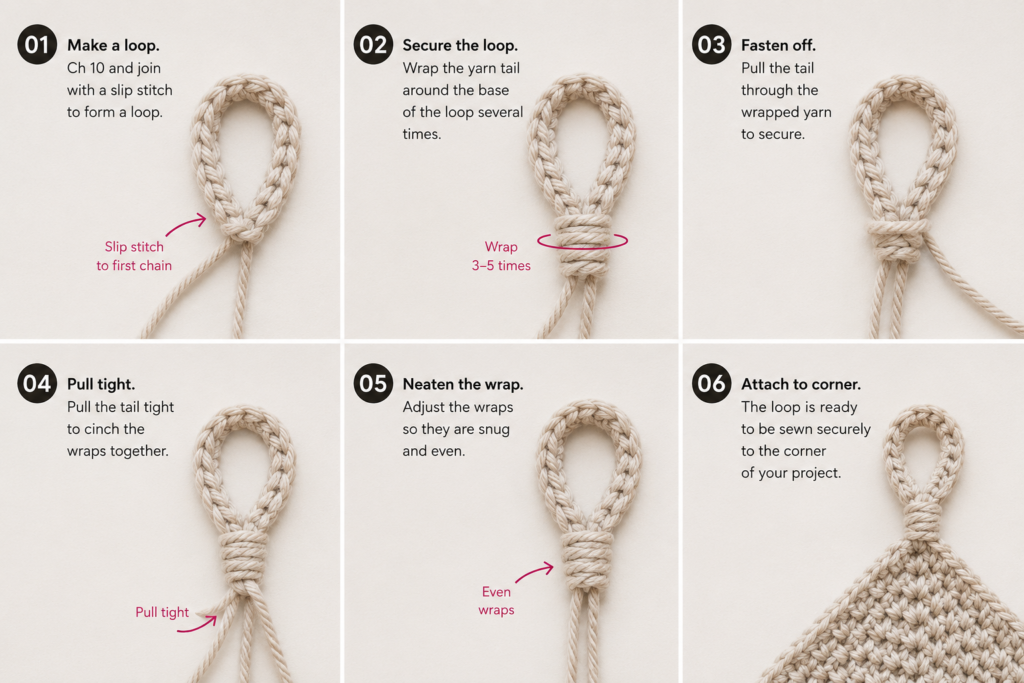
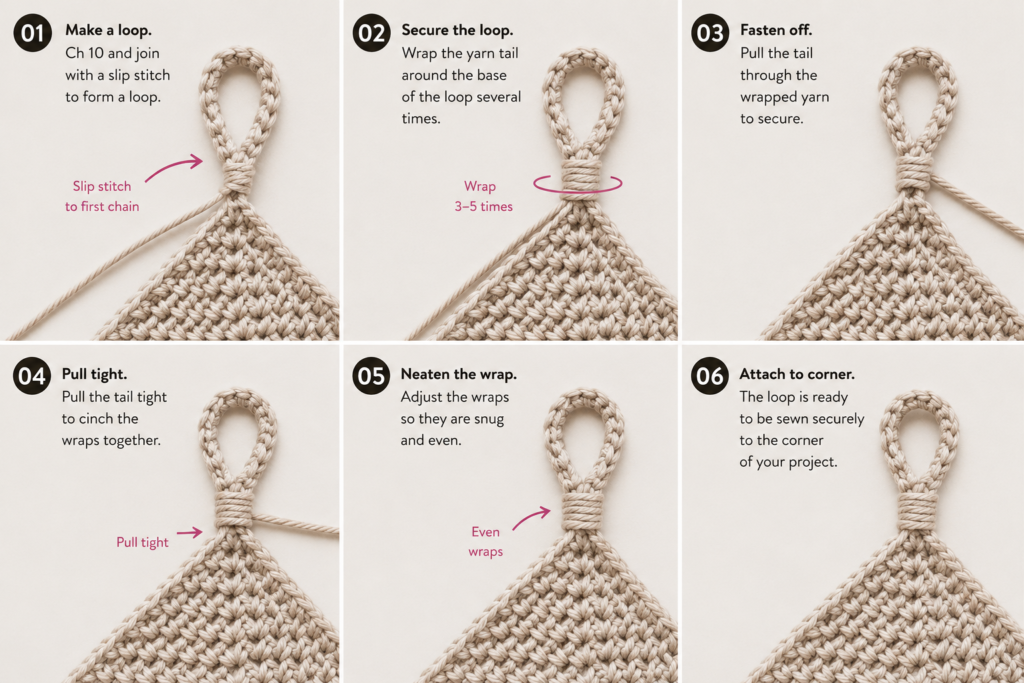
Step 6: Add the Reinforced Hanging Loop
Fold the final edge gently in half to identify its center stitch. With 39 stitches, stitch 20 is the center.
Attach the yarn to the center stitch with a slip stitch.
Chain 16.
Slip stitch back into the same center stitch. You now have a simple chain loop.
Turn the panel so the loop is easy to reach. Work approximately 20 sc around the chain, covering the chain rather than inserting the hook into individual chain stitches.
Slip stitch into the center attachment point and fasten off.
Weave both loop ends securely through several nearby stitches on the wrong side.
Test the loop before assembly:
- Place it over the intended peg or hook.
- Pull downward firmly with your hand.
- Check that neither attachment end moves.
- Add several hidden sewing stitches around the base when necessary.
Beginner tip:
Crocheting around the chain is easier than inserting the hook through each chain and creates a smoother, more comfortable loop.
Common mistake to avoid:
Do not make the single crochet covering so tight that the loop twists into a cord. The loop should curve naturally.
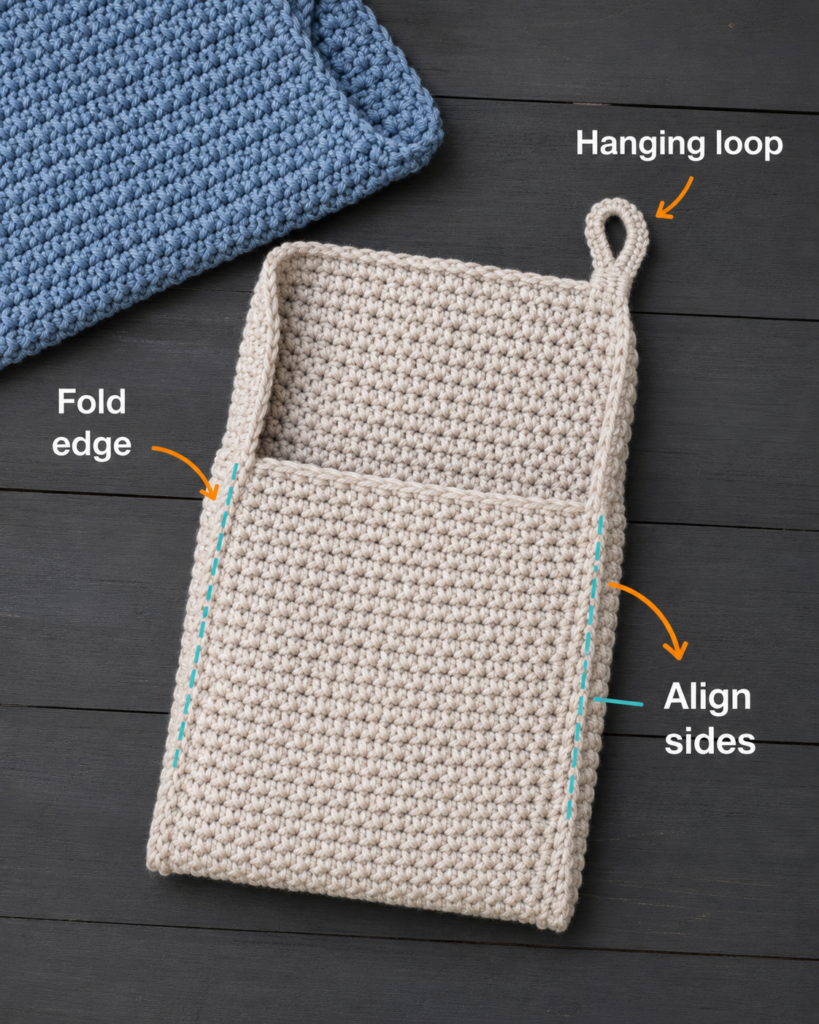
Step 7: Make the First Fold
Place the panel right side down with:
- The hanging loop centered at the top
- The broad final edge horizontal
- The original starting point facing downward
Bring the upper-left corner diagonally across the panel.
Position its point approximately one inch beyond the vertical center line. The exact overlap can be adjusted according to your gauge.
Clip the fold at the lower edge and near the center.
Check the side opening. The upper part should remain open enough to place items inside the basket.
Beginner tip:
Place a rolled washcloth or small ball of yarn inside the loose fold. This helps you judge the depth before sewing.
Common mistake to avoid:
Do not pull the first corner tightly across the panel. Excess tension makes the finished opening narrow and causes the basket to twist.
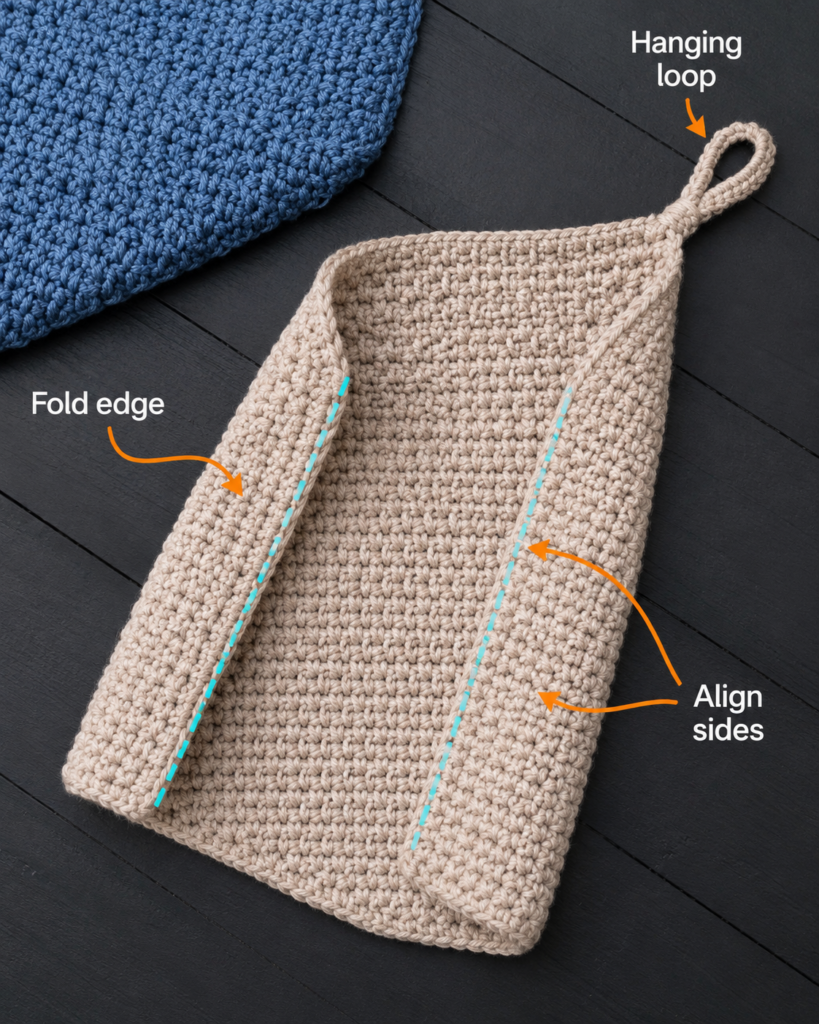
Step 8: Fold the Second Corner Across the Front
Bring the upper-right corner diagonally across the first fold.
Overlap the first flap by approximately 1–1½ inches.
The lower folded edges should meet or overlap near the bottom of the basket. Clip all layers together along the lower edge.
Adjust the shape until:
- The hanging loop remains centered.
- The outer sides appear balanced.
- The opening is wide enough for the intended contents.
- The front overlap lies flat.
- The lower point does not twist sideways.
The second flap will become the visible front layer.
Beginner tip:
Hang the clipped basket temporarily before sewing. Gravity reveals uneven folds more clearly than a flat tabletop does.
Common mistake to avoid:
Do not assume that both corners must overlap at mathematically identical positions. Crochet fabric can vary slightly. Prioritize a centered loop and balanced finished shape.
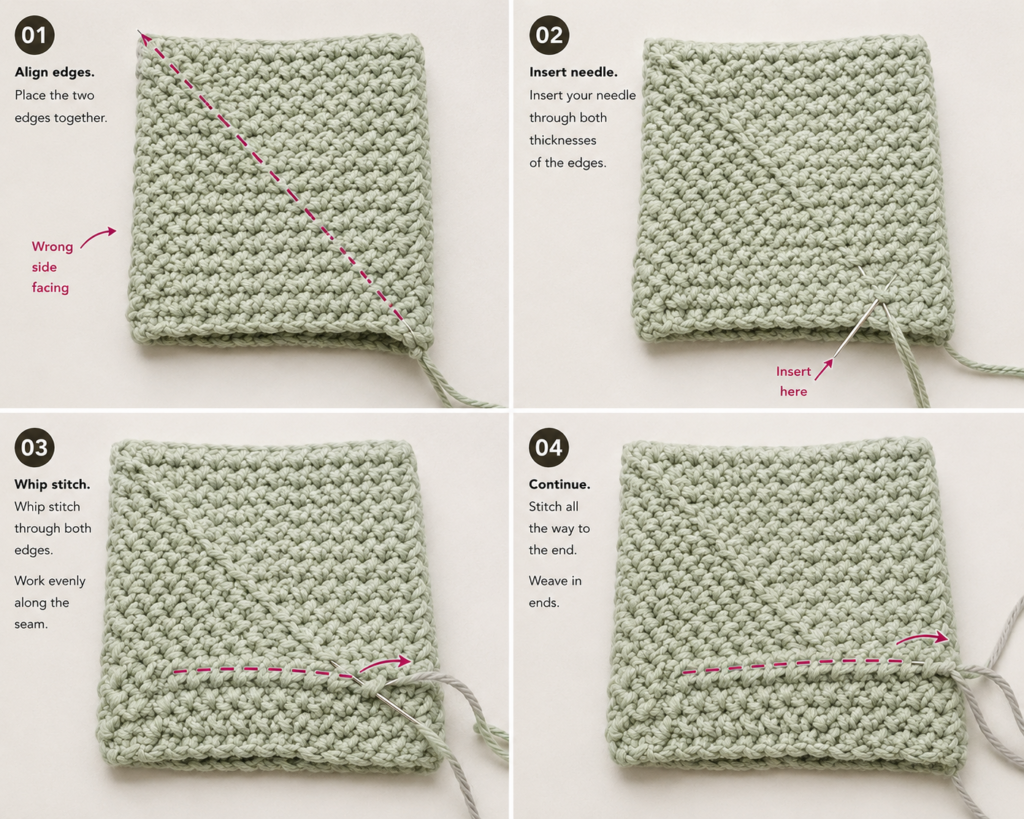
Step 9: Sew the Bottom Edge
Cut a length of matching yarn approximately three times the width of the bottom seam.
Thread the tapestry needle and secure the yarn inside the fold with several small stitches.
Whipstitch across the lower edge:
- Insert the needle through all folded layers.
- Pull the yarn through until the stitch lies flat.
- Move approximately one crochet stitch along the edge.
- Insert the needle through every layer again.
- Continue across the entire bottom.
Keep the seam firm but not tight. The finished bottom should remain flexible enough to open into a shallow pocket.
At the far side, make two additional stitches through the corner to reinforce it.
Beginner tip:
After every four or five stitches, place your fingers inside the basket and spread the bottom gently. This prevents the seam from tightening into a narrow ridge.
Common mistake to avoid:
Do not sew through only the front flaps. The needle must catch the back layer as well or the basket will remain open along the bottom.
Step 10: Secure the Front Overlap
The basket can technically hold its shape after the bottom is sewn, but the upper flap may shift when items are removed. A short hidden seam makes the organizer more stable.
Thread matching yarn and work small running stitches along approximately the lower half of the visible overlap.
Catch only the inner loops when possible. Avoid sewing through the upper section near the opening because that would reduce access to the basket.
Stop the seam approximately three inches below the top opening.
Secure the yarn on the wrong side and weave it through several different stitch directions.
Beginner tip:
Use a separate length of yarn for the overlap. A separate seam is easier to remove and reposition if the basket opening needs adjustment.
Common mistake to avoid:
Do not stitch the complete front edge from bottom to top. The basket requires an open upper section to expand around its contents.
Step 11: Shape and Test the Basket
Turn the basket so the chosen right side faces outward.
Place both hands inside the opening and gently expand the lower pocket. Press the side folds outward slightly to create storage depth.
Hang the basket from a sturdy peg and add a light test item, such as one rolled washcloth.
Check:
- The loop remains centered.
- The bottom seam does not open.
- The front flap does not pull away.
- The basket hangs vertically.
- The yarn does not stretch excessively.
Add one or two reinforcing stitches where needed.
Do not test the basket with breakable, sharp, extremely heavy, or liquid-filled objects.
Pattern Notes or Stitch Notes
Turning chain
Chain 1 at the beginning of every row. It does not count as a stitch.
Stitch count
The first row contains three stitches.
Every increase row adds two stitches: one additional stitch at each outer edge.
The even row does not change the stitch count.
One complete shaping repeat adds four stitches.
Repeat pattern
The main shaping repeat is:
- Row A: Increase at both ends
- Row B: Increase at both ends
- Row C: Work even
Repeat until the panel has nine complete three-row repeats or reaches the preferred size.
Right side and wrong side
The half double crochet panel is nearly reversible. Select the neater surface as the right side before folding.
During assembly, place the right side against the tabletop. After folding, the right side of the side flaps will face outward.
Size adjustment
For a smaller basket, stop after seven or eight repeats.
For a larger basket, add complete three-row repeats rather than stopping after a random row. This preserves the intended slope.
Every added repeat increases the final row by four stitches and adds approximately 1–1½ inches of length, depending on gauge.
Loop adjustment
For a small wall peg, chain 12–14.
For a thick door knob or closet rail, chain 18–24.
Always add enough single crochet stitches around the chain to cover it without forcing the loop to curl.
Common Beginner Mistakes
1. Missing the final stitch
Problem: One edge becomes shorter and steeper.
Fix: Mark the first and final stitch of every row until you can identify them confidently.
2. Increasing on the even row
Problem: The triangle becomes too broad and shallow.
Fix: Follow the A-B-C row sequence and mark the plain row on a paper counter.
3. Forgetting one edge increase
Problem: The lower point shifts away from the center.
Fix: Count the row immediately. An increase row should contain two more stitches than the preceding row.
4. Using yarn that stretches too much
Problem: The basket lengthens when filled.
Fix: Choose cotton, recycled cotton, tightly spun acrylic, or another structured yarn. Use the basket for lighter items when the yarn is soft.
5. Making the loop too loose
Problem: The basket hangs far below the peg and may swing.
Fix: Test the chain around the intended hook before reinforcing it with single crochet.
6. Pulling the bottom seam too tightly
Problem: The bottom puckers into a narrow line.
Fix: Spread the pocket after every several whipstitches and loosen any stitch that distorts the edge.
7. Sewing too far up the front overlap
Problem: The opening becomes too narrow to use comfortably.
Fix: Secure only the lower half of the overlap.
8. Filling the basket before testing the attachment
Problem: The loop or seams may fail under sudden weight.
Fix: Test with one lightweight item and increase the load gradually.
How to Customize This Crochet Project
Change the yarn
For maximum structure, use:
- Bulky cotton
- Recycled cotton
- Cotton-acrylic blend
- Braided textile cord
- Multiple strands of medium-weight yarn held together
When holding yarn double, treat both strands as one throughout the project.
Change the colors
Simple color ideas include:
- Dusty sage for a calm bathroom
- Terracotta for autumn storage
- Cream for a minimalist nursery
- Denim blue for an entryway
- Mustard for craft-room organization
- Charcoal for a modern office
For subtle stripes, change color only at the beginning of an even row. This keeps the transitions away from the edge increases.
Make a smaller basket
Stop after seven repeats for a smaller organizer suitable for:
- Keys
- Hair accessories
- Small charging cables
- Reusable face cloths
- Crochet notions
Test the fold before fastening off.
Make a larger basket
Add one or two complete shaping repeats.
Use a firm yarn and reinforce the loop with an additional strand of yarn if the basket will hold several fabric items.
A larger crocheted basket should still be reserved for lightweight storage. It is not a substitute for a load-rated hanging container.
Add a border
Before attaching the loop, work one row of single crochet around the entire panel.
Place:
- One sc in every stitch across the final edge
- Approximately one sc per row end along each sloping side
- Three sc in the lower point
A single-crochet border adds firmness but can reduce flexibility during folding.
Add texture
Replace the solid hdc fabric with:
- Hdc in the back loop only for subtle horizontal ridges
- Alternating hdc and sc rows
- Waistcoat stitch when you are comfortable inserting the hook through the stitch post
- A dense moss stitch for a woven appearance
Recalculate the panel by measurement rather than relying on the original row count when changing the stitch.
Add a decorative loop wrap
Wrap a separate strand of yarn around the base of the loop eight to twelve times. Tie the ends on the back and weave them into the panel.
This produces a finished tassel-neck effect while reinforcing the attachment point.
Gift and use ideas
Fill the basket with:
- Rolled spa cloths
- Yarn and a crochet hook
- Baby socks
- A small scarf and gloves
- Reusable cotton pads
- Craft-room supplies
- A handmade soap and washcloth set
Include the yarn label or written care information when giving the basket as a gift. The Craft Yarn Council recommends retaining yarn-label care guidance so the recipient knows how to wash and dry the handmade item.
Finishing Instructions
Fastening off
After completing every seam, pass the yarn through the final loop and pull firmly.
Avoid cutting the end immediately. Leave at least four to six inches for weaving.
Weaving in ends
Thread each tail through the tapestry needle.
Pass the tail:
- Horizontally through several stitch backs.
- Change direction.
- Pass vertically or diagonally through another group of stitches.
- Change direction once more before trimming.
Changing direction helps prevent the tail from sliding out during use.
Light blocking
Many structured baskets do not need full wet blocking.
To correct minor twisting:
- Lay the basket flat.
- Shape the opening and lower corners.
- Pin the folds without stretching.
- Mist lightly when permitted by the yarn label.
- Allow it to dry completely before hanging.
Do not apply heat directly to synthetic yarn unless its care instructions specifically permit heat.
Washing and care
Follow the yarn label rather than using one rule for every fiber.
For a removable wall basket, gentle hand washing is usually the least disruptive option:
- Use cool or lukewarm water.
- Avoid twisting or wringing.
- Press excess water between towels.
- Reshape the basket.
- Dry it flat.
Quick Printable-Style Summary
Project: Folded crochet hanging basket
Skill level: Easy beginner
Finished size: Approximately 8½ inches wide by 11 inches tall, excluding loop
Yarn: 170–190 yards of bulky category 5 cotton or structured cotton blend
Hook: 7 mm
Other materials: Scissors, tapestry needle, stitch markers, measuring tape, sewing clips
Stitches: Chain, slip stitch, single crochet, half double crochet
Gauge: Approximately 10 hdc and 7 rows = 4 inches
Starting method: Chain 2; work 3 hdc in the second chain from the hook
Shaping repeat:
- Increase in first and last stitch.
- Repeat the increase row.
- Work one even row.
Number of repeats: Nine complete three-row repeats
Final stitch count: 39 hdc
Loop: Join at center stitch, chain 16, slip stitch into same stitch, and cover the loop with approximately 20 sc
Assembly: Fold left corner inward, overlap right corner, whipstitch the bottom through all layers, and secure the lower front overlap
Finishing: Weave in all ends, shape lightly, test on a secure peg, and use for lightweight storage
FAQ
Is this crochet hanging basket pattern suitable for a complete beginner?
It is appropriate for a beginner who can make a chain and half double crochet. The most important skills are identifying the first and last stitch, counting each row, and sewing through several fabric layers.
Practice half double crochet on a small square first when those steps are unfamiliar.
Can I use worsted-weight yarn instead of bulky yarn?
Yes, but the fabric and finished dimensions will change.
You can:
- Hold two strands of worsted yarn together
- Use one strand with a smaller hook and add more shaping repeats
- Measure the panel rather than depending on the 39-stitch count
The fabric should remain firm enough for storage.
How much weight can a crochet hanging basket hold?
That depends on the yarn, hook, loop, seam strength, wall hardware, and construction quality. Treat this design as lightweight textile storage rather than load-bearing equipment.
Good contents include washcloths, scarves, yarn, soft accessories, and light craft supplies. Avoid glass, liquids, heavy tools, or objects that could cause injury if the basket falls.
Why does my triangle curl?
Mild curling can result from firm basket tension and may relax during folding.
Severe curling usually means:
- The hook is too small
- The edge stitches are unusually tight
- The turning chain is being pulled
- The yarn has a strong twist
Try moving up by 0.5–1 mm and relaxing the first and last stitch.
Can I crochet the basket in the round?
Yes, but that creates a different construction. Round baskets usually begin with a circular or oval base and build upward before a handle is added.
This pattern is designed specifically as a folded flat panel so beginners can see the shaping and modify the opening before sewing.
How do I stop the basket from stretching?
Use a firm low-stretch yarn, work at a compact gauge, reinforce the loop, and store only lightweight items.
A fabric lining can also reduce stretching. Cut a fabric pocket slightly smaller than the crocheted basket and hand-sew it inside after the crochet assembly is complete.
Can I hang this basket from a door knob?
Yes. Make the loop large enough to pass over the widest part of the knob without forcing it.
Chain 20–24 instead of 16, test the chain before reinforcing it, and ensure the basket does not interfere with the door latch or create a tripping hazard.
Conclusion
A hanging basket is an effective beginner project because it transforms a simple flat piece into a useful three-dimensional object without complicated shaping or multiple crocheted components.
Once you understand the three-row increase repeat, the project becomes rhythmic. The folding stage can then be adjusted before any permanent seams are made, allowing you to control the width of the opening and the depth of the pocket.
Use your first basket for lightweight bathroom or craft-room storage. After testing the size and yarn, make a coordinated set in several colors or adjust the number of shaping repeats to create small, medium, and large organizers.
Save the tutorial with your crochet home décor patterns so you can reuse the same flat-panel construction for future wall-storage projects.





