A crochet pumpkin may look like a shaped or advanced project, but this beginner version starts with the simplest possible form: a flat rectangle.
You will crochet straight rows, create texture by working in the back loops, join the two short ends, gather the openings, and add stuffing. The ribbed fabric naturally curves into a plump pumpkin shape, so there are no complicated increases, decreases, or continuous rounds to track.
This tutorial uses medium-weight terracotta yarn and a soft olive-green stem. The finished pumpkin is large enough to display on a shelf or table but small enough to complete in one relaxed crafting session.
The instructions include exact stitch counts for one medium pumpkin, along with guidance for changing the size after you understand the basic construction.
What You’ll Learn
- How to make a neat foundation chain
- How to work half double crochet
- How to crochet in the back loop only
- How to keep a rectangular crochet panel straight
- How to join the panel into a tube
- How to gather crochet fabric without leaving a large hole
- How much stuffing to use
- How to shape a pumpkin without complicated crochet increases
- How to make and attach a simple crochet stem
Finished Size
Approximately:
- 5.5 inches or 14 cm wide
- 4 inches or 10 cm high without the stem
- 5 inches or 12.5 cm high with the stem
Your finished dimensions may vary slightly because yarn thickness, hook size, stuffing, and tension all affect the final shape.
Materials You’ll Need
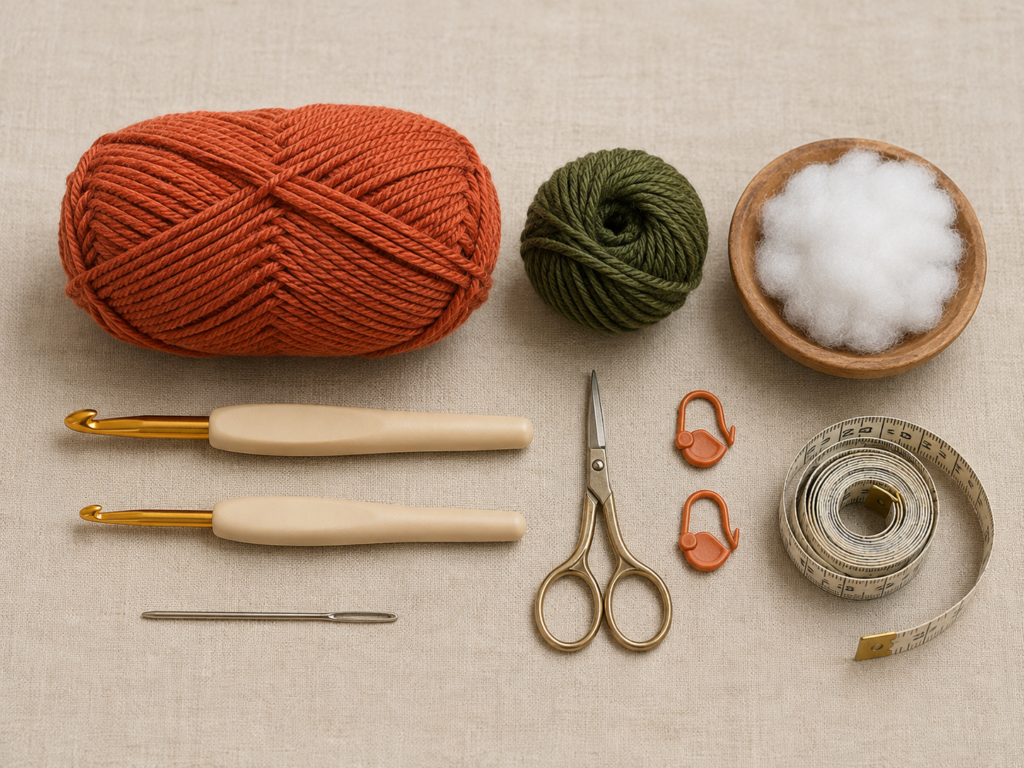
- Approximately 80–100 yards of category 4 medium-weight yarn in muted terracotta
- Approximately 10–15 yards of category 4 yarn in deep olive green
- 5 mm crochet hook for the pumpkin
- 4 mm crochet hook for the stem
- Polyester fiberfill
- Blunt tapestry or yarn needle
- Small scissors
- Flexible measuring tape
- Two locking stitch markers, optional
A 5 mm hook is commonly marked H-8, while a 4 mm hook is commonly marked G-6, although metric measurements are more reliable than letter designations because manufacturer labeling can vary.
Choose a yarn with a smooth, clearly defined strand. Highly fuzzy yarn can hide the back loops and make the first pumpkin more difficult than it needs to be.
Crochet Abbreviations Used
- ch = chain
- hdc = half double crochet
- hdc BLO = half double crochet in the back loop only
- sl st = slip stitch
- st/sts = stitch/stitches
- rep = repeat
- RS = right side
- WS = wrong side
These abbreviations follow common US crochet terminology. The Craft Yarn Council maintains a broader standardized abbreviation list for checking unfamiliar pattern terms.
US and UK Terminology Note
This tutorial uses US terminology.
A US half double crochet is called a half treble crochet in UK terminology. The construction method remains the same, but the stitch name changes.
Before You Start
Gauge and tension
Exact gauge is not critical because this is a stuffed decoration rather than a fitted garment. However, your stitches should be close enough that white stuffing will not show through the fabric.
A useful approximate gauge is:
- 14 half double crochet stitches = 4 inches
- 10 back-loop rows = 4 inches
Do not force your tension to match those numbers exactly. Instead, concentrate on producing an even rectangle with small, consistent spaces between the stitches.
When using medium-weight yarn, the Craft Yarn Council’s standard hook ranges are general guidelines rather than strict rules. A slightly smaller hook can be useful for a stuffed project because it creates denser fabric.
How to count stitches
The turning chain in this pattern does not count as a stitch.
At the end of every row, you should have 18 half double crochet stitches. Count the visible V shapes across the top edge before turning. The first and last stitches are the easiest to miss.
Placing a locking marker in the first stitch of each row can help you identify it when you return.
How to keep the edges straight
Work the first stitch into the first actual stitch directly beneath the turning chain. Work the final stitch into the last V at the opposite edge.
Do not accidentally place a stitch into the side of the turning chain. Doing so gradually adds stitches and makes the rectangle flare outward.
How to prevent excessive curling
Back-loop crochet creates an elastic ribbed fabric that may curl slightly. Mild curling is normal and will disappear when the rectangle is seamed and stuffed.
If the panel folds tightly into itself, your tension may be too firm. Relax your grip or try a 5.5 mm hook.
Choosing colors
Traditional orange works well, but a pumpkin can be rust, cream, mustard, olive, burgundy, dusty blue, or soft brown. For a coordinated collection, choose three shades with similar saturation rather than mixing one neon color with several muted colors.
Step-by-Step Crochet Tutorial
Step 1: Make the Foundation Chain
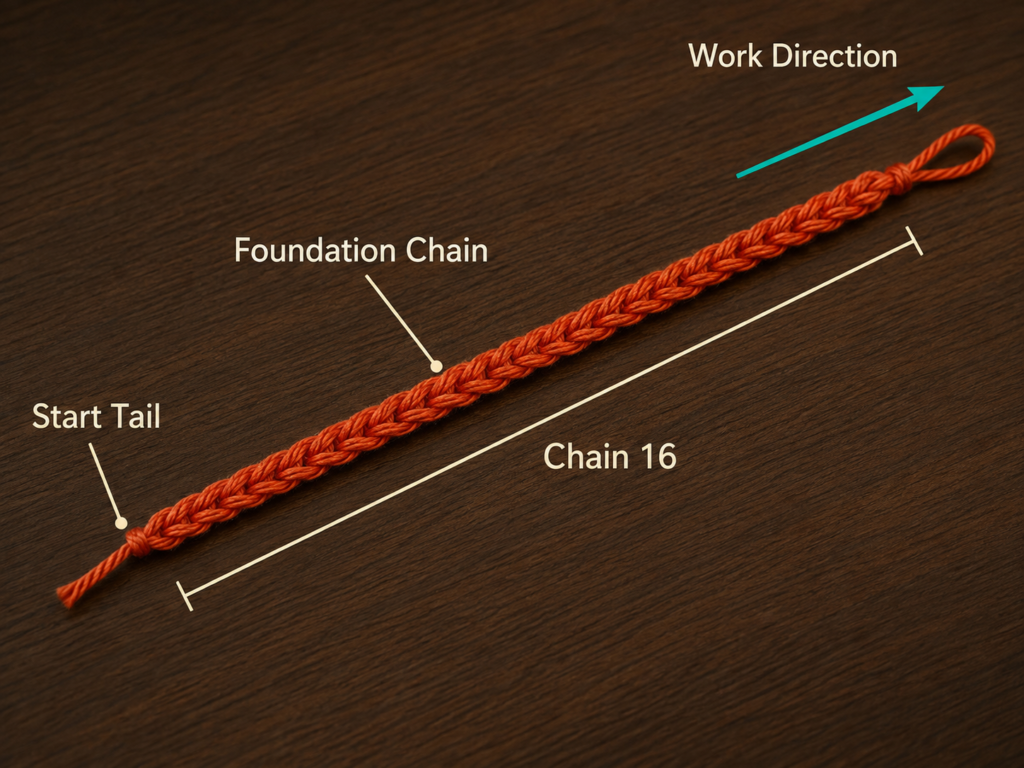
Using the 5 mm hook and terracotta yarn, leave a starting tail approximately 20 inches or 50 cm long.
Make a slip knot and chain 19.
The loop on your hook does not count as a chain. Count the V-shaped stitches below the hook until you have exactly 19.
The foundation chain determines the approximate height of the pumpkin panel. More chains make a taller pumpkin; fewer chains make a shorter one.
Beginner tip:
Keep the chain relaxed. It should be loose enough for the hook to enter each stitch without forcing it.
Common mistake to avoid:
Do not pull every chain tightly against the shaft of the hook. A tight foundation edge can make the panel curve and prevent the first and last rows from aligning cleanly.
Step 2: Crochet the First Row
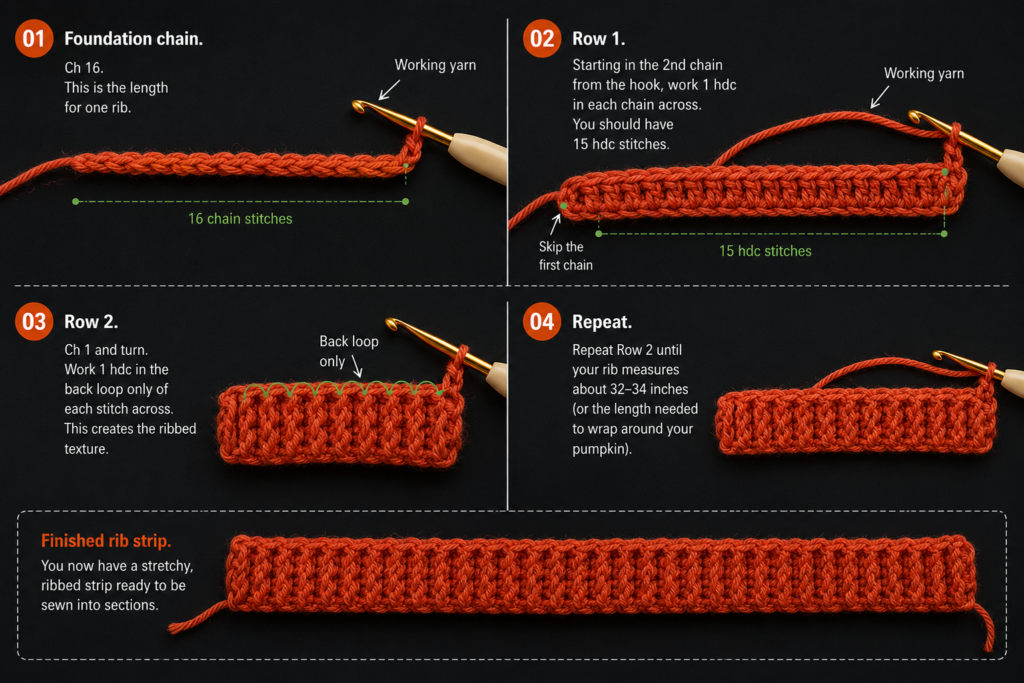
Yarn over.
Insert the hook into the second chain from the hook. Yarn over and pull a loop through the chain. You should now have three loops on the hook.
Yarn over once more and pull through all three loops. One half double crochet is complete.
Work one half double crochet in each remaining chain.
At the end of Row 1, you should have 18 stitches.
Turn the work.
The first row may feel slower than the later rows because foundation chains have less structure than completed stitches. Work carefully rather than trying to crochet quickly.
Beginner tip:
After completing the row, count from one edge to the other before continuing. Correcting a missed chain now is much easier than correcting it after several rows.
Common mistake to avoid:
Do not work into the first chain directly beneath the hook. Starting in that chain would leave no turning space and could make the lower corner bunch.
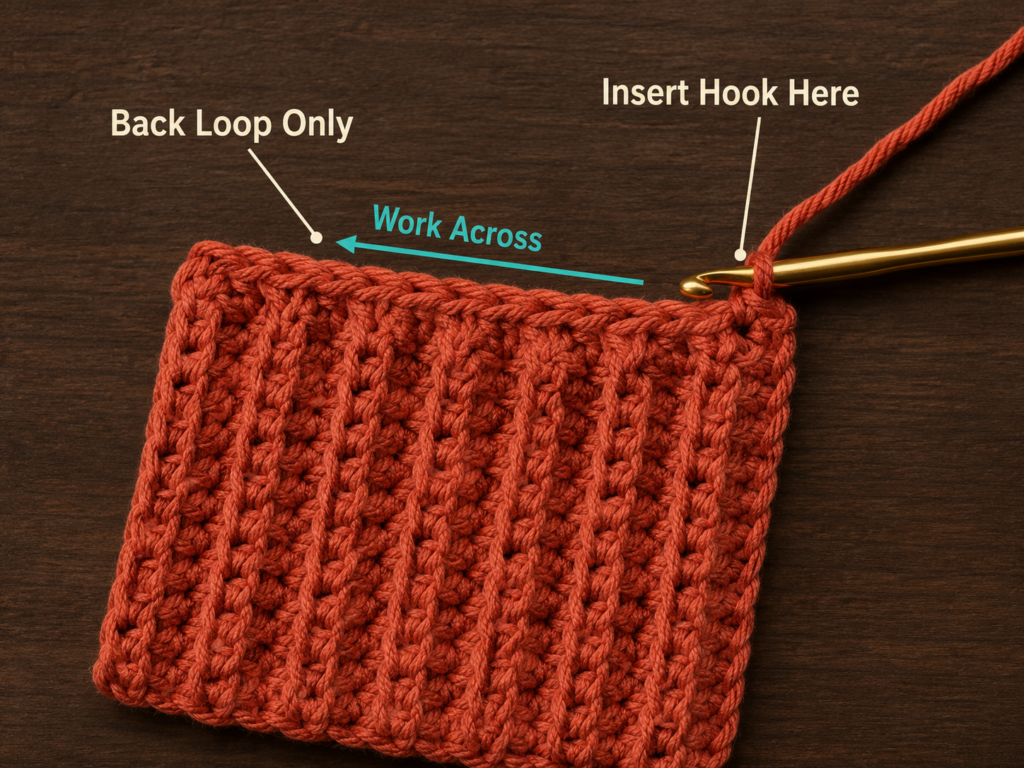
Step 3: Begin the Back-Loop Ribbing
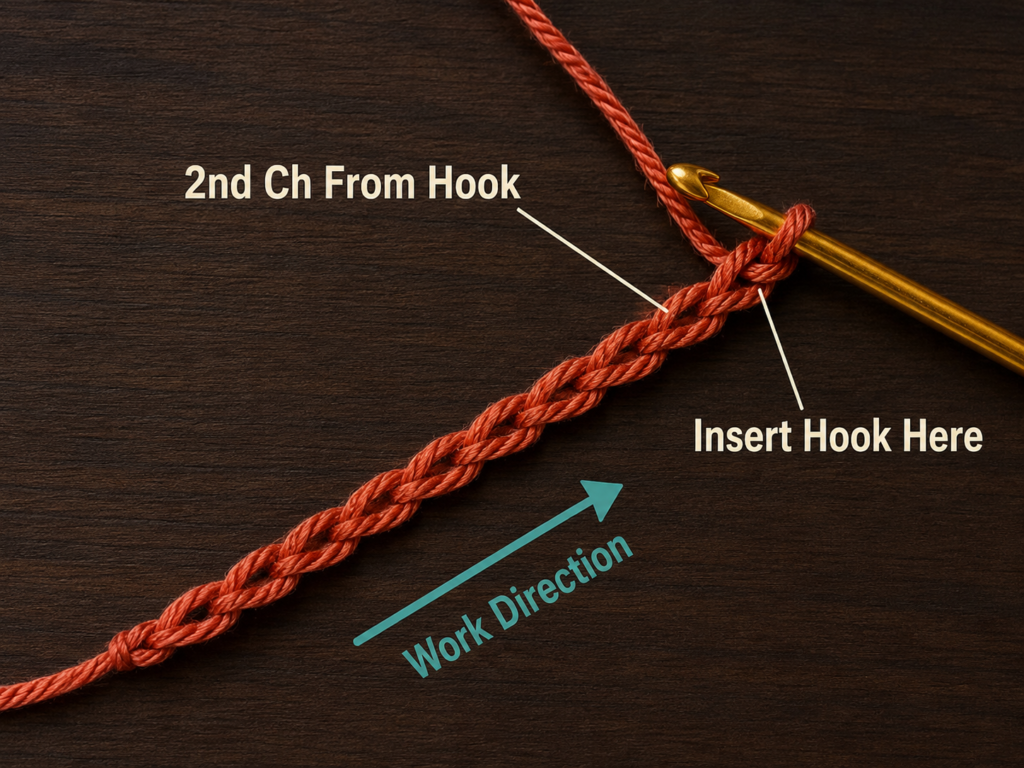
Chain 1. The chain does not count as a stitch.
Look at the top of the row. Each stitch has two loops that form a V. The loop closest to you is the front loop. The loop farther away is the back loop.
Yarn over and insert the hook under the back loop only of the first stitch. Complete one half double crochet.
Continue working one half double crochet in the back loop only of every stitch across.
You should still have 18 stitches.
Turn.
Repeat the same instructions for each following row:
- Chain 1
- Hdc BLO in every stitch
- Count 18 stitches
- Turn
Working through only the back loops pushes the unused front loops forward. Those horizontal ridges become the pumpkin’s ribs after the fabric is turned and shaped.
Beginner tip:
Pause after inserting the hook but before finishing the stitch. Check that only one loop is resting over the hook.
Common mistake to avoid:
Do not alternate accidentally between both loops and the back loop. Mixed placement creates irregular flat patches in the ribbing.
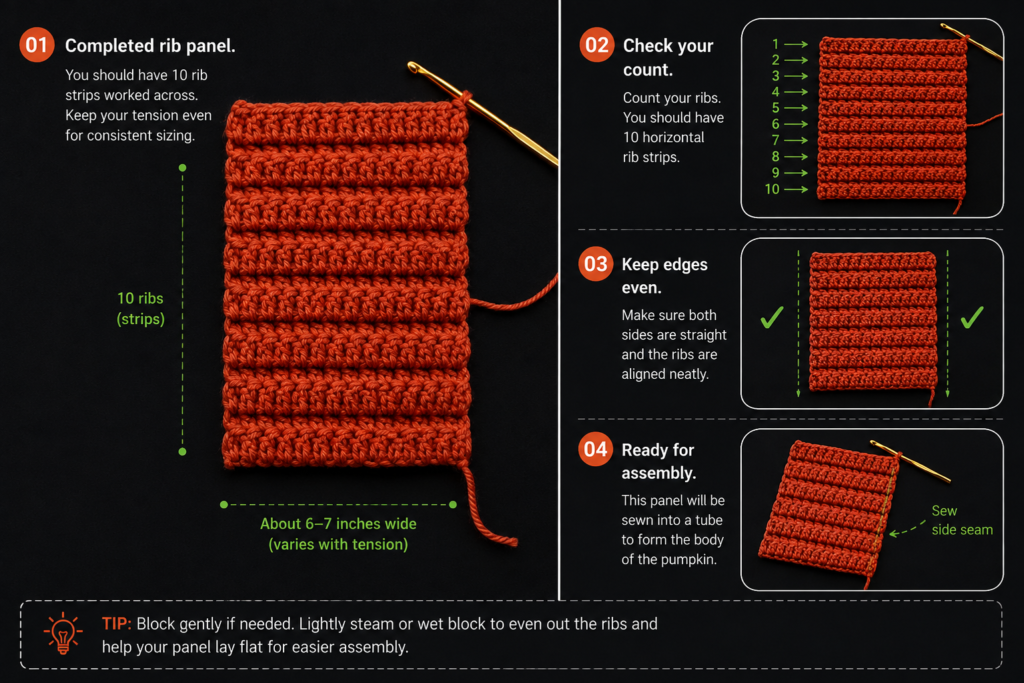
Step 4: Complete the Rectangle
Continue repeating the back-loop row until you have completed 30 rows in total, including Row 1.
The finished rectangle should measure approximately:
- 5–5.5 inches across the stitches
- 11–12 inches across the rows
Lay it flat without stretching it aggressively. The long dimension should be a little more than twice the short dimension.
If you reach 30 rows and the panel is noticeably shorter than 11 inches, add two or four more rows. If it is already longer than 12 inches, stop rather than adding unnecessary rows.
An exact row count matters less than balanced proportions.
Do not fasten off immediately. Leave the working loop active so you can use the hook to join the panel.
Beginner tip:
Count the raised ribs rather than recounting every row from the lower edge. Each back-loop row contributes to the repeating ridged texture.
Common mistake to avoid:
Do not stretch the ribbing while measuring. Stretching can make a panel appear long enough even though it will contract when released.
Step 5: Join the Rectangle Into a Tube
Fold the rectangle so that Row 1 and the final row meet.
Position the textured right side toward the inside temporarily. The flatter wrong side should face you while you make the seam. After joining, you will turn the tube right side out and hide the seam inside.
Align all 18 stitches from the first row with the corresponding stitches from the final row.
Insert the hook through the first stitch of both layers. Make a slip stitch.
Continue slip stitching through each matching pair until the seam reaches the opposite edge.
Keep these slip stitches relaxed. A tight seam can pull one side of the pumpkin inward and make a visible flat line.
Fasten off, leaving a tail approximately 24 inches long.
Turn the tube right side out.
Beginner tip:
Before seaming, place one stitch marker through both layers at each end. This prevents the rows from shifting while you work.
Common mistake to avoid:
Do not join the two long row-end edges. You must join the foundation row to the final row so the ribbing runs vertically around the tube.
Step 6: Gather and Close the Bottom
Thread the long yarn tail onto the tapestry needle.
Choose one open end of the tube to become the bottom. Pass the needle under approximately every second row-end loop around the opening. Use a loose running stitch and remain close to the edge.
After returning to the starting point, hold the beginning tail and pull the working yarn gradually. The opening will gather into the center.
Do not jerk the yarn. Pull a little, redistribute the gathers with your fingers, and pull again.
When the opening is as small as possible, sew across it several times in different directions. Pass the needle beneath a nearby stitch, make a secure knot, and push the remaining tail into the hollow tube.
The base does not have to be perfectly flat. Slightly irregular gathers will be hidden beneath the finished pumpkin.
Beginner tip:
Taking evenly spaced running stitches produces a smaller, tidier center opening.
Common mistake to avoid:
Do not take very deep stitches several rows below the edge. Deep stitches create bulky folds that are harder to close.
Step 7: Add the Stuffing
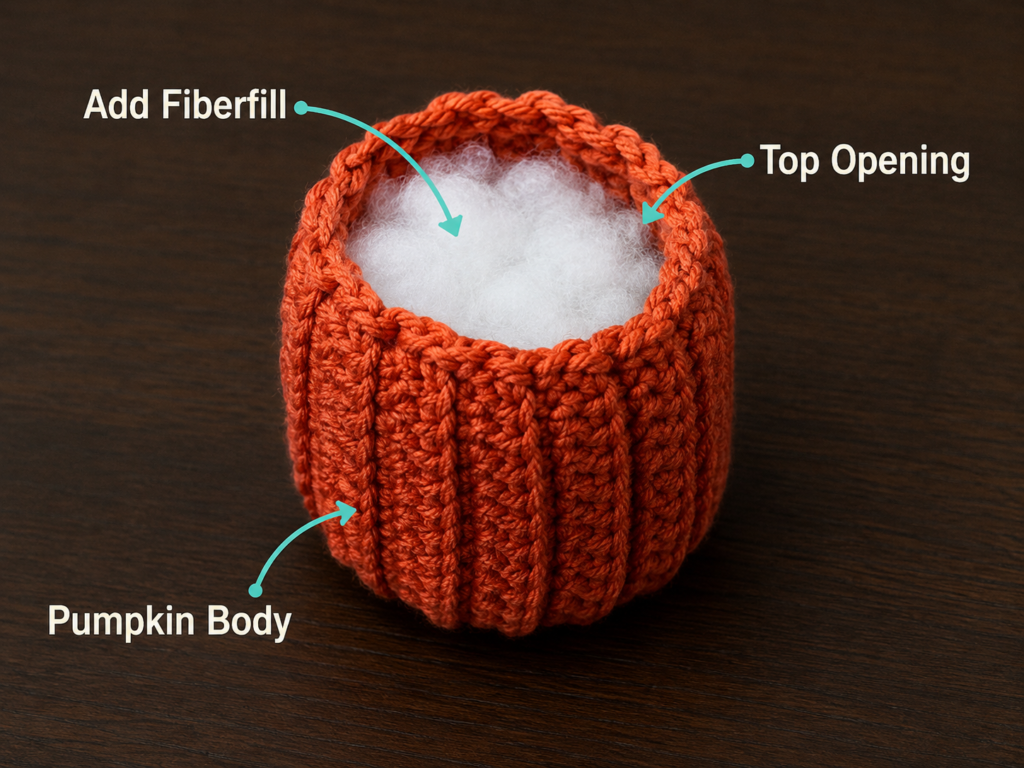
Stand the tube upright with the closed end resting on the table.
Add fiberfill in small pieces rather than inserting one compact ball. Push the first pieces into the lower corners and distribute them around the base.
Continue filling the center and sides. Rotate the pumpkin as you work so one area does not become firmer than the others.
The pumpkin should feel full but still compress slightly when squeezed. You should be able to draw the upper opening closed without fighting against the stuffing.
Check the exterior. If you can see white fiberfill through the stitches, remove a little or redistribute it away from that area.
Beginner tip:
Use the blunt end of the crochet hook or the closed scissors handle to move stuffing into an empty section. Do not use a sharp point that could split the yarn.
Common mistake to avoid:
Overstuffing stretches the stitches apart and produces a hard ball rather than a softly shaped pumpkin.
Step 8: Close and Shape the Top
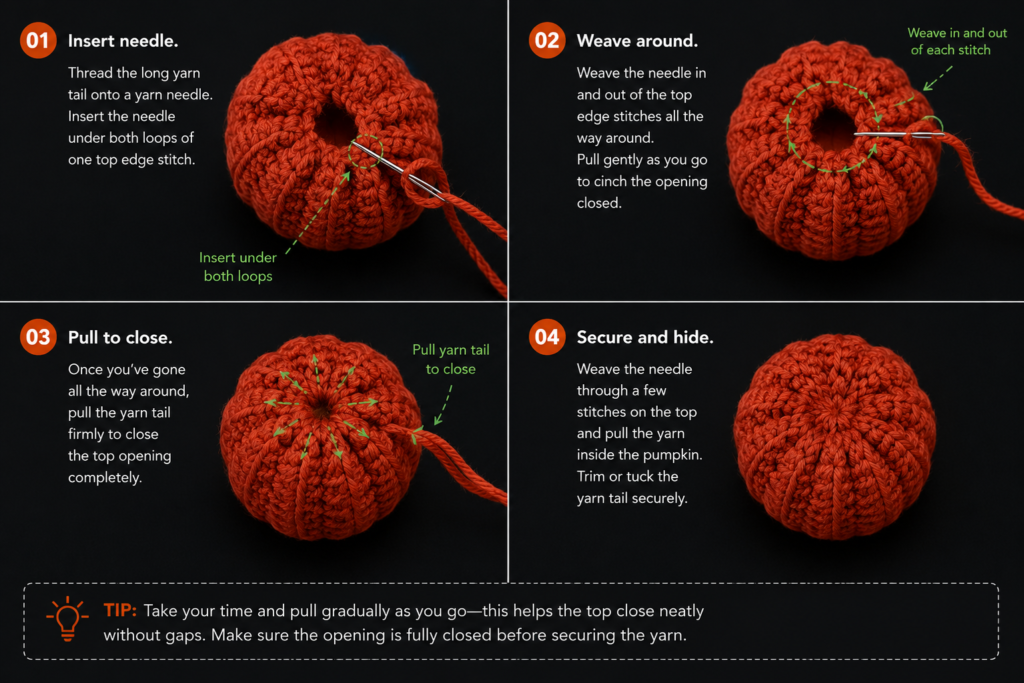
Thread the remaining long terracotta tail onto the tapestry needle.
Use the same running-stitch method around the upper opening. Keep the stitches close to the edge and space them evenly.
Pull gradually until the top gathers into the center. Before closing it completely, check the stuffing one final time. Add or remove a small amount if needed.
Pull the opening closed and sew across the center several times.
To create a deeper pumpkin indentation, insert the needle through the top center, pass it through the stuffing, and bring it out at the bottom center. Pull gently until the top and bottom move slightly toward each other.
Pass the needle back through the center once more. Secure the yarn at the bottom with several small stitches and hide the tail inside the pumpkin.
Do not pull so tightly that the pumpkin collapses. A shallow central indentation is enough.
Beginner tip:
Turn the pumpkin slowly in your hands and massage the stuffing until the shape appears balanced.
Common mistake to avoid:
Do not secure the center before checking the shape from every side. Repositioning the stuffing is much easier before the yarn is knotted.
Pattern Notes and Stitch Notes
Turning-chain rule
The chain 1 at the beginning of each row provides height only. It does not count as a stitch.
Stitch count
Maintain 18 half double crochet stitches in every row.
If one row contains 17 stitches, check whether the last edge stitch was missed. If it contains 19, check whether you accidentally worked into the turning chain.
Repeat pattern
Rows 2–30 follow the same repeat:
- Ch 1
- Hdc BLO across
- Turn
Right side and wrong side
The right side displays prominent horizontal ridges while the rectangle is lying flat. After the panel becomes a tube, those ridges run vertically and resemble pumpkin grooves.
The wrong side appears flatter.
Size-adjustment principle
The number of chains controls the approximate pumpkin height.
The number of rows controls the circumference and fullness.
A useful starting proportion is to make the rectangle’s long edge approximately 2.1–2.3 times its short edge. Use a slightly longer rectangle for a broader, squatter pumpkin.
Step 9: Crochet the Stem
Switch to the 4 mm hook and deep olive-green yarn.
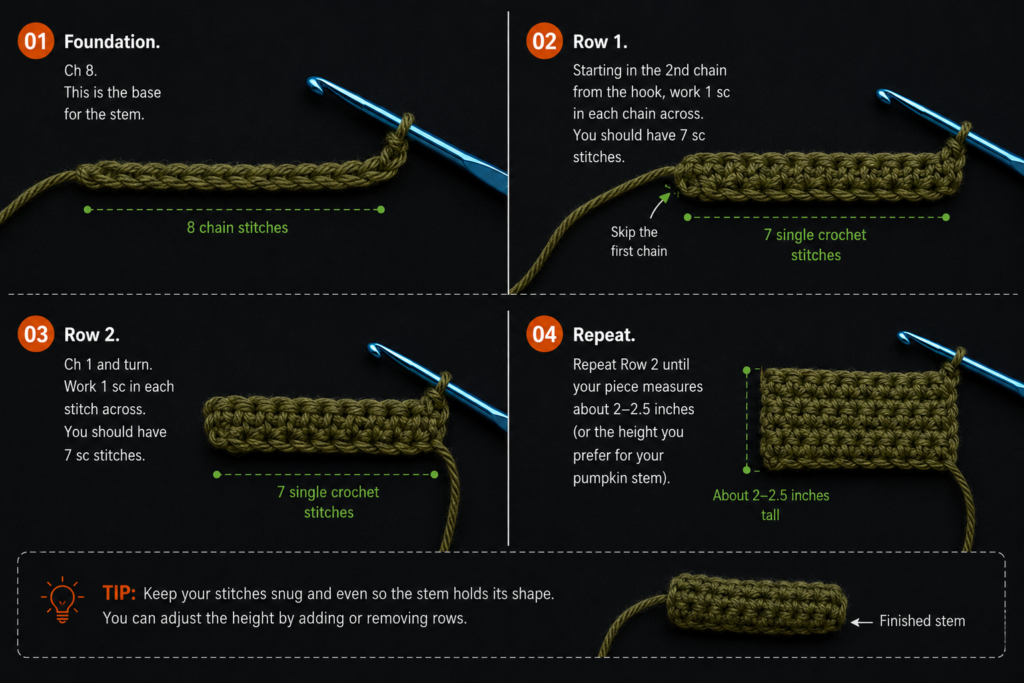
Chain 9.
Stem Row 1
Starting in the second chain from the hook, work one half double crochet in each chain across.
You should have 8 stitches.
Turn.
Stem Row 2
Chain 1. Work one half double crochet in the back loop only of each stitch across.
Turn.
Stem Rows 3–4
Repeat Row 2 twice more.
Fasten off, leaving a 20-inch tail.
You now have a small ribbed rectangle. Roll it tightly from one short end toward the other. Allow the upper end to curve slightly rather than keeping it perfectly straight.
Thread the long tail onto the tapestry needle and stitch through the lower layers several times to stop the roll from opening.
Leave the remaining tail attached for sewing the stem to the pumpkin.
Beginner tip:
Roll the strip firmly at the base and more loosely near the top. This produces a tapered stem.
Common mistake to avoid:
Do not sew through only the outer layer. Catch several inner layers so the stem remains rolled during use.
Step 10: Attach the Stem
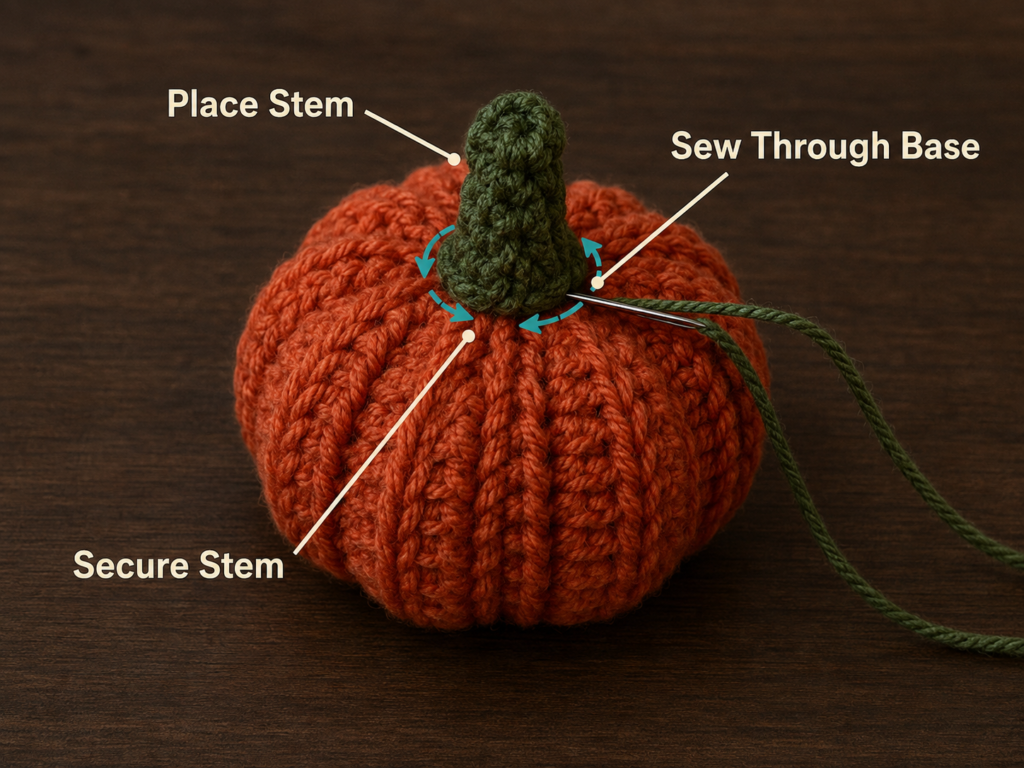
Place the stem over the gathered top center.
Use the attached olive tail to sew around the stem base. Pass the needle through the pumpkin’s crochet fabric and through the lower stem layers.
Make several small stitches around the entire base rather than one or two large stitches through the center.
Check that the stem remains upright when the pumpkin is released. Add another stitch to any side that lifts away from the surface.
Secure the olive yarn beneath the stem and push the tail through the pumpkin. Bring the needle out several inches away, pull lightly, and trim the yarn close to the fabric. The cut end will retract into the stuffing.
Fluff and rotate the pumpkin one final time.
Common Beginner Mistakes
1. Losing stitches at the row ends
Problem: The rectangle becomes narrower toward one end.
Fix: Count 18 stitches after every row. Place a stitch marker in the first stitch immediately after making it.
2. Adding stitches accidentally
Problem: The rectangle widens or develops angled sides.
Fix: Remember that the chain 1 does not count as a stitch. Do not work into the turning chain at the end of the row.
3. Working through both loops
Problem: Some sections look flat and do not match the surrounding ribbing.
Fix: Identify both arms of the V before inserting the hook. Work beneath only the loop farther away from you.
4. Making the panel too short
Problem: The stuffed result looks narrow and tall.
Fix: Add rows until the long edge is slightly more than twice the short edge.
5. Pulling the seam too tightly
Problem: A pinched vertical line appears along one side.
Fix: Make relaxed slip stitches. The seam should have approximately the same flexibility as the ribbed panel.
6. Overstuffing the pumpkin
Problem: The stitches spread, white filling becomes visible, and the pumpkin feels hard.
Fix: Remove small amounts of fiberfill until the surface relaxes and the top can be gathered without excessive force.
7. Leaving the gathered centers unsecured
Problem: The top or bottom begins to reopen.
Fix: After cinching, sew across the opening in several directions and make a secure knot beneath nearby stitches.
How to Customize This Crochet Project
Change the yarn
A smooth acrylic yarn is inexpensive and easy to handle. Cotton provides crisp stitch definition and a slightly firmer shape. A cotton-acrylic blend balances softness with structure.
Bulky yarn creates a larger pumpkin quickly, but you will need a larger hook and fewer chains. Thin DK yarn produces smaller pumpkins suited to garlands or table-place decorations.
Change the colors
Try:
- Cream pumpkin with a brown stem
- Mustard pumpkin with an olive stem
- Dusty blue pumpkin with a beige stem
- Forest-green pumpkin with a tan stem
- Burgundy pumpkin with a muted gold stem
- Three neutral pumpkins in oatmeal, taupe, and warm gray
Change the size
For a smaller pumpkin:
- Chain 13–15
- Crochet until the rectangle is a little more than twice as long as it is wide
- Use less stuffing
For a larger pumpkin:
- Chain 25–31
- Continue the rows until the correct proportion is reached
- Use a sturdy tapestry needle and longer gathering strands
Add stronger sections
For deeper pumpkin lobes, thread a long strand of matching yarn through the center. Wrap it around the outside, return through the center, and pull gently. Repeat at four to six evenly spaced points.
Avoid pulling so hard that the strand disappears into the stitches.
Add a tendril
With olive yarn, chain 16. Work two single crochet stitches in each chain beginning in the second chain from the hook. The piece will curl naturally.
Sew it beside the stem.
Add a leaf
Crochet a small leaf in olive, sage, or brown yarn and attach it near the stem. Keep the leaf proportional to the pumpkin; a large leaf can hide the central shaping.
Gift and display ideas
Use the finished pumpkin as:
- Fall shelf decor
- Thanksgiving table decoration
- Handmade hostess gift
- Craft-fair item
- Teacher gift
- Autumn centerpiece
- Place-card holder
- Component in a pumpkin garland
- Addition to a fall gift basket
Finishing Instructions
Check the pumpkin for visible yarn tails. Pull each tail into the stuffing rather than trimming it directly beside a knot.
Massage the sides gently to distribute the fiberfill.
Place the pumpkin on a flat surface and press down lightly. This settles the base and gives it a natural squat profile.
Blocking is normally unnecessary because the item is stuffed. Steam should be avoided unless you know the fiber can tolerate it.
Follow the care instructions printed on the yarn label. The Craft Yarn Council recommends retaining yarn-label information so the finished item can be cleaned according to its fiber content.
For most decorative pumpkins:
- Spot-clean when possible
- Do not soak unless the yarn is washable
- Reshape while damp
- Allow to air-dry completely
- Store only when clean and dry
This pumpkin is designed as home decor. When displaying it around very young children or pets, make certain the stem and optional decorations are securely sewn and cannot be pulled off.
Quick Printable-Style Summary
Skill level: Beginner
Finished size: Approximately 5.5 inches wide by 4 inches tall, excluding stem
Pumpkin yarn: Category 4 medium-weight terracotta yarn
Stem yarn: Category 4 deep olive-green yarn
Hooks: 5 mm and 4 mm
Other materials: Fiberfill, tapestry needle, scissors, measuring tape
Stitches: Chain, half double crochet, half double crochet in the back loop only, slip stitch
Starting chain: Chain 19
Row 1: Hdc in second chain from hook and across. 18 sts.
Rows 2–30: Ch 1, turn, hdc BLO across. 18 sts.
Rectangle target: Approximately 5–5.5 inches by 11–12 inches
Construction: Join first and final rows, gather bottom, stuff, gather top, shape center
Stem: Chain 9, work four short ribbed rows, roll and sew
Finishing: Attach stem securely and hide all yarn ends
FAQ
Is this crochet pumpkin pattern suitable for a complete beginner?
Yes. You need to know how to make a chain and half double crochet, but the project does not use increases, decreases, a magic ring, or continuous rounds. Practicing the back-loop placement on a small swatch first can make the full project easier.
Can I use single crochet instead of half double crochet?
Yes. Single crochet creates a denser, firmer pumpkin. You will need more rows because single crochet rows are shorter. Continue until the rectangle reaches the recommended proportions instead of relying on the 30-row count.
Can I use bulky yarn?
Yes. Select a hook appropriate for the yarn while keeping the fabric firm enough to hide the stuffing. Start with fewer chains because each bulky stitch is larger. Measure the rectangle rather than following the medium-weight stitch count.
Why does my crochet rectangle curl?
A small amount of curling is normal with back-loop ribbing. Severe curling usually means the foundation chain or stitches are too tight. Try relaxing your tension or moving up half a millimeter in hook size.
Why can I see the stuffing?
The hook may be too large, the tension may be too loose, or the pumpkin may be overstuffed. Remove some filling first. When making another pumpkin, use a slightly smaller hook.
How do I make the pumpkin wider and flatter?
Add more rows so the rectangle is longer before seaming. After closing the top, pass yarn through the center from top to bottom and pull gently to deepen the central indentation.
Can I use a real twig or cinnamon stick for the stem?
You can use one for an adult home-decoration piece, but it should be secured carefully. A soft crocheted stem is more suitable when the pumpkin may be handled by children or pets.
Conclusion
This beginner crochet pumpkin proves that a shaped seasonal decoration does not need complicated construction. A simple ribbed rectangle becomes a convincing pumpkin after one seam, two gathered edges, and a small amount of stuffing.
Once you complete the first terracotta version, try changing the rectangle proportions, yarn weight, or color. A coordinated group of cream, rust, mustard, and olive pumpkins can create an entire handmade autumn display from the same basic method.
Save the tutorial with your fall crochet ideas so the measurements, finishing sequence, and troubleshooting notes are easy to find when you are ready to make another size.






Alot of good advice…wish I would’ve read it BEFORE I crochet my first three pumpkins. I thought you would want the yarn to disappear when making “segment” on the semi- finished pumpkin… but you said you DON’T want it to disappear…. I think i pulled mine too tight…thereby making it look more like a board than a pumpkin🤦♀️…thanks again…keep up the good work
Goard…not board…lol